
10+ Ways to Fix HDMI Sound Not Working on TVs

Quick Fixes for You
- Verify devices aren’t muted, connect directly without intermediaries, disable wireless links, and run audio troubleshooters on both devices.
- Check hardware integrity, use correct HDMI ports (ARC/eARC), adjust sound output settings, and update or reinstall GPU and audio drivers.
- Disable advanced audio features, set audio format to PCM or 2-channel, and ensure adapters transfer both audio and video signals; consider a factory reset or contact manufacturer support as a last resort.
Facing silent screens when connecting your laptop to your TV via HDMI?
This article offers solutions derived from our tech team’s expertise and verified user experiences across forums to restore the harmony between your TV and laptop, whether it’s a Windows or a Mac.
Quick Navigation
- Initial Checks
- 8 In-Depth Checks
- 1. Broken/Faulty Laptop or TV
- 2. Wrong HDMI Port
- 3. Sound Output Settings
- 4. You Can’t Find Your TV in the Sound Output Menu
- 5. Buggy/Outdated GPU Audio Drivers (For Windows Users)
- 6. Buggy/Outdated Audio Drivers (For Windows Users) or Outdated Set-Top Box Firmware
- 7. Incompatible Audio Format
- 8. You’re Using Adapters That Transmit Video Signals Only
- Last Resorts
- Conclusion
Initial Checks
Before delving deep, ensure the following fundamental things are in place:
1. Make sure your TV and laptop are not on mute.
2. Connect the two devices directly, not using a receiver, switch, HDMI splitter, etc., in between.
3. Ensure the two devices aren’t wirelessly enabled by Bluetooth or linked to devices.
4. Run the audio troubleshooter on both devices:
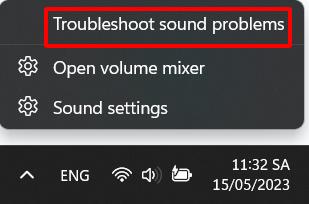
* Windows OS: Right-click the Sound icon in your taskbar’s bottom right and select Troubleshoot sound problems.
* TVs:
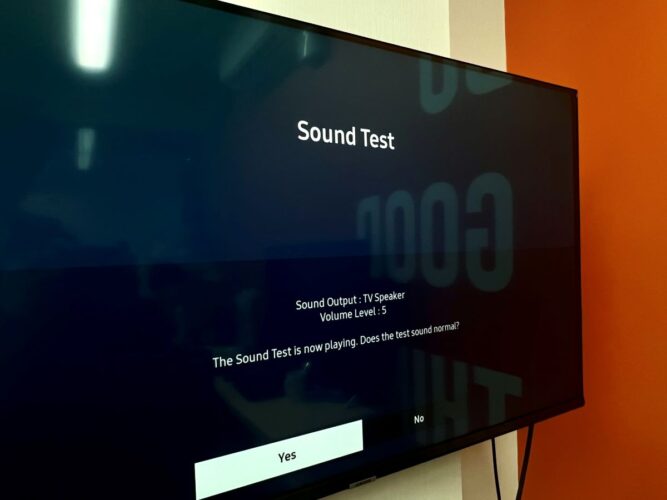
- Samsung: Settings > Support > Device Care > Self Diagnosis > Sound Test (or HDMI Test).
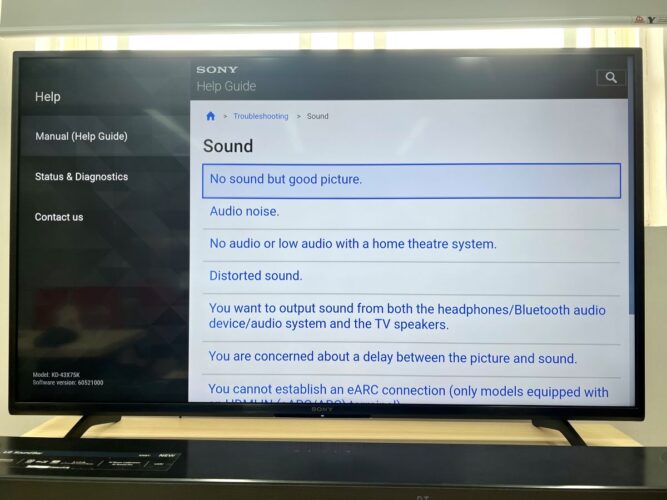
- Sony: Settings > Help & Feedback > Help > Manual (Help Guide) > Troubleshooting > Sound.
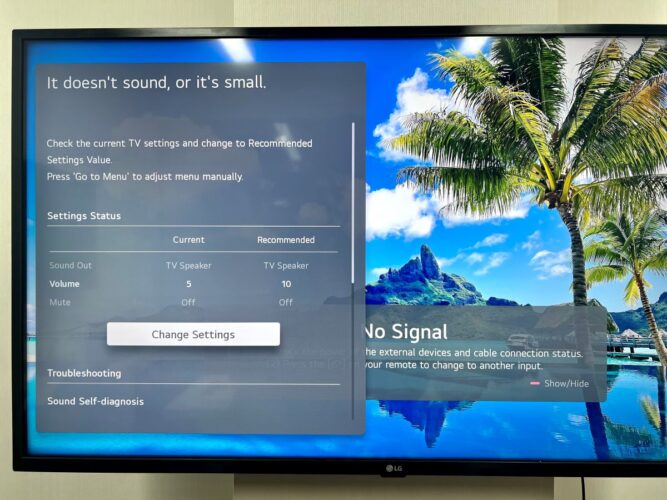
- LG: Settings > All Settings > Support > Quick Help > Check Items > Self-Diagnosis of TV Settings > Sound > It doesn’t sound or it’s small.
8 In-Depth Checks
If the above measures don’t help, it’s time to introspect further. Here are things to look at:
1. Broken/Faulty Laptop or TV
Try connecting your TV with another HDMI device – like a streaming device – If it works, then your laptop HDMI port or cable can be faulty. Otherwise, the TV HDMI port is faulty.
Change the cable if the HDMI cable is not in a good state or if you suspect a connector issue. If the cord looks good but still doesn’t work optimally, try switching its connectors (flipping the cables around).
At times, the HDMI/HDCP handshake could be the problem. It may have been interrupted or broken. Unplug and replug the cord to reset the handshake.
2. Wrong HDMI Port
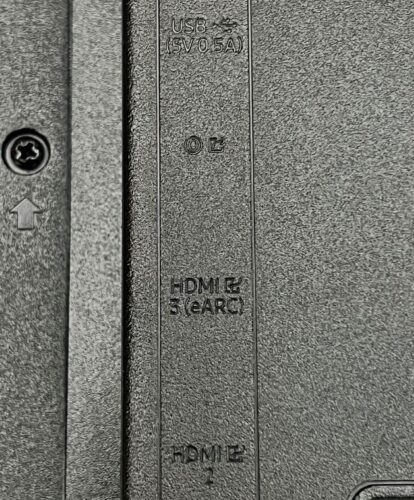
If you’re looking to connect your laptop to your TV and output sound to an external soundbar or speaker via HDMI, but there’s no sound, make sure the HDMI cable is plugged into the ARC (Audio Return Channel) or eARC (enhanced Audio Return Channel) ports on the respective devices.
Your TV must have an ARC (if it supports HDMI 1.4) or eARC (HDMI 2.1) input port, and the receiver or soundbar must have an ARC-compatible HDMI output port to receive the signal.
3. Sound Output Settings
There is anecdotal evidence stating that Windows laptop sound output got disabled automatically. It’s safe to assume this behavior may cause sound to come from your laptop computer instead of the TV it’s connected to.
To confirm that this automatic disabling is not the cause of your problem, do the following:
For Windows:
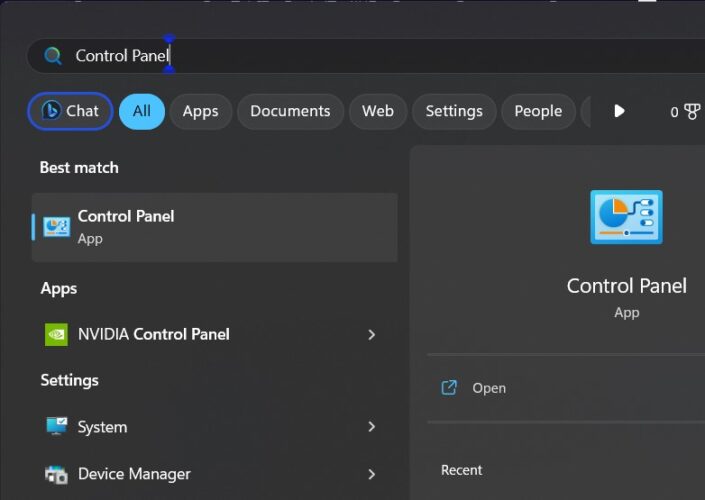
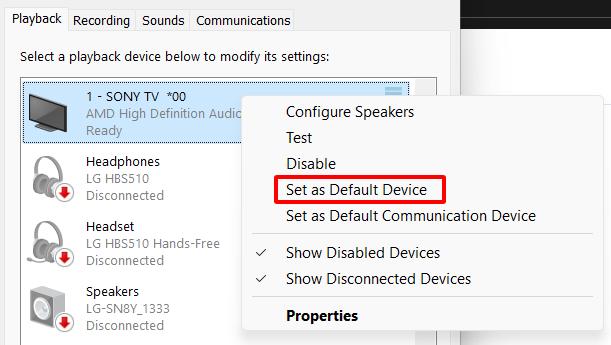
- Launch the Start menu by pressing the Windows key. In the search bar, type “control panel.” Open the app once the suggestion appears below.
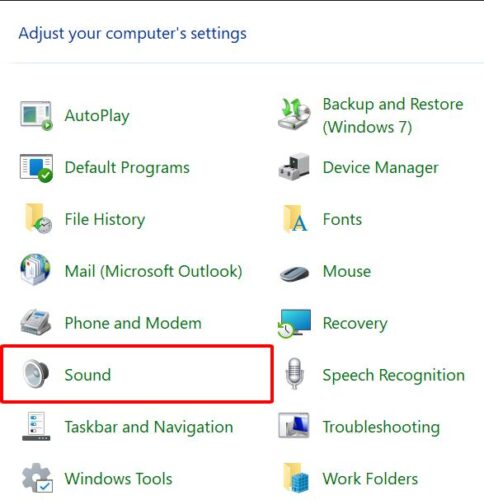
- Open Sound and look for a link denoting your TV. If you can see your TV, proceed to step 4.
- If you can’t see your TV, right-click on a blank area in the app and choose to enable the Show Disabled Devices and Show Disconnected Devices options. Your TV shall show in the Control Panel now.
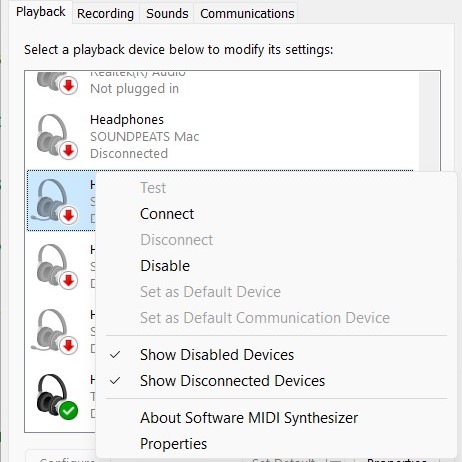
- Right-click the link to your TV and choose Set as Default Device. If the device is disabled, choose Enable first.
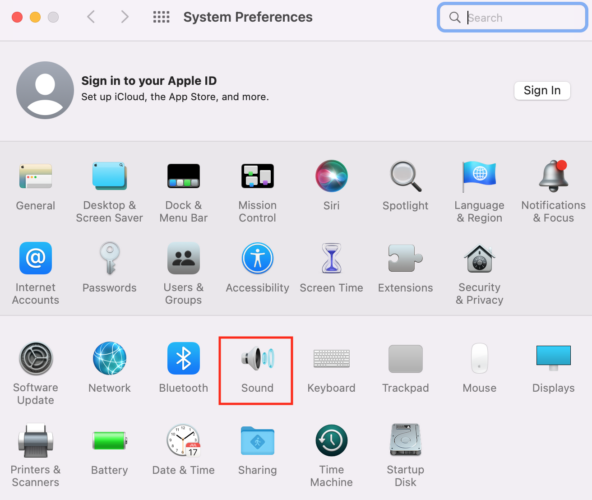
For Mac:
- Head to the Apple menu and click System Preferences.
- Select the Sound app in the next window.
- Next, select the Output tab and then your TV name.
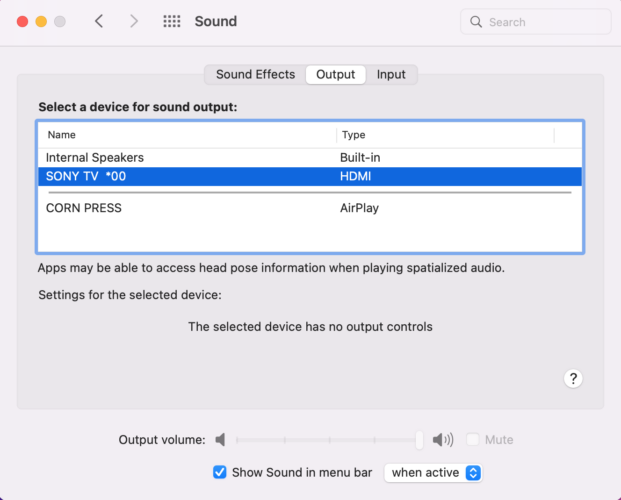
The sound should now come through your TV speakers.
4. You Can’t Find Your TV in the Sound Output Menu
If your TV is nowhere to be found in your computer’s sound output menu, try a third-party music app like this user, such as VLC. Here are the steps to install the application:
- Install VLC for Mac or Windows from this link.
- Open the app and go to the Audio menu at the top-left of the interface.
- Choose Audio Device, and search for your TV.
The audio should now come from your TV speakers.
5. Buggy/Outdated GPU Audio Drivers (For Windows Users)
Several modern GPUs have audio capabilities that transmit audio signals via DisplayPort or HDMI connections. These graphics cards could be merged with the audio driver and affect HDMI audio signals.
And the GPU may not support all audio formats—for instance, NVIDIA GPUs have different audio specifications. GeForce GTX 465, 470, 480, 570, 580, and 590 are incompatible with advanced audio codecs.
Check out this table from NVIDIA to learn about the different HDMI audio formats NVIDIA GPUs support.
To learn more about a GPU’s audio formats and to enable them, watch this video:

Now that you know how there could be discrepancies in the audio formats and drivers, let’s find out how to rectify the problem.
- Hit the Windows key to bring up the Start menu.
- Look for Device Manager.

- Click the arrow before Sound, video and game controllers. Then, right-click High Definition Audio Device from the drop-down menu.
- Select Uninstall device or Update driver. If you choose to uninstall (which we recommend), restart the device to have the driver re-installed automatically.
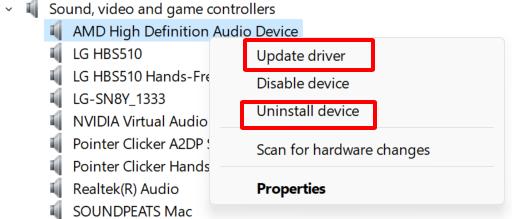
The issue should be resolved after the reboot.
6. Buggy/Outdated Audio Drivers (For Windows Users) or Outdated Set-Top Box Firmware
As you may have learned, drivers and audio issues are related to a great extent. Sometimes, the driver may turn buggy or outdated, causing the problem.
If that is the issue, here are the steps to fix it:
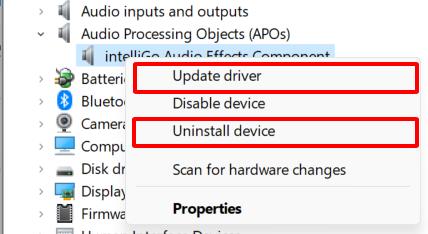
- Launch the Start menu and look for Device Manager.
- Open the app and head to Audio Processing Objects (for all things audio-related). Right-click a driver from the drop-down menu.
- Choose Update driver or Uninstall device.
Old set-top boxes may not support HDMI connections automatically. Buy a new set-top box or update the existing one if you can.
7. Incompatible Audio Format
Advanced audio formats such as DTS:X, Dolby Atmos, etc., elevate the audio experience to another level. But due to their advancements and relative newness, they could present unexpected audio concerns.
In other words, they could cause the “no sound” problem when connecting a laptop to a TV if the devices don’t support or enable the formats.
Simplify things by disabling all the advanced audio features and changing the format to 2-channel audio or PCM (pulse code manipulation), a method that digitally denotes analog audio channels.
You can change the format with the following steps:
For Windows:
- Launch the Start menu and open the Control Panel after typing the name in the search bar.
- Head to Sound and search for your TV.
- Right-click a blank space and choose to enable Show Disabled Devices and Show Connected Devices.
- Once the link to your TV appears, right-click it, choose Properties, and head to the Advanced tab.
- In the Default Format, choose the correct format from the drop-down menu (supported by your TV).

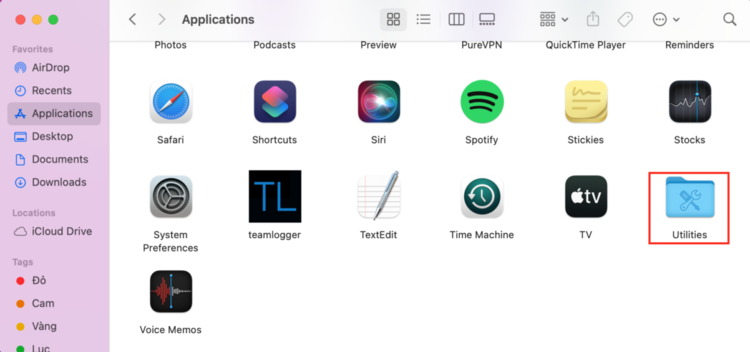
For Mac:
- Click the Finder icon to open the Finder window.
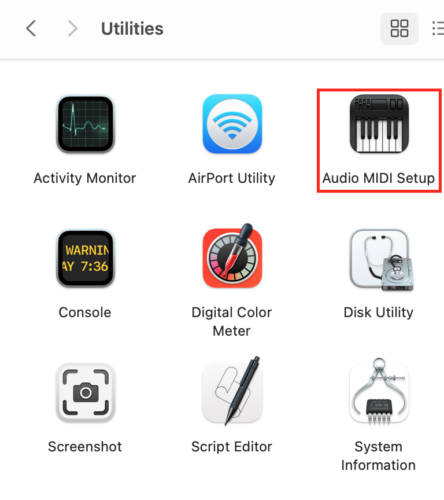
- Navigate to Applications, and launch Utilities.
- Search for Audio MIDI Setup and double-click it. In the window, you’ll see all devices linked to your Mac.
- Find your TV from the list and select it. Your TV could be mentioned by its company name or just “TV” or “HDMI.”
- After choosing your TV, select the format.
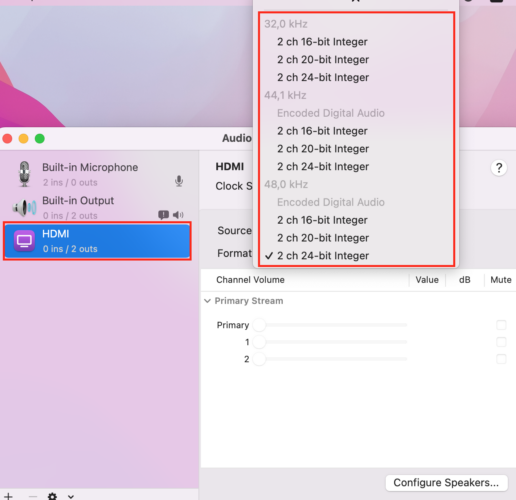
- Close the setup tool.
Enabling the feature shall ensure that the audio from your Mac computer gets routed via HDMI to your TV’s speakers.
8. You’re Using Adapters That Transmit Video Signals Only
Certain adapters send only video signals. If you’re using one, you’ll require a discrete audio cable for sound transmission—such as DVI to HDMI, VGA to HDMI, S-Video to HDMI, etc.
You can buy a cable that runs a separate audio line or use adapters that transfer audio and video signals to address the issue. Some adapters we recommend for the job include:
- DVI to HDMI Video Adapter with USB Power and Audio
- S-Video R/L Audio to HDMI Converter
- VGA to HDMI Adapter with Audio Cable
- USB-C to HDMI Cable
Last Resorts
If none of the above fixes work, contact the device manufacturer or overhaul the machine.
1. Factory Reset Your TV or Laptop
A factory reset is a complete software overhaul. It’s rebooting the system but much more advanced. A reboot doesn’t erase your data. But a factory reset will restart your device like it’s fresh from its packaging.
The factory reset instructions will vary slightly across device manufacturers. If you’d like to know more, click the links to learn the reset instructions for specific TV brands: Samsung, Sony, LG, and Vizio.
Since Samsung, LG, Sony, etc., launch different series of TVs, the reset instructions could marginally differ across televisions belonging to the same brand. The older the model, the more unique the reset instructions.
As mentioned earlier, a factory reset will fully erase your device’s data, app customizations, etc. If resetting your laptop, back up all important data or files on the device before a factory reset.
To factory reset a Windows laptop, here are the instructions:
- Head to Start and then Settings.
- Under System, click Recovery.
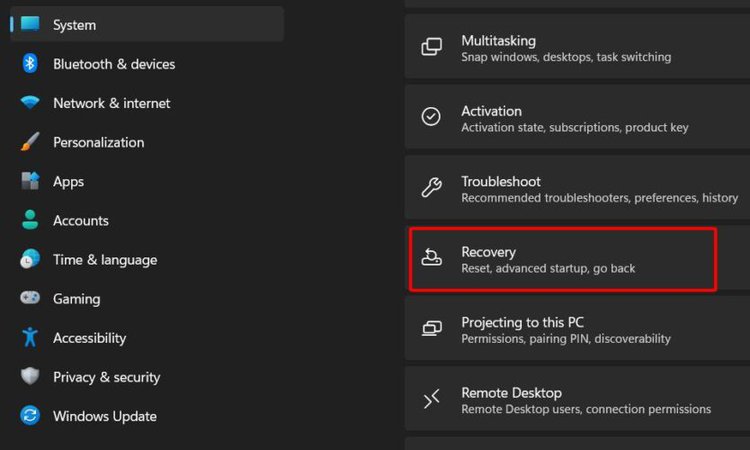
- Click the Reset PC button under Recovery options.
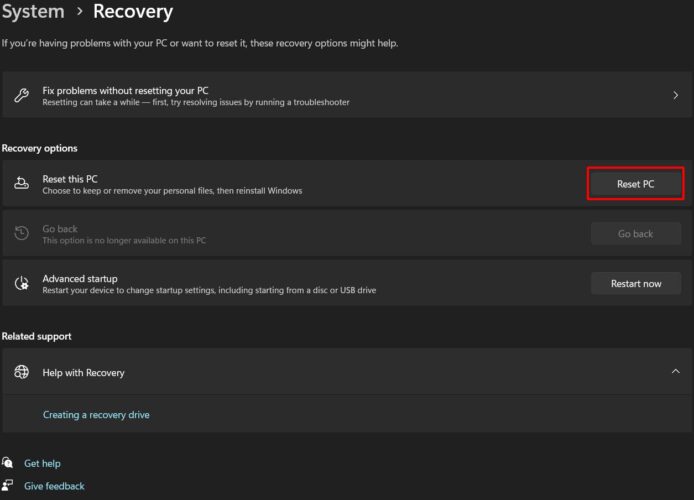
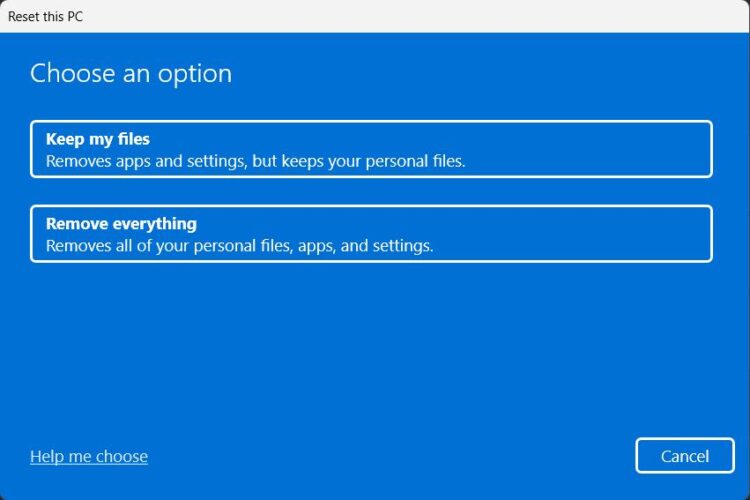
- Next, you can choose between Keep my files or Remove everything.
To learn more, watch this video:

Try troubleshooting before resetting by clicking the Fix problems without resetting your PC option > Other Troubleshooters > Incoming Connections.

To factory reset a Mac running macOS Monterey (the process may vary on different macOS versions, you can check the Apple Website for more), here are the steps:
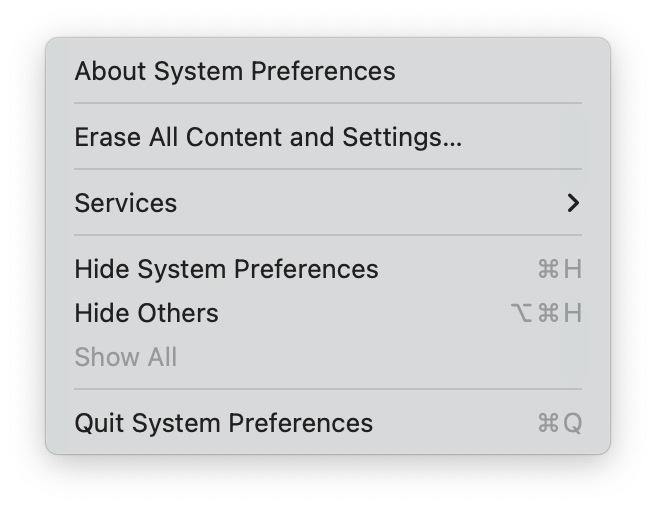
- Click the Apple icon in your screen’s top-left corner and click System Preferences.
- Click System Preferences again in the top-left of the menu bar and click on Erase All Content and Settings.
- Type in your Mac password in the pop-up Erase Assistant window to authenticate the process.
- Back up your data on the device before proceeding any further. Connect an external drive to your Mac and press Continue on the Time Machine Backup window.
- Click Select Disk and click to select your external storage device. Click the Use Disk button to start the backup process.
- After backing up, close the Time Machine window and click the Continue button again on the Time Machine Backup window and click on the link to your user account.
- Click Continue and enter your password to sign out of your Apple ID, and click Continue.
- Click the Erase All Content & Settings button in the dialog box that immediately pops up. Your Mac should now start to reset itself.
Here is a video demonstrating the above:
![macOS Monterey: How to Erase and Factory Reset your Mac! [Hard Reset]](https://pointerclicker.com/wp-content/plugins/wp-youtube-lyte/lyteCache.php?origThumbUrl=https%3A%2F%2Fi.ytimg.com%2Fvi%2Fv95npHIp_ps%2F0.jpg)
2. Contact the Manufacturer
Contact the maker if none of the fixes mentioned above or a factory reset help. Samsung, LG, Sony, Vizio, Microsoft, Apple, etc., have robust online and offline support systems. You should, therefore, not have any problem getting heard.
But because these are large conglomerates, contact the correct department for the needed service. Big corporations have multiple support teams catering to specific products and service requests.
Don’t contact the marketing team when you should have talked to after-sales support. Just search for the contact information of your TV/laptop’s customer support brand in your region.
Conclusion
The sound coming through your laptop instead of the TV it’s connected to or no sound reproduced through either of the devices can be truly frustrating.
Luckily, it’s not a major issue, and there are things you could do to fix the problem. The resolutions mentioned above are almost certain to rectify it. If in case it doesn’t, contact brand support.
Note that the various troubleshooting measures may not work uniformly across brands and devices. It’s, therefore, recommended to use the product manual as a guide or point of reference when you implement the solutions mentioned above.
Also, it’s highly advised to keep your laptop and smart TV’s operating systems up-to-date. If there’s an audio issue or any other problem, restart the device. Next, consider checking the software status and applying updates if any are pending.
Move on to the other solutions if the issue persists after the restart and software update.

Catherine Tramell has been covering technology as a freelance writer for over a decade. She has been writing for Pointer Clicker for over a year, further expanding her expertise as a tech columnist. Catherine likes spending time with her family and friends and her pastimes are reading books and news articles.

Duy Anh is a seasoned technical editor specializing in helping readers troubleshoot TV, projector, and Wi-Fi issues. He’s always been drawn to logical problem-solving. His ability to approach matters from various angles with a neutral mindset enhances his technical expertise.