
11 Tested Fixes for Vertical Lines on a Projector Screen
Quick Fixes for You
- Check HDMI connections, apply slight pressure near the DMD chip for a temporary fix, and secure connectors and ribbon cables inside the projector to address vertical lines.
- Clean the DLP chip’s contact pins, secure and clean the connection between the DMD chip and the mainboard, or replace the DMD chip if necessary.
- Adjust the source device’s resolution to match the projector’s, allow the projector to cool down, turn off ECO mode, perform a soft or factory reset, or contact the manufacturer for support.
Experiencing the frustrating vertical lines on your projector screen can quickly destroy your whole movie night.
This guide will walk you through simple, effective fixes, from HDMI troubleshooting to internal adjustments.
Dive in and discover how to restore crystal-clear visuals with ease!
Quick Navigation
- 1. Check the HDMI (or Any AV) Connection
- 2. Temporary Fix: Flick/Push Down Your Projector’s Cover Slightly Near Its DMD Chip
- 3. Secure the Connectors & Re-Attach the Ribbon Cables Connected to the Mainboard
- 4. Clean the Contact Pins of the DLP-Labeled Chip
- 5. Secure & Clean the Connection Between the DMD Chip & the Mainboard
- 6. Replace the DMD Chip
- 7. Mismatched Resolution
- 8. Let Your Projector Cool Down
- 9. Disable the ECO Mode
- 10. Try Soft & Factory Reset Your Projector
- 11. Contact the Manufacturer
1. Check the HDMI (or Any AV) Connection

Begin by disconnecting the HDMI cable that links your source device (like a laptop or Roku stick) to your projector. This is a simple yet effective first step in troubleshooting.
If the HDMI connection is indeed the problem, you’ll notice the vertical lines on your projector screen disappear immediately upon unplugging the cable. This quick test confirms whether the HDMI link is at fault.
To pinpoint the issue, use the same HDMI cable with a different source device. This step helps determine whether the problem lies with the cable itself or with the HDMI port of your original source device.
In my experience, I encountered both vertical and horizontal lines on my projector when I connected it to a laptop with a faulty HDMI port. This kind of hands-on test can be very revealing.
If your HDMI cable and connection have no issues, continue reading to learn about the other likely causes and their solutions.
2. Temporary Fix: Flick/Push Down Your Projector’s Cover Slightly Near Its DMD Chip
The following doesn’t sound very scientific. But if a slight tap or nudge on the projector cover can eliminate the vertical lines on the screen, we’re not protesting.
A Reddit user soft-slapped their projector on the top (near the lens rear) and saw the vertical line issue vanish. You may even apply some pressure with your thumb on the area.
Unfortunately, the clear visuals may last just 10 to 30 minutes. After that, the vertical lines may reappear. But it’s nonetheless a start.
It’s not apparent how this esoteric measure fixes things, albeit momentarily. Maybe the link between your projector’s mainboard and its DMD (digital micromirror device) chip is secured with thumb pressure.
Or perhaps the external physical intervention momentarily realigns the internal parts or jostles a loose connection.
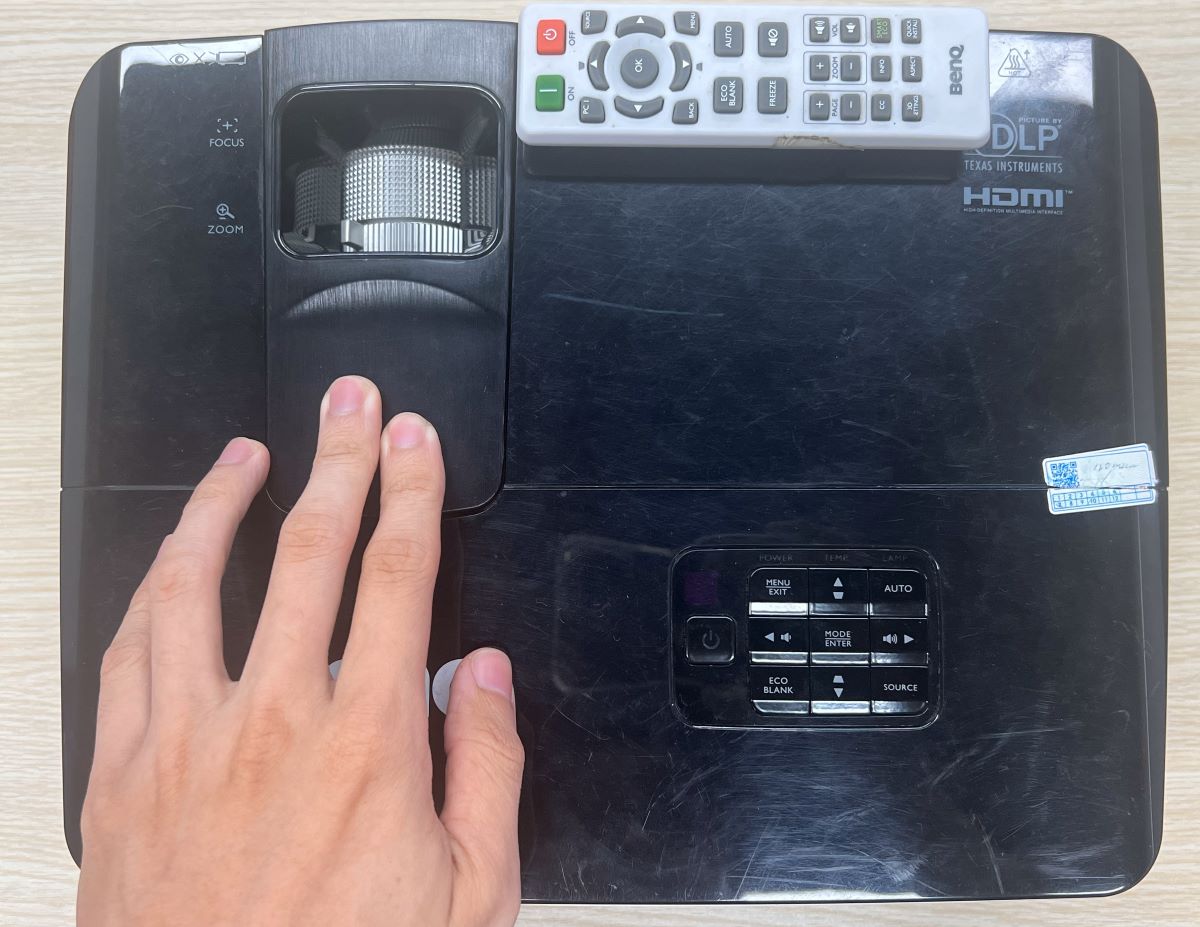
Tapping or holding down the projector cover (close to 2.5 to 3 inches to the backside of the screen size-adjusting dial) could impact the mainboard and potentially strengthen its link with the DMD chip.
Here is a picture demonstrating the same.

The below image shows the exact spot to hold down or press on the projector.
If this temporary fix works for you, jump to solution number 5 in this article for a permanent resolution.
Note: This solution only helps eliminate thin vertical lines like the ones in the first picture below. You likely won’t find relief from the thick lines depicted in the second picture. I discovered this after carrying out some testing myself.

3. Secure the Connectors & Re-Attach the Ribbon Cables Connected to the Mainboard
Since the projector’s mainboard is likely in the center of the action, ensuring the connection to the board is secure and doesn’t cause the vertical lines problem is imperative.
Fiddling with the mainboard entails opening up the projector partially.
I’ll illustrate how I open my BenQ MH680 projector so you get an idea. If you’re rocking another brand/model, continue to read, as the steps to dismantle your projector should be similar to my BenQ.
Note: Snap pictures of the disassembly process at each stage so you have no trouble putting the components together later.
You’ll need multiple screwdrivers for the job—one with a flathead bit, another with a large or medium Philips bit (PH0 – PH2), and one more with a hex bit.
The flathead screwdriver helps with screws with a groove or slot on the head. The Philips one works with screws whose heads have an X-shaped or cross-shaped indentation. And the hex bit tool is generally used with hexagonal bolts or screws.
Once the tools needed are handy, get on with the disassembly.
Step 1: Remove the projector lamp cover using the flathead screwdriver.

Step 2: Take out the lamp and case screw.

You may have to exert more pressure onto the side opposing the freshly removed screw (since there are plugs linking the projector and the lamp there).
Step 3: Unscrew the screws at the bottom and the case/lid on the top.

Step 4: Use the hex and Philips screwdrivers to detach the fasteners, rear cover, and metal bezel.

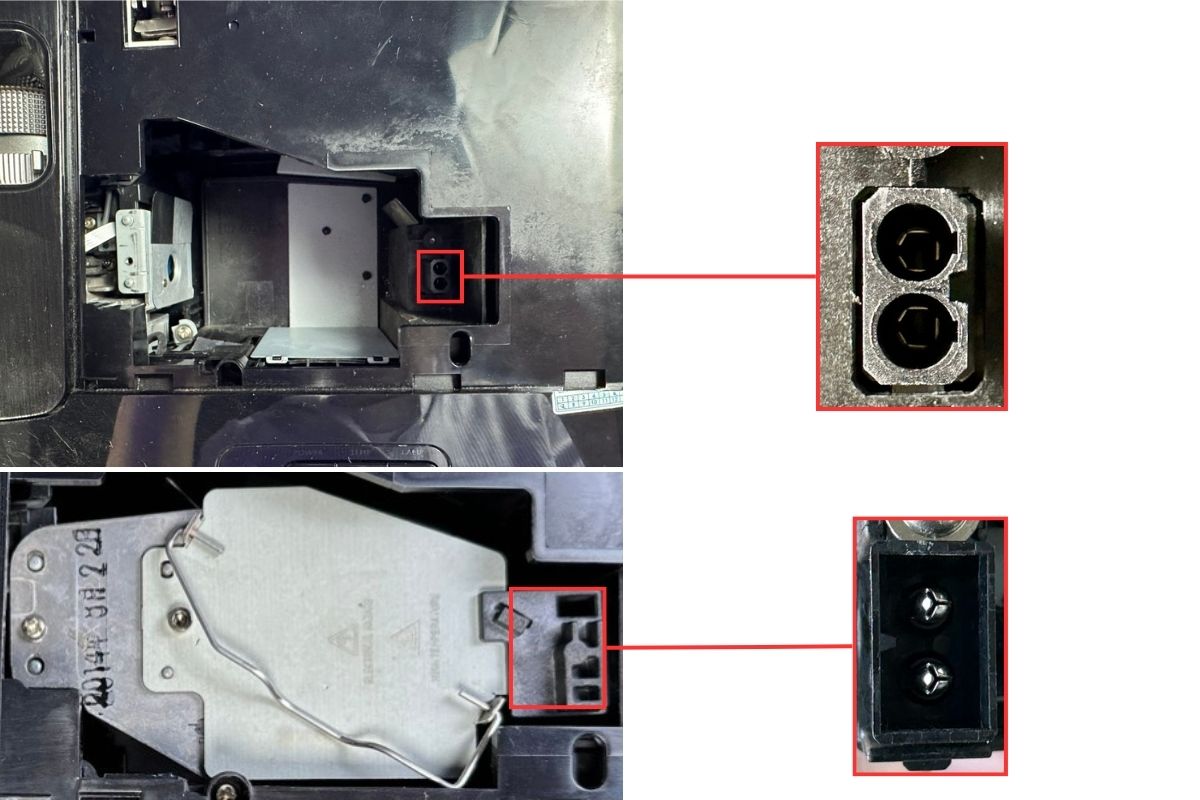
Step 5: Unhook the connectors and ribbon cords linked to the mainboard and re-attach them securely.

Step 6: Carefully reassemble all the parts and then verify if the vertical lines on your projector have vanished.
4. Clean the Contact Pins of the DLP-Labeled Chip
This fix also requires partial disassembly of the projector. Since we’ve already discussed dismantling the projector in the solution above, refer to it to access your DLP-labeled chip.
Use isopropyl alcohol and a Q-tip cotton swab to tidy the contact pins near the chip. The pins may have accumulated dust, contaminants, etc., causing poor electrical contact and compromised signal integrity.

The vertical lines could be a fallout of signal disruption or interference caused by corroded or dirty corroded pins.
The contact pins in any electronic device can oxidize and corrode over time, particularly if you live in a high-moisture or highly humid region.
The isopropyl alcohol helps remove corrosion and oxidation, preventing the electrical contacts from degrading. The solution evaporates quickly, ensuring no residue is left behind, or a can of fresh conductivity problems is not opened.
The small Q-tip cotton swab facilitates precise and targeted cleaning of the pins without harming nearby components.
5. Secure & Clean the Connection Between the DMD Chip & the Mainboard
If cleaning the contact pins doesn’t help, this fix will eliminate the vertical lines. I speak from my experience dealing with the unpleasant stripes on my BenQ MH680 device.
This proven fix entails opening the projector entirely. If you’re not comfortable doing that, get a technician on board.
Note: Again, it’s recommended to snap photos at each step of the process for quick and easy reassembly later.
The steps to remove the projector cover are identical to those shared in the third fix above. Therefore, refer to them until step #5.
Once you’ve removed the projector cover and have a complete view of your projector’s innards, proceed to execute the remainder steps:
Step 1: Remove the primary board.

You’ll need to apply some force in the two regions beneath since there are plugs linking the board to the projector.

Step 2: Clean the connectors lying between the mainboard and the DMD chip.

Step 3: Once done, reassemble the components and check if the vertical lines have gone.
6. Replace the DMD Chip

Most importantly, a failing or malfunctioning DMD chip could cause vertical lines on the screen and possibly various other display irregularities.
Since a faulty DMD chip cannot generally be repaired, replacement is the only way out. Skilled technicians, preferably manufacturer-authorized ones, can ably replace bad DMD chips.
But you can also do the replacement yourself and save some bucks if you have the specialized tools and solid experience handling projector parts.
Note that a replacement DMD chip may not be readily available for some projector models. Therefore, check the parts availability of your device before proceeding any further.
If your projector is under warranty, it’s always best to contact the manufacturer and apprise them of the situation so that you don’t void the official protection.
If the warranty is over and you want to replace the chip yourself, here’s a detailed guide for your assistance.
7. Mismatched Resolution

If your projector’s native resolution and the source device’s resolution don’t match, various display issues may arise—one among them could be the vertical lines problem.
It’s not clear why that happens. But our educated guess is that the interpolating or scaling that the projector must do to match resolutions could introduce lines, artifacts, and other distortions if not done correctly.
Therefore, if there’s a discrepancy in your setup, setting the resolutions right is highly advised.
The process to alter the resolution will vary with the device. Therefore, check the product manual and learn the steps before proceeding.
If your input device is a Windows computer, MacBook, Roku, Chromecast with Google TV, or Firestick, refer to this article for instructions on changing the resolution.
Just ratchet down the source device’s resolution and check if the problem disappears.
8. Let Your Projector Cool Down
A projector running hot is a recipe for multiple unfavorable outcomes. The thermal stress could break down a projector or its parts haphazardly. The vulnerable components are the optics, DMD chips, capacitors, resistors, etc.
For example, the DMD chip that modulates light to generate visuals gets impacted by rising temperatures, affecting its performance and potentially resulting in vertical lines and other visual artifacts.
The point is that it’s pretty plausible the vertical lines on the screen could be due to an overheating projector. If you agree, we hope you do so; take the necessary measures to cool your projector down first.
We’ve already discussed in detail how to tackle a toasty projector. Kindly read this article to learn more.
9. Disable the ECO Mode

The ECO mode in projectors is a double-edged sword. On the one hand, it reduces brightness and increases lamp life, limiting power consumption and heat generation.
However, on the other hand, it lowers fan speeds. The decreased speed results in less noisy operations but it also reduces airflow for cooling, increasing the chances of heating.
When ECO mode is enabled at a stretch in conjunction with an environment with poor ventilation or high ambient temperatures, the risks of overheating only go up further.
If your projector overheats within minutes, cut down on your tendency to turn on the ECO mode in your projector at will. Use the option sparingly or turn it off completely.
In the table below, find the steps to turn off the power-saving mode in different projector brands.
| Projector Brands | Instructions |
| Epson | Go to Menu and then ECO. Choose Power Consumption and set it to Normal. Next, navigate to ECO Display and set it to Off. |
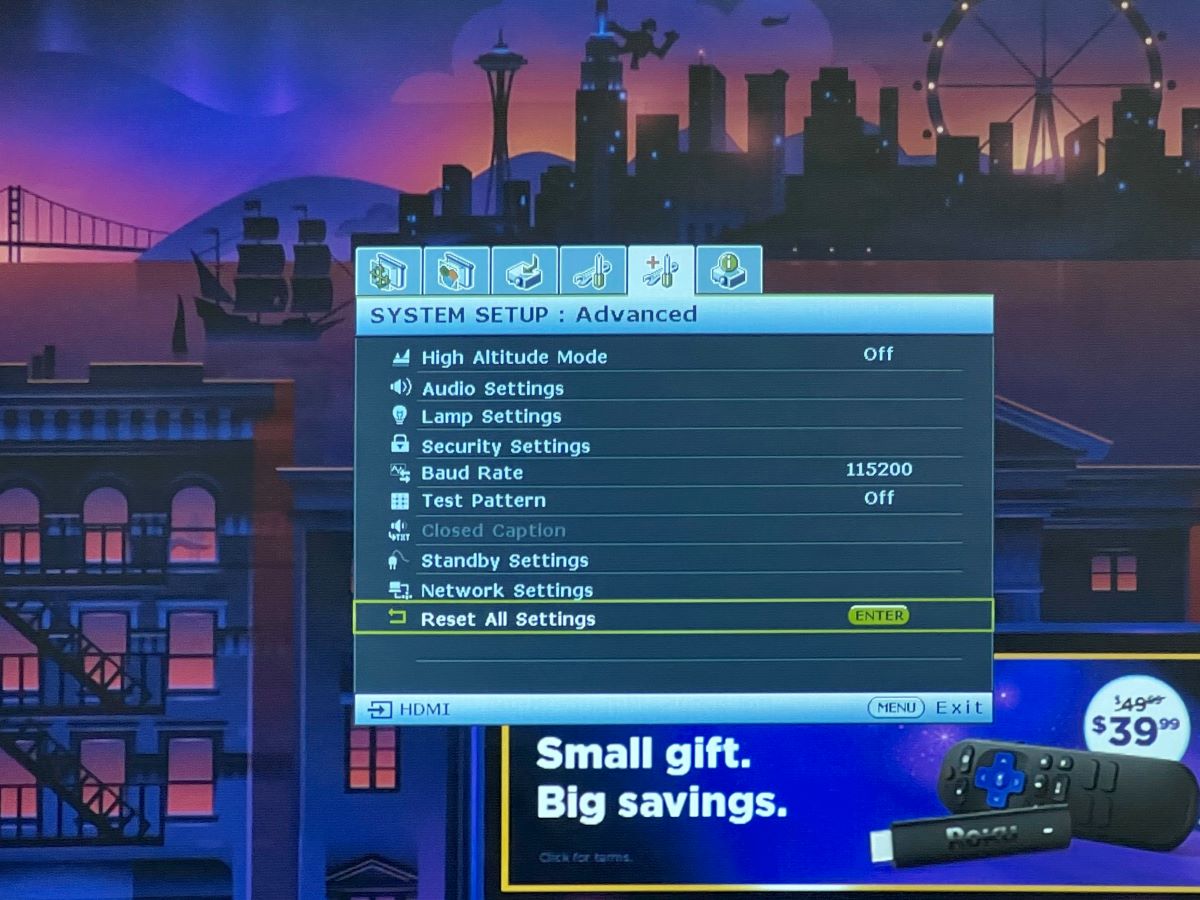
| BenQ | Head to Menu settings and then System Setup: Advanced. Select Lamp Settings. Choose Lamp Mode and set it to Normal. |
| Optoma | Open Menu and enter Setup. Head to Power Settings and choose Power Mode (Standby) and then Normal. |
Note that the above steps may vary slightly depending on your projector model. Keep the user manual handy in case of doubts.
10. Try Soft & Factory Reset Your Projector
A soft reset eliminates all temporary glitches (such as vertical lines) impeding your projector.
To soft reset, turn off your projector and then unplug it. If the fan’s running, wait until you hear it stop.
Next, unplug the device from the wall and keep it that way for 30 seconds to a minute. After approximately a minute, plug in the projector again and turn it on.
If the soft reset doesn’t help, the next step is a factory reset.
A factory (or hard reset) is a slightly more complex or deeper-level software rehaul, with the steps varying across brands.
We’ve outlined the process for the three most popular projector manufacturers below.
| Projector Brands | Instructions |
| Epson | Hit the Menu key and head to the Image tab. Select Reset All (Factory Default) and then Reset. |
| BenQ | Press Menu and choose Information. Press the Up and Down keys thrice alternatively, and then press Enter. Open tab 1, and go to Factory Hard Reset. Choose Yes from the prompt that shows to start the reset. |
| Optoma | Launch Menu. Open Setup and navigate to Reset. Go to Reset to Default and select OK. |
As said earlier, these reset steps could vary between models. Refer to the product manual to learn more.
11. Contact the Manufacturer
If a hard reset also doesn’t help, contact the projector manufacturer.
If you own an Epson, call (562) 276-4394. Phone support is available Monday to Friday from 7 AM to 4 PM (Pacific Time)
To send an email message, click here. You can also reach out to the brand through their company pages on various social media platforms.
For BenQ support, call 1-888-512-2367 on Mondays to Fridays between 8:30 AM and 5:30 PM (Central Standard Time). Or email them at [email protected].
BenQ also has X (Twitter) and Facebook pages to message them directly.
If you need help with your Optoma projector, contact the business at 1-888-289-6786. The operation hours are 6 AM to 5 PM (Pacific Standard Time).
Although the working days are not clearly mentioned, we assume weekends are off. Click on this link if you’d like to send a message instead.

Catherine Tramell has been covering technology as a freelance writer for over a decade. She has been writing for Pointer Clicker for over a year, further expanding her expertise as a tech columnist. Catherine likes spending time with her family and friends and her pastimes are reading books and news articles.

Duy Anh is a seasoned technical editor specializing in helping readers troubleshoot TV, projector, and Wi-Fi issues. He’s always been drawn to logical problem-solving. His ability to approach matters from various angles with a neutral mindset enhances his technical expertise.