
Dead Pixels on Your Projector? 4 Tested Fixes Inside!
What To Know
- LCD, LCoS, and DLP projectors with microdisplay technology tend to develop more dead pixels over time.
- Dead pixels in a projector, which no longer reflect light, appear as permanent black or brightly colored unchanging spots on the screen, affecting the overall image quality.
- To address dead pixels, clean the LC panels or DMD chips, use High Altitude mode to cool an overheating projector, consider replacing the panels or chips, or contact the manufacturer for further support.
Dealing with dead pixels on your projector, especially with popular brands like BenQ, can be a frustrating experience.
This guide will explain why dead pixels appear on your projector and offer effective solutions to fix those annoying white or black dots, ensuring your projector delivers crisp, clear images.
Keep reading to discover how easy it can be to bring your projector back to its best performance!
Quick Navigation
Dead pixels in projectors typically stem from problems with the Digital Micromirror Device (DMD) chip in DLP projectors, or the LCD/LCoS panels in LCD/LCoS projectors.
Additionally, overheating of the projector can lead to dead pixels, as it affects the performance of the DMD chip or LCD/LCoS panels.
Where Are the Pixels Found in Projectors? How Do Dead Pixels Look?
Pixels are found in the microdisplay chips.
Most lamp projectors use microdisplay technologies. They may be LCD/LCoS panels or DMD chips.
These microdisplay units, equipped with a fixed number of micromirrors acting as pixels, are essential for image formation.
In DLP projectors, for instance, there can be as many as 2 to 3 million micromirrors on a single chip, contributing to their notably crisp images.
However, over time, these projectors are more prone to developing dead pixels.
So, how can you identify a dead pixel?
Typically, a pixel (micromirror) switches between an ‘on’ position, reflecting colored light to craft images, and an ‘off’ position, deflecting light to produce dark or grey shades.
The entire image is a cumulative result of this light manipulation.
A dead pixel, having lost its ability to reflect light, appears as a permanent black dot on the screen, indicative of a light absence in that area.
Conversely, a colored spot, be it red, blue, green, or white, signals a stuck pixel, which is constantly in the ‘on’ position, resulting in a bright, static spot.
For a deeper dive into the three projector types mentioned above and their pixel functionalities, consider reading this dedicated article.
How to Fix Dead Pixels?
1. Clean the DMD Chip or Replace It If Needed

As explained earlier, projectors employ micromirrors/microdisplays to account for several million pixels.
If dead pixels appear, it’s likely an issue with the DMD chip. It could have been physically damaged, experienced wear and tear, contaminated, etc. If the dead pixel is well-defined, it’s likely a DMD issue.
In such a scenario, cleaning or replacing the DMD component is imperative.
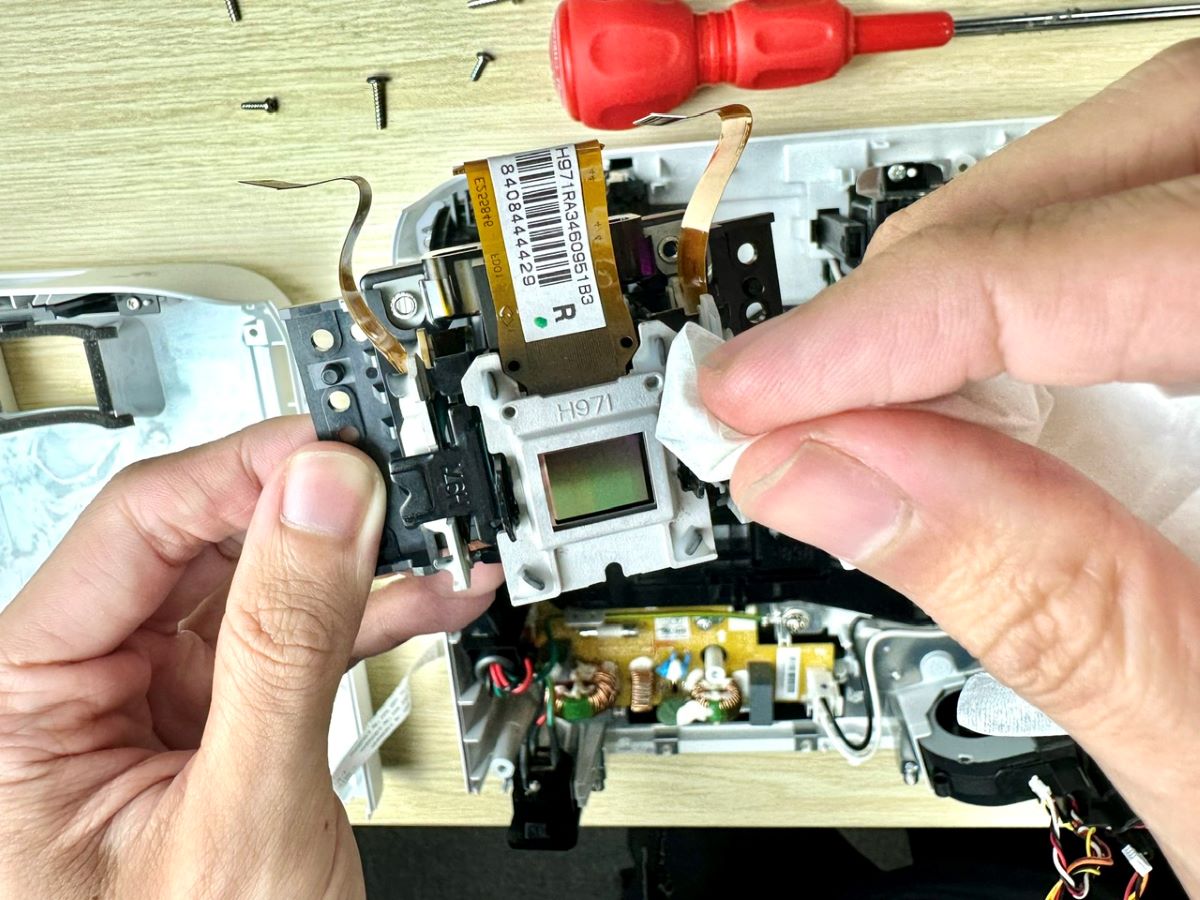
If you like to do things yourself, read the instructions below to deal with the projector DMD chip (I shall demonstrate that using my BenQ MH680).
If you’re not handy with electronics, hire a skilled technician to get the job done.
For the DIY folks, follow the steps below:
(Notes:
- Do snap pictures of the steps below for easier reassembly later.
- Also, for the job, you’ll need a lint-free cloth and three screwdrivers: a flathead bit screwdriver, another one with a large or medium Philips bit (PH0 – PH2), and one more with a hex bit.)
Step 1: Take off the lamp cover using the flathead screwdriver.
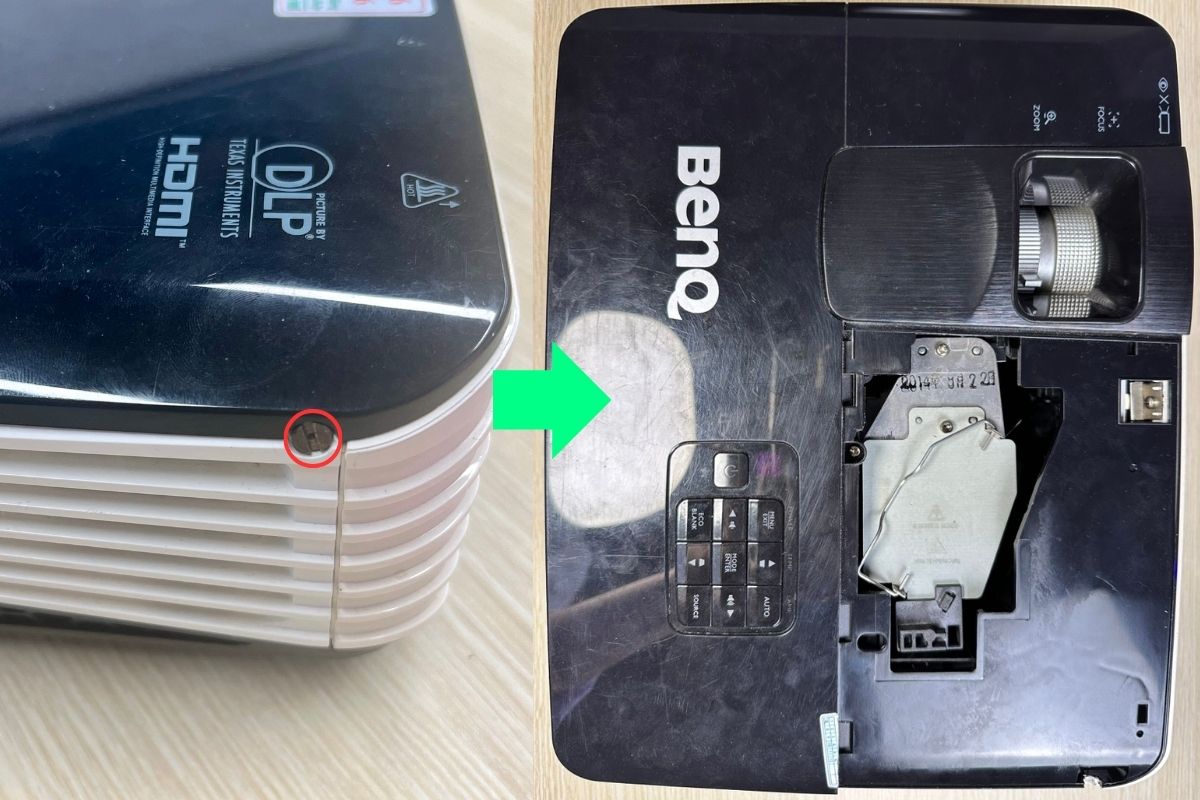
Step 2: Remove the lamp and case screw.
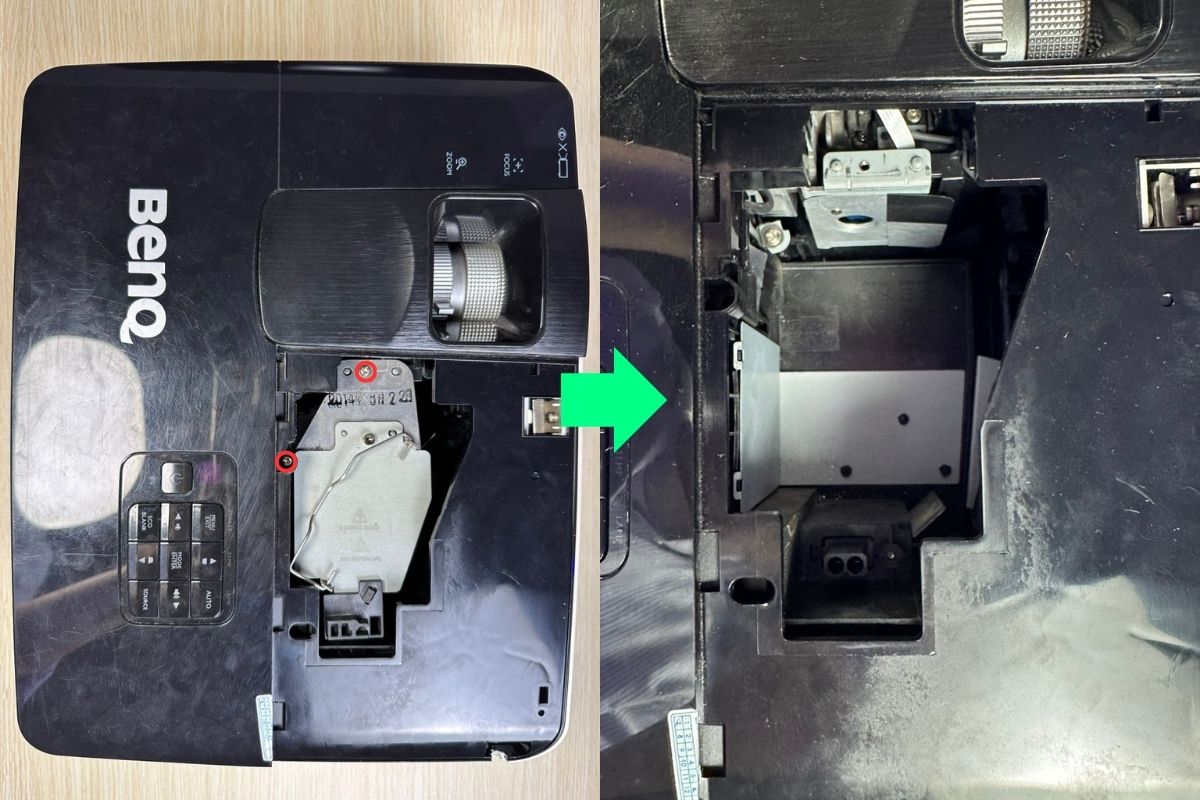
Apply a bit more force onto the side opposite the screw newly removed since the region comprises electrical plugs connecting the projector and the lamp.
And if you just turned off the projector, be careful handling the lamp since it could be too hot to the touch.
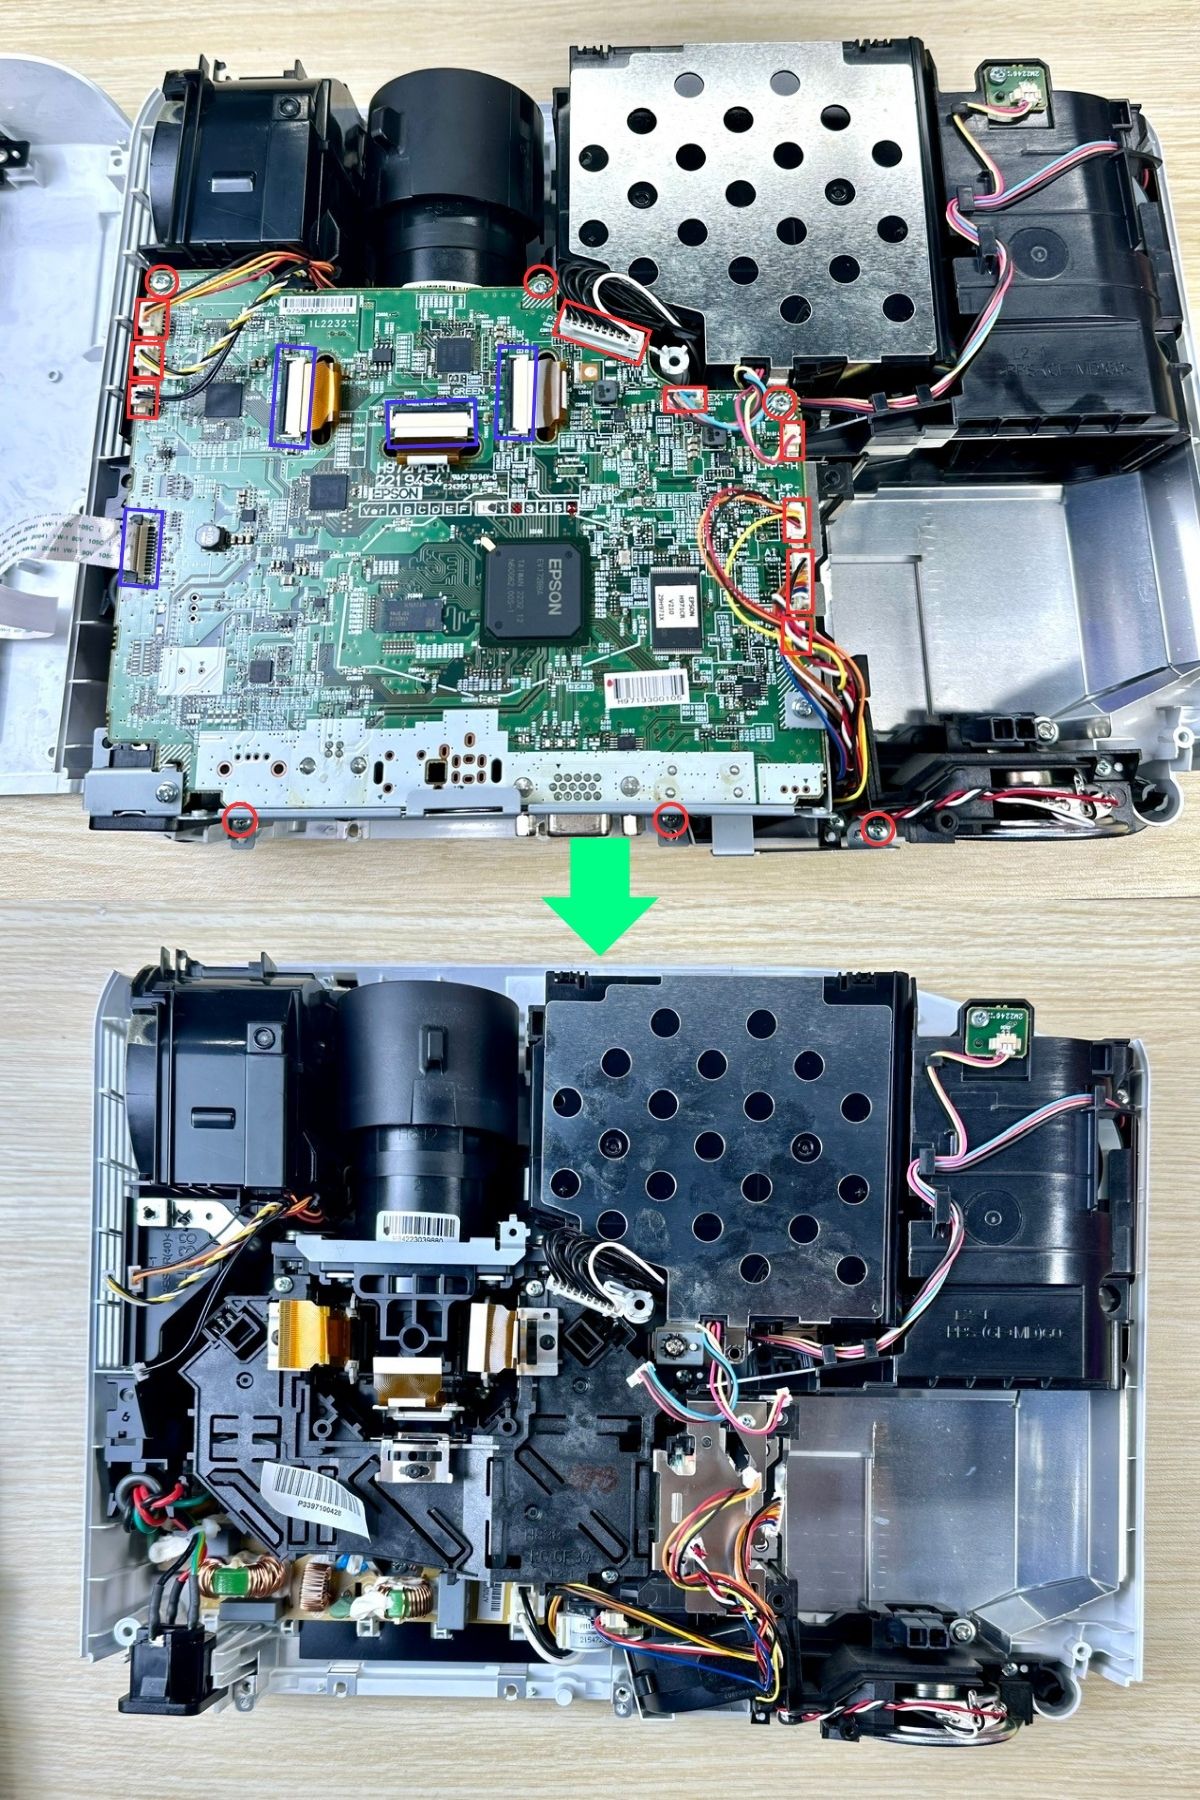
Step 3: Take out the multiple bottom screws and remove the top case/lid after flipping the projector back over. The cover could bend a bit. Be careful not to break it.
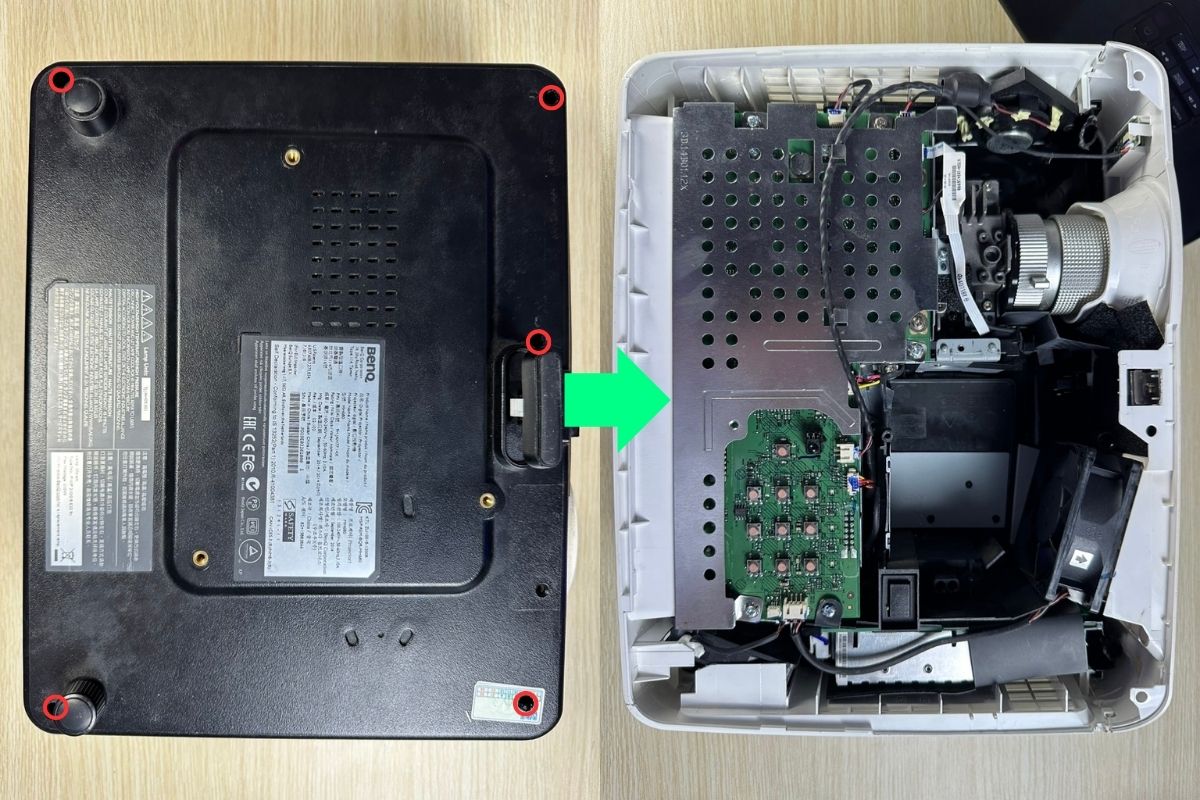
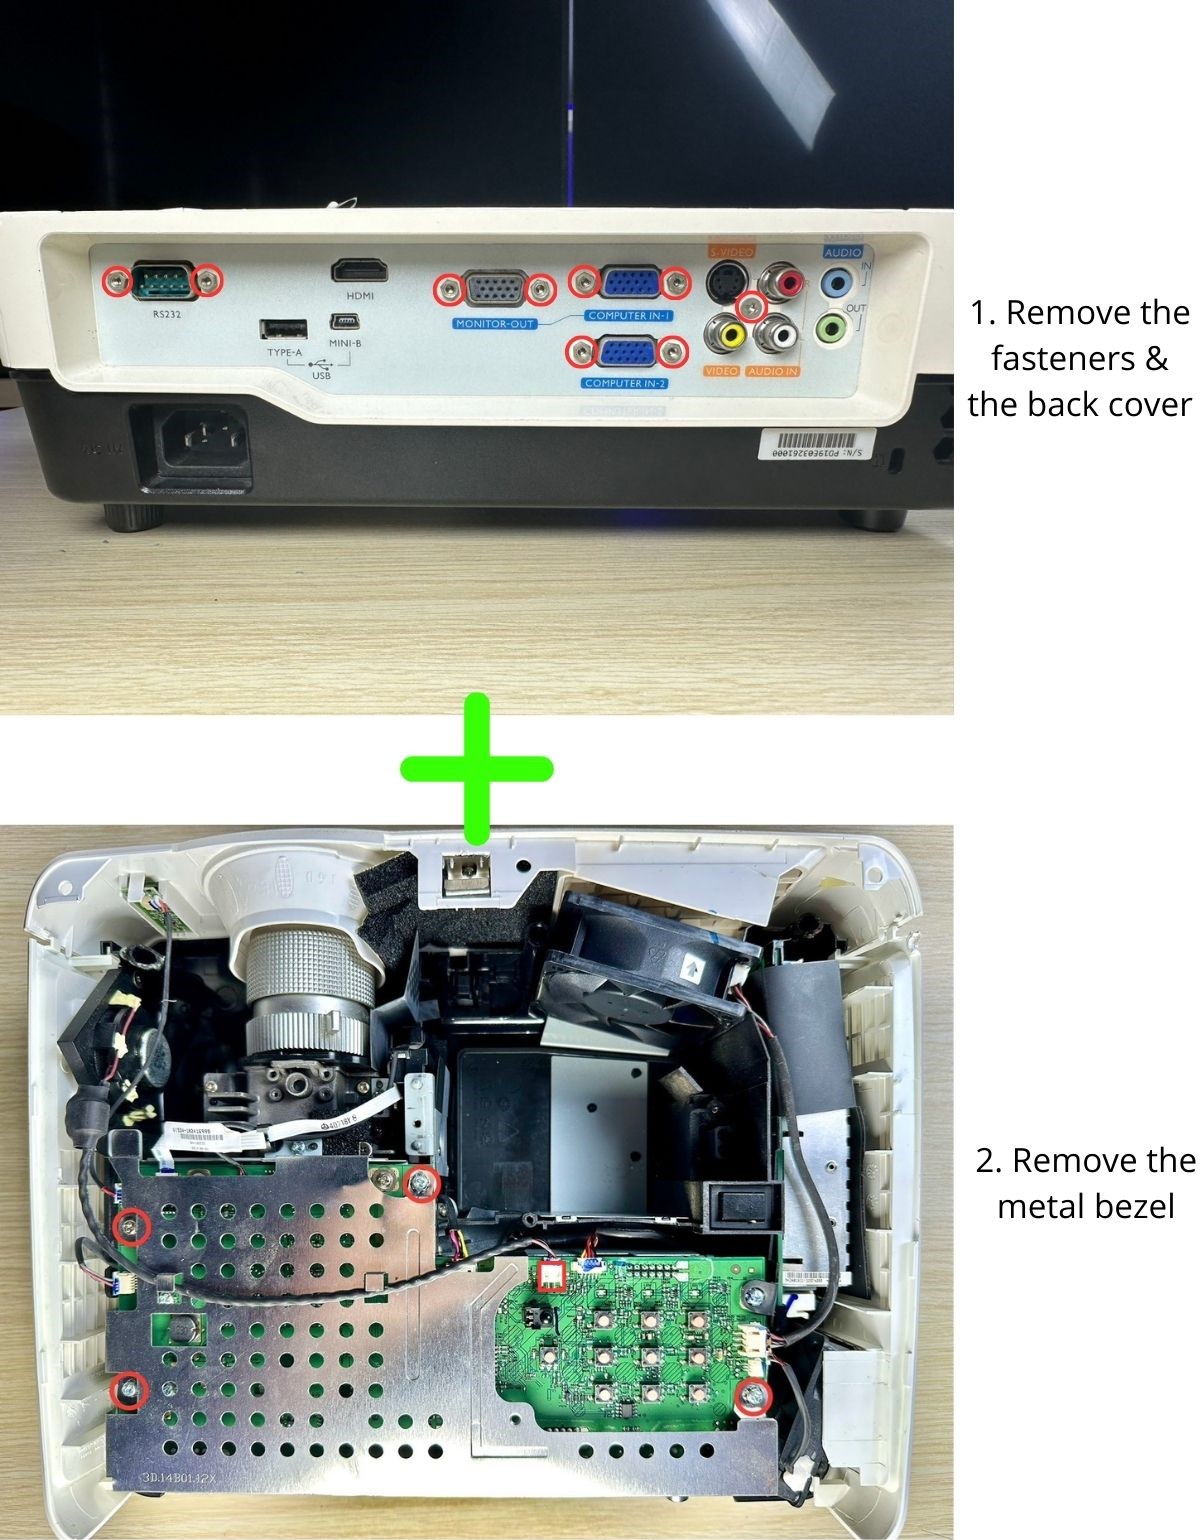
Step 4: Take off the fasteners near the input and output ports at the back and then the rear cover.
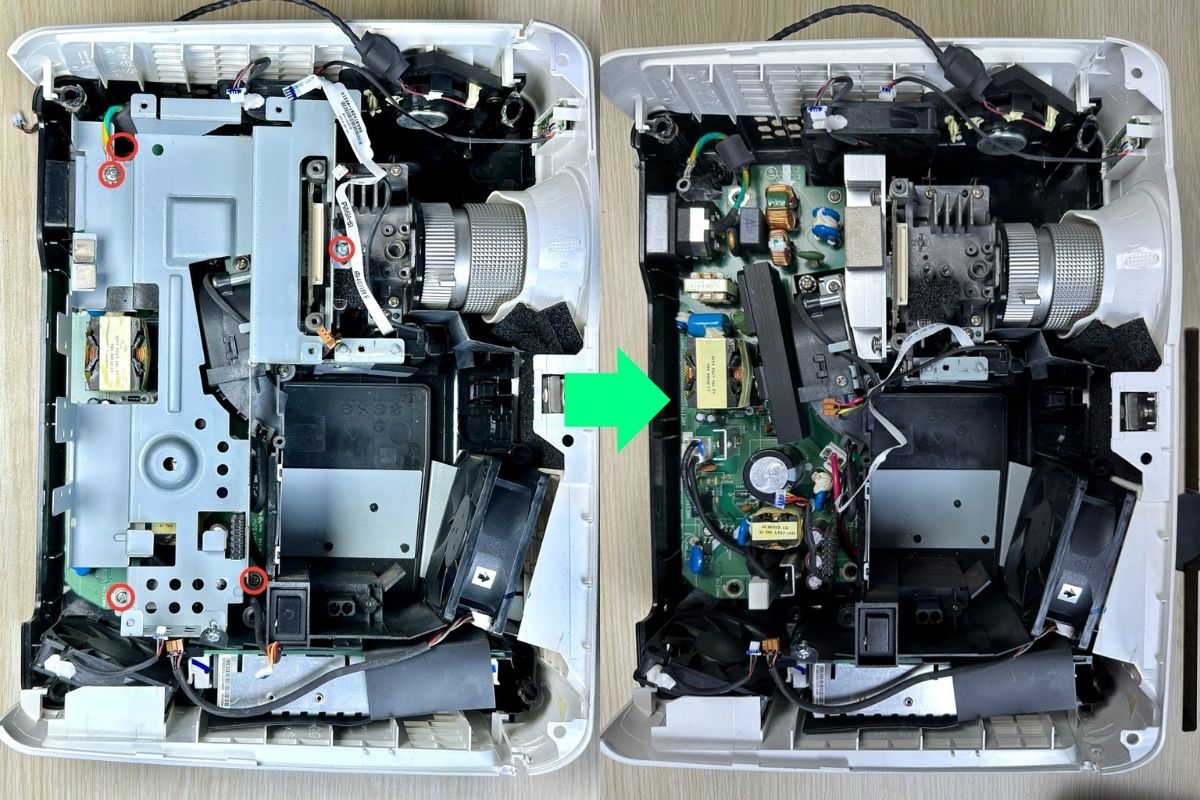
Step 5: Remove the metal bezel after clearing a few ribbons in the path and removing some screws. Grab the bezel at the edges for leverage.
Step 6: Once the bezel is off, you can see the main board clearly. Take it out, too.
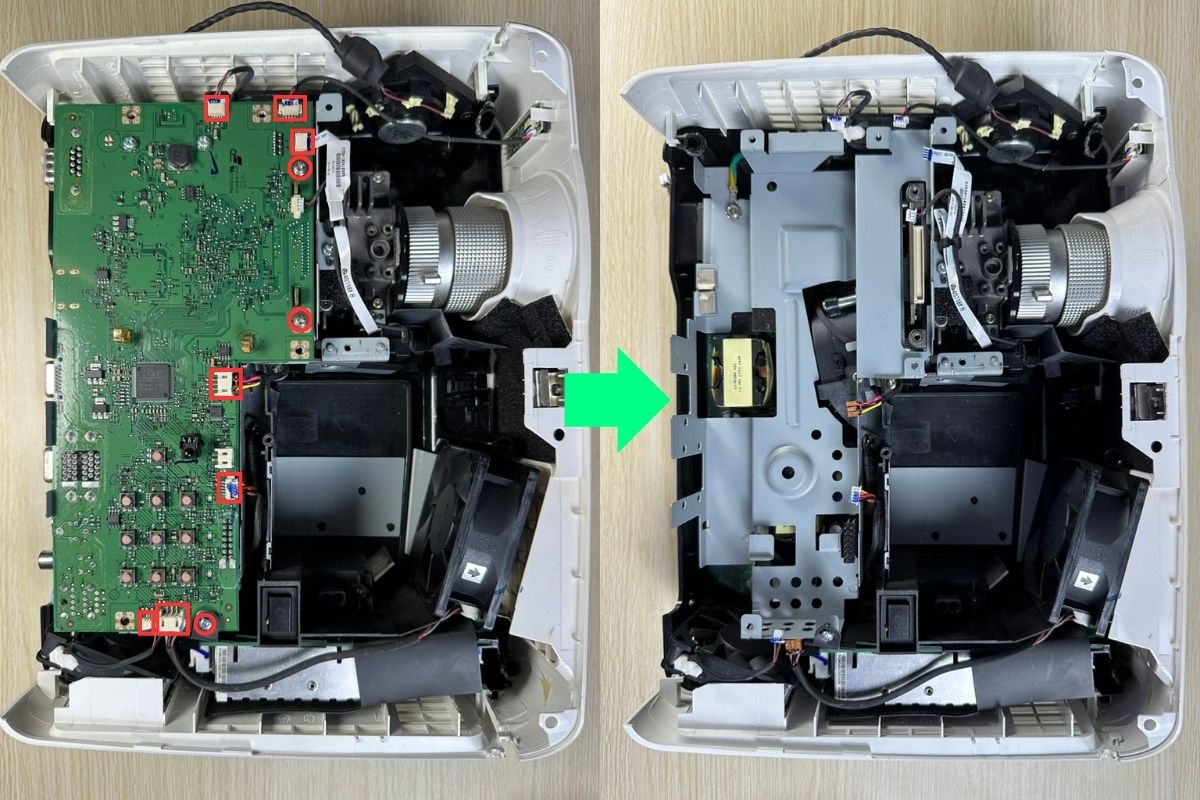
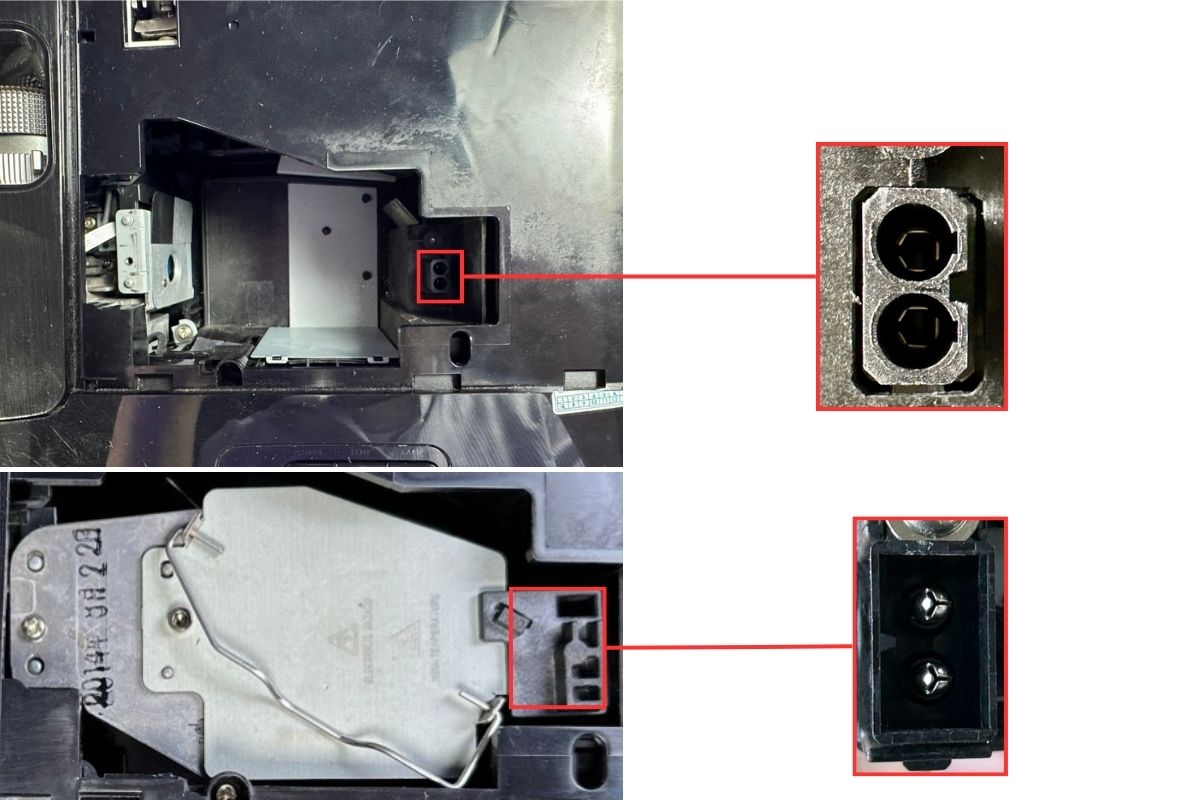
Before doing that, unfasten the plugs from their sockets on the board. There are a few connectors hidden underneath the projector (as depicted below). Use some force while taking the board out so the links get disconnected.
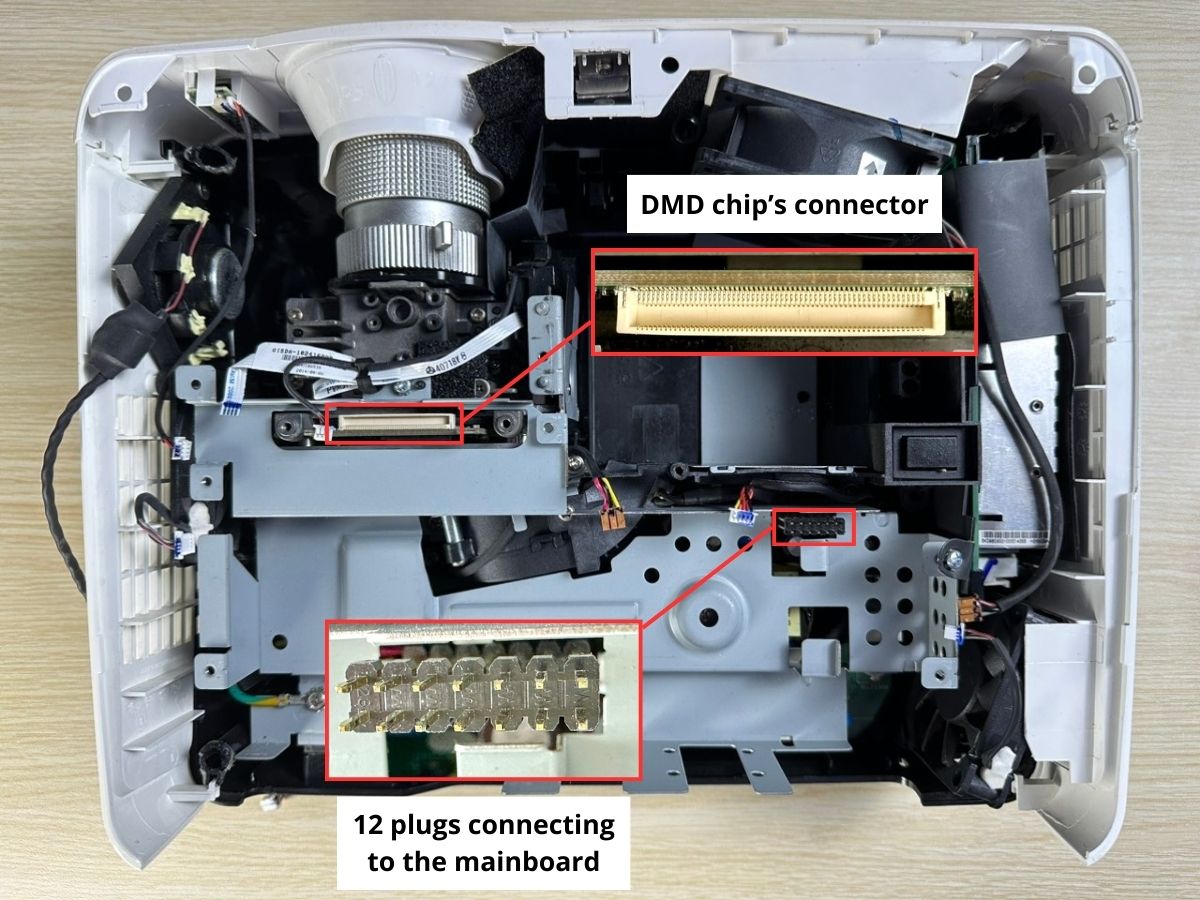
Step 7: Unscrew the metal bracket and take it out. Ensure no small wires are clinging on.
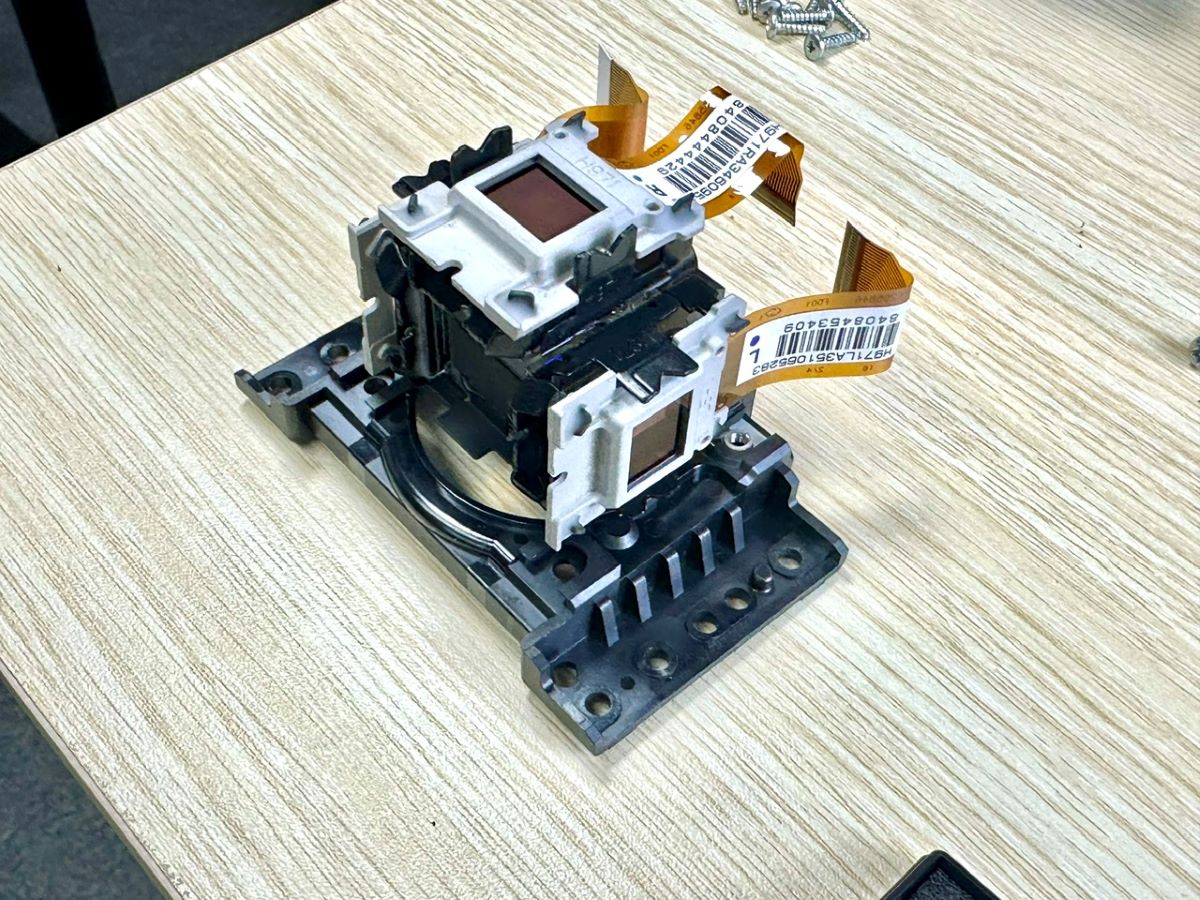
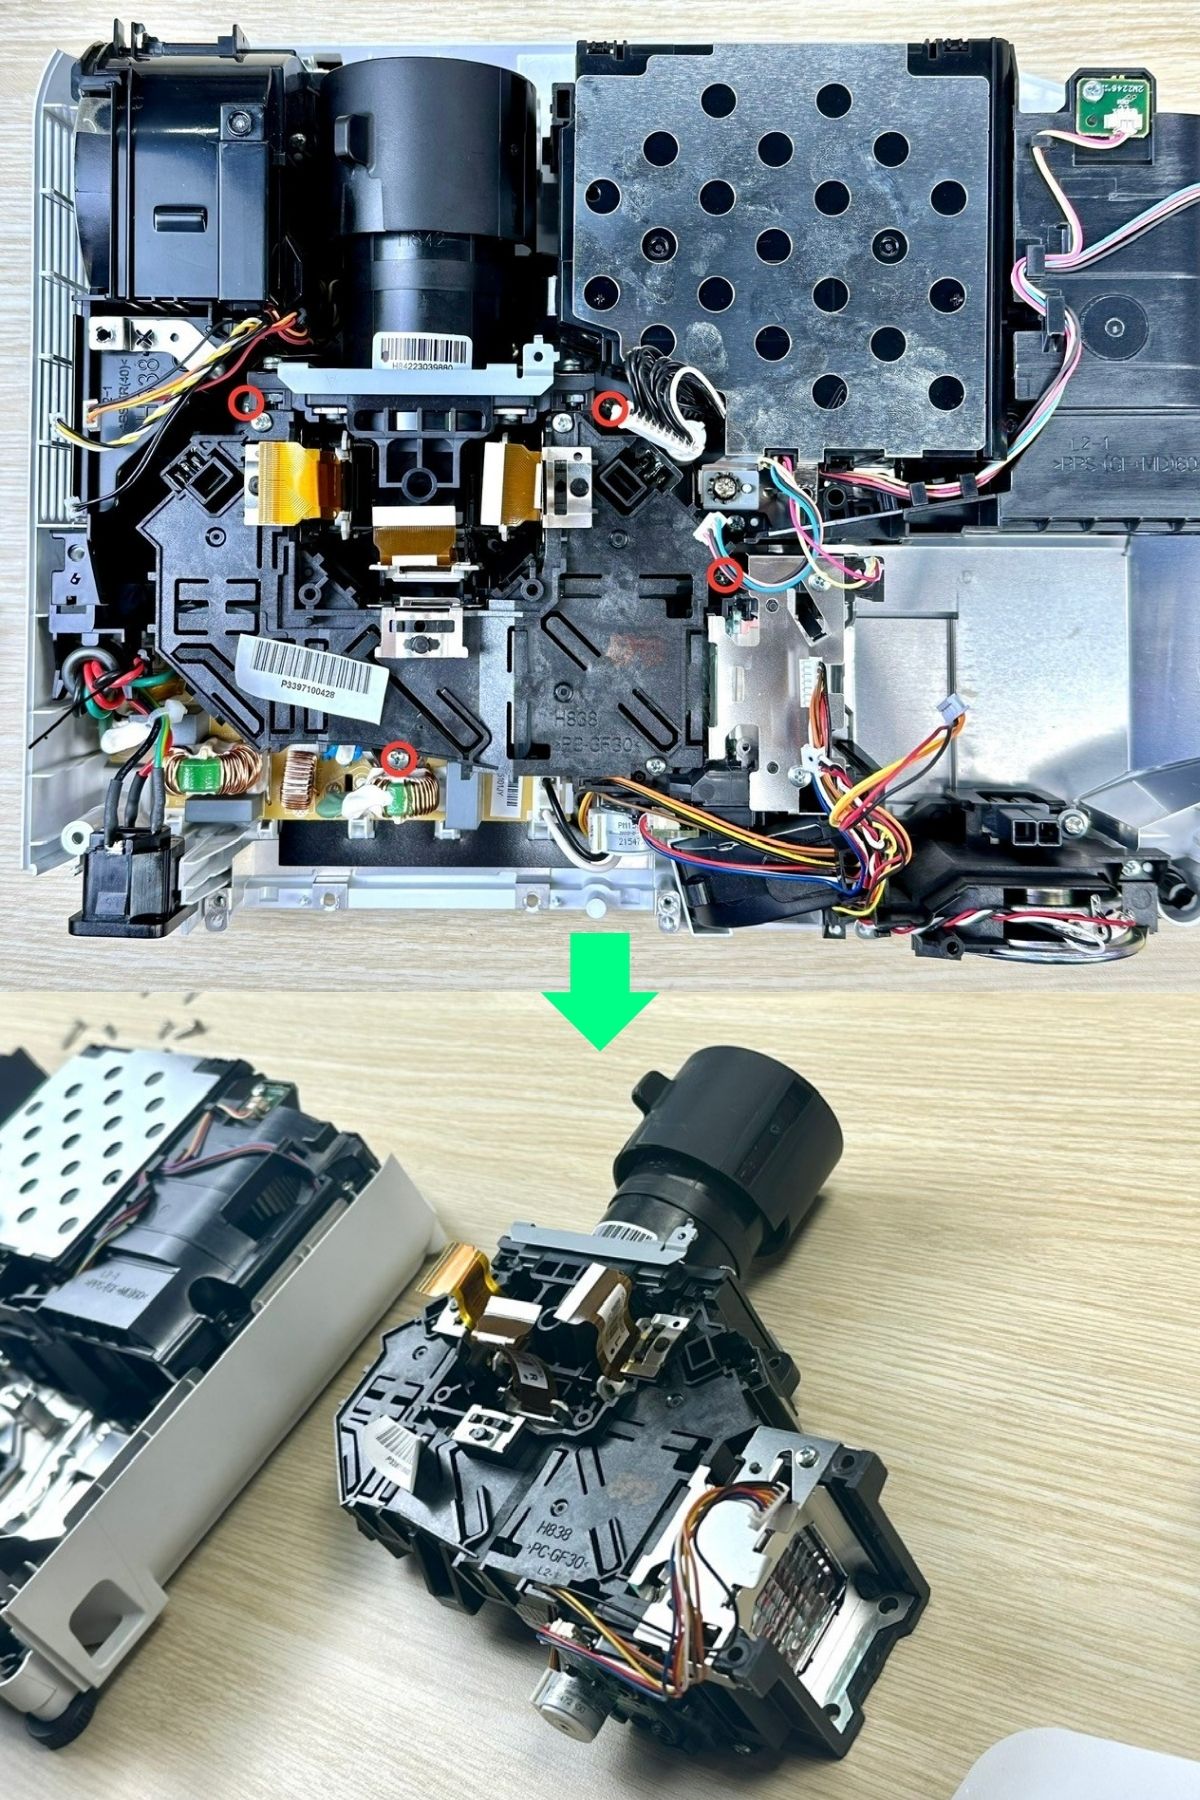
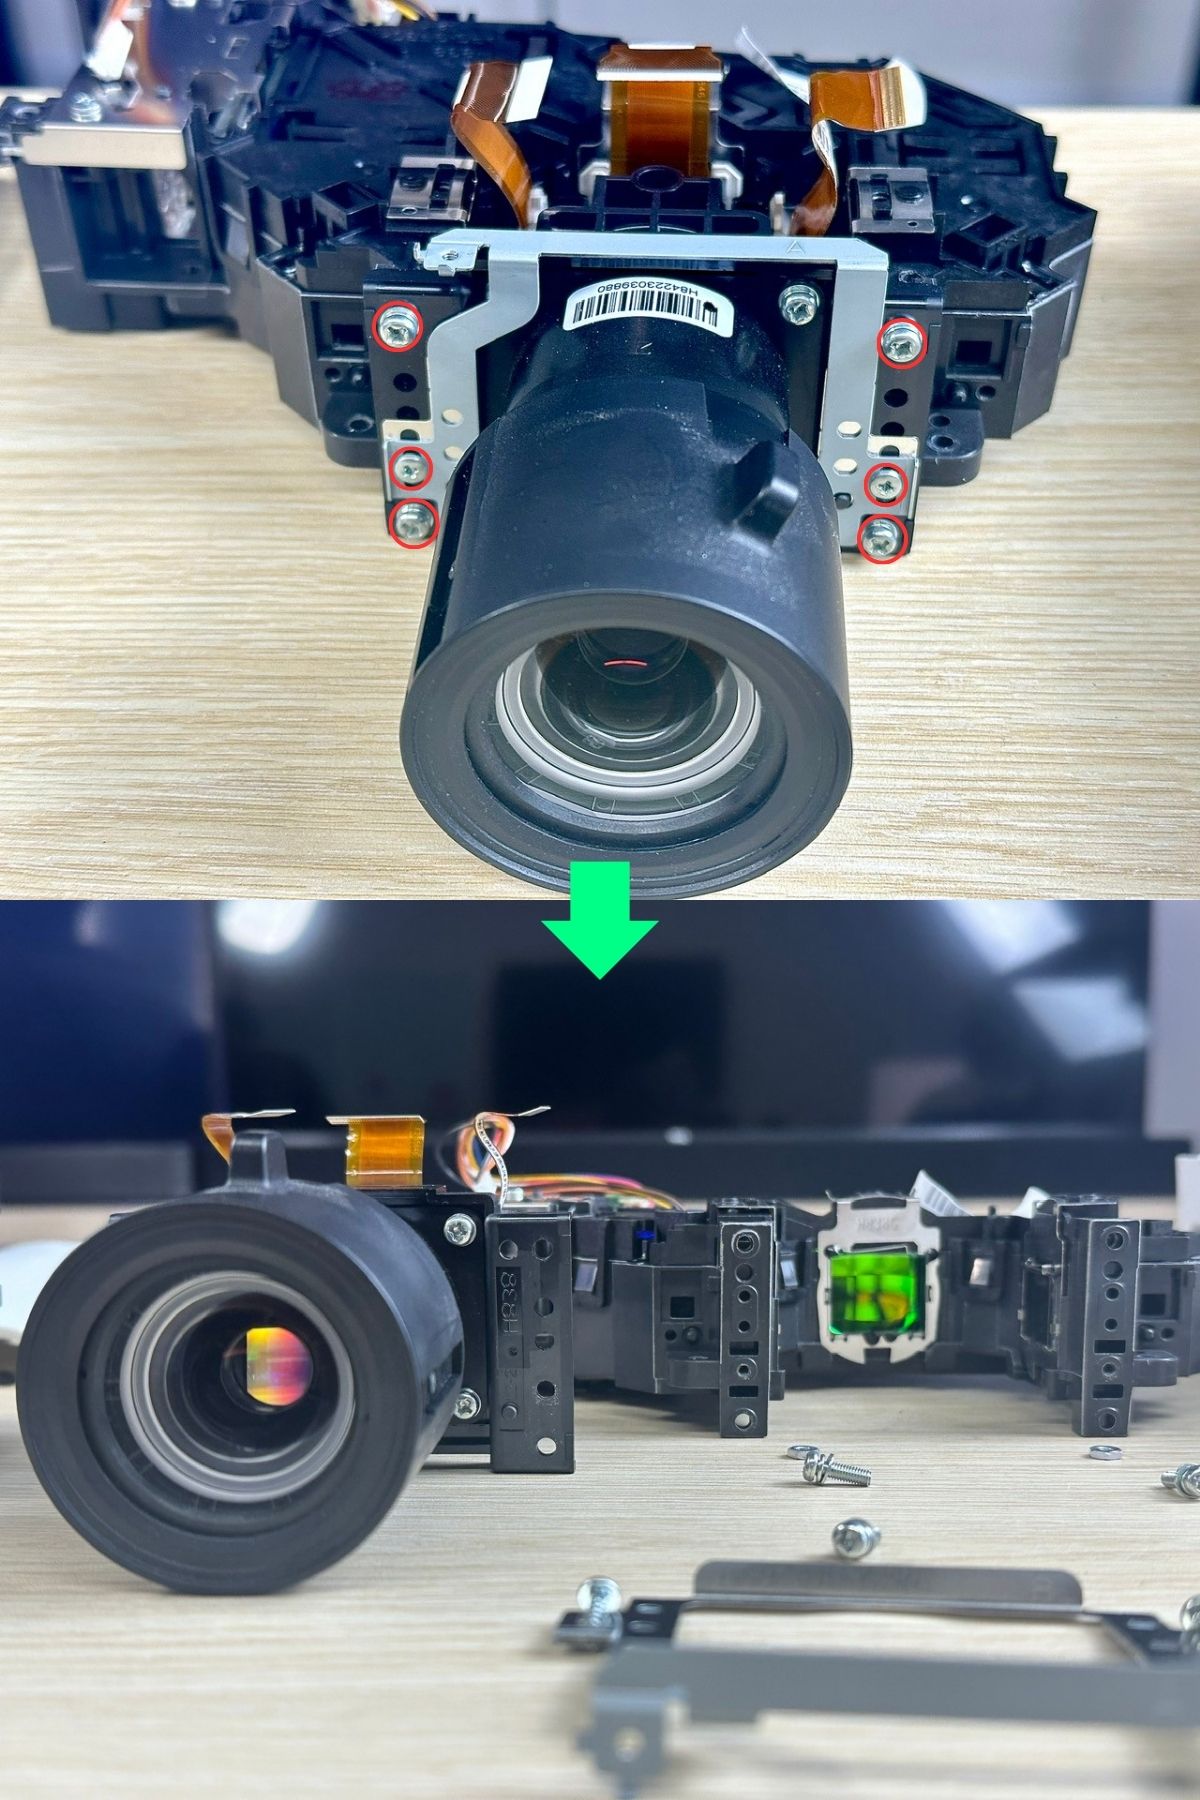
Step 8: Next, take out the lens assembly using the Philips screwdriver.

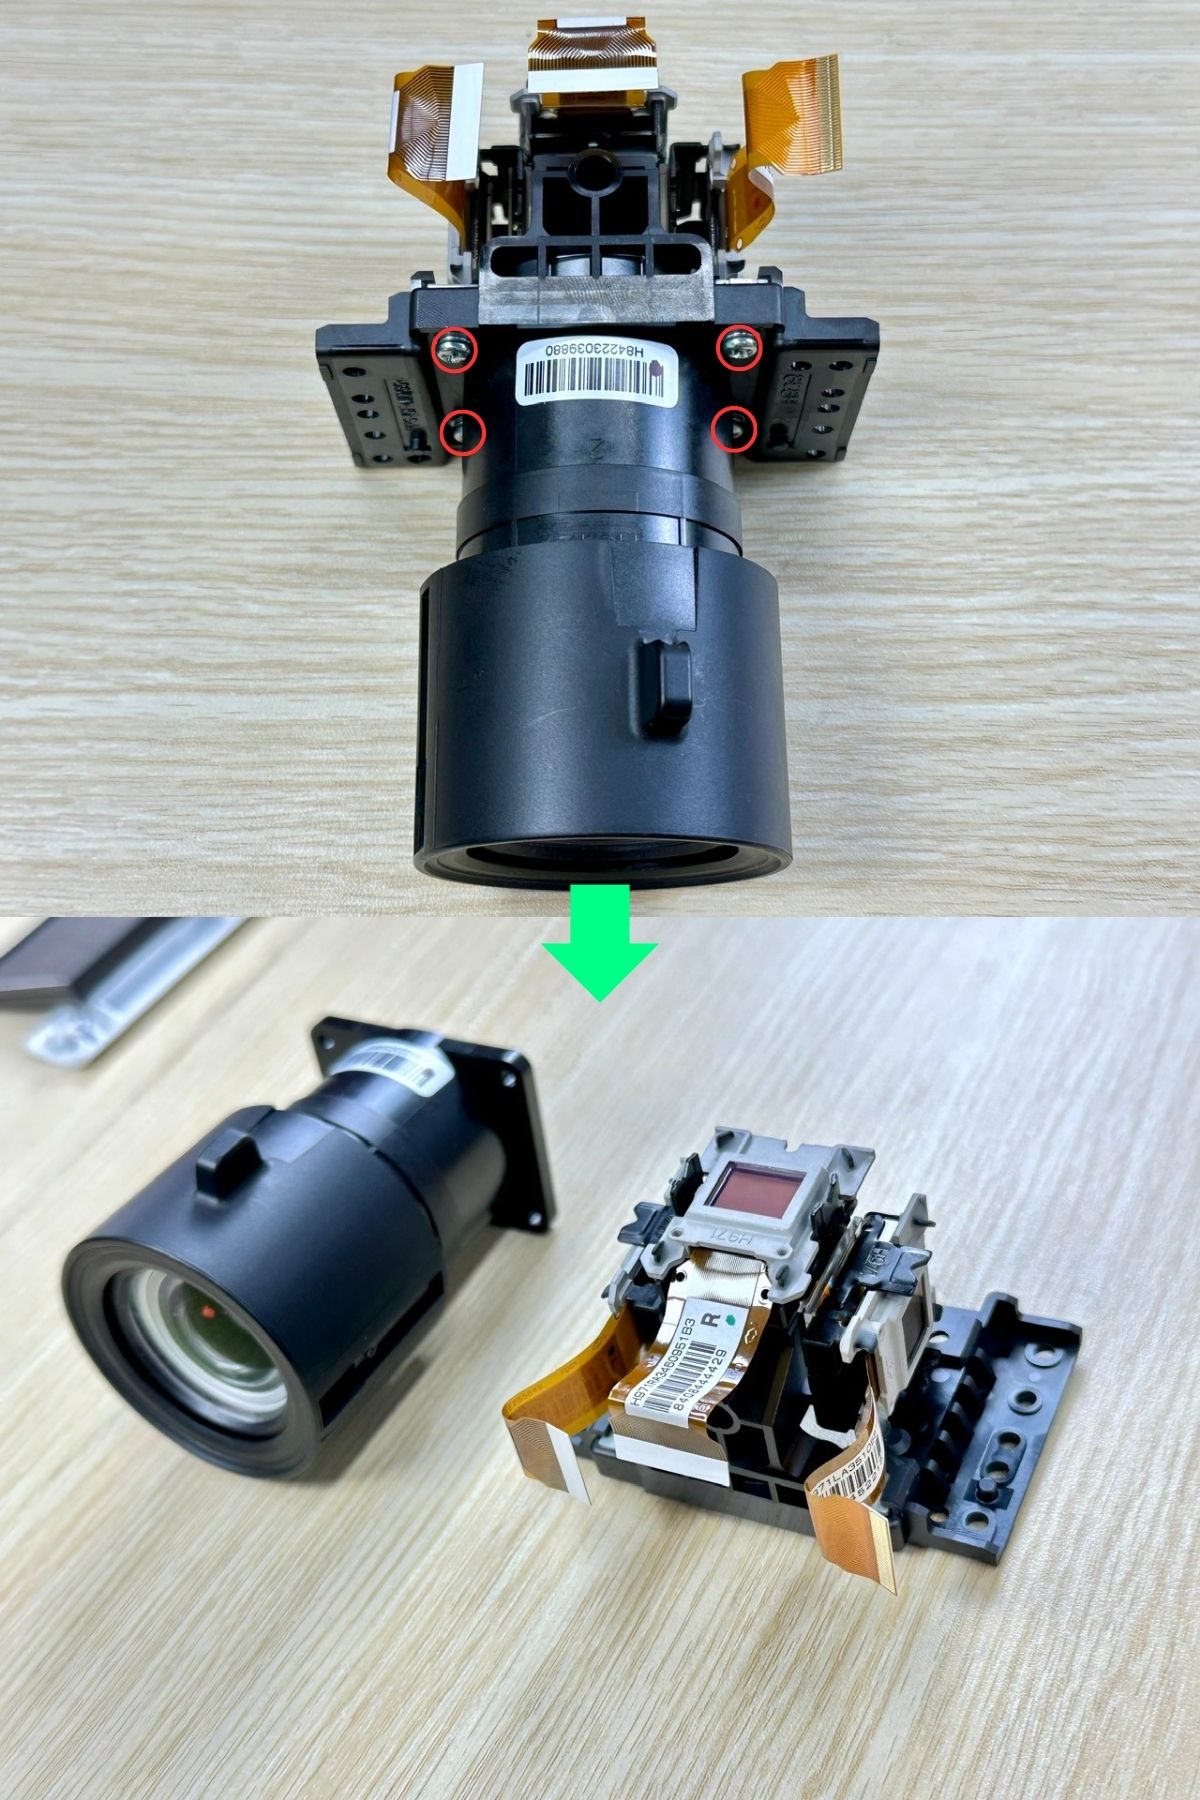
Step 9: Unscrew and remove the heatsink from the lens module so you can grab hold of the DMD chip.
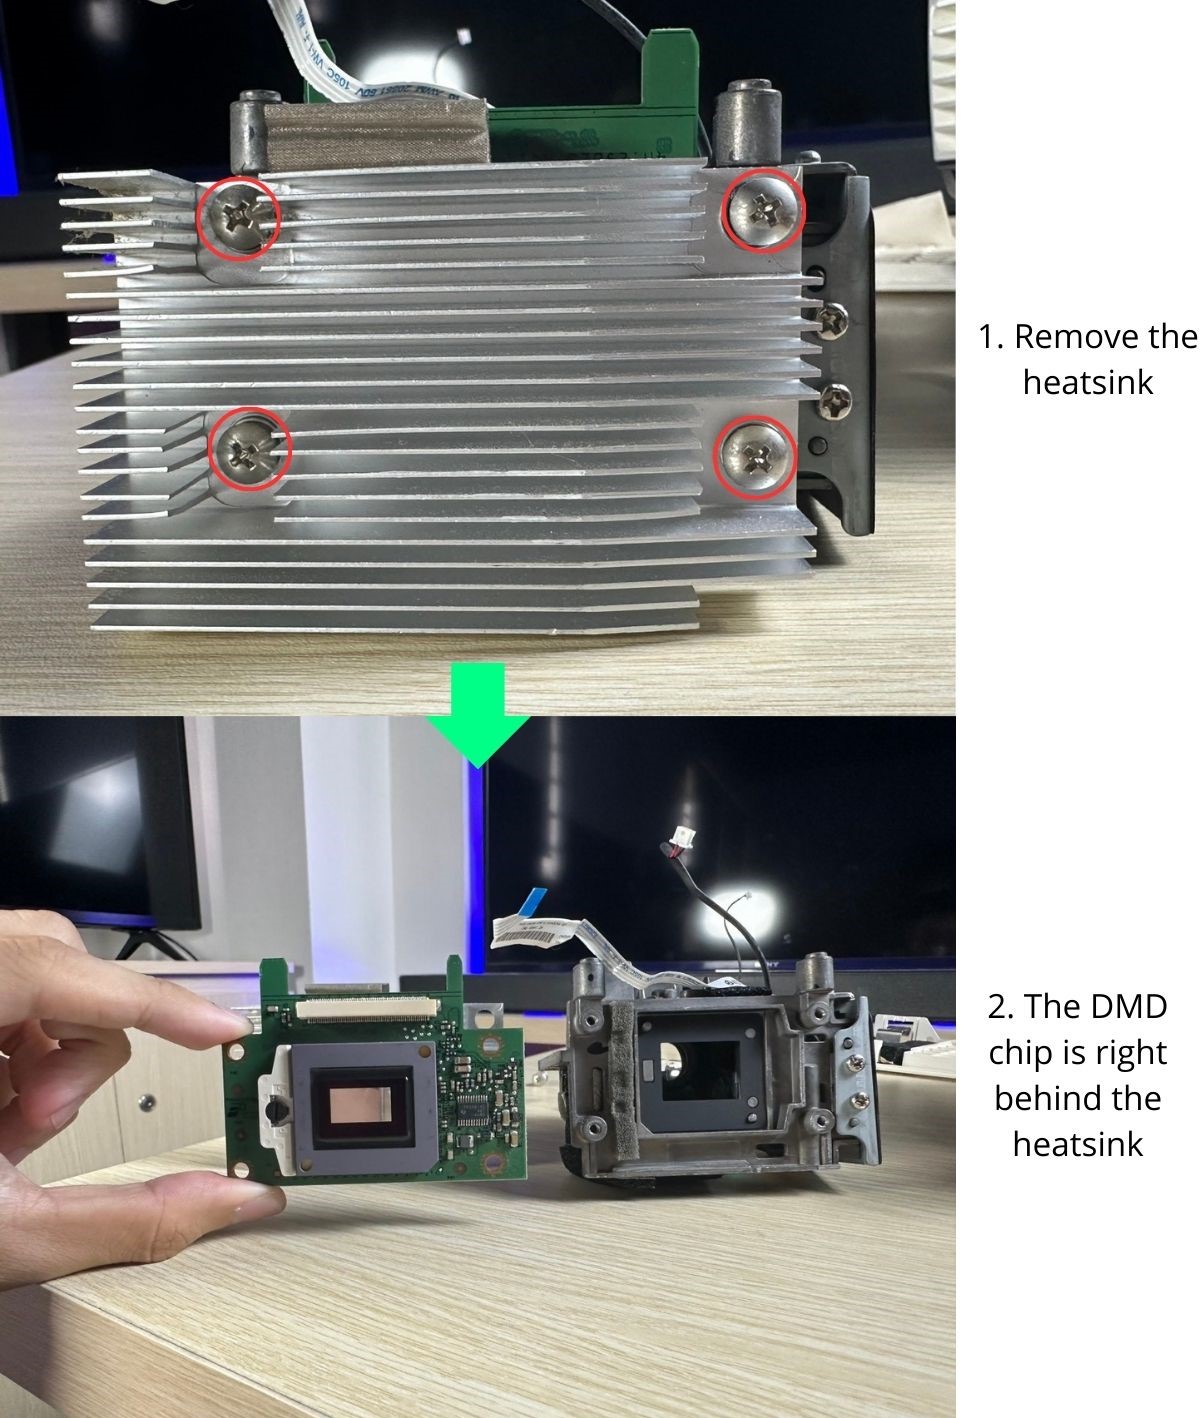
Step 10: Replace or clean the DMD chip. If you know what you’re doing, you are welcome to clean other assembly components, such as mirrors/lenses.
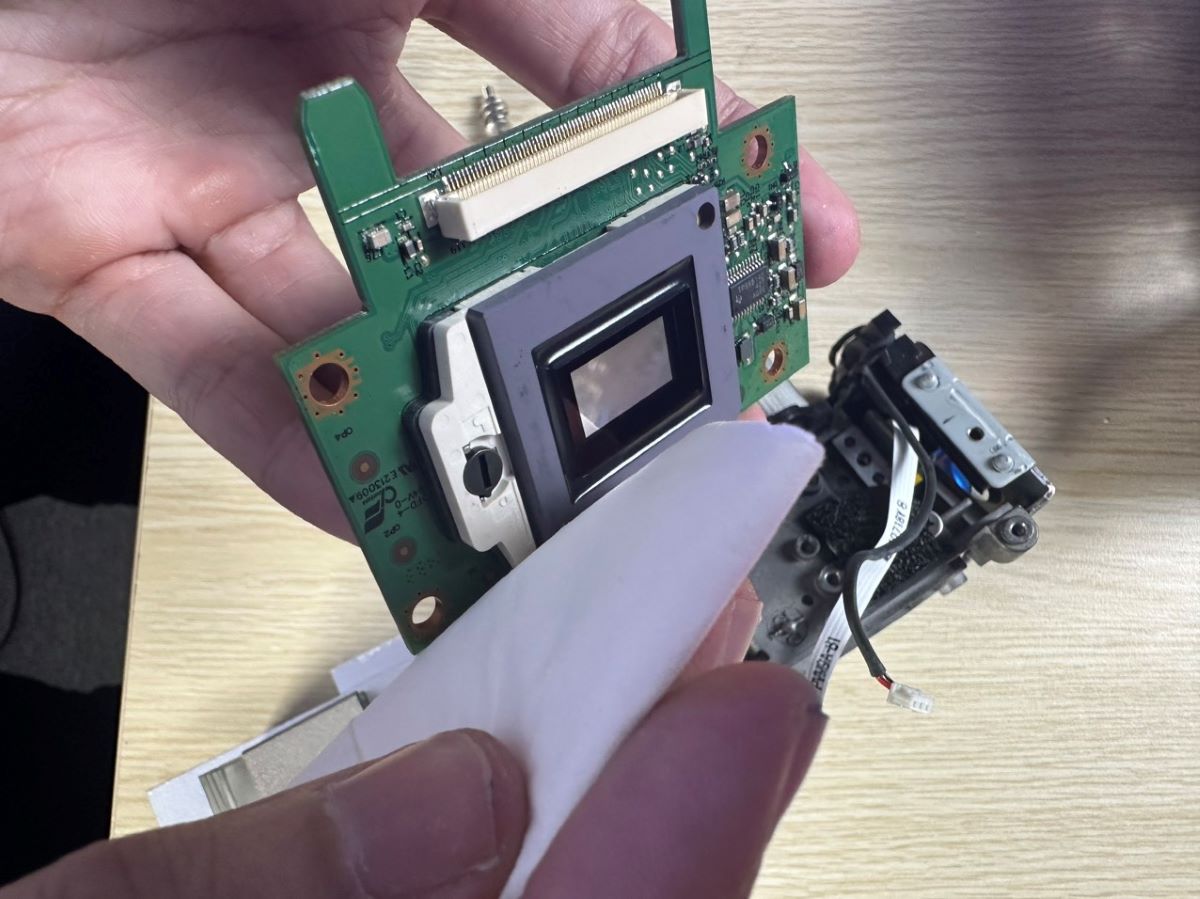
If the DMD component is damaged beyond repair, note the model number to find an apt replacement chip online or at a local store.
If you cannot find a replacement chip, buying a new projector is the only option.
2. Clean the LCD or LCoS Panels or Replace Them If Needed
As explained above, you must clean or replace the LCoS or LCD panels based on whether your projector is LCD or LCoS.
Again, if you’d like to replace or clean the LCD panels, the guide below should help (I’ve demonstrated the process using my Epson EB-E01 projector). If not, you can always enlist expert help.
Since you’ll need to open up the projector, you’ll need three types of screwdrivers: a Philips PH00 (small bit), a Philips PH0 – PH2 (medium or large), and a third one with the hex bit. If the Philips screwdriver is not large enough to handle torque, opt for the tool with the bigger bit.
Here are the steps:
Step 1: Unscrew the singular screw attaching the panel to the device. The screw will loosen but won’t fully come out. When it’s fully unfastened, slide off the lamp cover.
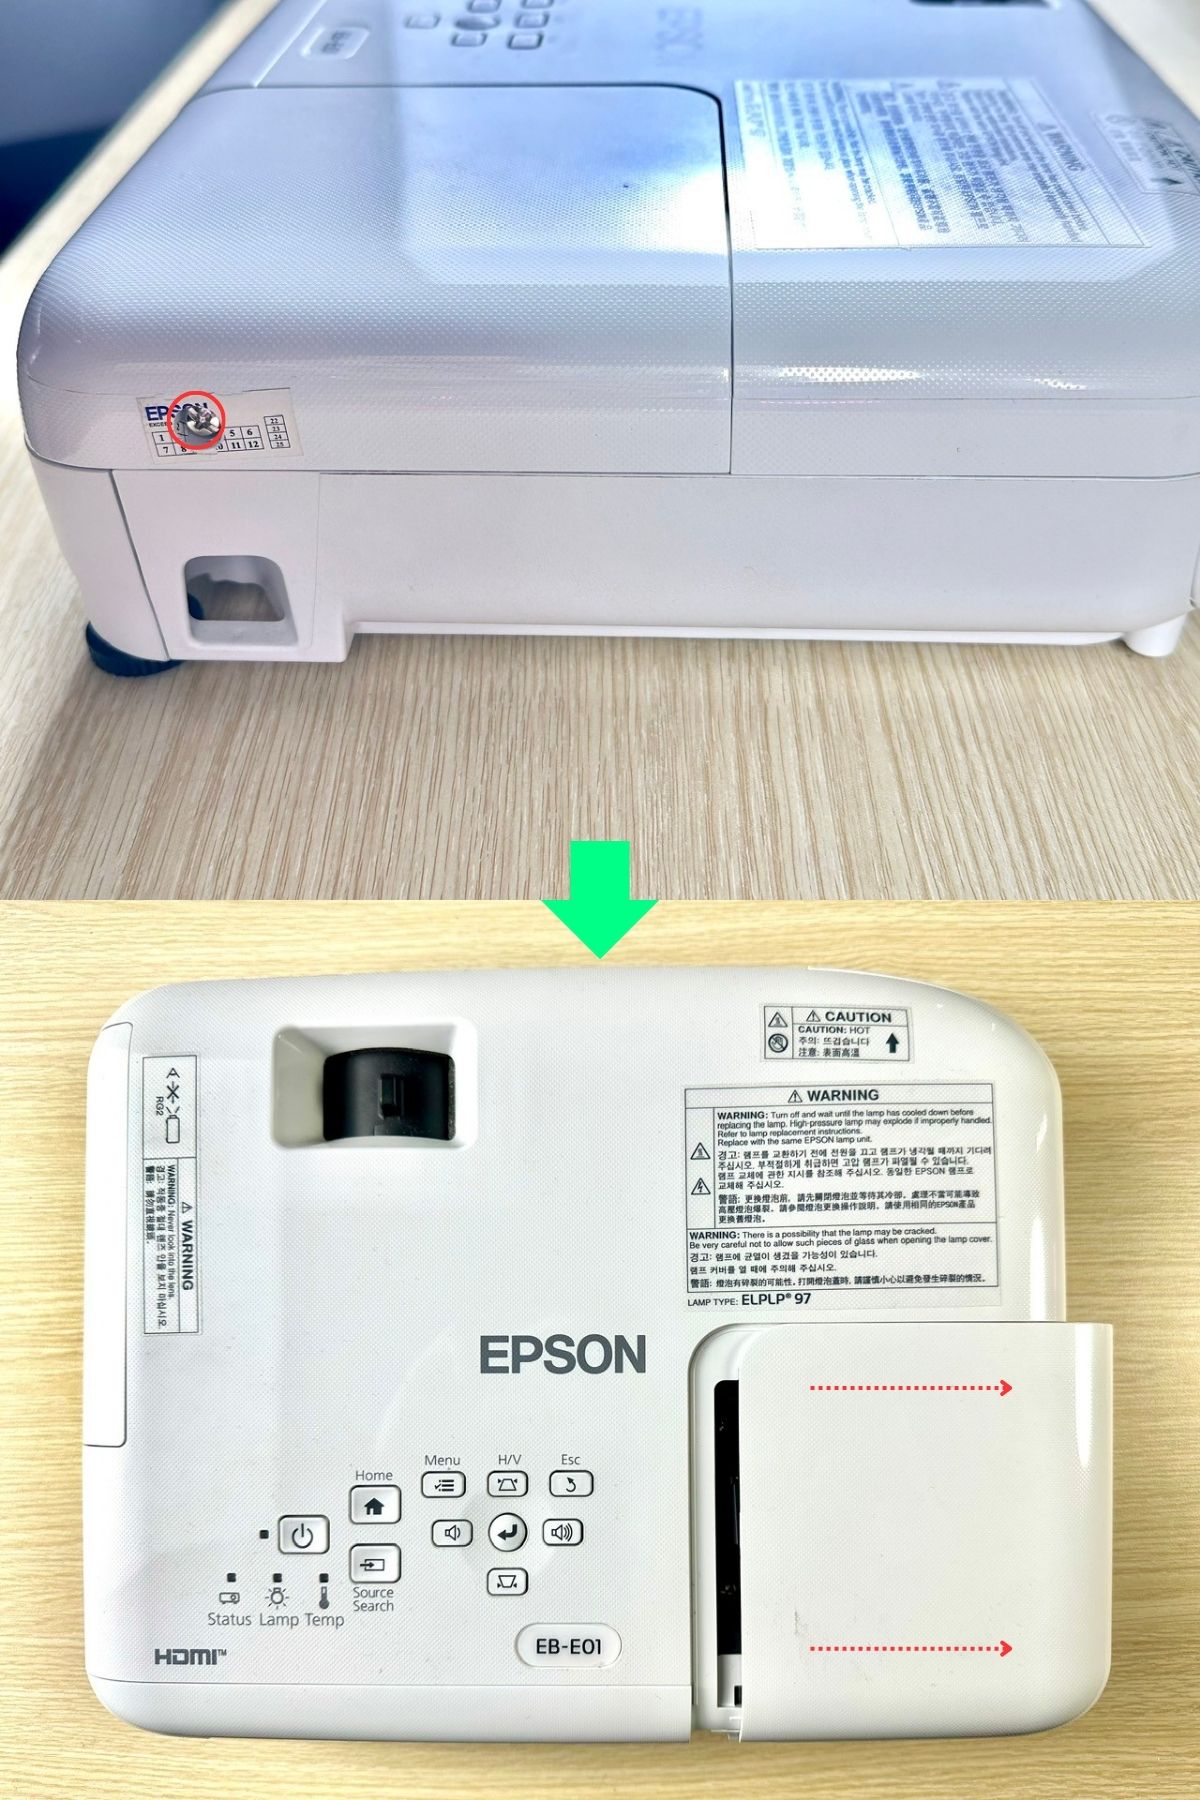
Step 2: Remove the projector lamp and then the upper case’s screws.
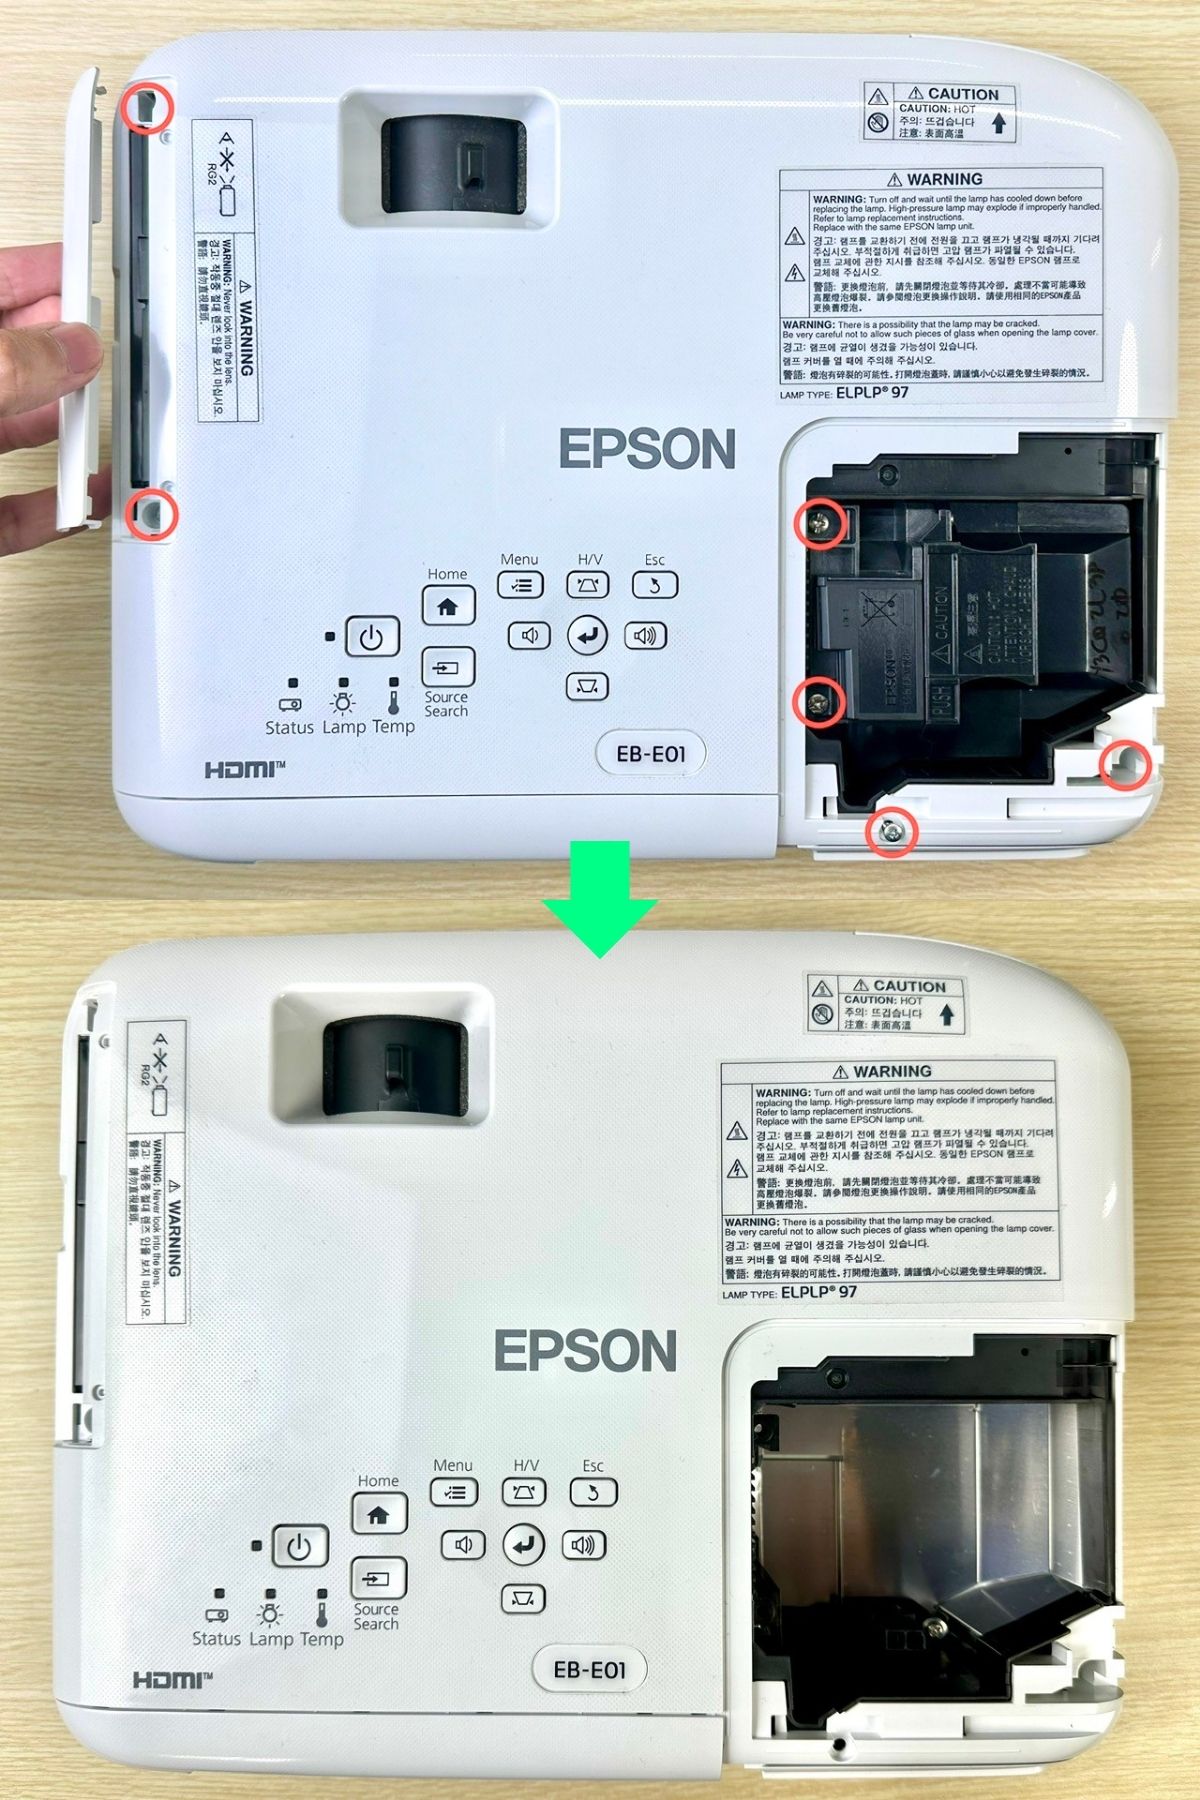
Step 3: Take off the rear cover after removing the screws that are attaching it to the projector.
Step 4: Flip over the projector to remove the screws at the bottom and then the upper case.
Exercise caution when taking the top cover off since there’s a white ribbon cord linking it to the primary board. Just place the top cover close to the projector to avoid tension.
The cover can be separated after the brown tape connecting the board and the case is detached.
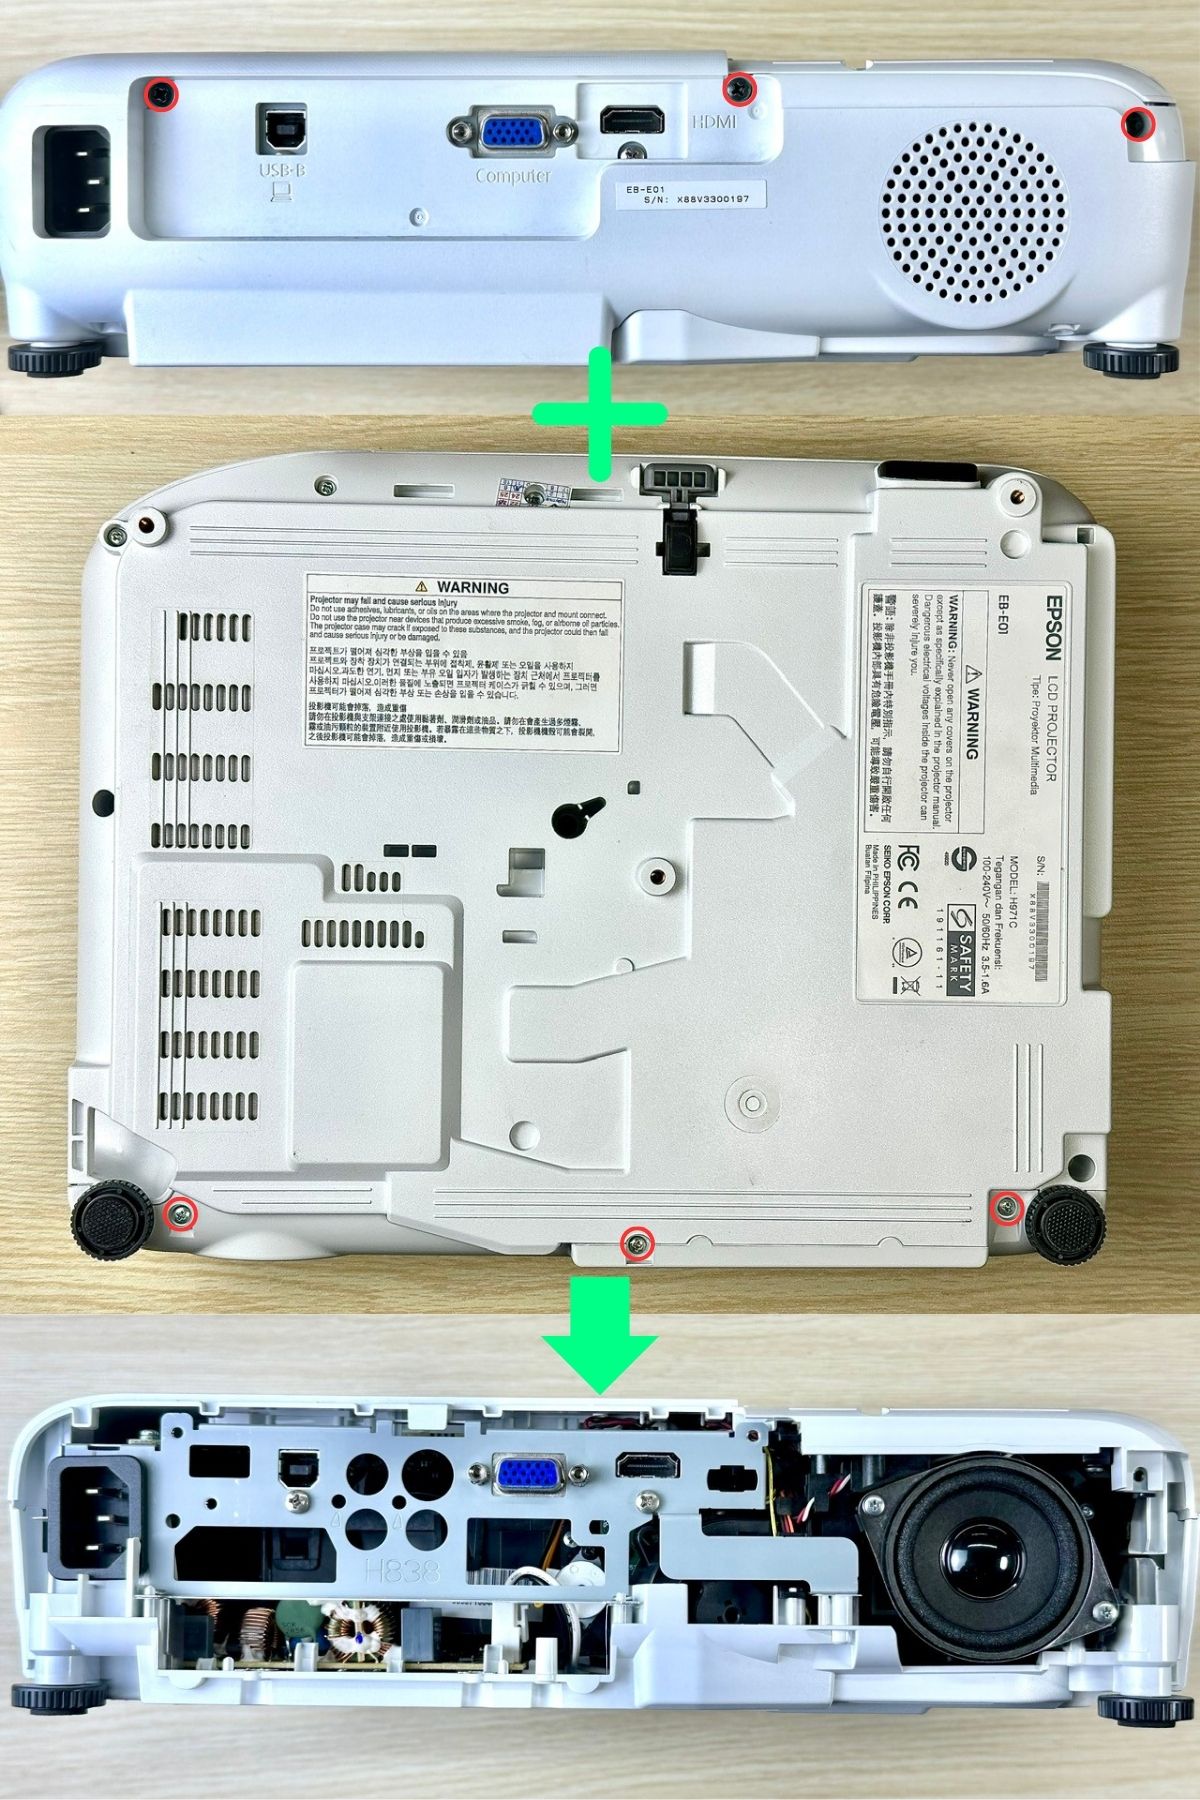
Step 5: Now, try to remove the mainboard and metal bracket after disconnecting all the cords connected to the motherboard. Use your fingers to raise the black locking tabs at the areas with blue highlights below and then delink the ribbon cords.
Step 6: Take the black box and the lens out after, of course, removing the multiple inner screws.
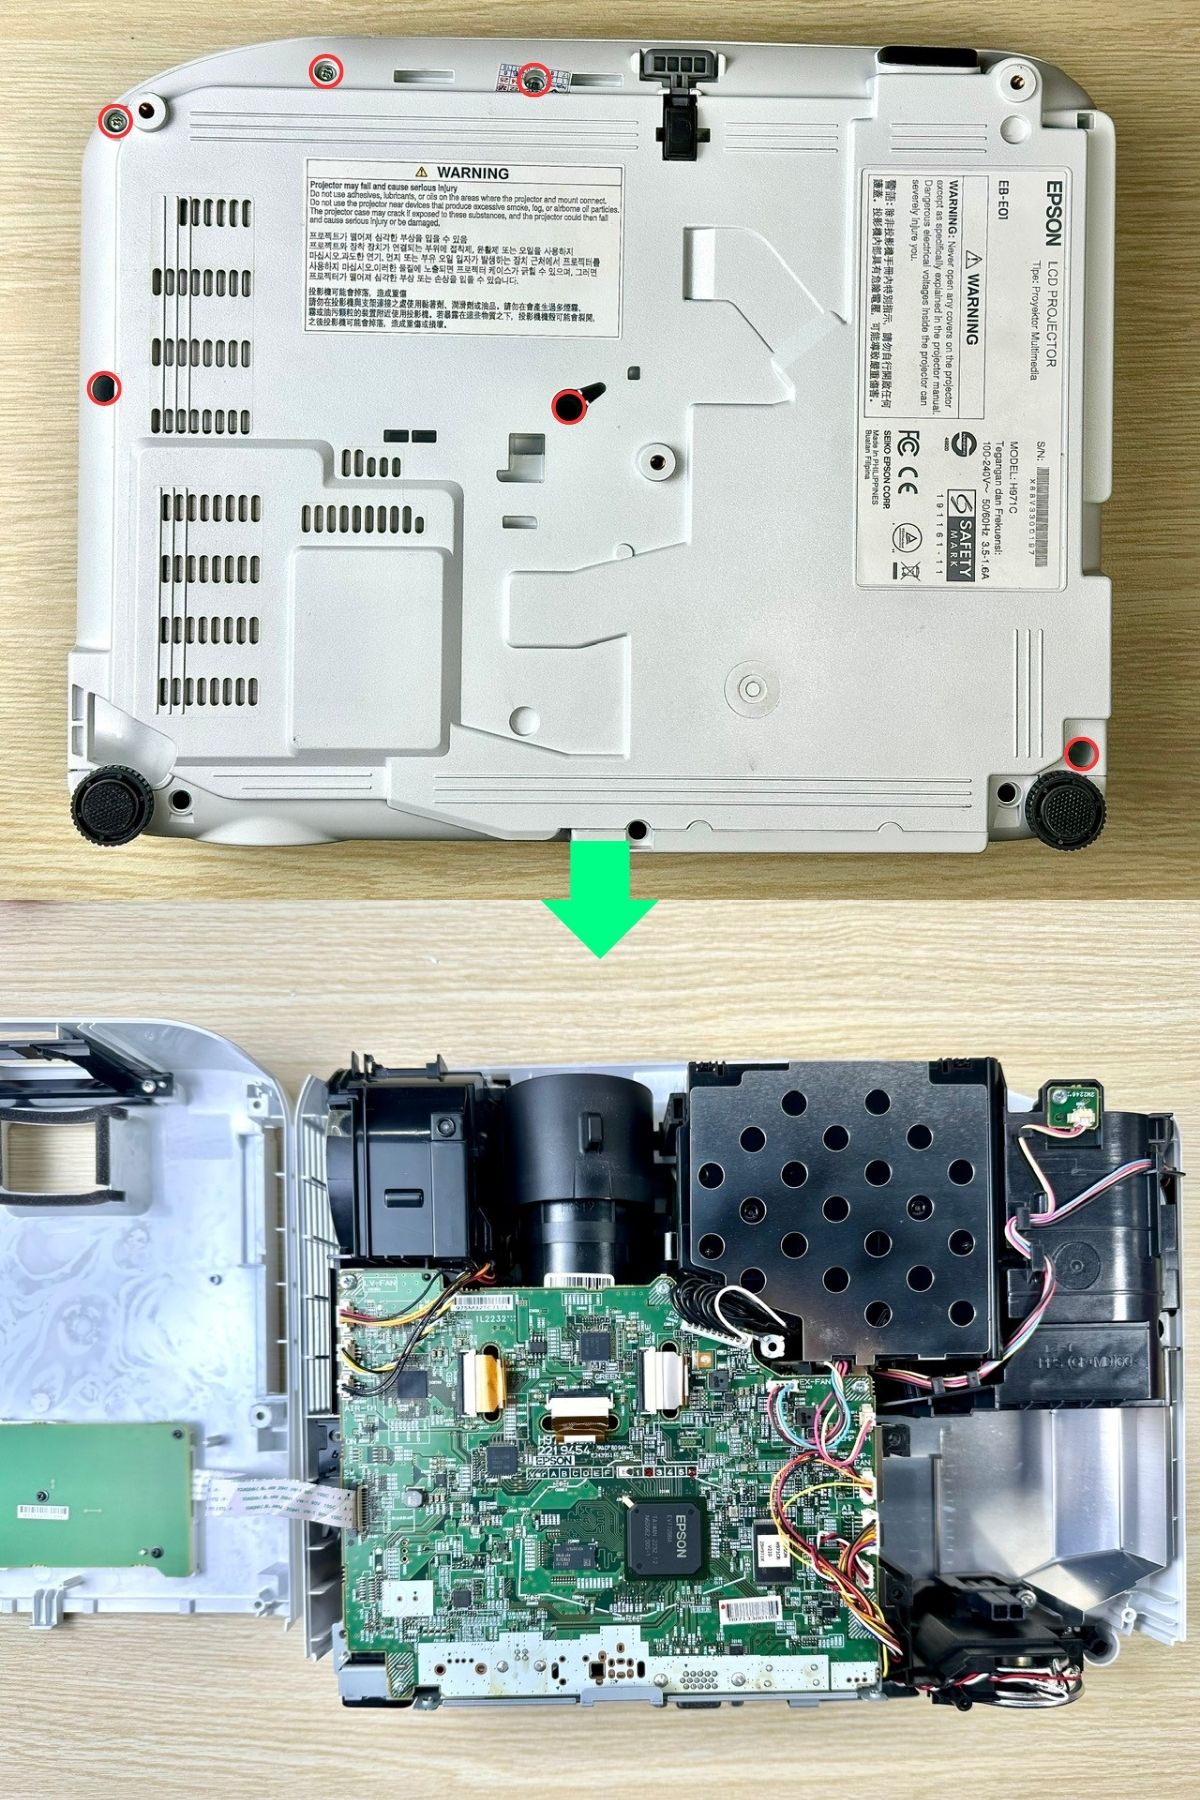
Step 7: Unfasten the screws connecting the lens and the LCD boards to the black enclosure.
Step 8: Take the lens out to access the LCD component.
Step 9: Clean the LCD panels. If cleaning doesn’t help, replace them.
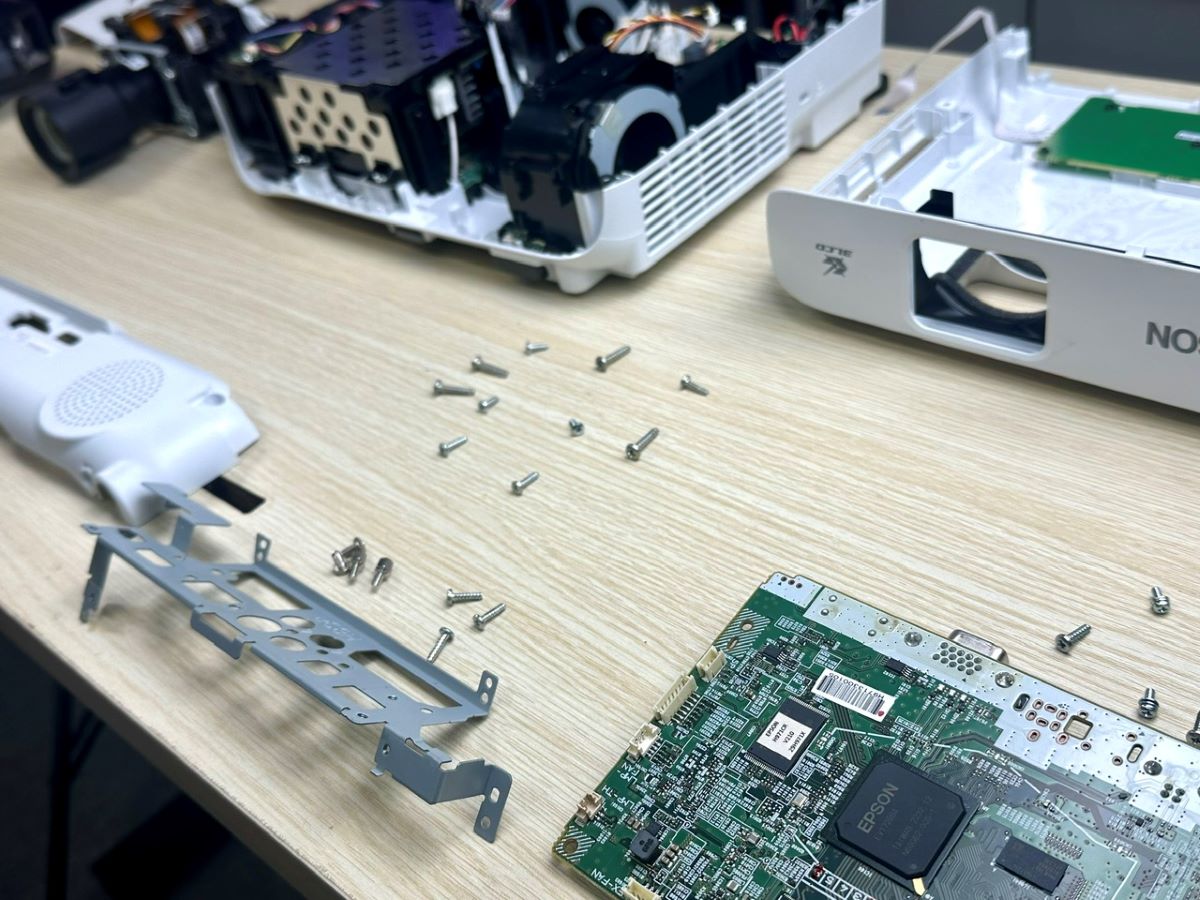
Step 10: Now, re-assemble all the parts and check if dead pixels have disappeared.
3. Cool Down Your Overheating Projector
An overheating projector can cause many problems including the dead pixels issue.
The DMD chip inside your projector has a heatsink attached to its rear. It helps the DMD element cool down during use, converting the heating to air or fluid.
If the cooling is inefficient, the micromirrors in the DMD chip won’t flip to properly project the visuals, resulting in dead pixels appearing on the screen.
If your projector overheats often and dead pixels appear in conjunction, enable High Altitude mode on the device. The fans will rotate faster.
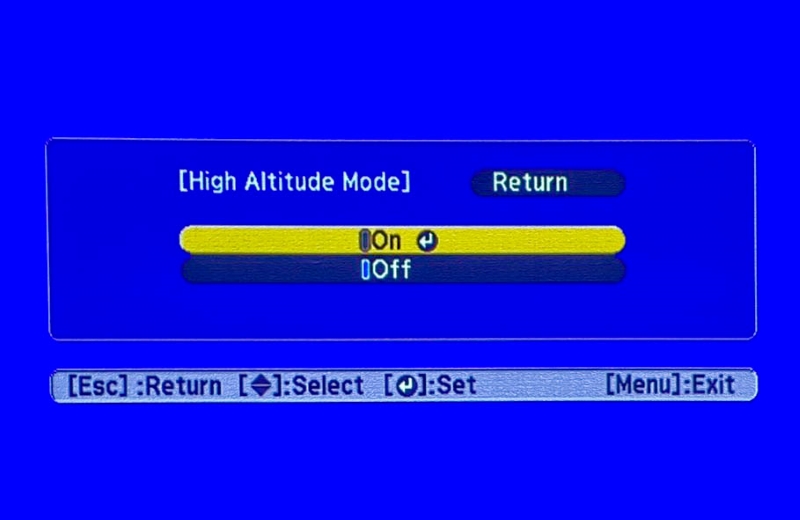
Let the feature be turned on for a few hours or until the heat’s dissipated.
If your projector does not have the exact function, it should pack in some other built-in cooling mechanism.
The table below lays down the path to access the High Altitude Mode on some popular projector brands.
| Projector Brand | Instructions |
| Epson | Press the Menu key. On the screen, head to Extended and then Operation. Look for High Altitude Mode and toggle it On. |
| BenQ | Press Menu and go to System Setup: Advanced, then High Altitude Mode, and toggle it On. |
| Optoma | Hit the Menu key. Choose Setup and go to Options. Select High Altitude and toggle it On. |
Besides enabling High Altitude, there are many other ways to cool down a hot projector or prevent it from getting toasty in the first place.
- Ensure the air filter is not clogged or broken. If it’s dirty, clean it. If the filter is damaged, get a new one.
- Check if the fan is functioning correctly. If it’s mucky or has a technical glitch, it may rotate slower than usual or not function.
- Ensure the projector’s surroundings are pleasant, not comprising external heating sources (heaters, computers, etc.) in the immediate vicinity.
- Ensure proper ventilation. The projector should not be in an enclosure or tucked away in some corner with no airflow.
- If you live in a particularly hot region, don’t use the projector out in the open, especially not during the day. Set up a dedicated room with proper air conditioning for your projection sessions.
If you want to learn more, we’ve covered the points above in detail in the article “6 Tested Solutions to Fix Projector Overheating Issues.”
4. Contact the Manufacturer
If none of the above works, talk to the brand, especially if the device is under warranty.
Companies like BenQ, Optoma, Epson, etc., have multiple modes of communication open through which customers could reach out for help.
If you have a BenQ projector, talk to the support team at 1-888-512-2367. Alternatively, email them at [email protected] or use their Contact Us page to drop a message.
For Epson users, call at 562-276-4394. The lines are open Monday to Friday between 7 AM and 4 PM PT (Pacific Time). To write to Epson Support, click here. Type your projector model. Scroll down to access the Contact Us tab and click the Email Us option.
If you use an Optoma, contact their customer support team at 510-897-8600 or 1-888-289-6786 from 6 AM to 5 PM PST (Pacific Standard Time). Or you can write them a message here.
FAQ: Can the Dead Pixel Be Ignored?
Yes, a dead pixel or two is not a significant deterrent to a viewing experience and can be tolerated.
But people who want a blemish-free screen will not put up with a dead pixel speck.
However, the other big reason a dead pixel or two shouldn’t be ignored is it could multiply if an environmental factor or manufacturing defect has caused it.
If there’s some underlying issue with an internal component or display technology, the dead pixels can quickly proliferate.
Not to mention, a used projector with a dead pixel issue will have few takers, or its price in the secondary market will be significantly hit.
Long story short, it’s best to address a dead pixel when it surfaces.

Catherine Tramell has been covering technology as a freelance writer for over a decade. She has been writing for Pointer Clicker for over a year, further expanding her expertise as a tech columnist. Catherine likes spending time with her family and friends and her pastimes are reading books and news articles.

Duy Anh is a seasoned technical editor specializing in helping readers troubleshoot TV, projector, and Wi-Fi issues. He’s always been drawn to logical problem-solving. His ability to approach matters from various angles with a neutral mindset enhances his technical expertise.