
How To Connect a PS4 to a MacBook: With HDMI, USB & Remote Play App

What To Know
- There are two main methods to connect a PS4 to a MacBook: wirelessly through the Remote Play app, and via a wired connection using an HDMI cable and a capture card.
- MacBooks’ HDMI ports don’t input AV signals; therefore, using a capture card is necessary for a wired connection, and if the MacBook lacks a USB-A port, a USB-C hub is required.
- The process to connect a PS4 to an iMac is similar to the MacBook, necessitating either a capture card connected directly to the iMac’s USB port or through a USB-C hub.
This comprehensive guide, I will outline two simple ways to connect your PS4 to a MacBook.
The first way is wireless and uses the Remote Play app while the second is wired and employs an HDMI cable coupled with a capture card.
I’ve tested both these methods and confirmed they work seamlessly. However, I’ll throw in some bonus advice on which one works best for FPS gaming on your PS4 while using your MacBook as a monitor.
MacBooks’ HDMI ports can not output AV signals, so you won’t be able to connect your PS4 to it like you would a TV or projector. Luckily, there’s a workaround.
Let’s get started!
Quick Navigation
Using Remote Play App
While PS4s are primarily used with TVs, they can also be easily connected to a variety of other displays, including your smartphone, Windows laptop, and MacBook. To sweeten the deal, Sony has made it possible to connect your PS4 to these devices wirelessly – no cables needed!
However, before wirelessly connecting your PS4 to your MacBook, ensure your PS4’s Remote Play function is enabled.
Follow the instructions listed below to enable Remote Play on your PS4 and wirelessly connect it to your TV.
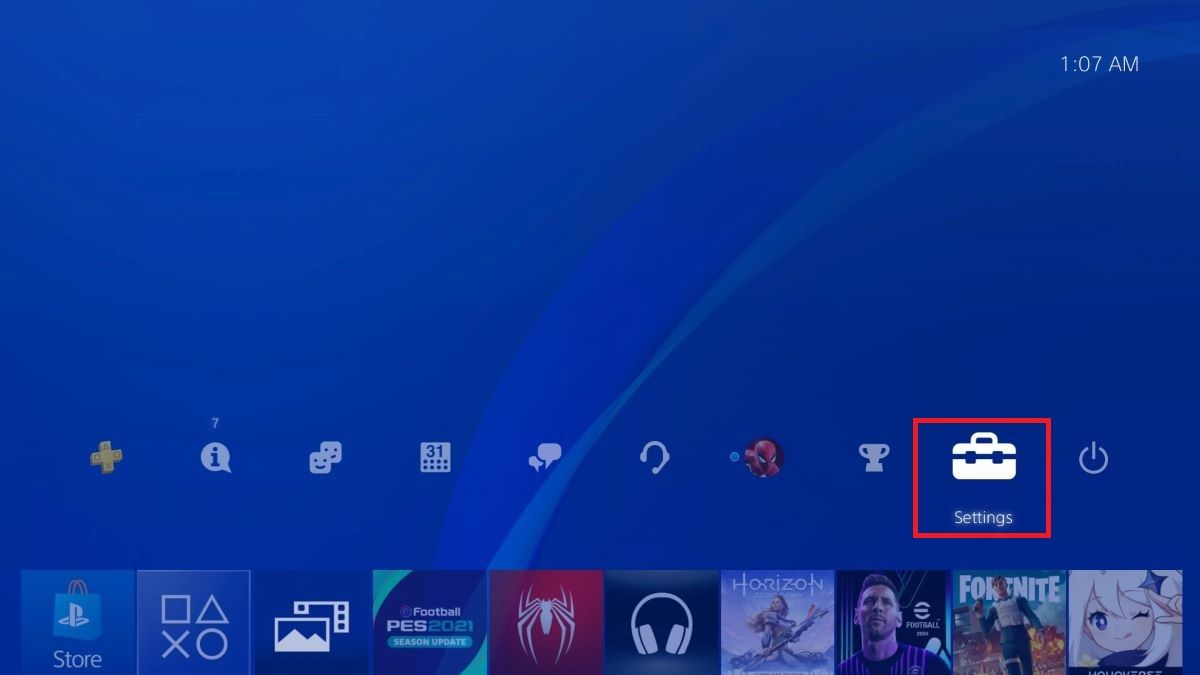
Step 1: On your PS4, head to the Settings menu.
Step 2: Go to Remote Play Connection Settings.

Step 3: Tick the check box beside Enable Remote Play.

Now that Remote Play is enabled on your PS4, you’re ready to set up the connection on your MacBook.
To do so, you must install the PS Remote Play app on your MacBook before linking it to your PS4.
Follow the steps below to learn how.
Step 1: In a browser on your MacBook, navigate to the PlayStation Remote Play download website.
Step 2: Scroll down and tick the Agreement check box before clicking the Download button.

Step 3: Follow the instructions to install the PS Remote Play app on your MacBook. Once installed, launch the app.
Step 4: Press the Share and PS buttons on your PlayStation controller until the LED light flashes white to pair it to your MacBook via Bluetooth.

Step 5: Then, turn your attention to your MacBook. Go to the Apple menu and click on System Preferences.

From here, head to Bluetooth and choose your PS controller (e.g. DUALSHOCK 4 Controller) from the list of devices to connect to it.


Step 6: Now that your PS controller is paired with your Macbook, you can begin using Remote Play. To connect these two devices wirelessly, ensure they’re on the same Wi-Fi network.
Then, launch the PS Remote Play app on your MacBook and sign into the PSN account that’s currently being used on your PS4.

Step 7: Choose PS4.

Step 8: Once you’ve chosen your PS4, the Remote Play app will begin linking to your PS4 console.

Don’t worry if this process takes a while. The app has to verify several components before making a secure connection.

Once your MacBook and PS4 are connected, the setup should look like the one shown below.

With HDMI
While wireless connections can be cleaner and more convenient, they do require a stable internet connection. Otherwise, your MacBook and PS4 could randomly disconnect, quickly putting a stop to any game you were playing.
The process to connect your MacBook and PS4 via HDMI varies depending on which port your MacBook has.
Here, I’ll cover how to connect a PS4 to a MacBook with a USB-A and USB-C port.
MacBook With USB-A Port
On its own, a MacBook can not be used as a display for a PS4. However, when your MacBook is connected to a capture card, this process becomes possible.

Think of capture cards like a USB to HDMI input adapter, since they utilize your MacBook’s USB port to transmit AV signals.
This small, but powerful device, will allow your MacBook to display your PS4’s content and it couldn’t be easier to set up.
You will need the following materials:
- Capture card
- HDMI cable
- OBS software
A quick Google will reveal various capture card options, some high-end and others low-end.
To find out which capture card is right for your gaming needs and see a few of our top recommended capture card brands, check out this article of ours.
Once you’ve found the best capture card for you, follow the steps below to use it to connect your MacBook to your PS4.
Step 1: Plug the capture card into one of your MacBook’s USB ports.

Step 2: Plug one end of your compatible HDMI cable into your PS4’s HDMI port.

Then, connect the other end to the capture card’s Input port.

Step 3: Power and turn on your PS4 before launching the OBS app.
Step 4: On your MacBook, navigate to the Sources tab and right-click on the screen. Then, go to Add followed by Video Capture Device.

Once you’ve completed Step 4, you’ll notice your PS4’s content is visible on your MacBook in the OBS app, as shown below.

If your PS4’s content is not visible on your MacBook and the screen is simply black, ensure the HDMI cable is securely connected to both the capture card and PS4.
MacBook With USB-C Port
If you have a MacBook Pro, you’ve probably noticed it doesn’t come with a standard USB port. Instead, this MacBook model is fitted with several USB-C ports.

Luckily, there’s still a way to connect your MacBook Pro to a PS4 using a USB-C hub. These hubs often have HDMI and USB-A input ports.

While connecting your MacBook Pro to a PS4 does require different tools, it’s very similar to connecting a MacBook with USB-A ports to a PS4.
Follow the steps below to connect your MacBook Pro to a PS4.
Step 1: Connect the USB-C hub to your MacBook’s USB-C port.

Step 2: Then, plug the capture card into one of the USB-C hub’s USB-A ports.

Step 3: Connect one side of your HDMI cable to the PS4 before plugging the other end into the capture card’s HDMI port.
Step 4: Power on your PS4 and launch the OBS app.
Step 5: On your MacBook, go to the Sources tab and right-click your mouse. In the drop-down menu, head to Add and select Video Capture Device.
Now you should be able to see and play your PS4’s games on your MacBook screen.
If you want to play games in fullscreen, right-click anywhere on the screen. Then, navigate to Fullscreen Display before clicking on Display.

Under normal circumstances, this setup should foster a flawless gaming experience. So, if there’s a lot of input lag or an inconsistent FPS, your capture card may be to blame.
Low-end capture cards can cause your setup to glitch or malfunction. Check out our article discussing the ins and outs of capture cards to learn more.
Can You Connect a PS4 To an iMac Using HDMI?
Yes, a PS4 can be connected to an iMac via an HDMI cable.
That said, you’ll need a capture card to achieve a successful setup since iMac’s HDMI ports can not input AV signals.
Thankfully, this process is fairly easy and is similar to the solutions listed above since you can either connect the capture card directly to your iMac’s USB-A port or its USB-C port using a USB-C hub.
Wrapping Things Up
MacBooks have long been admired for their high-resolution screens with envy-worthy contrast levels. So, they’re the perfect display to connect your PS4 to if you don’t have a TV or projector at home.
You can connect your MacBook to a PS4 wirelessly using the Remote Play app or via a wired connection using a capture card. Remember, if your MacBook does not have a USB-A port, you must connect the capture card to it via a USB-C hub.
If you have an iMac, you’re in luck! You can still connect your PS4 to it using one of the methods listed in this article.
What’s your experience connecting a PS4 to a MacBook? Do you prefer a wireless or wired connection?
Let us know in the comments below!

Yesenia Achlim is a technical copywriter and editor with a focus on AV equipment. She aims to break down complicated topics and make technology accessible, no matter your technical expertise. When she’s not teaching you how to replace a projector lamp, you can find her reading and baking.

Tai “Ty” Luu, an Electronics Engineering graduate from Sheridan College, is a passionate technical editor with a deep love for technology and gaming. He constantly seeks new challenges to expand his expertise in the tech and gaming fields.