
How to Connect a Fire TV Stick to a MacBook, Easy-to-Follow Videos & Image Instructions

What To Know
- A Fire TV Stick can be connected to a MacBook using a capture card, even if the MacBook lacks an HDMI port.
- To set up the connection: Connect the Fire TV Stick to a capture card > Plug the capture card’s USB into the MacBook > Use the OBS app for configuration.
- Using a Fire TV Stick on a MacBook is practical for those without a TV, but remember that many streaming platforms are available via browsers without the need for a Firestick.
Fire TV sticks turn any TV into a smart model, and up until recently, you’ve been exclusively using your Fire Stick on your TV. However, since your TV died a few weeks ago, you’ve been unable to watch your favorite Fire TV-exclusive streaming apps.
Then, a crazy, wonderous thought occurs to you: can you use a Fire TV Stick with a MacBook? And if so, should you?
Keep reading to find out!
Prefer Visuals? Check Out the Video Version Here!

Quick Navigation
Can I Connect My Fire TV Stick to a MacBook? If Possible, Should I?
Yes, you can connect your Fire TV Stick to any laptop, including MacBooks.
However, whether or not it’s advisable to do so depends on your specific situation, as it’s always recommended to use a Fire TV Stick on a TV.
If you live in student housing with limited space or a tight budget that prevents you from purchasing a TV, using your Fire TV Stick on your MacBook is an effective way to watch your favorite streaming platforms.
Remember, streaming websites like Netflix and Hulu are accessible on web browsers, so you don’t need a Fire TV Stick to watch them. However, if you want to watch other streaming platforms and apps that can’t be accessed with a web browser, it’s a good idea to connect your Fire TV Stick to your MacBook.
You can set up this connection anywhere and at any time using only a few portable tools that are light enough to fit in your backpack and take on the go. Naturally, you will need a MacBook, Fire TV Stick, any necessary power cables, and a capture card.
But, if you’re going on a vacation and staying in a hotel or Airbnb with an HDMI-compatible TV, it’s best to simply connect your Fire TV Stick to the TV. Not only is this easier as you won’t need a capture card to do so, but it also facilitates a better viewing experience since you can watch shows on a big screen.
How to Connect Your Fire TV Stick to a MacBook
A MacBook’s HDMI port is HDMI OUT, meaning it can natively only output content to a display (e.g. monitor, TV, projector). On the other hand, Fire TV Sticks must be plugged into an HDMI IN port.
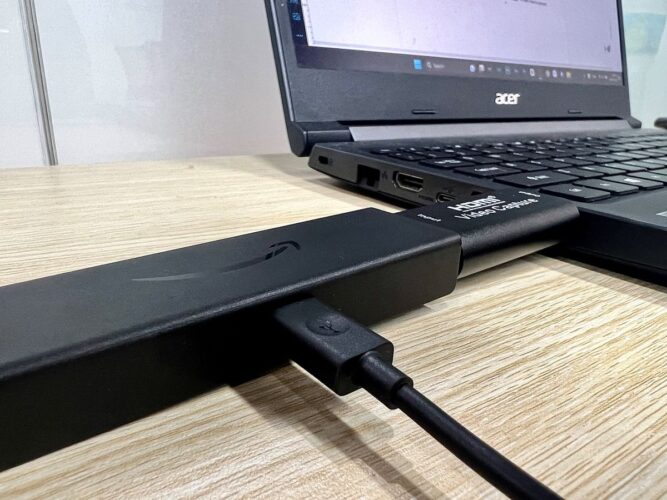
So, you’ll need a capture card to view a Fire TV Stick’s content on your MacBook.
A capture card is a small, portable device that can connect your Fire TV Stick to laptop. It captures your input device’s video signals, encodes them into the format that allows them to be streamed on your laptop. Capture cards can also record a source device’s content, allowing you to watch it later.
While some capture cards are fitted into your PC, others can simply be plugged into your laptop’s USB port, allowing you to watch an HDMI-compatible source device’s content on a non-HDMI-compatible display.
To learn more about capture cards, check out Make Use Of’s informative article What Is a Capture Card and How Does It Work?
Since Fire TV Sticks use HDMI, we recommend investing in a budget-friendly HDMI Video Capture device , as shown in the video tutorial below.
While this process is somewhat lengthy, it’s not overly complicated.
Follow the steps below to connect your Fire TV Stick to a MacBook.
Step 1: Connect your Fire TV Stick to power. While you can use one of your computer’s USB ports as a power source, it’s usually recommended to connect it to a wall outlet instead. Then, ensure your MacBook is turned on and sufficiently charged.
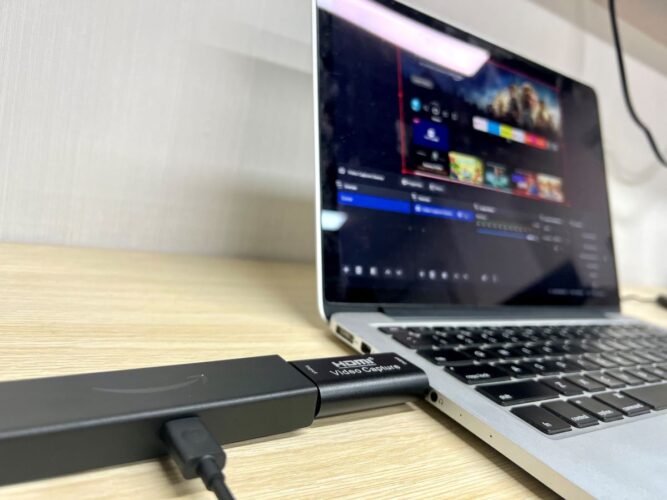
Step 2: Plug your Fire TV Stick’s HDMI connector into the capture card’s HDMI port.
Step 3: Connect the capture card’s USB connector to one of your MacBook’s USB ports.
Step 4: Now we need to program the capture card. On your MacBook, open a web browser and navigate to OBS Project.
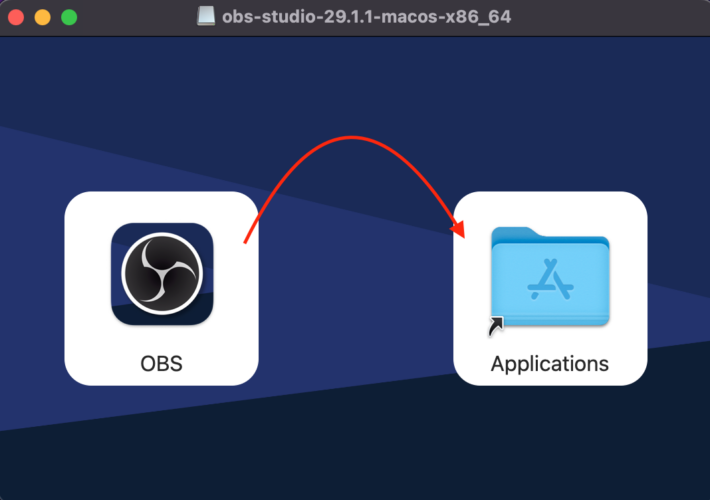
Step 5: Click on the macOS download option or install it in this link. You’ll notice that the necessary software immediately begins to download onto your computer. Once downloaded, click on the file to open it.
Step 6: In the pop-up window, drag and drop the OBS icon into the Applications folder. If you see an OBS file on your desktop, feel free to move it to the Bin/Trash.
Step 7: Press your MacBook’s F4 key to open the Launchpad before opening the OBS app. When asked if you’re sure you want to open the app, click on Open.
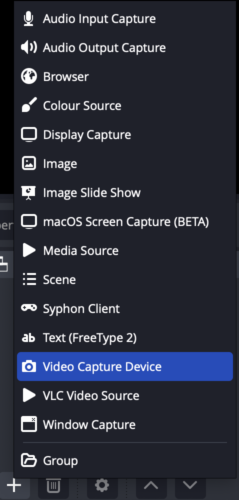
Step 8: Make the OBS app full-screen and click on the + icon at the bottom of the screen.
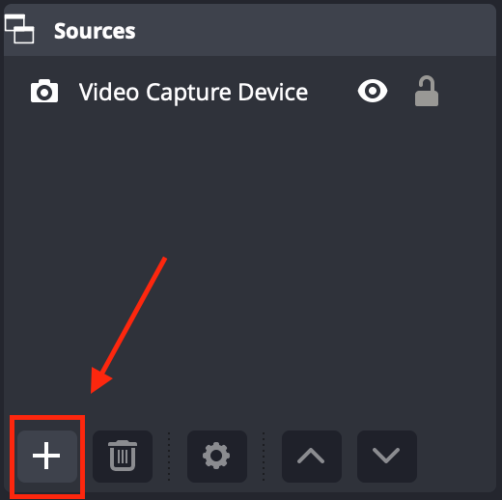
Step 9: Select Video Capture Device from the drop-down menu.
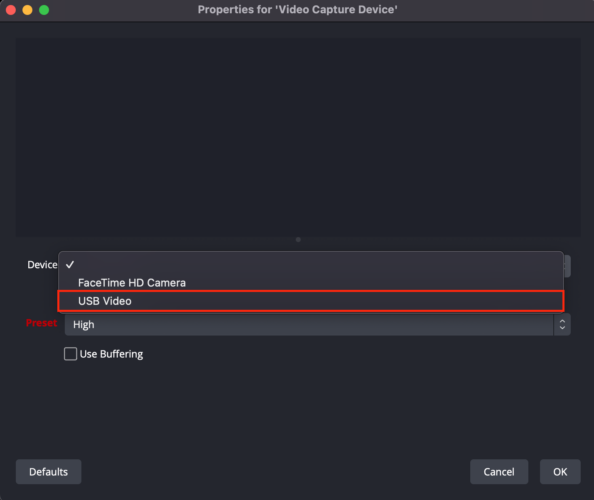
Step 10: In the pop-up window, name your device (optional) and click OK.
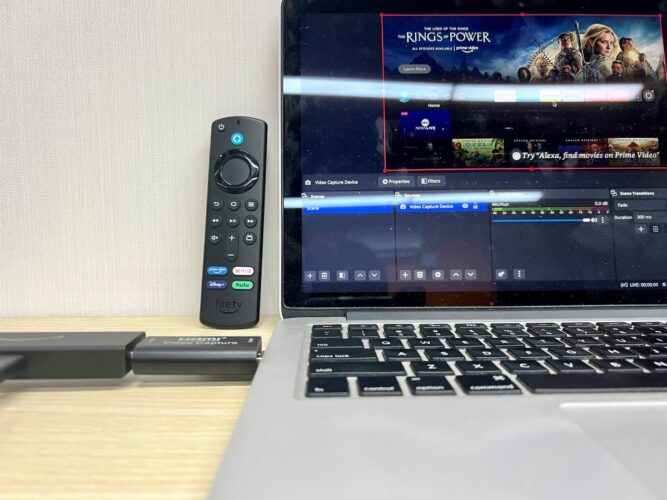
Step 11: Click on the drop-down menu beside Device and choose USB Video from the list. You should immediately be able to see your Fire TV Stick’s home screen in the window. But, if you don’t, double-check if the capture card is securely plugged into the laptop’s USB port.
Step 12: To adjust your Fire TV Screen’s window, drag the corners outwards. Then, long-press your keyboard’s Shift key before using your mouse to drag the bottom of the window downwards. Now your Fire TV Stick’s screen should fill the entire window.
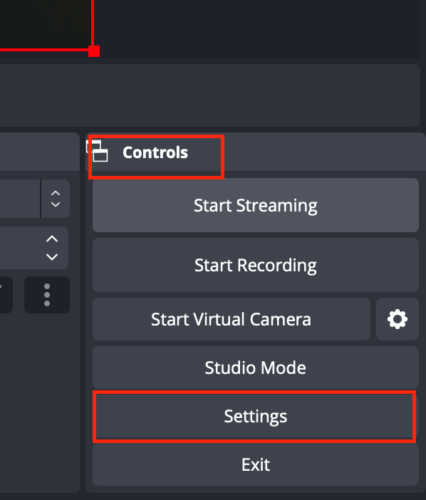
Step 13: Under Controls, select Settings.
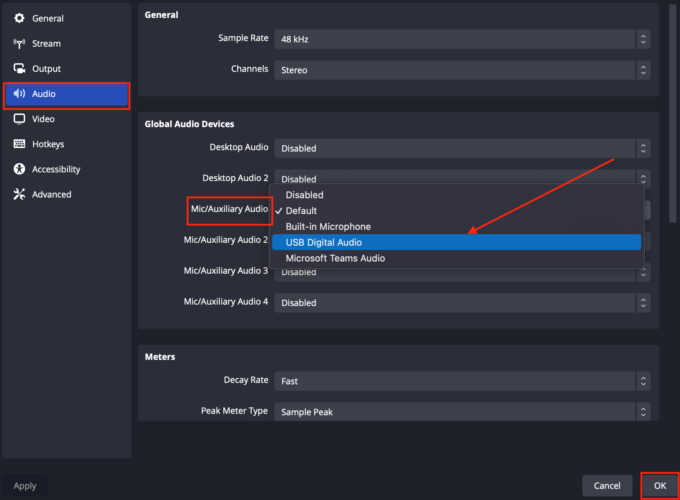
Step 14: Select Audio from the left-hand menu.
Step 15: Click on the drop-down menu next to Mic/Auxiliary Audio and choose USB Digital Audio from the list.
Step 16: Then, under Advanced change the Monitoring Device to Built-in Output.
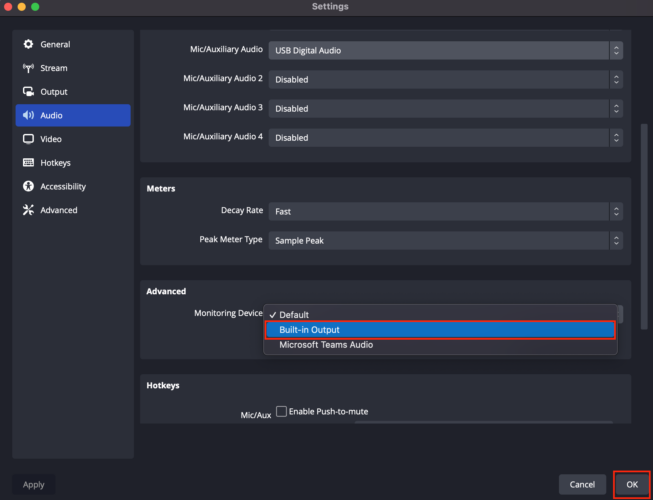
Step 17: Select Apply to save your changes before clicking OK.
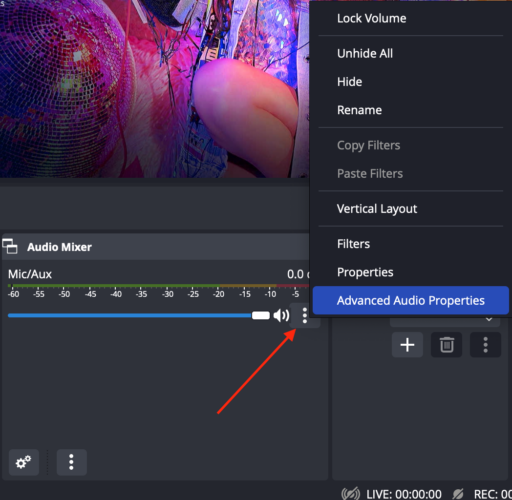
Step 18: Now, find the Audio Mixer section at the bottom of your screen and click on the Gear icon to open the settings.
Step 19: Select Advanced Audio Properties from the drop-down menu.
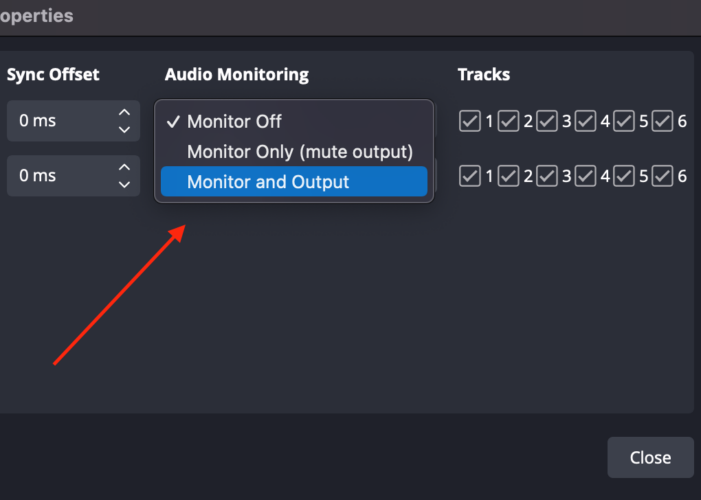
Step 20: Adjust Audio Monitoring to Monitor and Output. Then, click Close.
Step 21: Finally, you need to make your Fire TV Stick full-screen by right-clicking on the gray border around the Fire TV Stick window. In the drop-down menu, hover your mouse over Fullscreen Projector (Preview) and select the option that appears beside it.
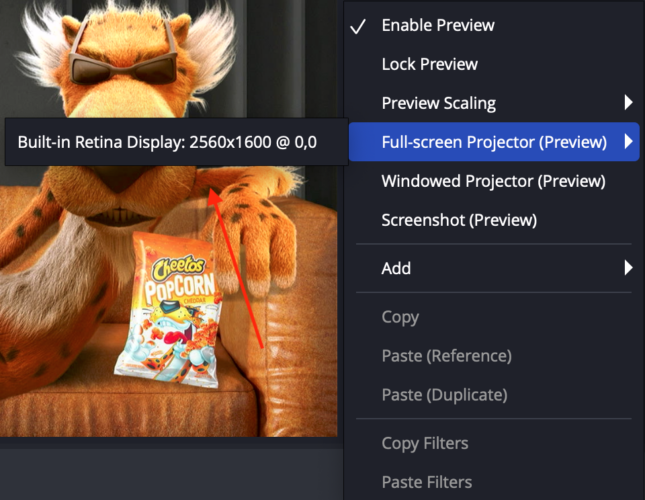
Now you can watch and browse your Fire TV Stick on your MacBook!
Bonus: How to Connect Your Fire TV to a Laptop
If you’re curious about how to connect a Fire TV Stick to a Windows laptop, head over to our other article Can You Use a Fire Stick on a Laptop? for an in-depth guide on how to do so.
It includes helpful tips on connecting a Fire TV Stick to both HDMI-compatible and non-HDMI-compatible laptops.
Wrapping Things Up
There are no ifs, ands, or buts about it, you can use a Fire TV Stick on any MacBook, regardless of if it has an HDMI port or not.
The only additional equipment you’ll need is an HDMI video capture card, which is as convenient as it is easy to use!
You’ll also need to install the free OBS app and alter a few settings to program the capture card to your MacBook.
Remember to check that your Fire TV Stick is correctly powered, as it won’t work otherwise.
Now you’re ready to watch your Fire TV Stick anywhere you wish, even if you don’t have a TV.
What’s your experience using a Fire TV Stick on a MacBook? Did you know that Fire TV Sticks could even be used with a laptop?
Let us know in the comments below!

Yesenia Achlim is a technical copywriter and editor with a focus on AV equipment. She aims to break down complicated topics and make technology accessible, no matter your technical expertise. When she’s not teaching you how to replace a projector lamp, you can find her reading and baking.

Duy Anh is a seasoned technical editor specializing in helping readers troubleshoot TV, projector, and Wi-Fi issues. He’s always been drawn to logical problem-solving. His ability to approach matters from various angles with a neutral mindset enhances his technical expertise.
Hi, thank you for this article. Can I download a VPN onto my Firestick using my Macbook (and not using a TV)?
@Mary, I’m managed to sort this out myself.
I just bought a Firestick and first need to link it to my amazon account. I need a TV to link it, but can I instead use the method you explained above to link it to my amazon account?
That is, when I connect the Firestick as you explained above, will I see the code that is required to link the Firestick to my account?
Thank you
@Mary, I’ve managed to sort this myself as well.
I’ve done everything successfully it’s just the volume that doesn’t work. Any suggestions?
Hi
Followed all instruction but still not showing my firestick, screen on mac is still black?
I have an video capture plugged into mac and then firestick plugged into video capture following all instructions and still nothing. any ideas?
Thanks
Julia