
How to Program Your Roku Remote for TV Volume Control

- Roku remotes come in two types: a simple remote without volume & power buttons and a voice remote that can control TV volume and features a built-in microphone.
- To control TV volume with a Roku voice remote: Settings > Remotes & Devices > Remotes > Select your Voice Remote > Set up remote for TV > IR setup > Follow the on-screen instructions.
- If your Roku remote lacks volume controls, install the Roku Mobile app for voice commands and volume control, or consider purchasing a Roku Voice Remote or a Sideclick Universal Remote as alternatives.
If you’ve got a Roku, you may want to seamlessly control your TV volume with it.
This article will help you understand the different Roku remote types, get step-by-step instructions on how to set up your Roku remote for TV volume control, and explore options if your remote doesn’t have volume buttons.
Let’s delve into and elevate your convenience with simplified remote functionalities.
Quick Navigation
Why Doesn’t My Roku Remote Have Volume and Power Buttons?
Before we dive into the details, it’s important to understand that there are two types of Roku remotes: the Roku voice remote and the Roku simple remote.
The Roku simple remote, as the name suggests, focuses on simplicity by eliminating the volume and power buttons and prioritizing the essentials.
Powered by infrared (IR) technology, the simple remote requires you to point it directly at your Roku device when using these specific functions.
It usually comes with older Roku devices like the Roku Express, Roku Premier, and some older Roku models.
On the other hand, we have the game-changing Roku voice remote. This remote connects to your TV via a wireless network, allowing you to point it anywhere to control your Roku.
Not only does it grant you the power to control your TV’s volume and power, but it also introduces an innovative addition—a built-in microphone. This microphone enables you to control your Roku with effortless and hands-free commands.
However, to use the volume and power control features on the Roku voice remote, you need to set it up first. We’ll discuss this further in the next section.
How to Know If My Roku Device Comes With a Voice Remote?

To determine whether your Roku device comes with a voice remote, you can try one of the following methods:
- Quickly check if your Roku remote has the Mic or Magnifying Glass button.
- Select your Roku device from a Roku comparison table to see if it comes with a voice remote.
- Read the user manual for your Roku device.
How to Set up (Program) a Roku Remote to Control the TV Volume?
If you haven’t paired your voice remote with your Roku device yet, follow the below instructions to set it up.
Step 1: Press and hold the Pairing button on the back of the remote for 5 seconds or until the light starts blinking.
Step 2: Go to Settings on your Roku device and navigate to Remotes & Devices.

Step 3: Choose Remotes and select your Voice Remote.
Step 4: In the Set up remote for TV control section, choose IR setup, and follow the on-screen instructions to complete the setup process.

After completing these steps, you should be able to control the TV volume and power using your Roku voice remote.
Can I Purchase a Roku Voice Remote for My Old Roku Device?
Yes and no. The Roku voice remote is compatible with most Roku devices, but not all of them.
The very first requirement is that your Roku device needs to run the Roku OS 9.4 or higher (to be able to use the voice command). Here is how to check.
Step 1: Go to Settings on your Roku device and navigate to System.
Step 2: Select About and look for the Software version information.

If your Roku device is running Roku OS 9.4 or higher, it is compatible with the voice remote. If your device is not up to date, you can update it by following these steps:
Step 1: Go to Settings on your Roku device and navigate to System.
Step 2: Head to Software update and select Check now to see if any updates are available.

Here are some Roku devices that are compatible with the Roku voice remote:
- Roku Express: 3900, 3930
- Roku Express 4K: 3940
- Roku Premiere: 3920, 4620
- Roku 2: 4210
- Roku 3: 4200, 4230
- Roku 4: 4400
Please note that even if your Roku device comes with a simple remote, you can still pair and control it with a voice remote if it’s one of the above Roku players.
Pro tip: You can test whether or not your Roku device is compatible with the Roku voice remote by installing the Roku Mobile app (the #1 method in the next section) and trying to use the voice feature on the app.
Alternative Ways to Control the TV Volume
1. Use the Roku Mobile App
The Roku Mobile app serves as a handy alternative for controlling your Roku device and managing your TV volume.
To utilize this option, ensure that your Roku device is running Roku OS 6.2 or later and that your smartphone meets the requirements (Android OS 5.0 or higher, or iOS 11.0 or higher).
Follow these steps to set up and use the Roku Mobile app:
Step 1: Visit your smartphone’s app store, search for the Roku Mobile app (available for both Android and iOS), and install it.
Step 2: Connect both your Roku device and smartphone to the same Wi-Fi network.
Step 3: Sign in to your Roku account within the Roku Mobile app, and it will automatically detect your Roku device on the network (allow the app to do so).
Step 4: Once your Roku device is connected, navigate to the Remote tab in the app.

Step 5: Press the Microphone (Mic) icon within the app to activate the voice command feature.
![]()
Step 6: Use voice commands to control the volume by simply speaking your desired adjustments.
While the Roku Mobile app allows voice commands, changing the volume through the app may not be possible for some users (as we experienced with our Roku Express 4K+).
You can give it a try because at least if you can control the Roku device using the app’s voice feature, you can know that your Roku supports a Roku voice remote.
Alternatively, you can make use of the headphone feature of the Roku Mobile app to control the volume indirectly.
Step 1: In the Remote tab, press the Headphone icon. Now, the TV will output audio through your phone.
![]()
Step 2: Connect a pair of headphones to your smartphone, and adjust the volume on your phone to change the TV volume.
With these alternative methods, you can easily control the TV volume even if your Roku remote lacks volume buttons or if you prefer additional control options.
2. Purchase a Roku Voice Remote

- Easy voice search & control: Quickly search across thousands of top channels, play entertainment,...
- No more juggling remotes: Power up your TV, adjust the volume, control your Roku device, switch...
- Pre-set channel shortcuts: Pre-set channel shortcuts let you launch popular streaming channels with...
Last update on 2024-07-18 / Paid Link.
Check if your Roku device supports the voice remote by using the method mentioned above. Once confirmed, consider purchasing a Roku Voice Remote.
This remote offers the convenience of both the volume button and the voice feature for adjusting your TV volume. With the voice feature, you can simply speak commands to control the volume effortlessly.
3. Purchase a Sideclick Universal Remote (for Roku Players)
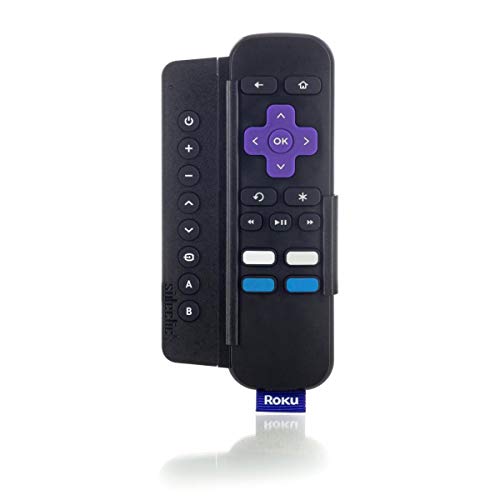
- Slim universal remote attachment for Roku streaming player
- Control the basic functions of your tv, receiver, sound bar, blu ray and Roku all-in-one
- Easy to program. Must have your original device remote to program Sideclick
Last update on 2024-07-18 / Paid Link.
Another option is the Sideclick Universal Remote for Roku Streaming Player.
This versatile remote can control all functions of your Roku device and even some basic functions of your TV, receiver, sound bar, and Blu-ray player.
It provides a comprehensive solution for managing multiple devices with a single remote.
Wrapping Things Up
In a nutshell, if you find yourself in a situation where your Roku remote lacks volume and power buttons, there are a few explanations.
The Roku simple remote is designed to prioritize simplicity, omitting these buttons for a streamlined experience. This remote operates using infrared (IR) technology, requiring direct pointing at the Roku device for volume and power control.
On the other hand, the game-changing Roku voice remote offers wireless connectivity and features a built-in microphone for effortless and hands-free control of both your Roku and TV.
To use the voice control feature, you need to set up the remote by following the instructions provided. While the Roku voice remote is compatible with most Roku devices, ensure your device runs Roku OS 9.4 or higher.
If you need alternative ways to control your TV volume, consider purchasing a Roku Voice Remote, a Sideclick Universal Remote for Roku Players, or using the Roku Mobile app, which provides additional control options.
Explore these alternatives based on your specific needs and preferences.

Yesenia Achlim is a technical copywriter and editor with a focus on AV equipment. She aims to break down complicated topics and make technology accessible, no matter your technical expertise. When she’s not teaching you how to replace a projector lamp, you can find her reading and baking.

Duy Anh is a seasoned technical editor specializing in helping readers troubleshoot TV, projector, and Wi-Fi issues. He’s always been drawn to logical problem-solving. His ability to approach matters from various angles with a neutral mindset enhances his technical expertise.