
6 Effective Ways to Stop HDMI Flickering on Your TV or Monitor

What To Know
- Ensure a secure HDMI connection and consider replacing the HDMI cable if flickering persists.
- Use alternative ports on your TV or monitor (like USB-C, DisplayPort, VGA, or DVI) or adapters if HDMI flickering occurs, especially when the HDMI port is suspected to be faulty.
- Try updating or reinstalling your laptop’s drivers and adjusting the display’s refresh rate to match your computer’s settings.
Dealing with HDMI flickering can be a real headache, whether it’s from a bad cable or an incompatible setup.
In this guide, I’ll tackle the common culprits behind this pesky problem and provide straightforward solutions to get your screen stable and clear.
Quick Navigation
Before diving into solutions for HDMI flickering, it’s crucial to ensure a couple of things:
- Verify that the flickering isn’t originating from the video or movie itself.
- Ensure that all devices are not overheating. Electronics that overheat can lead to various problems, including screen flickering. If possible, let them cool down.
1. Make Sure That the Connection Is Secure
A common and straightforward solution is to check your HDMI connection: Jiggle the HDMI cable at both ends and firmly push them into the ports.
A loose connection can often cause flickering. I’ve personally experienced flickering when the cable was loosely connected to my laptop’s HDMI port. Sometimes, unplugging and firmly replugging the cable can stabilize the image.
2. Replace the HDMI Cable
Often, a broken HDMI cable is the culprit. Replacing it is a simple yet effective solution.
Moreover, I faced issues when using a standard HDMI 1.4 cable with my 4K monitor at 144 Hz. This is because the HDMI 1.4 bandwidth is only enough for 4K resolution at 30 Hz.
Meanwhile, a new HDMI cable with the best features nowadays only costs you a few bucks. Also, investing in a new HDMI cable is worthwhile for an enhanced viewing experience.
Here are three HDMI cables I recommend:
3. Use the Other Ports of Your TV or Monitor

For TVs
If other HDMI ports don’t work, TVs usually offer additional ports like composite, component, S-video, VGA, DVI, and SCART.
If you’re unsure how to connect an HDMI device to your TV without an HDMI port, we have an article that can guide you.
For Monitors
Monitors often provide alternative connection options such as USB-C or DisplayPort.
If you’re considering using DisplayPort, we have an article outlining 5 easy steps to connect an HDMI device to a DisplayPort.
For USB-C ports, typically, your PC or laptop will also have a USB-C port, allowing for a direct connection using a USB-C cable.
4. Use the Laptop’s Other Ports

If the HDMI port on your laptop or PC is the suspected cause of screen flickering, consider using an alternative port.
For monitor connections, USB-C or DisplayPort are good options, and for TV connections, VGA or DVI can be used.
In cases where your TV only supports HDMI, adapters are necessary. Here are a couple of adapter options:
Connecting two devices using an adapter is straightforward.
Connecting devices using an adapter is simple. First, ensure all devices, including the adapter, have a stable power source. Then, plug in the cables correspondingly.
For instance, with an HDMI to RCA adapter, connect the HDMI end to an output port (like your laptop’s), and the RCA end to an RCA input port on your TV.
HDMI to RCA adapter means it will help convert HDMI signals from your PC/laptop to RCA signals for your TV.
5. Reinstall or Update Your Laptop’s Driver
Sometimes, faulty or outdated drivers can cause screen flickering. Reinstalling or updating them can often resolve the issue.
On Windows
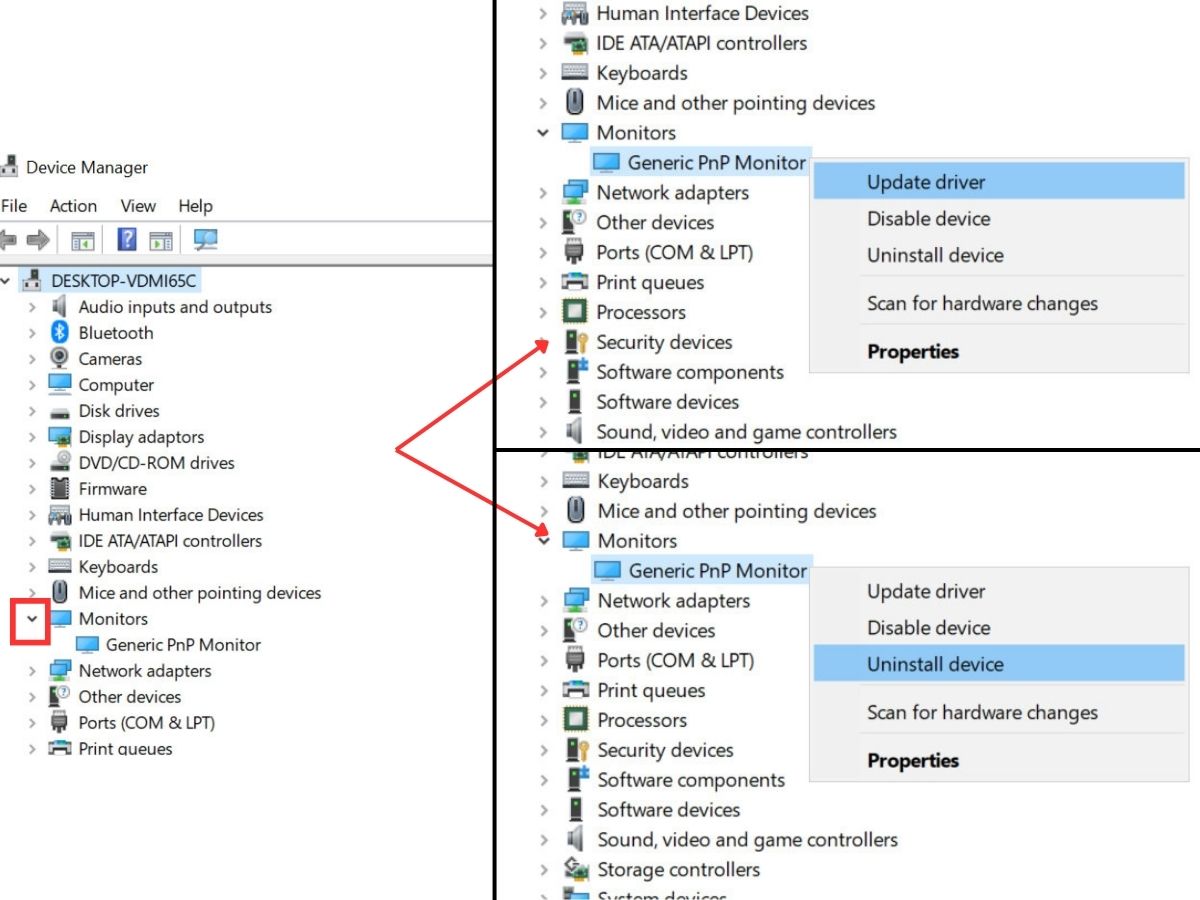
Step 1: Press the Windows button, and type “Device Manager” into the search bar.

Step 2: Click the arrow button on the left of Monitor before right-clicking your monitor to choose Update driver or Uninstall driver. If you choose to uninstall, restart your computer after that.
On macOS
Since driver updates aren’t a thing on macOS, try updating the software instead.
Step 1: Open the Apple menu, and go to System Preferences.

Step 2: Navigate to Software Update.

Step 3: Select Update Now if there is any update available.

6. Change the Display’s Refresh Rate
Another common reason for display issues could be a mismatch in refresh rates between your computer and the display.
Tweaking the refresh rate settings might just be the fix you need.
On Windows
Step 1: Press the Windows button, and go to Settings.

Step 2: Navigate to System > Display, then select Advanced display or Advanced display settings.

Step 3: For the monitor/TV connected to your PC/laptop, open the Refresh Rate list and test each option to find the rate that stops the flickering.

On macOS
Step 1: Open the Apple menu, and go to System Preferences.
Step 2: Select Display.

Step 3: Go to Display Settings.

Step 4: Choose your TV, and set Use as: to Extended display.

Step 5: Click the Refresh Rate drop-down menu, and lower the refresh rate gradually until the flickering stops.

Bonus: Quick Test to Identify Whether the HDMI Port or Cable Is Faulty
Got a flickering screen and not sure whether it’s the HDMI port, the cable, or your TV at fault?
Here’s a quick test you can perform using two HDMI cables, two devices with HDMI output ports (like a laptop and a Roku Express 4K+), and a TV.
Make sure at least one of the HDMI cables is known to work properly.
In my situation, I’m certain that my second HDMI cable is in good condition, but I’m unsure if the issue lies with the HDMI cable, the TV, or one of the HDMI devices.
Let’s break down the test.
Step 1: Plug the first HDMI cable into the HDMI ports of the laptop and TV.
Possible scenarios:
- If flickering occurs, the issue is with one of the three – the HDMI cable, the laptop, or the TV. The Roku is fine.
- If there’s no flickering, the problem likely lies with the Roku’s HDMI port.
If you’re in the first situation (which needs to identify whether HDMI cable, laptop, or TV is faulty), continue to step 2.
Step 2: Now, connect the first HDMI cable between the Roku (which worked fine in step 1) and the TV.
Possible scenarios:
- If flickering happens, the HDMI cable or the TV is faulty. The Roku and laptop are okay.
- If there’s no flickering, the problem is surely with the laptop.
If you’re in the first situation (which needs to identify whether HDMI cable or TV is corrupted), continue to step 3.
Step 3: Connect the second HDMI cable (the one you know works well) to the laptop and TV.
Possible scenarios:
- If flickering still occurs, the issue is with the TV.
- If there’s no flickering, the first HDMI cable is the culprit.
Through this process, you can systematically identify the source of the flickering issue – whether it’s the HDMI cable, one of the devices, or the TV itself.
Knowing the exact faulty component allows you to focus on the right solution, saving you time and potentially unnecessary expenses.

Duy Anh is a seasoned technical editor specializing in helping readers troubleshoot TV, projector, and Wi-Fi issues. He’s always been drawn to logical problem-solving. His ability to approach matters from various angles with a neutral mindset enhances his technical expertise.