
How To Connect a Roku Player to a TV Without the HDMI Port?

What To Know
- To connect Roku to TVs without HDMI, various adapters are required depending on the type of port available on the TV—composite, component, S-Video, VGA, DVI, or SCART.
This guide walks you through using the right adapter to bridge the gap between digital and analog, allowing your Roku to communicate with older TV models via composite, component, S-Video, VGA, DVI, or SCART connections.
Ready to get your stream on? Let’s roll out the details.
Quick Navigation
Quick Guide
| TV Port | Materials | Setup Instructions |
| Composite |
|
Roku → HDMI Cable (If applicable) → HDMI to Composite Adapter → Composite Cables → TV |
| Component |
|
Roku → HDMI Cable (If applicable) → HDMI to Component Adapter → Component Cables → TV |
| S-Video |
|
|
| VGA |
|
|
| DVI |
|
|
| SCART |
|
Roku → HDMI Cable (If
Applicable) → HDMI to SCART Adapter → SCART Cable (If applicable) → TV |
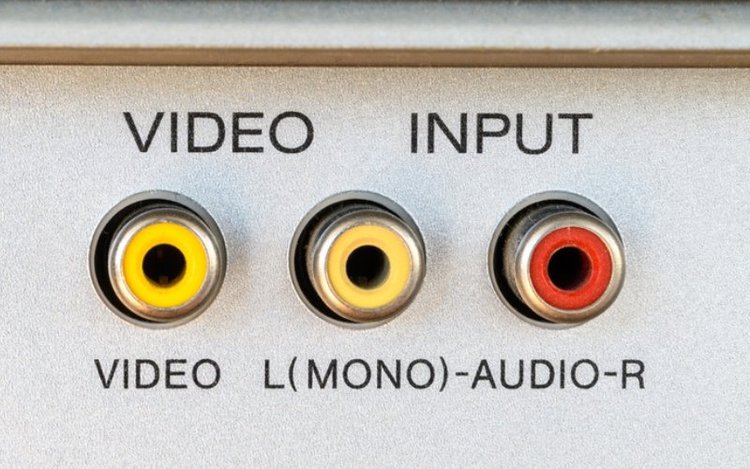
1. TV With Composite Ports
Materials:
- HDMI to Composite Adapter
- Composite Cable
- HDMI Cable (If applicable)
- Power cable for the adapter (The type of cable will depend on your adapter)
Instructions:
Step 1: Plug one end of the provided power cable into the adapter’s Power port. Then, plug the other end into a wall outlet. If the cable is USB, you will need to use a USB power adapter for this step.
Step 2: Then, connect the Roku to power with the included power cable.
Step 3: Now, connect the Roku to the adapter’s HDMI port. Roku sticks can be plugged directly into the adapter using their HDMI connector, while other Roku devices must be connected via an HDMI cable.
Step 4: Plug the adapter’s composite cables into your TV’s composite ports. Ensure you connect each of the color-coded composite cables to their respectively colored ports and check that they’re securely plugged in.
Step 5: Adjust your TV’s input to Composite. It may take a few seconds for the Roku logo to pop up on-screen.
Watch the video below demonstrating how to connect your Roku player to a TV’s composite ports.

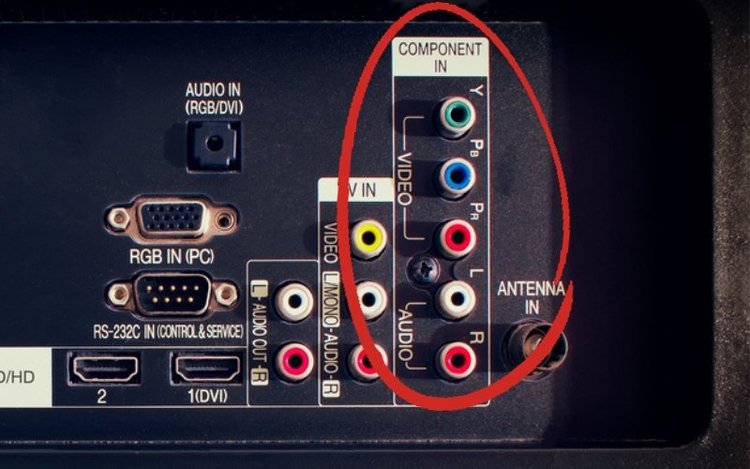
2. TV With Component Ports
Materials:
- HDMI to Component Adapter
- Component Cable
- HDMI Cable (If applicable)
- Power cable for the adapter (The type of cable will depend on your adapter)
Instructions
Step 1: Connect the adapter to power with its included power cable.
While some USB-compatible power cables can be plugged into a TV’s USB port, we recommend plugging it into a wall outlet with a USB power adapter for the best results.
Step 2: Now, connect the Roku to power with its micro USB cable. For best results, plug the Roku into a wall outlet with a USB power adapter.
Step 3: Plug the Roku into the adapter’s HDMI port, ensuring it’s secure. If your Roku must be connected with an HDMI cable, also ensure it’s correctly plugged into the Roku device.
Step 4: Like composite cables, component cables are also color-coded and must be plugged into ports of the same color. Find the red component cable labeled video and then plug it into the adapter’s Pr port.
Then, find the other red cable labeled audio and connect it to the adapter’s R port. The adapter will not work if you plug the red cables into their wrong ports, so double-check that you’ve set them up correctly.
Next, plug the other cables into the adapter ports of their corresponding colors.
Step 5: Now you’re ready to connect the adapter to your TV. Plug the other ends of the component cables into your TV’s component ports, ensuring they’re plugged into their respectively colored ports.
Step 6: Finally, change your TV’s input to Component to display the Roku logo on-screen.
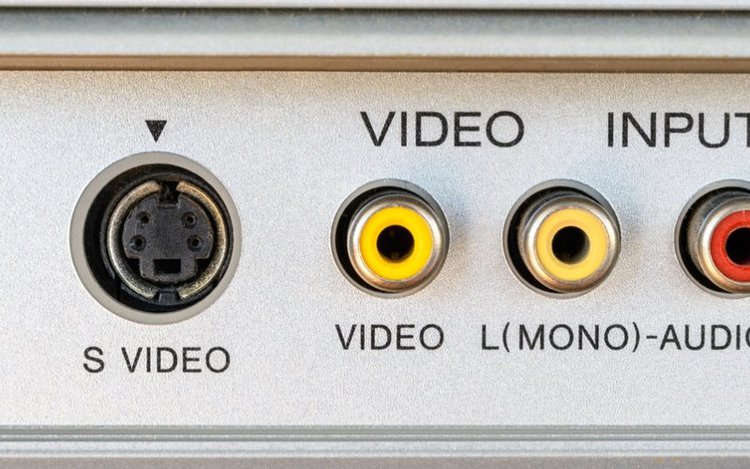
3. TV With an S-Video Port
Materials:
- HDMI to S-Video Adapter
- S-Video Cable
- RCA Audio Cable
- HDMI Cable (If applicable)
- Power cable for the adapter (The type of cable will depend on your adapter)
Instructions:
Step 1: Power your HDMI to S-Video adapter by plugging one end of its power cable into the adapter’s Power port. Then, plug the other end into a working wall outlet.
Step 2: Plug the Roku into a wall outlet or your TV’s powered USB port.
Step 3: Attach the Roku’s HDMI connector or cable to the adapter’s HDMI port. If using an HDMI cable, ensure it’s also securely attached to the Roku’s HDMI port.
Step 4: To connect your adapter to your TV, plug one end of an S-Video cable into the adapter’s S-Video port and then connect the other end to your TV’s S-Video port.
S-Video cables have uneven pins that must be correctly aligned with the port’s pinholes. So, take some time to ensure they’re properly aligned before using minimal force to plug it in.
Step 5: Some adapters, like the one linked above, have multiple output ports that each support a different cable. If this is the case for your adapter, flip its output switch to S-Video.
Step 6: Since S-Video cables only support video, you must also use RCA cables to transmit audio. Plug the red and white RCA cables into the TV and adapter’s corresponding colored ports.
Step 7: Lastly, change your TV’s input to S-Video.
Watch the video below demonstrating how to use an HDMI to S-Video adapter to connect a Roku to a non-HDMI-compatible TV.

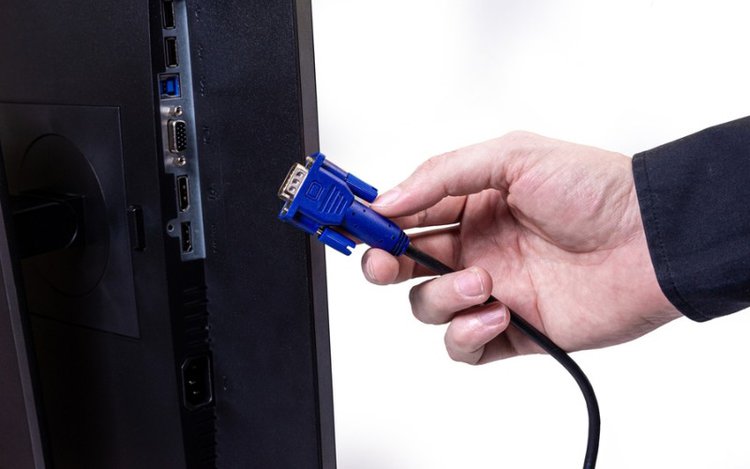
4. TV With a VGA Port
Please note that a TV’s VGA port may also be labeled D-sub or PC input. So, if you can’t find VGA listed in your TV’s inputs, try looking for these labels instead.
Materials:
- HDMI to VGA Converter with Audio
- VGA Cable
- HDMI Cable (If applicable)
- AUX cable (If your speakers do not have a built-in cable)
- Power cable for the adapter (The type of cable will depend on your adapter)
Instructions:
Step 1: Plug the adapter into power. The HDMI to VGA adapter linked above uses a DC IN power cable, though other adapters may use a USB-C or micro USB cable instead.
Step 2: Rokus must be powered, so ensure yours is plugged into a stable power source with its micro USB cable.
Step 3: If your Roku does not have an attached HDMI connector, plug one end of an HDMI cable into its HDMI port before plugging the other end into your adapter’s HDMI port.
Roku streaming sticks can be plugged directly into the adapter. You may also use an HDMI extender if it’s difficult to plug your streaming stick directly into the adapter’s HDMI port.
Step 4: Now, it’s time to connect your VGA cable to your adapter. Line up its pins with the port’s pin holes before screwing it in place using its two screws. Ensure it’s firmly screwed in place so that each pin is in contact with its respective pinhole.
Step 5: VGA cables can only be plugged into TVs that are turned off. Failing to do so can damage both your TV and VGA cable.
Once you’ve ensured your TV is off, plug the other end of the VGA cable into your TV’s VGA port and screw it in place so that the cable’s connector is flush with the port.
Step 6: Like S-Video, VGA only transmits video. So, you will need to use speakers to hear your Roku’s content.
Plug the speaker’s AUX cable into the adapter’s Audio port. If your speaker does not have a connected AUX/3.5 mm cable, then you will need to connect one to it before plugging it into your adapter.
If your speaker needs to be powered, ensure it’s connected to a wall outlet.
Step 7: Then, use the Input/Source button on your remote to change the TV’s input toVGA, D-sub, or PC input, depending on your TV.
5. TV With a DVI Port
Materials:
- HDMI to DVI Adapter with Audio
- DVI-I cable or DVI-D cable (Check your TV if you need DVI-I or DVI-D, the adapter supports both DVI variants)
- HDMI Cable
- AUX cable (If your speakers do not have a built-in cable)
- Power cable for the adapter (The type of cable will depend on your adapter)

Instructions:
Step 1: Power your HDMI to DVI adapter using the provided power cable. Ensure that the adapter is sufficiently powered by plugging it into a wall outlet.
Step 2: Plug the Roku into a wall outlet with a USB power adapter or your TV’s sufficiently powered USB port.
Step 3: Connect the Roku’s HDMI connector or cable to the adapter’s HDMI port. Now is also an excellent time to check that your cable is in good condition, as damaged cables will be unable to transmit high-quality video and sound.
Step 4: Like VGA cables, DVI cables also have screws that must be tightened in place. So, line up both sides of your DVI cable with the TV and adapter’s ports before tightening the screws.
If the cable isn’t working, double-check that the screws are sufficiently tightened and that the cable’s pins are lined up with the ports’ pinholes.
Step 5: Since DVI does not support audio, you will need to use wired speakers to complete your setup.
Plug one end of an AUX/3.5 mm cable into your speakers and then connect the other end to the adapter’s Audio port. If your speakers have an AUX cable attached, you can plug it directly into the adapter.
If needed, plug your speaker into power.
Step 6: Adjust your TV’s input to DVI using the Input/Source button found on the remote or TV control panel.
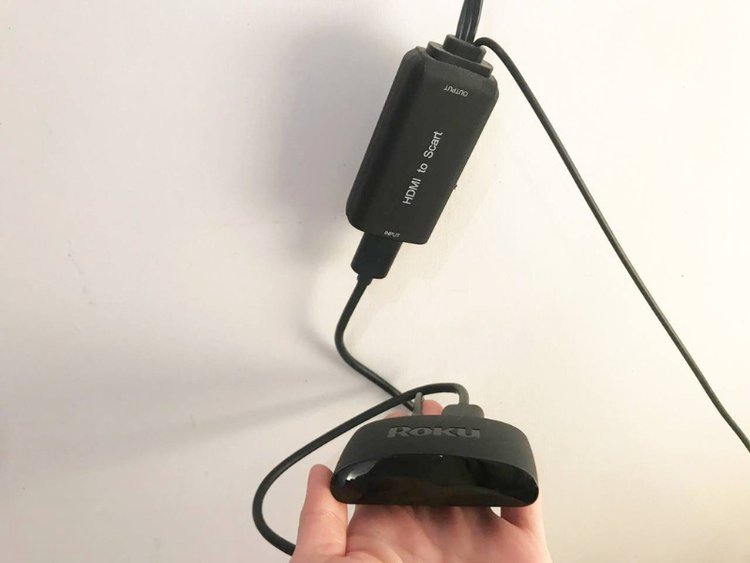
6. TV With a SCART Port
Materials:
- HDMI to SCART Adapter
- SCART Cable (If applicable)
- HDMI to DVI Adapter with Audio (If applicable)
- Power cable for the adapter (The type of cable will depend on your adapter)
Instructions:
Step 1: Connect the HDMI to SCART adapter to a wall outlet with its provided power cable. If the power cable is USB, you will need to plug it into a USB power adapter before connecting it to an electrical outlet.
Step 2: Check that your Roku is also connected to power with its micro USB cable and a power adapter.
Step 3: Plug your Roku’s HDMI connector or HDMI cable into the HDMI to SCART adapter’s HDMI IN port. Then, ensure the HDMI cable (if applicable) is also plugged into the Roku.
Step 4: Find your TV’s SCART port on the back of the unit, characterized by a rectangle tilted slightly to the left with two rows of pinholes. Then, plug the adapter’s SCART cable into your TV’s SCART port.
If your adapter does not come with a SCART cable attached, you will need to connect a separate cable. Ensure the cable is securely connected to both the TV and the adapter’s ports.
Step 5: Next, flip the adapter’s NTSC/PAL switch to the correct mode for your region. NTSC is used in North and South America, while PAL is used in Europe and Asia.
Step 6: Then, change your TV’s Input to SCART. On some TVs, this input may also be labeled AV.
Watch the video below demonstrating how to use an HDMI to SCART converter to connect an HDMI-compatible Roku to your SCART-compatible TV.


Yesenia Achlim is a technical copywriter and editor with a focus on AV equipment. She aims to break down complicated topics and make technology accessible, no matter your technical expertise. When she’s not teaching you how to replace a projector lamp, you can find her reading and baking.
Can you email an 84-year-old woman and suggest how I can sync my ROKU remote when I cannot access set-up instructions because my remote doesn’t work? I’ve tried everything I can think of: unplugging and replugging, switching ROKUs, pushing every button on the ROKU, searching UTube, etc. HELP!
[email protected]