
Roku Player or TV HDMI No Signal? 10 Fixes to Make It Work Again

What To Know
- Addressing “no or weak signal” issues can often be resolved through simple steps such as performing a soft reset, ensuring a secure HDMI connection, and checking that the Roku’s power source and cord are properly connected and functioning.
- Also, consider lowering the Roku’s resolution, waking up the device if it’s in standby mode, and directly connecting it to your TV’s HDMI port to avoid potential signal interference from intermediary devices.
- For persistent Roku issues, ensure the device is not overheating, update its firmware, perform a factory reset, and, if necessary, contact the Roku Support Team for further assistance.
This article has gathered the most effective solutions, all tested or proven successful by users across various forums.
Therefore, you’re just steps away from resolving your Roku’s “no signal” issue and returning to your favorite entertainment without delay. Let’s dive in!
Quick Navigation
- 1. Soft Reset Your Roku
- 2. Check the HDMI Connection
- 3. Check the Power Source & Cord
- 4. Lower the Resolution
- 5. Wake Your Roku Up
- 6. Remove Any Intermediary Devices (Adapters, Switches, Receivers, etc.)
- 7. Ensure Your Roku Is Not Overheating
- 8. Update the Roku Firmware
- 9. Factory Reset Your Roku
- 10. Contact the Roku Support Team
1. Soft Reset Your Roku
While it might seem straightforward, a soft reset is often the best solution for resolving problems related to “no or weak signal.”
To perform a soft reset on your Roku, simply disconnect it from the power source for at least 30 seconds before plugging it back in.
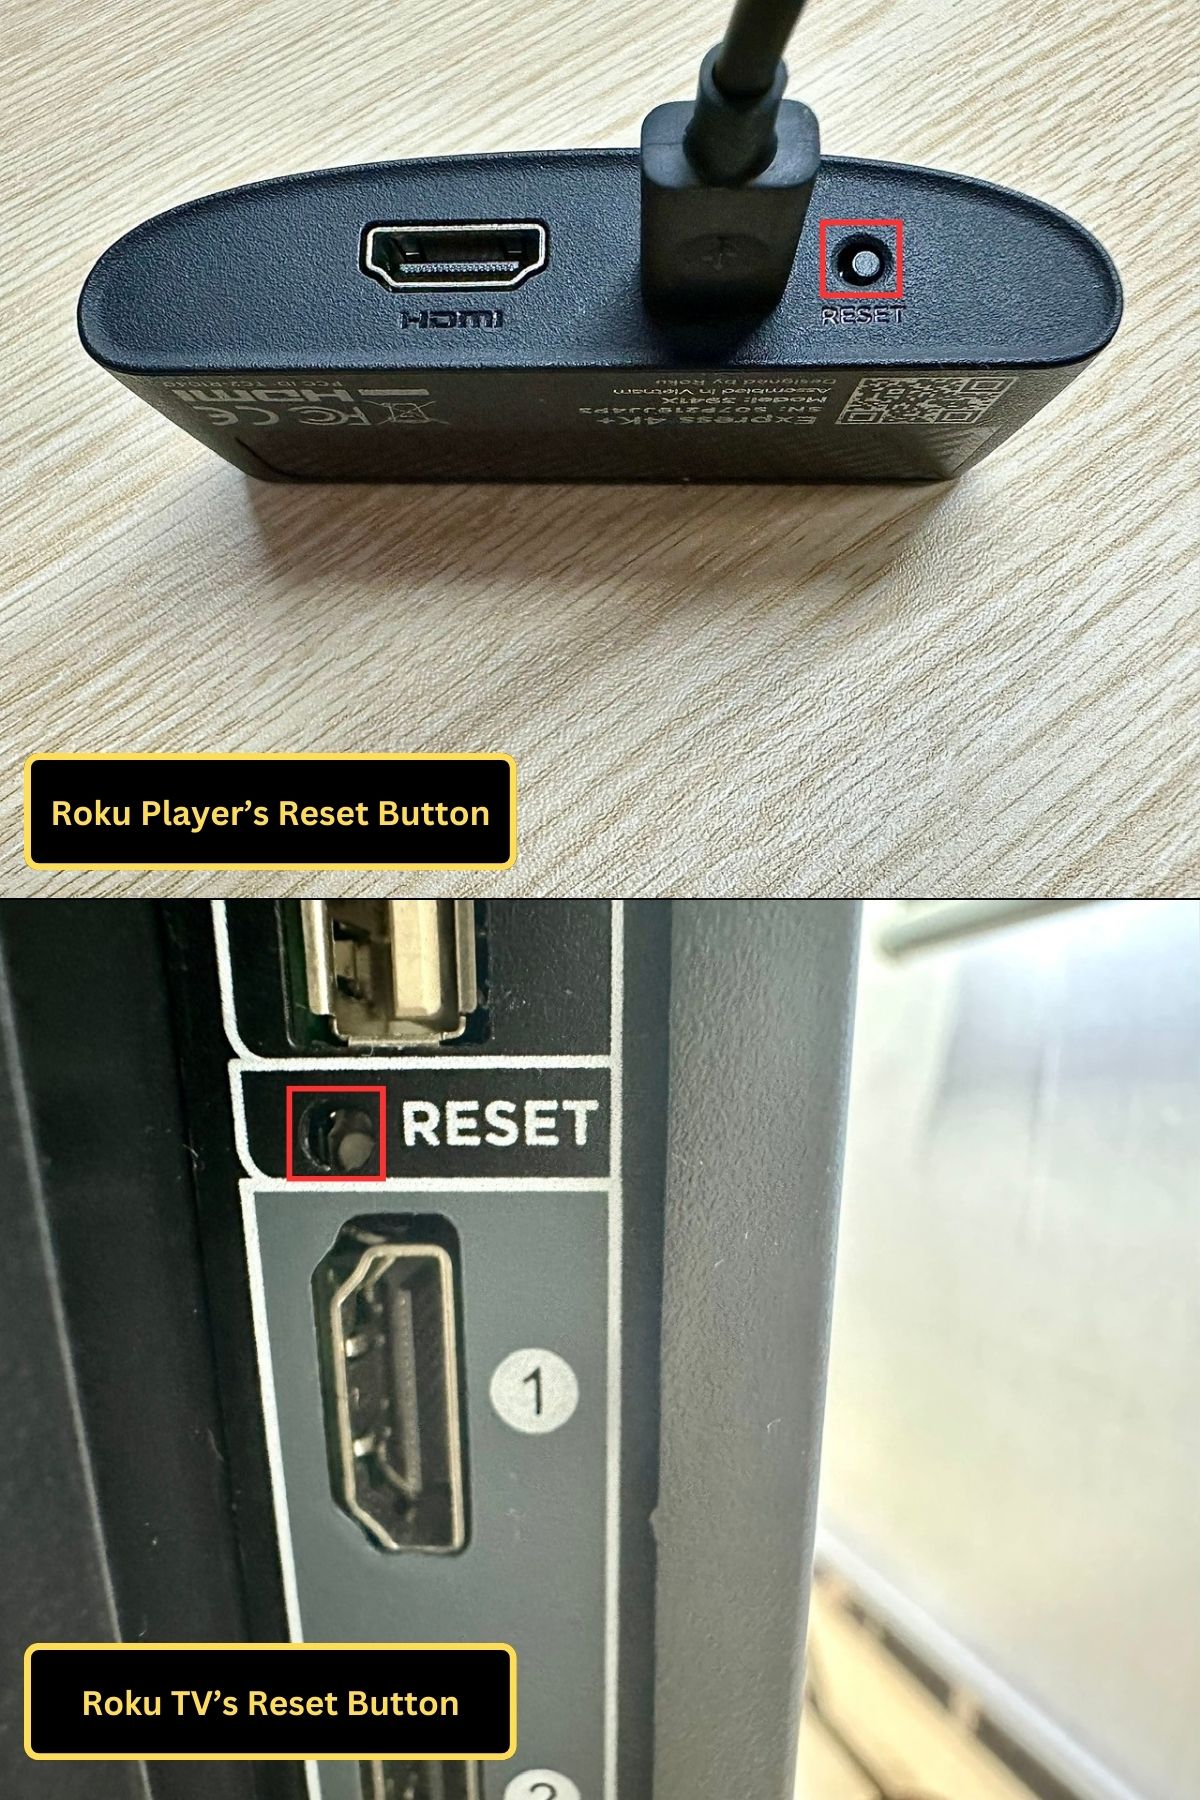
Alternatively, you can quickly address any glitches by pressing the reset button on your Roku player. For those with a Roku TV, you’ll need a pen or a similar object with a fine point to press the reset button effectively.
2. Check the HDMI Connection
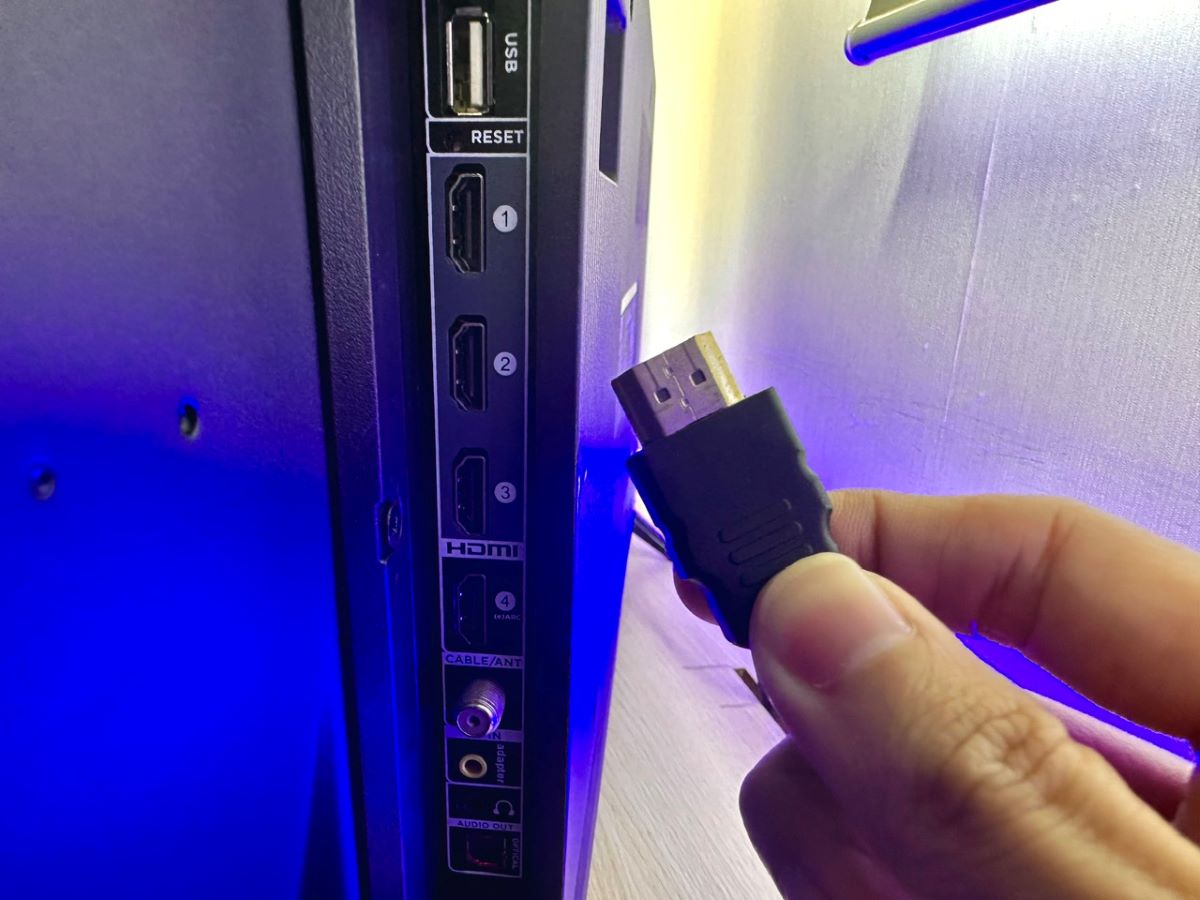
A loose HDMI connection often causes that pesky “HDMI no signal” issue. So, let’s make sure your HDMI cable is snugly connected.
It’s a good idea to unplug and then plug back the cable at both ends, just to be sure. While you’re at it, why not throw in a soft reset? This little trick can work wonders.
Ever thought about simply switching inputs on your TV back and forth? This easy step can sometimes kick those annoying software glitches right to the curb.
Also, take a moment to check on your HDMI cable – if it looks a bit worse for wear, it might be time for a new one.
Don’t hesitate to try plugging it into different HDMI ports on your TV too. You never know, the issue might just be with a particular port.
3. Check the Power Source & Cord
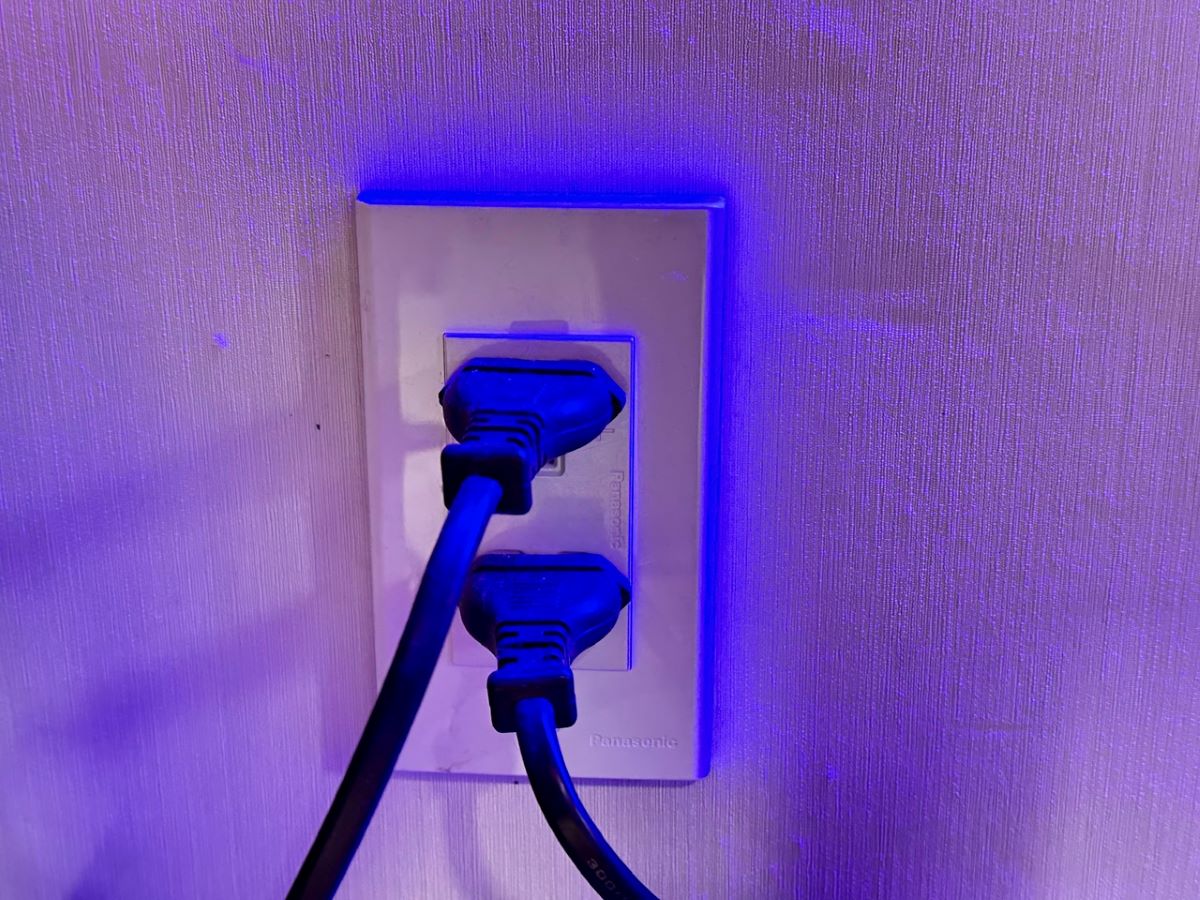
Are you powering your Roku through your TV’s USB port or a power strip? It might be time to switch things up and plug it directly into a wall outlet instead. This simple change can sometimes make all the difference.
Already using a wall outlet? It’s a good idea to try out different outlets or test the one you’re using with another device, like charging your phone. This can help you determine if the issue lies with the power source itself.
4. Lower the Resolution
If you’re experiencing issues with your Roku TV, adjusting the resolution in the settings menu might help. For those using a Roku player, a handy trick is to connect it to another TV that supports a higher resolution (4K should do the trick).
Once connected, lower the resolution settings before reconnecting your Roku to the original TV. This approach helps avoid resolution mismatches, which are common problems like the one this user encountered.
To adjust the resolution on your Roku, follow these simple steps:
Step 1: Go to Settings, and select Display type.
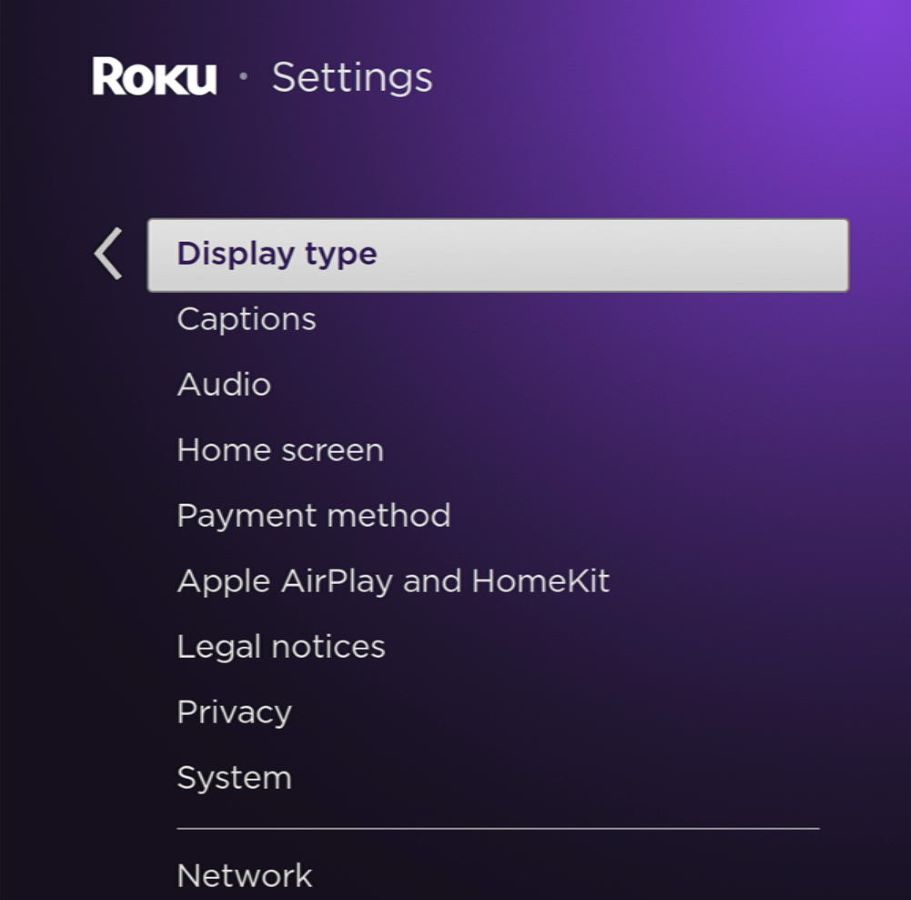
Step 2: Choose the 720p TV option. This resolution is widely compatible and may help resolve any mismatch issues you’re encountering.

5. Wake Your Roku Up
Roku is set to get in standby mode after a while of not working, try pressing buttons like the directional or power button to wake it up before proceeding to any further troubleshooting.
Sometimes, your Roku can automatically turn off after 20 minutes, which means pressing some random buttons may not be able to wake it up.
In such cases, performing a soft reset would definitely help, that’s also what this user has encountered.
If you’d like to disable the Roku auto-off function, you can disable it in the settings.
Step 1: Press your Roku remote’s Home button, and select Settings from the menu.

Step 2: Click on System, and go to Power.
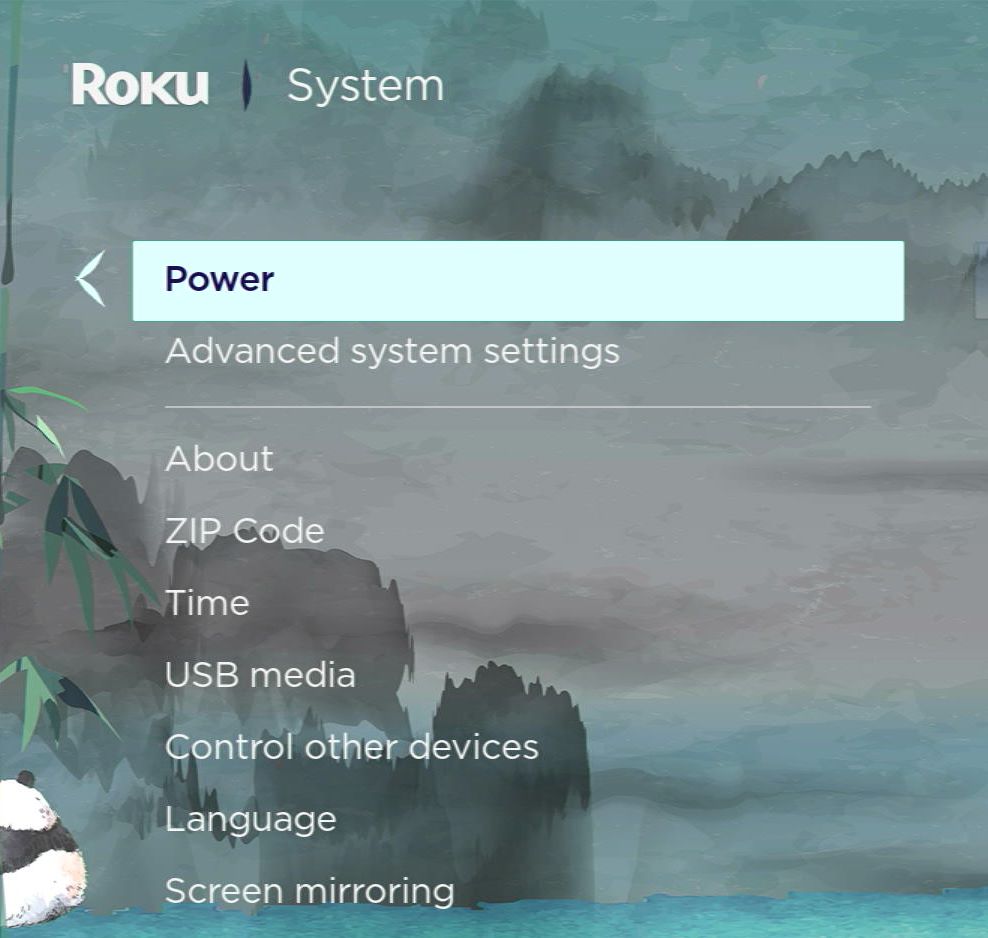
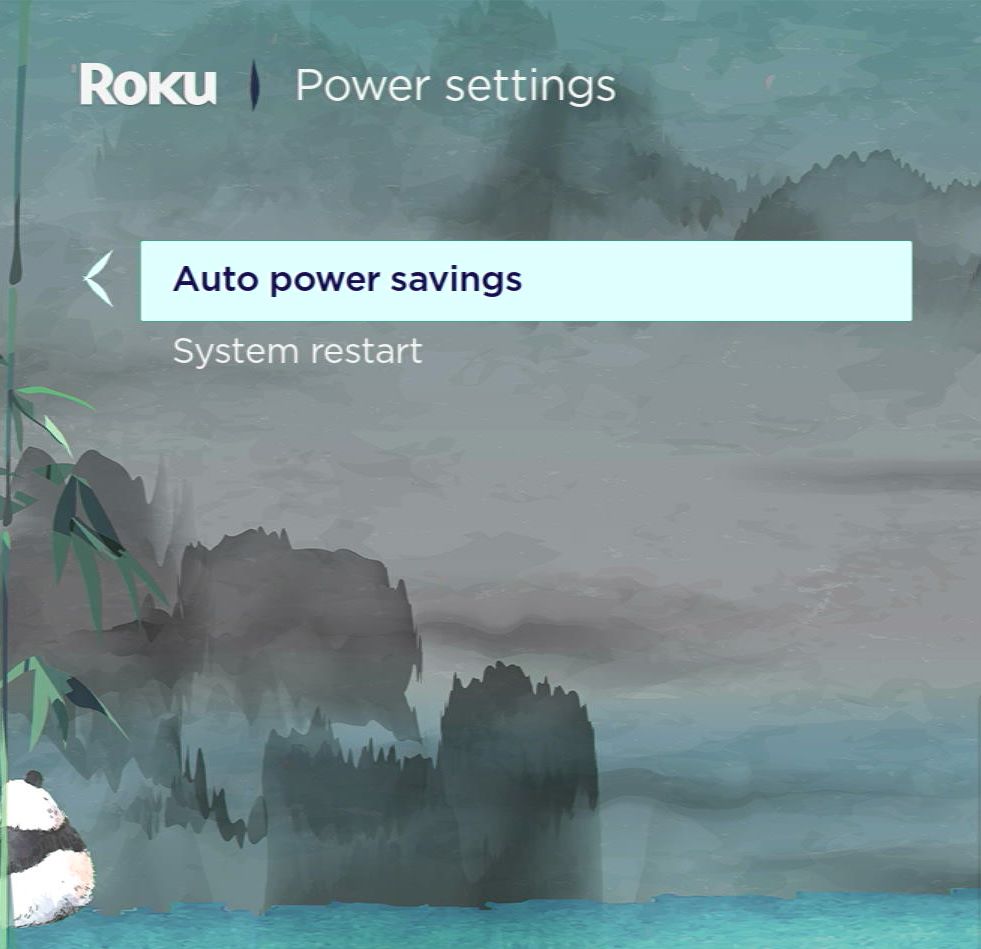
Step 3: Select Auto Power Savings.
Step 4: Select After 20 minutes of no interaction to uncheck its checkbox, disabling it.
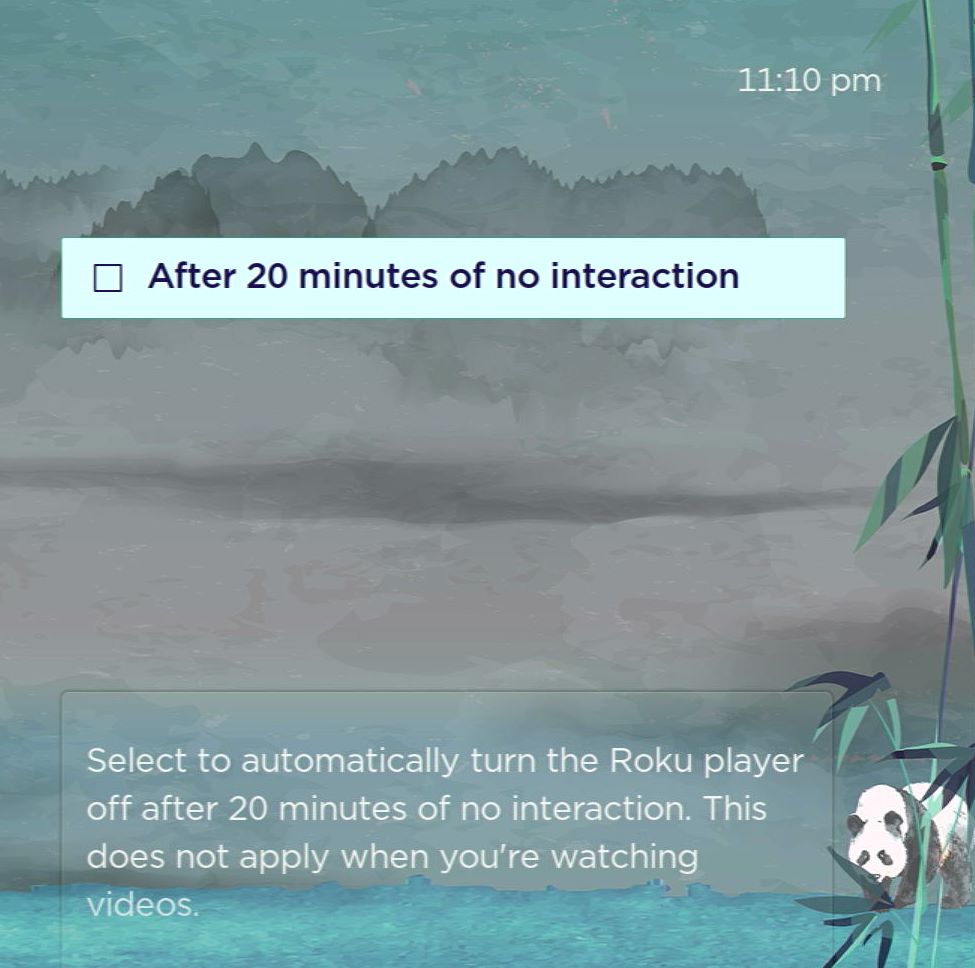
Now, your Roku will remain on even if you’re not using it.
6. Remove Any Intermediary Devices (Adapters, Switches, Receivers, etc.)
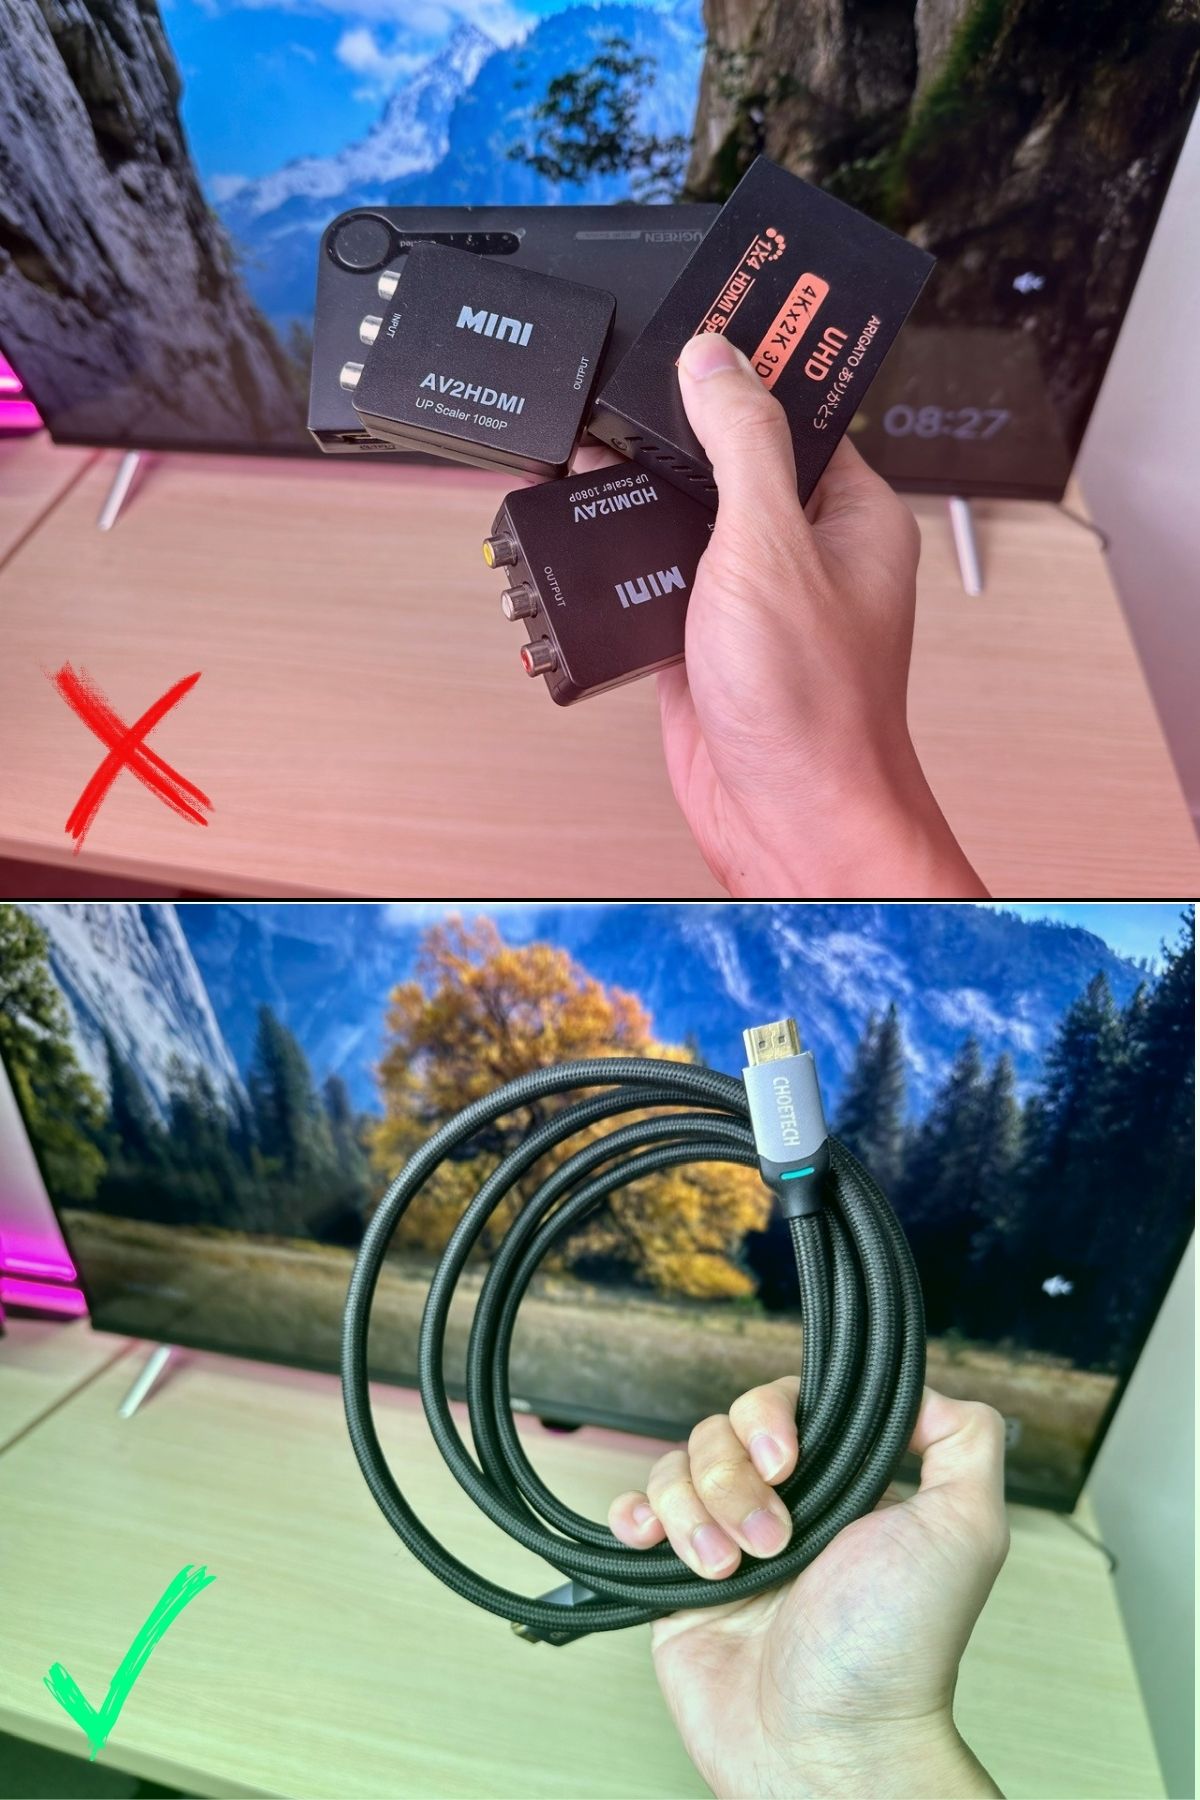
Although intermediary devices like HDMI adapters, switches, and the like can make your AV setup more convenient and easier to connect, they might also interfere with the AV signals.
Therefore, consider connecting your Roku directly to your TV’s HDMI port, eliminating any adapters, switches, or receivers in the setup.
If you’re using a Roku TV, directly plug the desired device into the TV’s port. After making these adjustments, give all the devices in the setup a soft reset (unplug from power for 30 seconds, then replug) to check if the issue has been resolved.
7. Ensure Your Roku Is Not Overheating
Like all electronics, Roku devices can run into problems if they overheat. Fortunately, we’ve covered this topic in another article.
If you notice your Roku getting warm, take a moment to check out that dedicated piece for help. Here are a few quick fixes mentioned in the article you might try:
- Place your Roku in a cool and well-ventilated environment.
- Adjust the resolution.
- Clear the storage.
8. Update the Roku Firmware
Sometimes, the issues with Roku devices stem from software glitches that only the manufacturer can fix.
With sufficient feedback from users, Roku often investigates and addresses these glitches in their operating system, resolving many errors in the process.
So, if you’re using a Roku TV and encounter problems, dive into its settings to search for any available updates.
Similarly, if you’re using a Roku streaming device and face recurring no-signal issues, especially during crucial moments of your favorite movie, check for updates the next time you can turn your Roku on.
Here’s how to check and update your Roku.
Step 1: Navigate to Settings, then System.

Step 2: Select Software update.
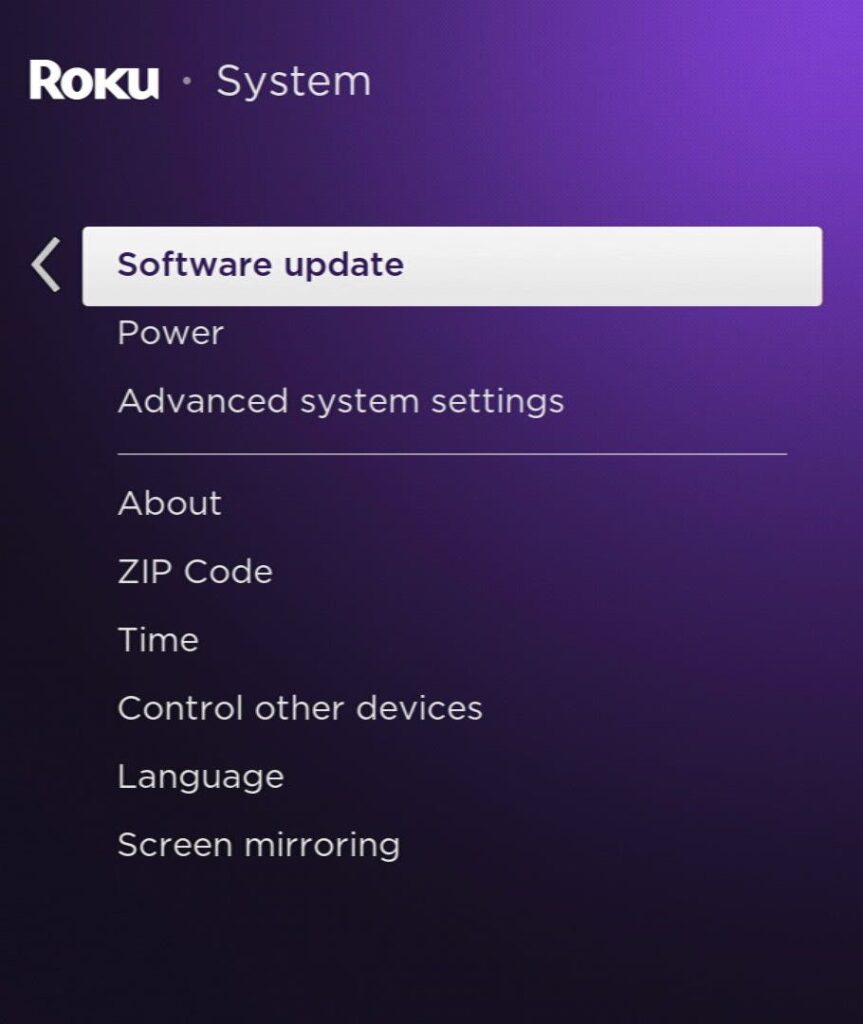
Step 3: Click on Check now for any missing updates.

9. Factory Reset Your Roku
Opting for a factory reset should be your last step in the troubleshooting process, as it erases all the information and installed apps on your device.
However, a factory reset on a Roku device isn’t as daunting as it sounds. This is because much of your information and installed apps are linked to your Roku account.
As long as you log back into your Roku account after the reset, everything will reappear, almost as if nothing happened.
The process for performing a factory reset is the same for both Roku players and Roku TVs, and it’s quite simple. Here’s what you need to do:
Step 1: From the Home screen, navigate to Settings.

Step 2: Go to System, then Advanced system settings.

Step 3: Choose Factory reset, enter the 4-digit PIN code, and select OK.

Step 4: Click Start factory reset to confirm your decision.

After the reset, follow the on-screen instructions to set up your Roku device from the beginning, log back into your Roku account, and check if the issue has been resolved.
If you’re using a Roku player and suspect the problem might also be with your TV, consider factory resetting your TV as well. This approach has solved issues for other users. Below are guides for factory resetting popular TV brands:
10. Contact the Roku Support Team
If you’ve tried all the fixes mentioned above and still face issues, it’s time to reach out to Roku’s technical support team for assistance.
You can get in touch with them through their website’s live chat, email support, or even via their social media pages. Should your device still be under warranty, you might qualify for a free replacement or have the repair costs covered.
To make the support process as smooth as possible, consider preparing a video that showcases the issue you’re encountering with your Roku.
Additionally, compile a list of all the troubleshooting steps you’ve already taken. Providing this information upfront can significantly enhance the support team’s ability to offer you effective help.
Remember to have your Roku device’s model and serial number ready. This preparation can expedite the support process and bring you closer to resolving the issue.

Duy Anh is a seasoned technical editor specializing in helping readers troubleshoot TV, projector, and Wi-Fi issues. He’s always been drawn to logical problem-solving. His ability to approach matters from various angles with a neutral mindset enhances his technical expertise.