
What Is the Best Brightness & Contrast Settings for HDR TVs?

What To Know
- There’s no universal HDR setting. It varies based on device, lighting, and what you’re watching.
- TVs have preset modes like Dynamic and Movie for varied viewing scenarios.
- Devices like Windows and iPhones allow personalized adjustments for brightness and contrast in HDR.
Today, I’m diving into a topic that many tech enthusiasts and cinema buffs often ponder: ‘What should the contrast be for HDR on TV?‘
The ideal contrast for HDR on TV varies based on TV technology, content source, and viewer preference, in addition to room lighting. Adjust settings considering these factors for the best experience.
Having spent countless hours experimenting with various HDR settings on different devices and environments, I’ve gathered key insights and findings. My tests, which you’ll find detailed in the article, have shed light on how contrast plays a significant role in optimizing your visual experience.
Ready to dive in? This guide not only demystifies the HDR contrast puzzle but also provides actionable steps to ensure you get the most out of your high dynamic range content.
Quick Navigation
Explore Brightness & Contrast Settings for HDR TVs
Brightness and contrast go hand in hand. So, a TV screen’s luminosity has to be mentioned in the passing when discussing its contrast levels.
The ideal combo of the two is determined by the TV’s display quality, capability, and how illuminated the room is.
Because choosing the right mix of the two entails quite a bit of trial and error, and the various nuances can be overwhelming, TVs come with expertly-curated, ready-to-implement picture modes.

Users can seamlessly switch between the options until the one that meets their expectations is arrived at. Several TVs, in fact, let you select a picture mode when you first set up the device.
For example, suppose you intend to use the TV in your home and not at a retail store. In that case, the television will consider the selection and adjust the contrast and brightness settings based on a standard living room’s viewing environment.

And then the barrage of options letting you fine-tune the nuanced aspects of the picture are presented until the setup is complete.
It’s worth mentioning that different TV brands have their own brightness and contrast settings and adjustments apropos to the panels used.
Regardless, the below-mentioned picture modes offered are commonly found on most televisions:
Dynamic/Vivid Mode
As the name hints, “dynamic/vivid” mode sets your TV’s brightness and contrast to the maximum.
When turned on, the whiter objects look completely white, and shadow, darker details look more gray.
The mode suits sports viewing the best as it becomes easier to discern the ball and players, appreciate the teams’ colors and jerseys, capture fine details on the playing field, etc.
The picture mode is ideal when watching TV during the day in a room with the windows open and a lot of natural light coming in and illuminating the space.
It is also chosen when the space is completely lit with artificial lights or when using the TV outdoors.
We tested Samsung and LG televisions with the dynamic mode enabled, and below are the results:

One of the biggest pushbacks against the vivid setting is its tendency to make the images look unnatural or heavily color-saturated. The overly bright pictures can be challenging to look at after a period of prolonged watching.
And if your TV has inherent picture quality or color accuracy issues, the dynamic mode will exaggerate those shortcomings.
Because the visuals are brighter than usual, other imperfections, such as motion blur problems or image distortion concerns, come more to the fore.
Movie/Cinema Mode
Due to the washed-out effect, the dynamic/vivid mode picture setting is not ideal when watching movies. The namesake “movie/cinema” mode sets the picture tone correctly instead.
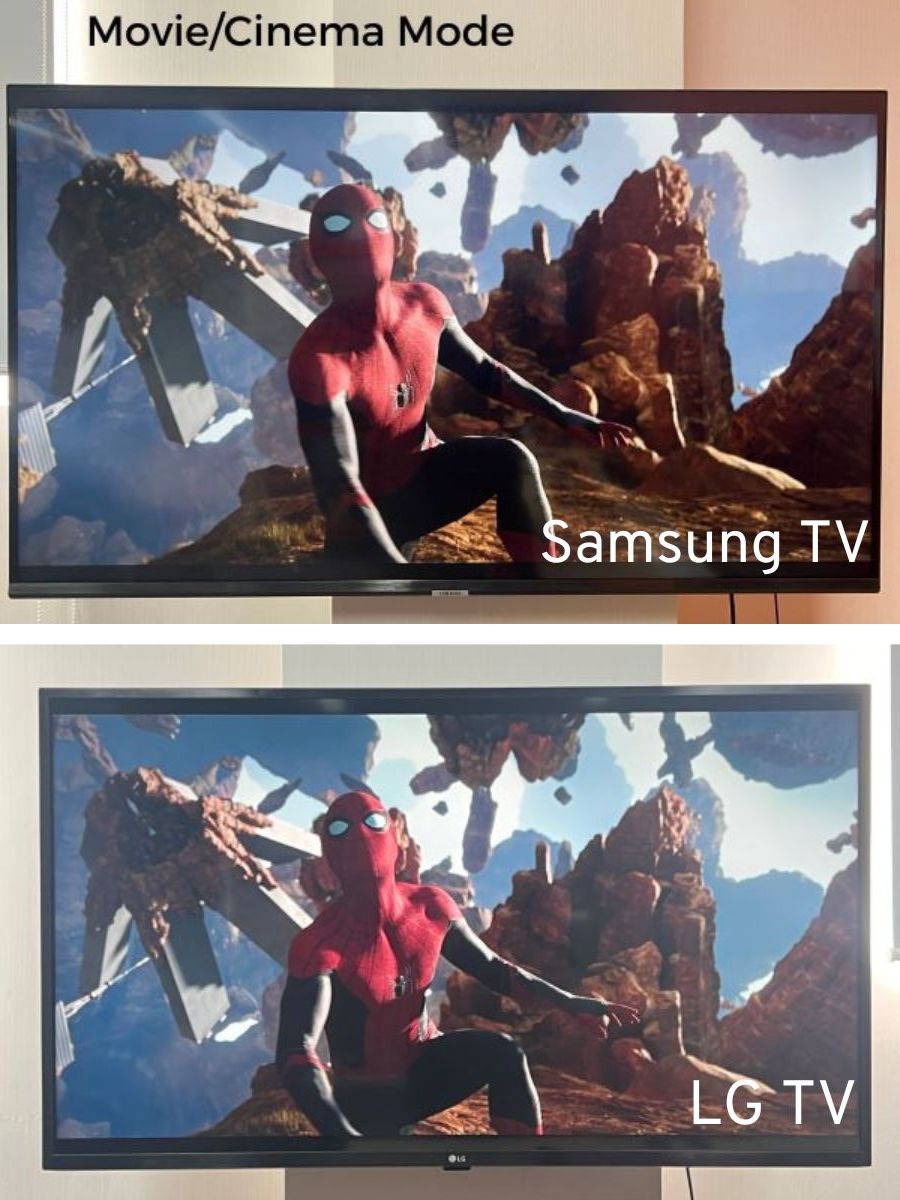
The movie mode is also known for being the most accurate or naturalistic of all preset TV picture modes.
The tones, colors, etc., that cinema mode assumes are the closest to what the movie or show director intended. If you experience the “soap opera effect,” enabling cinema eliminates that by turning off motion smoothing.
Compared to vivid mode, cinema appears dimmer, which helps recreate more realistic, deeper shadows and preserve the visual’s bright details.
In the movie/cinema mode, the image could assume a slightly reddish tone compared to other modes.
That indicates the panel’s color temperature is higher in the image setting. And the slightly warmer tone is not bad. It is, in fact, more accurate, reducing eye strain and offering a genuinely personal cinematic viewing experience.
You may, however, require a couple of days to adjust to the visuals if your eyes are more accustomed to bluer, cooler tints.
Standard/Normal Mode
The “standard/normal” mode is a TV’s default picture setting. It strikes a proper balance between the dynamic and cinema modes, making it compatible with most types of content.
The particular mode is calibrated to show brightness, contrast, and colors close to real life. The contrast and brightness are usually set to 50% or medium.
But, although standard mode shines overall, its color accuracy is usually slightly lacking.

If you don’t like to switch between picture modes each time you watch different types of content, the standard mode is a hassle- and fuss-free option that you can set and forget.
My Verdict
I tried the various settings above on my Samsung and LG TVs.
As per what my eyes could discern, Samsung’s brightness, contrast, color, and saturation looked better than LG’s.
But, wanting to not come to a premature conclusion, I delved deeper into the settings and tried tweaking them for a more optimal output.
That is when I stumbled upon a video that guided me on the subject:

After watching the video, I altered or set the display settings on my TV as follows:
- Picture mode: Movie
- Color temperature: Warm1
- White balance: 2 point

Your TV may provide different picture settings. Watch the video to choose the ones applicable to your device.
What If Your HDR Is Too Bright? How to Set HDR?
HDR thrives on brightness. The higher the brightness levels, the better HDR performs. But it’s not always the case. At times, the HDR setting could render the visuals too bright.
Several users have found their Windows 10 and 11 operating system’s default HDR settings excessively bright when gaming.
If you notice something similar, you can always dial down the HDR’s luminance levels to your liking or to match the room’s lighting.
Keep reading to learn how to modify the HDR brightness settings.
For Windows 10
Step 1: Press the Windows/Start key.
Step 2: Click on Settings > Apps > Video playback.

Step 3: Choose Windows HD Color settings under Stream HDR video.
Step 4: Under Choose display, select your computer display.

Step 5: Choose Change calibration settings.
Step 6: Select Full screen to play the sample video on the calibration screen.
Step 7: Drag the bottom-positioned slider to the right or left to calibrate the display. Look to achieve a proper balance between brightness and the details in the darker portions of the scene.

Step 8: Once done, choose Exit full screen.
Step 9: Pull up an HDR video and play it to inspect the quality.
Calibrate the display again if the video is too bright or the HDR quality could be better overall.
For Windows 11
If using Windows 11, there are two ways to address the situation.
Changing the Brightness Bar Inside the Settings
Launch the Settings app to decrease the brightness. Here are the steps:
Step 1: Open the Settings app. You could look for it using the Windows search bar.

Step 2: On the left pane on the app, choose Display and then Use HDR.


Step 3: Scroll down to the SDR brightness scale and move the bar to reduce your screen’s brightness.
If the outcome is unsatisfactory, Windows 11 offers an app called Windows HDR Calibration to calibrate the screen’s brightness and darkness.
Using the Windows HDR Calibration App

Click the link to download the Microsoft app.
Once downloaded, launch the app and follow these instructions:
Step 1: Upon opening the app, you’ll be greeted with the interface below. Click Get Started to start calibrating your screen.

Step 2: Move the Minimum Luminance screen slider to the lowest or until the square outline entirely disappears. Once done, click Next.

Step 3: On the next screen, you will choose the Maximum Luminance using the same slider tool. Choose the maximum setting or a number equivalent to your TV’s full peak brightness and click Next.
Step 4: Next, you’ll be shown an SDR and HDR screen comparison. If you reckon the color saturation could be better, use the slider below to reduce or increase it and click Next.

Step 5: On the following screen, review the before and after calibration screens. If you’re happy with the output, click Finish. If not, click Restart to begin the process from scratch.
Note that there’s no Windows 10 version of this calibration tool.
iPhone
If you receive videos on your iPhone 7 from other iPhones that look brighter than normal, like with these iPhone 7 users, there’s likely something missing.

This was not always the problem, particularly not when the iPhone 7 was a new device.
But as newer iPhones and iOS versions were released, and the iPhone 7 got updated to the latest software, such complaints started to surface.
If the videos and images mention “HDR” to their top left, they will look excessively bright on an older iPhone 7 with a non-HDR display, especially if the device runs the most recent iOS.
To rectify the issue, here are a few things you may try:
Save the Non-HDR Version of the Photos
If HDR compatibility is the problem, save the non-HDR avatar of the images. Until the iPhone X, the user could save photos received via text even if the picture is HDR-compatible.
Here are the steps:
Step 1: Open the Settings app on your iPhone.
Step 2: Scroll down and choose Camera.
Step 3: Enable the Keep Normal Photo option.
The device will save the image’s non-HDR version in the Photos app.
Turn Off Automatic HDR
Some users reported clicking pictures or recording videos on their iPhones with the HDR feature made the photos look excessively bright.
HDR is, by default, enabled on iPhones. However, you can turn it off easily. Here are the steps to disable HDR on your iPhone XS/ XR/ 11/ SE (2nd generation)/ 12:
Step 1: Open the Settings app.
Step 2: Choose Camera.
Step 3: Disable Smart HDR.
If you’re rocking the iPhone X or 8 series, the steps to disable HDR are identical to the above. The only difference is it is Auto HDR instead of Smart HDR.
For iPhone 13 and later models, follow these steps:
Step 1: Open Settings.

Step 2: Choose Camera and then select Record Video.

Step 3: Turn off HDR Video.

Conclusion
Since no hard and fast rules exist for correct HDR brightness and contrast, you must do much of the heavy lifting to get the image fidelity right.
Although a TV’s different HDR picture modes come to the rescue, they may not be to everybody’s taste, and customizing and fine-tuning become inevitable.
Hopefully, this article taught you a lot about setting contrast for HDR to your liking on different devices and platforms.
Contact your TV manufacturer for increased assistance and clarity if you still have concerns with contrast on HDR.

Catherine Tramell has been covering technology as a freelance writer for over a decade. She has been writing for Pointer Clicker for over a year, further expanding her expertise as a tech columnist. Catherine likes spending time with her family and friends and her pastimes are reading books and news articles.

Tai “Ty” Luu, an Electronics Engineering graduate from Sheridan College, is a passionate technical editor with a deep love for technology and gaming. He constantly seeks new challenges to expand his expertise in the tech and gaming fields.