
10 Fixes for Yellow Tint/Spot on Your Projector

Quick Fixes for You
- Inspect HDMI/AV connections and adjust color settings; if you’re using a DLP projector, consider replacing its color wheel.
- Address persistent yellow tint issues by replacing the blue LCD panel or the polarizer if you’re using an LCD projector.
- Replace aging bulbs, ensure proper cooling, clean the lens regularly, reset the projector settings to default, and contact the manufacturer as a last resort.
Tackling a yellow tint or an unexpected yellow spot on your projector screen shouldn’t dim your enthusiasm for a great display.
This article will navigate you through a spectrum of solutions, from quick fixes to in-depth hardware repairs, ensuring your projector casts images as vibrant and clear as intended.
Get ready to bring back the true brilliance of your projector’s display!
Quick Navigation
- 1. Check the HDMI (or Any AV) Connection
- 2. Adjust or Reset the Color Settings
- 3. Replace the Color Wheel
- 4. Replace the LCD Panels (Especially the Blue One)
- 5. Replace the Bad Polarizer
- 6. Replace Your Dying Bulb
- 7. Always Keep Your Projector Cool
- 8. Clean the Projector Lens
- 9. Reset All Config of Your Projector
- 10. Contact the Manufacturer
The yellow tint or spot on your projector screen is often caused by issues ranging from simple connection problems, like a faulty HDMI or AV cable, to more complex internal components needing attention, such as faulty color wheels, deteriorating LCD panels, or bad polarizers.
Overheating, aging bulbs, or dirty lenses may also contribute to this discoloration.
1. Check the HDMI (or Any AV) Connection
Check the HDMI connection. Unplug the cable both at the source device (laptop, streaming device, etc.) and the projector end.
If HDMI was the issue, the yellow tint should disappear from the projector screen immediately after you remove the cable.
Once you realize HDMI is faulty, try some things to set things right.
You can use another HDMI cable. You may also use another source device with the old or the new HDMI cord to learn whether the problem lies with the source device.
2. Adjust or Reset the Color Settings
The different projector color settings could cause the yellow tint on the screen, especially if the hues are not configured correctly or there’s some malfunction.
For example, yellow spotting or tinting could emerge if the RGB (Red, Green, Blue) settings of the projector are not in synergy or one of the colors is more saturated than the other.
In such a scenario, reduce the saturation levels of green and red while boosting blue, diminishing the yellow tint as yellow is the combination of the red and green colors.
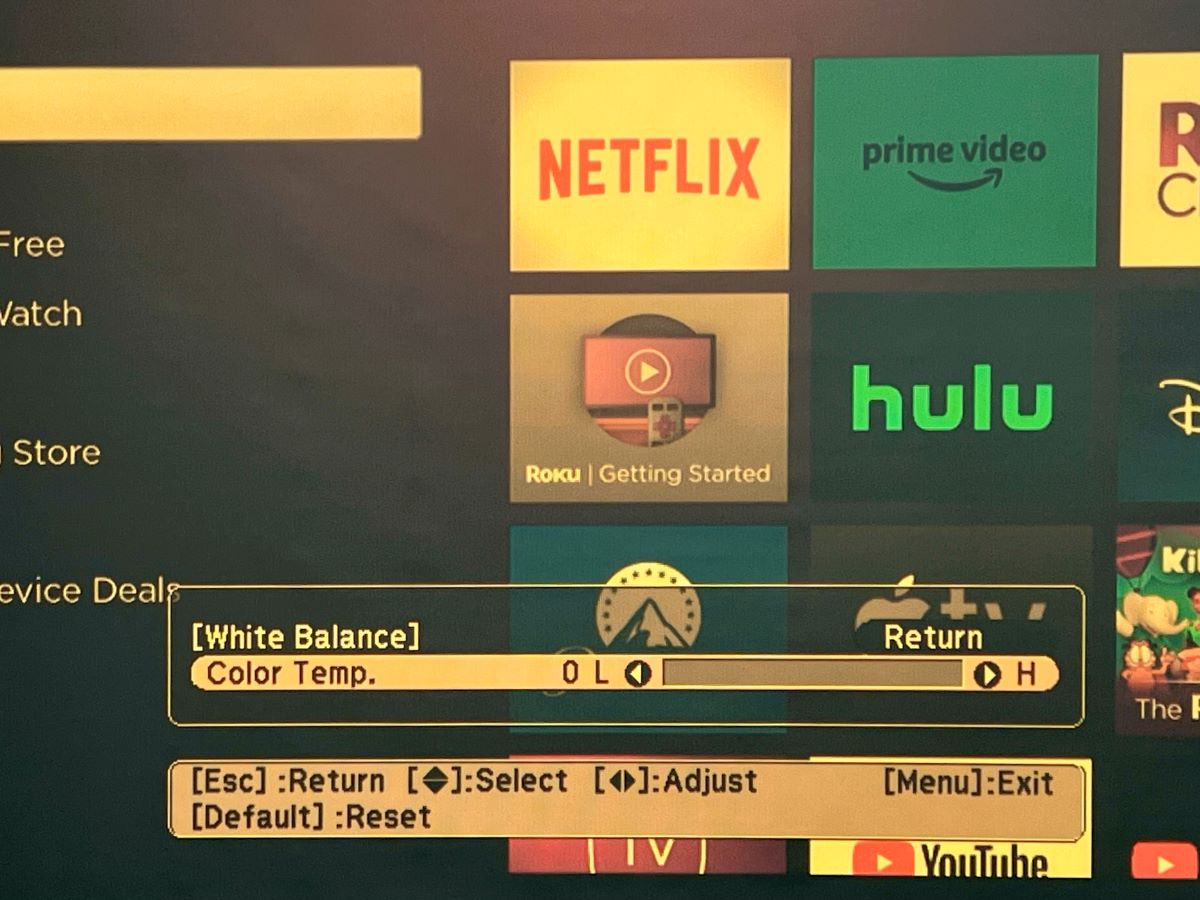
To implement the change correctly, follow the instructions in the table guide below for the three popular projector companies.
| Projector Brands | Instructions |
| Epson | Hit the Menu key. On the Settings screen, navigate to Image and then White Balance. Next, select Color Temp. Adjust the “H” side slider to modify the color tone. |
| Alternatively, press Menu. Choose Image and then White Balance. Select Custom and then increase Gain B and Offset B while lowering the Gain R & G and Offset R & G. | |
| BenQ | Press the Menu button. Under Settings, choose Picture and then Color Temperature. Select Normal and then Cool. |
| Optoma | Hit Menu and navigate to Display. Choose Color Settings. Select Color Temperature and set it to Medium/Cool. |
| Press the Menu button and go to Display. Choose Color Settings and then RGB Gain/Bias. Lower the red and green slides and increase the blue slide. |
3. Replace the Color Wheel
Note: Replacing the color wheel entails dismantling the projector. If you’re not proficient or don’t feel confident about it, enlist a professional. If your projector is under warranty, contact the brand. But if you want to go the DIY route, go ahead. Take pictures of each process step so you can easily put the projector back together later.
The color wheel constitutes the core of any projector. As the name denotes, it’s a rotating disc bearing various color segments (red, green, blue, etc.).
The wheel is placed between your projector’s DMD chip and the light source. When the projector lamp’s white light passes through the spinning wheel, different color elements get ushered into the path, creating an entire spectrum of colors.
If the color wheel fails to reproduce colors accurately or is not spinning in sync with other key projector elements, color imbalances or abnormalities, such as yellow spots or tints, can occur.
If dust or debris is causing an issue or a minor malfunction, repair the wheel. But if there’s significant damage, replacement is the only choice.
Either way, you’ll need to access the color wheel after taking apart the projector.
We’ve already discussed how to dismantle a projector. I’ve demonstrated it with my BenQ MH680. Click here for the detailed guide. The picture below shows the color wheel taken out of its device.
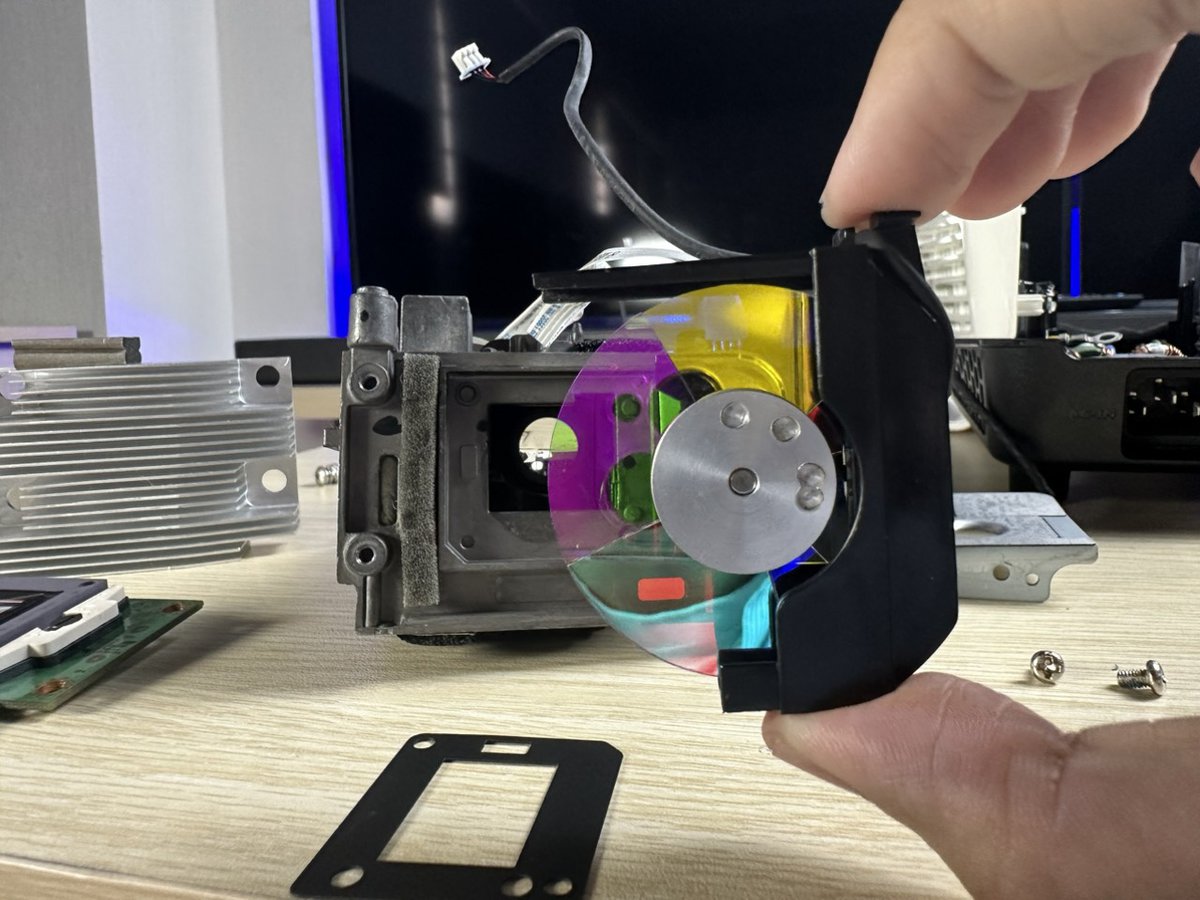
Once taken out, replace it with a new color wheel. You can easily find a replacement online, at brand reseller stores, etc.
4. Replace the LCD Panels (Especially the Blue One)
Note: Replacing the LCD panels requires disassembling the projector. If you are confident enough to dismantle the device yourself, go ahead. If not, hire a technician or contact the projector manufacturer. As mentioned earlier, snap pictures if you go the DIY route.
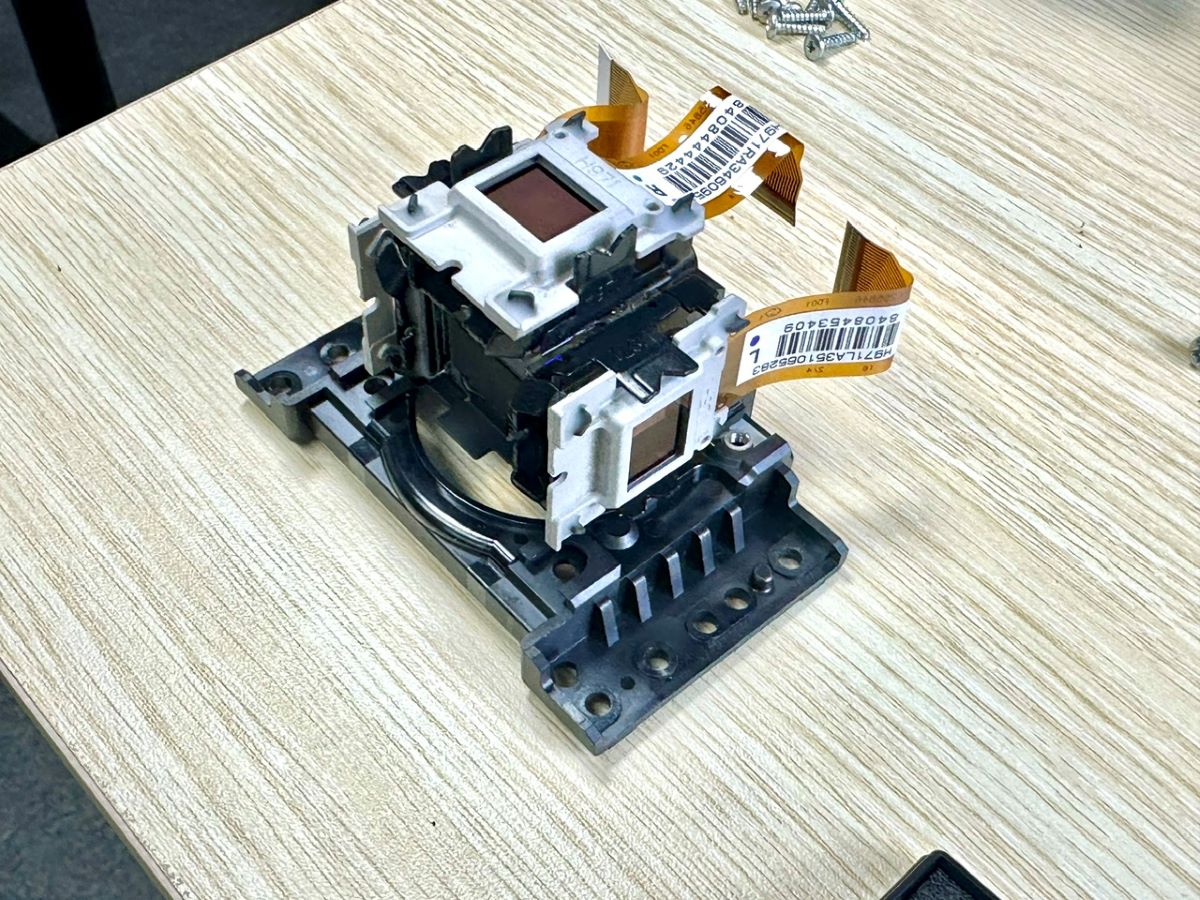
Your LCD projector has three LCD panels, corresponding to the colors red, green, and blue, respectively.
If the LCD projector is faulty or one or more of the three panels don’t work as designed, a yellow tint(s) could appear.
Cleaning dust collected on the LCD panels, fixing misaligned panels, etc., can help remedy the issue. If it doesn’t help, get the LCD component replaced.
To learn how to change LCD panels, click here for a detailed guide where I’ve demonstrated the same on my Epson EB-E01.
5. Replace the Bad Polarizer
Note: Replacing the polarizer requires dismantling your projector since the optical component is situated in the guts of the device—the projector’s light path, to be specific. If you’re confident about removing and repairing it, do it yourself. But if you’re not sure and the product is still under warranty, get a technician or talk to the brand.
The polarizer is an optical module in an LCD projector. It helps manipulate light to attain the desired brightness and color in a projected visual.
The component can degrade over time due to the projector’s inefficient cooling system, sub-par internal UV filters, internal operating temperature, etc.
When the polarizer deteriorates, it leads to issues such as spotting or color tints on the projection screen.
This Reddit user faced a problem with their projector polarizer, which they eventually remedied by replacing the optical unit.
A projector usually has more than one polarizer. Watch this YouTube video from 13:01 to learn about your projector’s input and output polarizers.
Invariably, there’s a polarizer at the light path’s beginning, close to the light source. It’s called the input light polarizer.
And there’s the output light polarizer, which, as the name suggests, is situated at the exit side of the LCD panel.
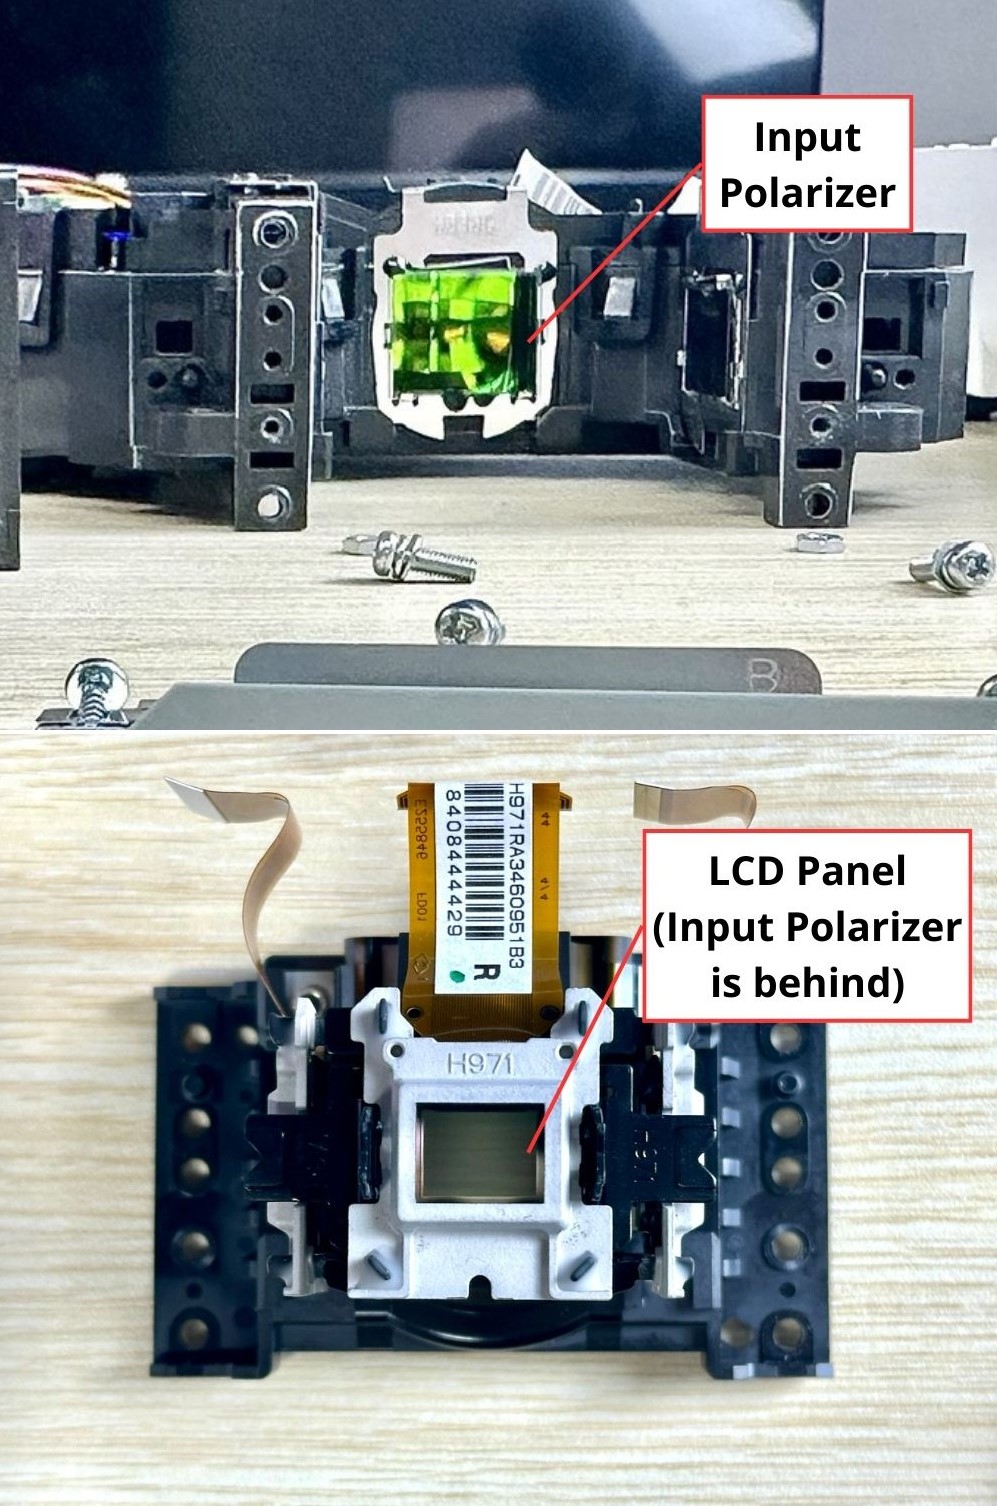
Read this detailed guide to learn how to disassemble an Epson LCD projector, access the polarizers, detect the defective one, and replace it.
Replacing the broken input polarizer entails removing the screw clasping the polarizer, so you can take it out and install a new one.
Similarly, based on the model, removing the damaged output polarizer can require cutting the adhesive beads using a slender knife, as shown here.
If replacing one polarizer doesn’t help, or the colors look off despite no yellow spots, swap them all, as the other polarizers might have lost their sheen, too.
Note: If replacing the output polarizers, ensure the LCD panels align with the prisms to converge correctly and create a well-aligned visual on the screen. Color inaccuracy, sharpness, and other distortions will arise if the convergence fails.
6. Replace Your Dying Bulb
An old, withering bulb could also cause yellow spots on your projector screen. A projector bulb, on average, lasts 1,500 to 2,000 hours of use in normal mode.
If set to ECO or power-saving mode, it shall be good for longer, between 3,000 and 5,000 hours. To learn more about a projector bulb’s lifespan, click here.
Therefore, if you see yellow tints on the screen, check how spent the bulb is. Find your projector’s lamp timer information to ascertain if the bulb is pending replacement.
Find the steps to check the lifespan numbers on different brands of projectors below.
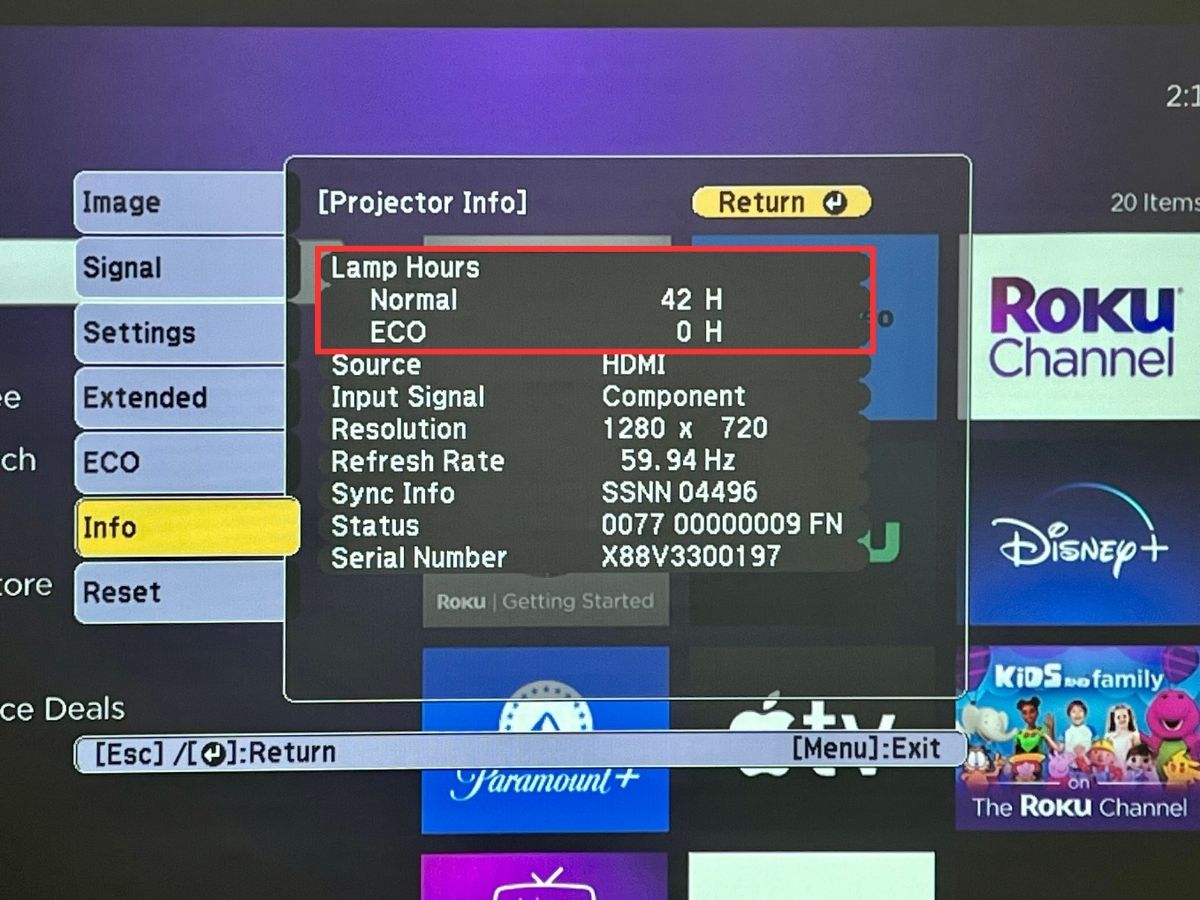
| Projector Brands | Instructions |
| Epson | Press the Menu button. On the screen, head to the Info tab and choose Projector Info. Find lamp details under Lamp Hours. |
| BenQ | Hit the Menu key. Navigate to Information and then look for Equivalent Lamp. |
| Optoma | Press Menu. Go to Info and then Lamp Hours. |
In some cases, the bulb could have developed a burnt streak or spot, which may cause the yellow spot/tint problem. Changing the bulb becomes a must, then.
Removing the bulb is not that difficult, especially on modern projectors. All it takes is taking the lamp cover off and the lamp screws. Finally, pull the bulb out.
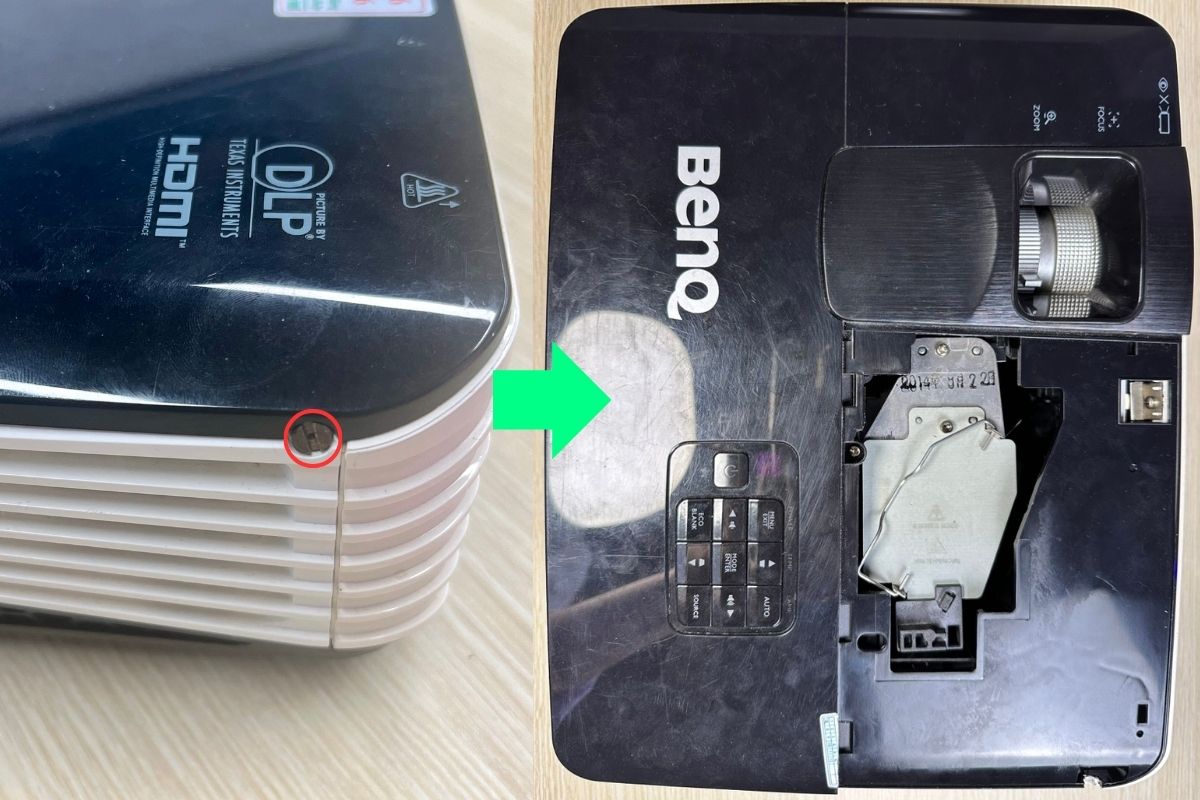
Here are the steps to remove a BenQ MH680 projector lamp.
Step 1: Remove the cover using a flathead screwdriver.
Step 2: Take the lamp out and the case screw.
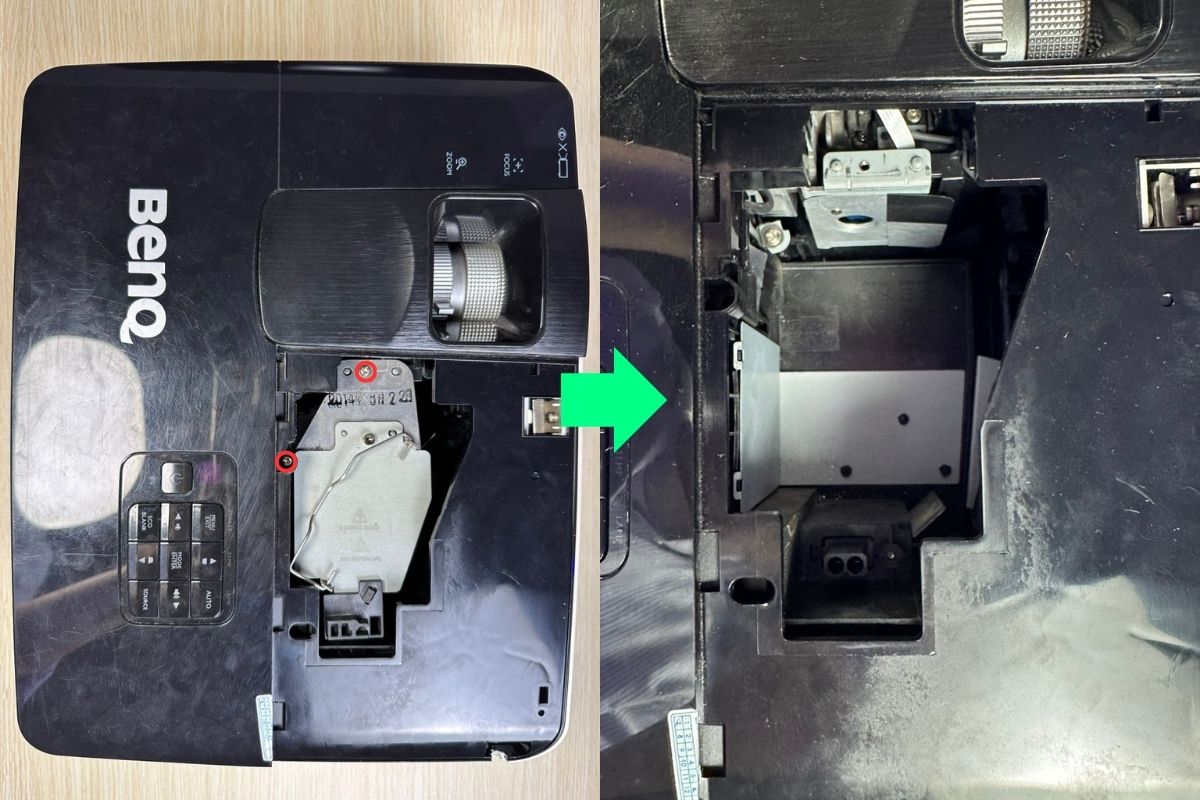
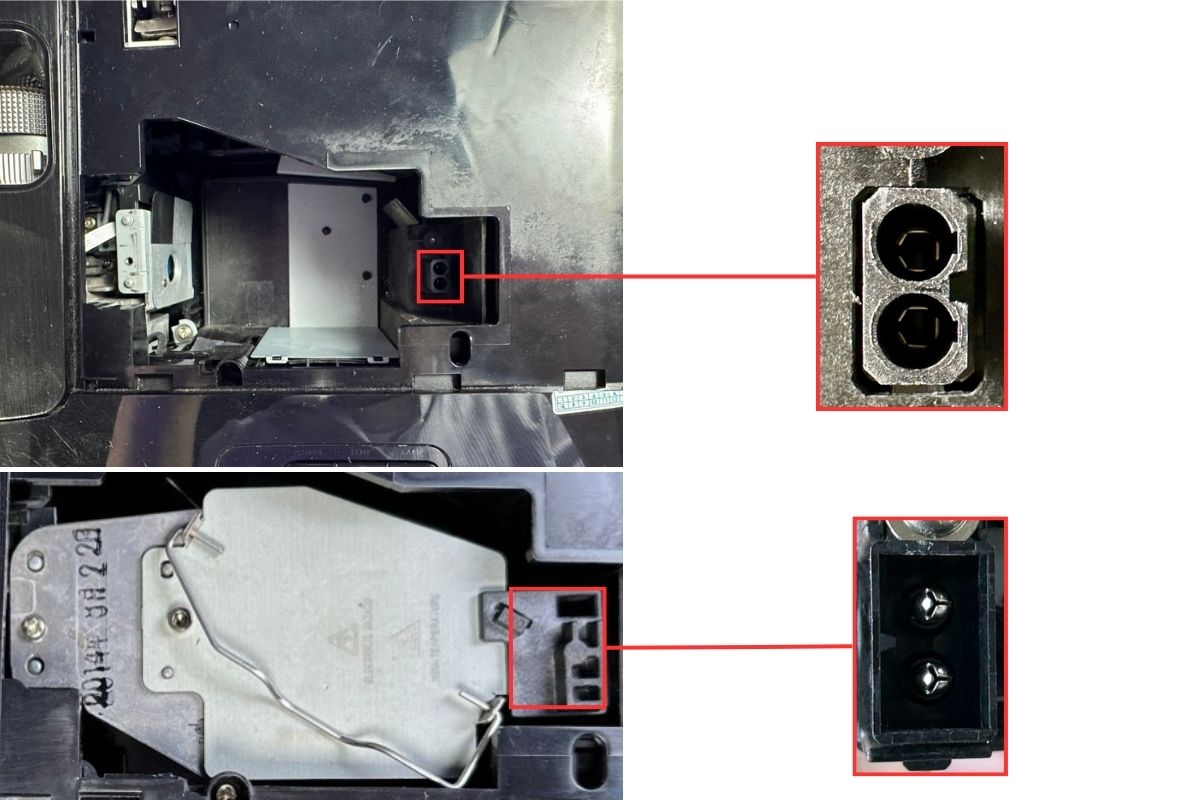
Since there are electrical plugs linking the projector and the lamp, you might have to exert some physical pressure at the spot opposite to the freshly removed screw.
Step 3: Place the new bulb in the projector and put the device back together.
After putting the new lamp in, reset its timer so you can track its usage hours. Check the table below to reset lamp hours on some popular projector brands.
| Projector Brands | Instructions |
| Epson | Press the Menu button. Go to Reset and choose Reset Lamp Hours. Select Yes to confirm and complete. |
| BenQ | Hit the Menu key. Under System Setup: Advanced choose Lamp Settings. Select Reset lamp timer and then Reset to confirm. |
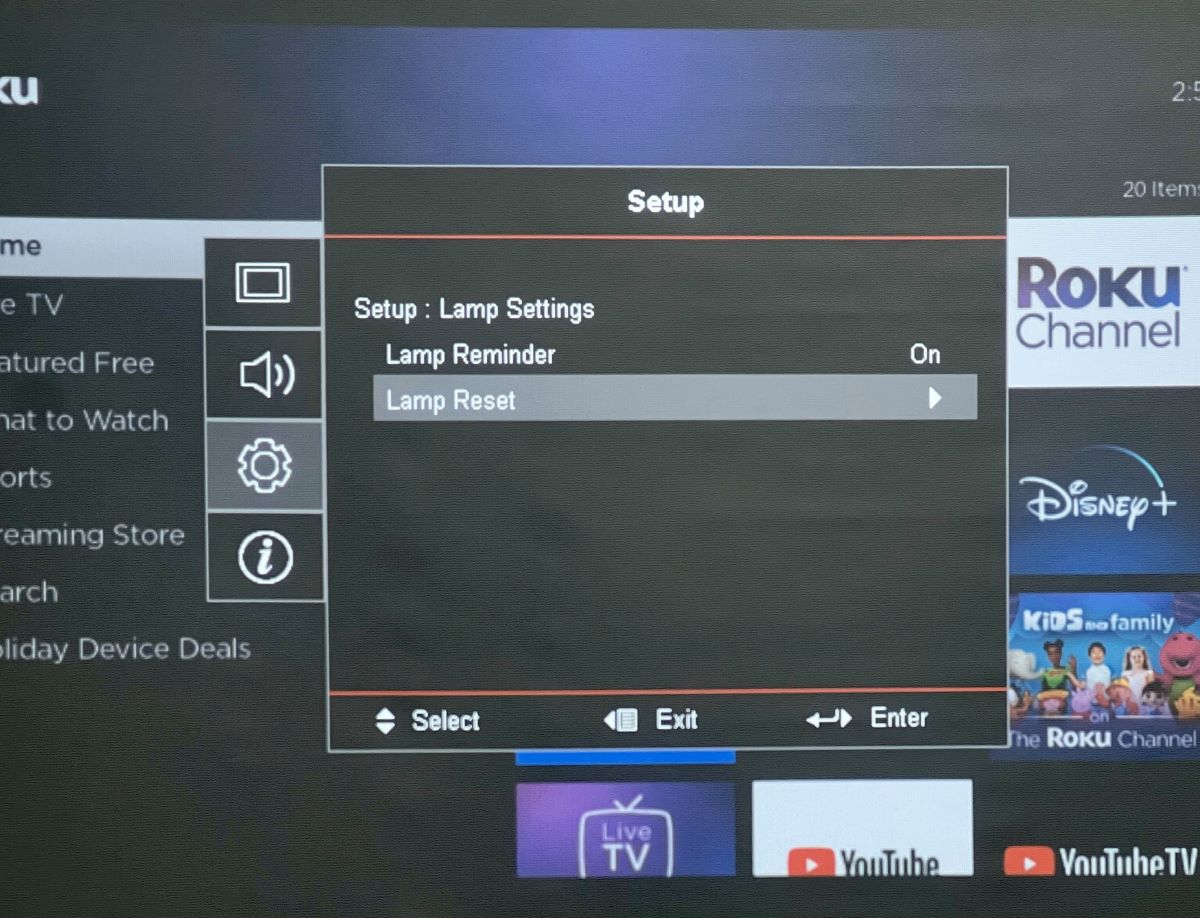
| Optoma | Press Menu and go to Setup. Select Lamp Settings and then Lamp Reset. Select Yes when prompted. |
7. Always Keep Your Projector Cool
Ensure your projector’s thermals are always in check. If the device runs excessively hot every time you use it, it can burn the polarizer or damage the color wheel or LCD panel over time.
To avert the situation, ensure the projector is always kept in a well-ventilated place, at least during use.
Proper airflow to the device may not rectify the yellow spot/tint issue, but it can prevent future occurrences and other problems.
If you’d like to know more about keeping your projector running cool, we’ve discussed the same in detail in a separate article here.
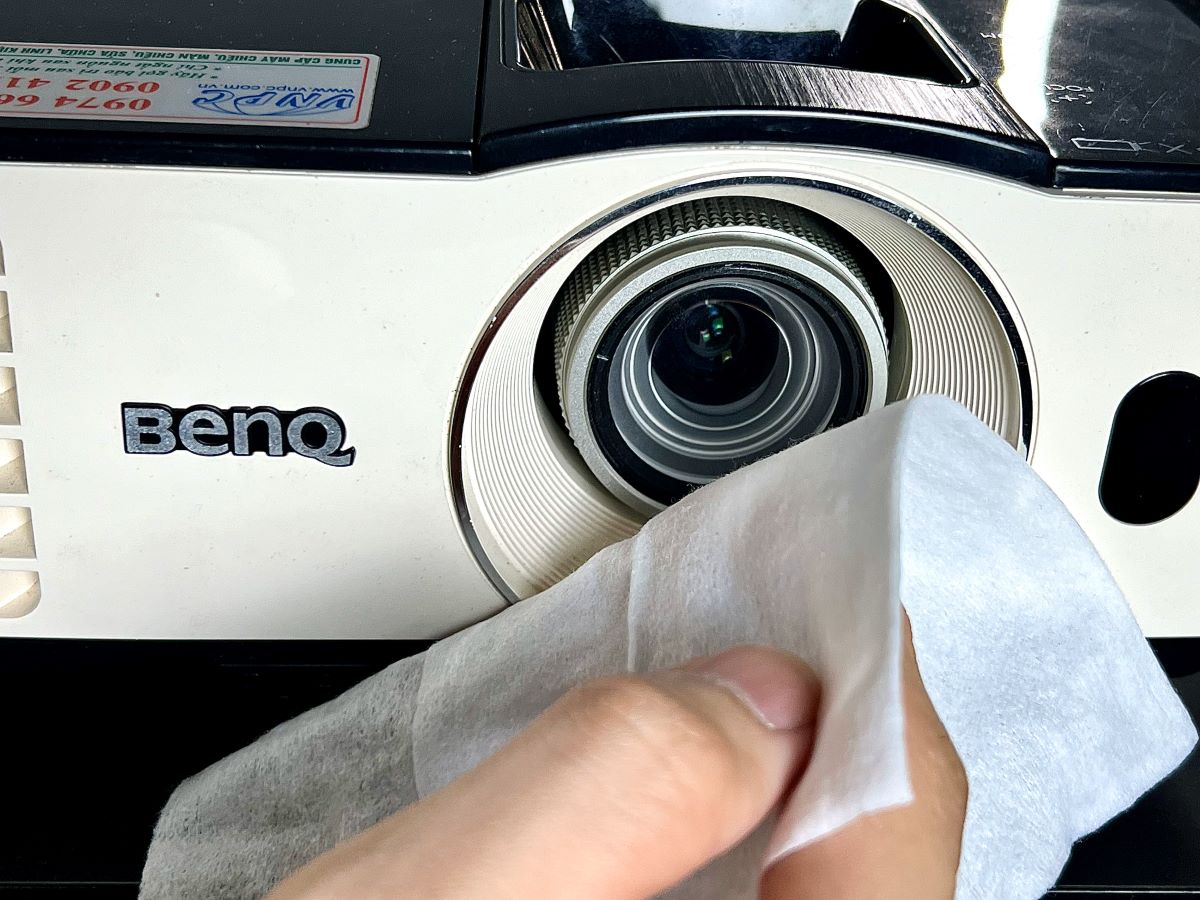
8. Clean the Projector Lens
A dirty projector lens could be, at times, the cause behind yellow tints on a projector screen.
The glass used for projector lenses isn’t as scratch-resistant as the ones used in eyewear. In other words, the material is easy to scrape. Even a brief wipe with a regular cloth may pose risks.
If abrasions develop, they’ll show as colored spots or other artifacts as the light interacts with the scratched surface, causing different visual distortions.
Therefore, if you think the projector lens is dirty, clean it with the right tools:
You won’t always need the above tools all at once.
The lens cloth alone will suffice for routine cleaning. The cleaning solution should be used sparingly or when deeper cleaning is needed. The gas duster helps remove loose debris and dust.
Here are the steps to properly clean the projector lens:
Step 1: Grab the lens cloth and spray some cleaning liquid onto it. Don’t spray the solution on the lens directly to avoid waste, spilling, streaking, or seepage.

Step 2: Clean the projector lens with a moist cloth.
Step 3: If the lens glass has dust or debris stuck, blow it out using the compressed air duster. Hold the duster at least seven inches away from the lens to prevent inadvertent damage.
Note: Refrain from touching the projector lens with bare hands. Even if your fingers are spotless, the naturally textured surface of your mits will leave behind fingerprints or cause scratches.
9. Reset All Config of Your Projector
If none of the above measures help, one of the last few things you could do is set the projector to its default state.
If any incorrect or customized color-related settings cause the yellow tint or spot problem, resetting will help.
In the table below, we’ve shared the steps to reset the configuration on some popular projector brands.
| Projector Brands | Instructions |
| Epson | Press the Menu button. Scroll to Reset and choose Reset All Config. Select Yes to confirm. |
| BenQ | Hit Menu. Go to Picture and choose Reset Picture Settings. |
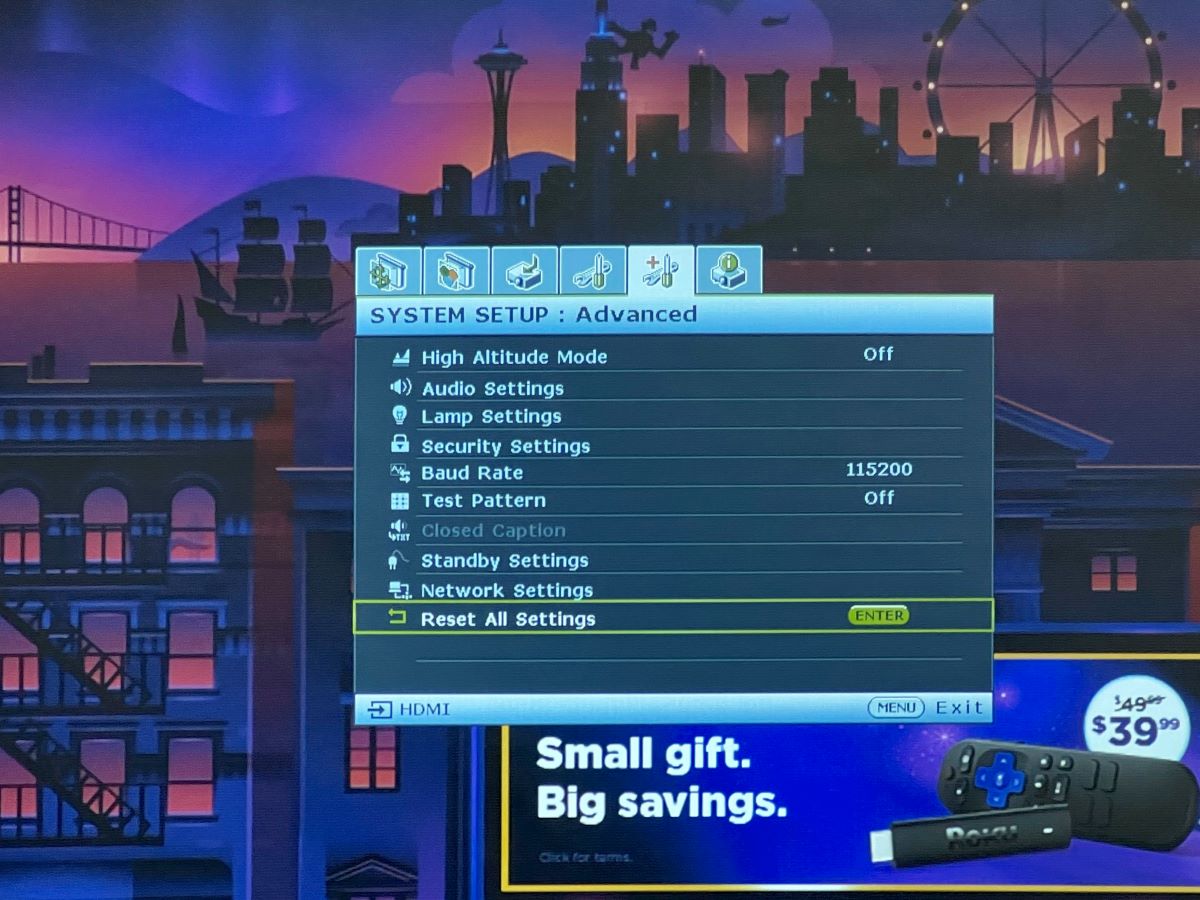
| Press Menu. Under System Setup: Advanced and select Reset All Settings. | |
| Optoma | Hit the Menu key. Navigate to Setup and then Reset. Select Reset to Default and then choose OK. |
10. Contact the Manufacturer
If the aforementioned hard reset also doesn’t help, contact the projector manufacturer.
If you own an Epson, call (562) 276-4394. Phone support is available Monday to Friday from 7 AM to 4 PM (Pacific Time)
To send an email message, click here. You can also reach out to the brand through their company pages on various social media platforms.
For BenQ support, call 1-888-512-2367 on Mondays to Fridays between 8:30 AM and 5:30 PM (Central Standard Time). Or email them at [email protected].
BenQ also has X (Twitter) and Facebook pages to message them directly.
If you need help with your Optoma projector, contact the business at 1-888-289-6786. The operation hours are 6 AM to 5 PM (Pacific Standard Time).
Although the working days are not clearly mentioned, we assume weekends are off. Click on this link if you’d like to send a message instead.

Catherine Tramell has been covering technology as a freelance writer for over a decade. She has been writing for Pointer Clicker for over a year, further expanding her expertise as a tech columnist. Catherine likes spending time with her family and friends and her pastimes are reading books and news articles.

Duy Anh is a seasoned technical editor specializing in helping readers troubleshoot TV, projector, and Wi-Fi issues. He’s always been drawn to logical problem-solving. His ability to approach matters from various angles with a neutral mindset enhances his technical expertise.