
How to Adjust Angle & Position on Your BenQ Projector: Fix Greyed-Out Settings

What To Know
- To correct image orientation, ensure the correct BenQ projector installation mode (Front Table, Rear Table, Front Ceiling, Rear Ceiling) is selected based on your setup.
- Utilize the built-in grid test pattern to align the BenQ projector image precisely, ensuring straight and even lines for distortion-free projection.
- If BenQ projector position settings are greyed out, connect a PC/laptop using a VGA (analog RGB) cable to unlock these options and adjust the image’s position accurately.
In this guide, I will show you three steps to adjust your BenQ projector’s position and angle perfectly to achieve an optimal projection image, along with troubleshooting tips if you encounter greyed-out position settings on the projector.
Let’s get started!
Quick Navigation
- Step 1: Choose the Correct Projector Installation Mode
- Step 2: Utilize the Grid Test Pattern To Prevent Image Distortion
- Step 3: Fine-Tuning the Projection Image to a Rectangular Shape With Keystone Correction
- Bonus: Zoom In and Then Position the Highlighted Image
- Troubleshooting: Greyed-Out Position Settings
- Wrapping Things Up
Step 1: Choose the Correct Projector Installation Mode
Most BenQ projectors can be set up using one of the following methods: setting the projector on a flat surface like a table/desk or ceiling mounting it.
You can also choose which direction to project the image onto your screen by placing the unit in front of or behind it.
Since all these projection positions drastically change the image’s orientation, BenQ units come with four modes for you to choose from: Front Table, Rear Table, Front Ceiling, and Rear Ceiling.
So, the first step is to ensure you’ve selected the right projector installation mode to fix your unit’s upside-down or flipped image.
This is a common problem, so we’ve already written an article covering how to fix it. Check out our detailed guide BenQ Projector Upside Down: How to Fix It to learn all about mounting your projector and dealing with flipped images.
If you haven’t already adjusted the projector installation mode, follow the steps listed below to do so.
Step 1: Turn on your BenQ projector.
Step 2: Launch the Quick Install menu by pressing the remote’s Quick Install key.

Step 3: Head to Projector Installation.

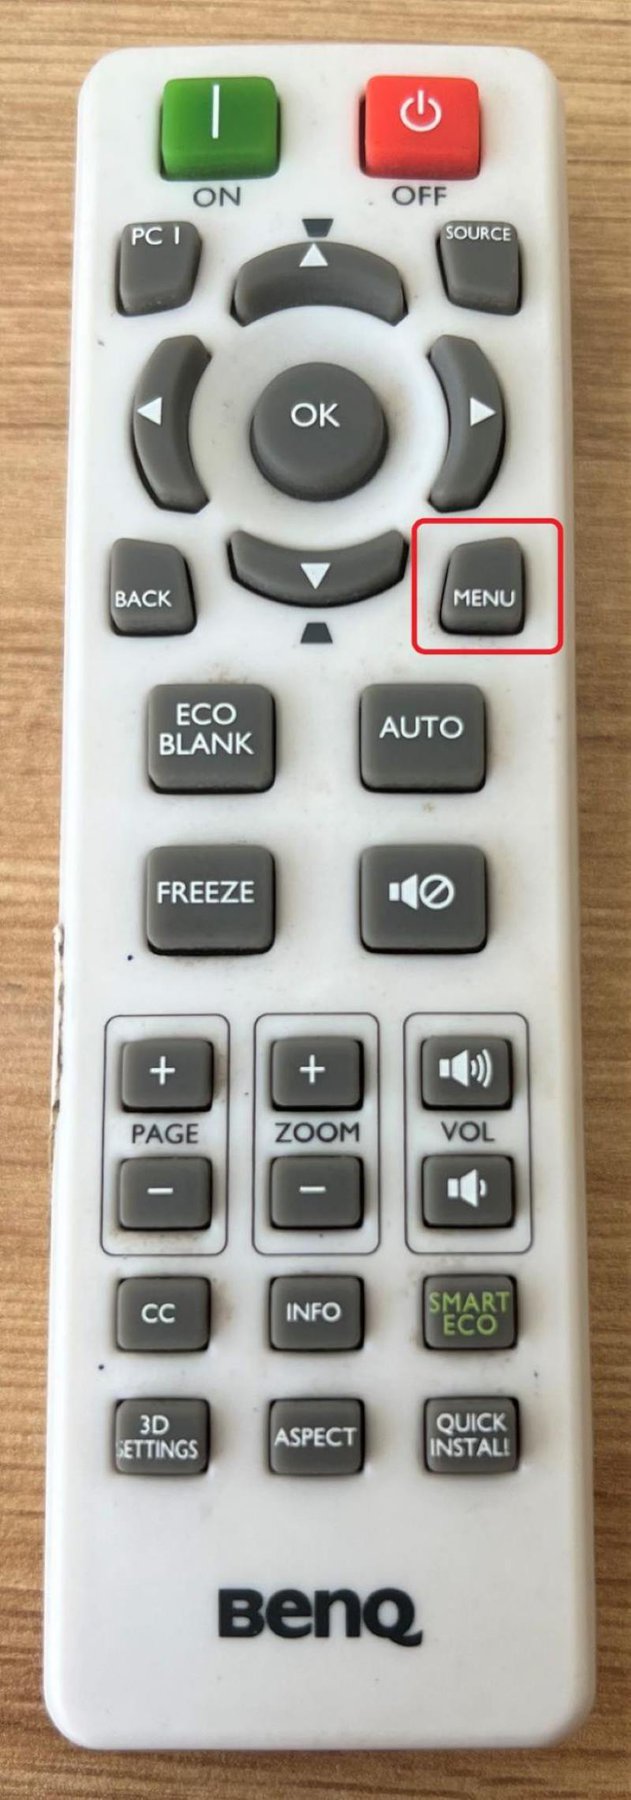
Alternatively, hit the control panel or remote’s Menu button to navigate to the Menu Settings screen.
Head to the System Setup: Basic tab at the top of the screen, before scrolling down and selecting Projector Installation.

Step 4: Choose the right projector installation mode for your setup.

Step 2: Utilize the Grid Test Pattern To Prevent Image Distortion
Understanding the projector picture’s position can be challenging when displaying a TV show or simple landscape image.
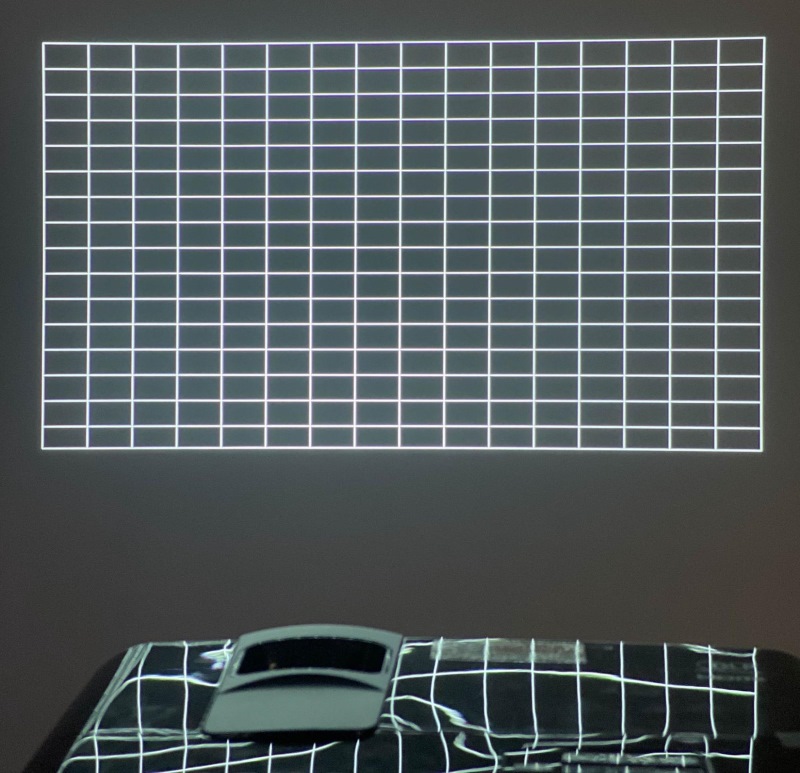
Luckily, BenQ projectors come with a test pattern which is a simple grid. This grid will help you fine-tune the image by ensuring every line and box is straight and even.

Follow the steps below to adjust the projector image using the built-in test pattern.
Step 1: Hit the remote’s Quick Install button to open the Quick Install menu.
Step 2: Navigate to Test Pattern.

Alternatively, find and press the Menu button on the unit’s control panel or remote to go to the Menu Settings.
Then, open the System Setup: Advanced tab before heading to Test Pattern.

Step 3: Display the Test Pattern by turning it On.

Step 4: Now, the tricky part. You must carefully position your projector’s image so the grid lays flat against the wall and is completely straight and uniform. This will take some tinkering, so be patient and continue adjusting the image until it looks like the grid shown below.
Step 5: When you’re happy with the image position, change the Test Pattern to Off. Otherwise, the projector will be stuck on the test pattern grid.

Step 3: Fine-Tuning the Projection Image to a Rectangular Shape With Keystone Correction
Last, but certainly not least, you must adjust the unit’s Keystone correction to ensure the image is perfectly rectangular and lays flat against the screen.
Note: BenQ projector’s Keystone correction feature only supports vertical adjustments of up to 40 degrees. If your projector image exceeds this distortion level, you must use other adjustment methods before using the Keystone correction feature.

Follow the instructions below to adjust your BenQ projector’s Keystone correction.
Step 1: Connect your projector to a source device (e.g. laptop, phone, console) and display an image on-screen. For the best results, I recommend using an HDMI connection.
Step 2: From here, you can access the Keystone settings using one of the following methods.
a. Hit the Up or Down arrow keys on the projector remote.

b. Press the remote’s Quick Install key before selecting Keystone.

c. Hit the control panel or remote’s Menu button and navigate to Keystone.

Step 3: Next, use the remote’s Up and Down arrow buttons to manually align the image unit until it’s an even rectangle, like the one below.

Bonus: Zoom In and Then Position the Highlighted Image

If your projector image isn’t perfectly centered on the screen, the easiest way to adjust it is by zooming into the image before adjusting the highlighted image’s position. This will allow you to ensure the image is correctly centered and not being cut off.
Follow the steps below to zoom in and position your BenQ projector image.
Step 1: Power on your projector, connect it to an input device (preferably with an HDMI cable), and display an image.
Step 2: Open the Zoom settings using one of the following methods:
a. Hit the remote’s Zoom + or Zoom – key.

b. Hit the control panel or remote’s Menu key before going to Digital Zoom.

Step 3: Then, use the remote’s Zoom + and Zoom – keys to adjust the highlighted image’s size until you find a size that works best for your setup.
While doing this, you should see a small window in the bottom right corner of the screen that will help you navigate the zoomed-in image easier.

Step 4: Use your remote’s D-pad to adjust the zoomed-in image’s position until your desired image section is displayed on-screen.

Troubleshooting: Greyed-Out Position Settings
This user was trying to adjust his BenQ projector image’s position only to find that the position settings were greyed out, making it impossible for the user to make any changes.
As you can see in the image below, I had a similar issue on my own projector.

These settings are only available when your projector is connected to a PC/laptop with a VGA (analog RGB) cable. As you can see in the image below, these settings suddenly became accessible once I connected my laptop to the projector using this method.

So, if these settings are greyed out on your BenQ projector, try connecting your PC/laptop to it using a VGA connection.
If your PC/laptop isn’t VGA-compatible, consider using an HDMI to VGA adapter to connect it to your projector.
Wrapping Things Up
BenQ projectors boast some incredible features, including built-in speakers, a 4K picture, HDR, and more. However, your projector may take more than a couple of cables to set up.
If your projector image is upside-down or flipped, ensure you’ve selected the correct projection installation mode for your setup.
You may also need to use the unit’s built-in test pattern to fine-tune the image’s position. Remember, you want the image to be as even and straight as possible, so take your time when adjusting the position settings.
Sometimes, your projector image may look more like a distorted quadrilateral than an even rectangle. In this case, you must adjust the Keystone correction feature fix the image’s shape, and make it lay flat against the screen. You can even zoom and position the image further if you’re displeased with the placement.
If you can’t access the position settings, make sure your PC/laptop is connected via VGA, rather than HDMI.
What’s your experience adjusting a BenQ projector image’s position?
Let us know in the comments below!

Yesenia Achlim is a technical copywriter and editor with a focus on AV equipment. She aims to break down complicated topics and make technology accessible, no matter your technical expertise. When she’s not teaching you how to replace a projector lamp, you can find her reading and baking.