
How To Focus BenQ Projector Images Quickly + 5 Tips to Troubleshoot Blurry Displays
What To Know
- Focus a BenQ projector by manually turning the focus ring or using the auto-focus button, ensuring the lens is clean and the projector is aligned with the screen.
- Troubleshoot blurry images by checking for a dirty or scratched lens, aligning the projector with the screen, adjusting sharpness settings, and ensuring strong Wi-Fi signal strength.
- Regular maintenance, like cleaning the lens with a microfiber cloth and using the projector’s carrying case, can prevent common focusing issues.
In this article, I will share with you two proper methods to focus the images on your BenQ projector and five useful tips that can help you get rid of blurry display issues.
Let’s dive in!
Quick Navigation
Method 1: Using the Focus Ring
There are two primary ways to achieve correct focus with a BenQ projector. The first and most common method is to employ the focus ring manually.
Here are the steps to use the ring:
Step 1: Power on the projector and link the device to a phone or laptop with an HDMI cord for the best images.
Step 2: Showcase a picture from your phone or laptop on the screen.

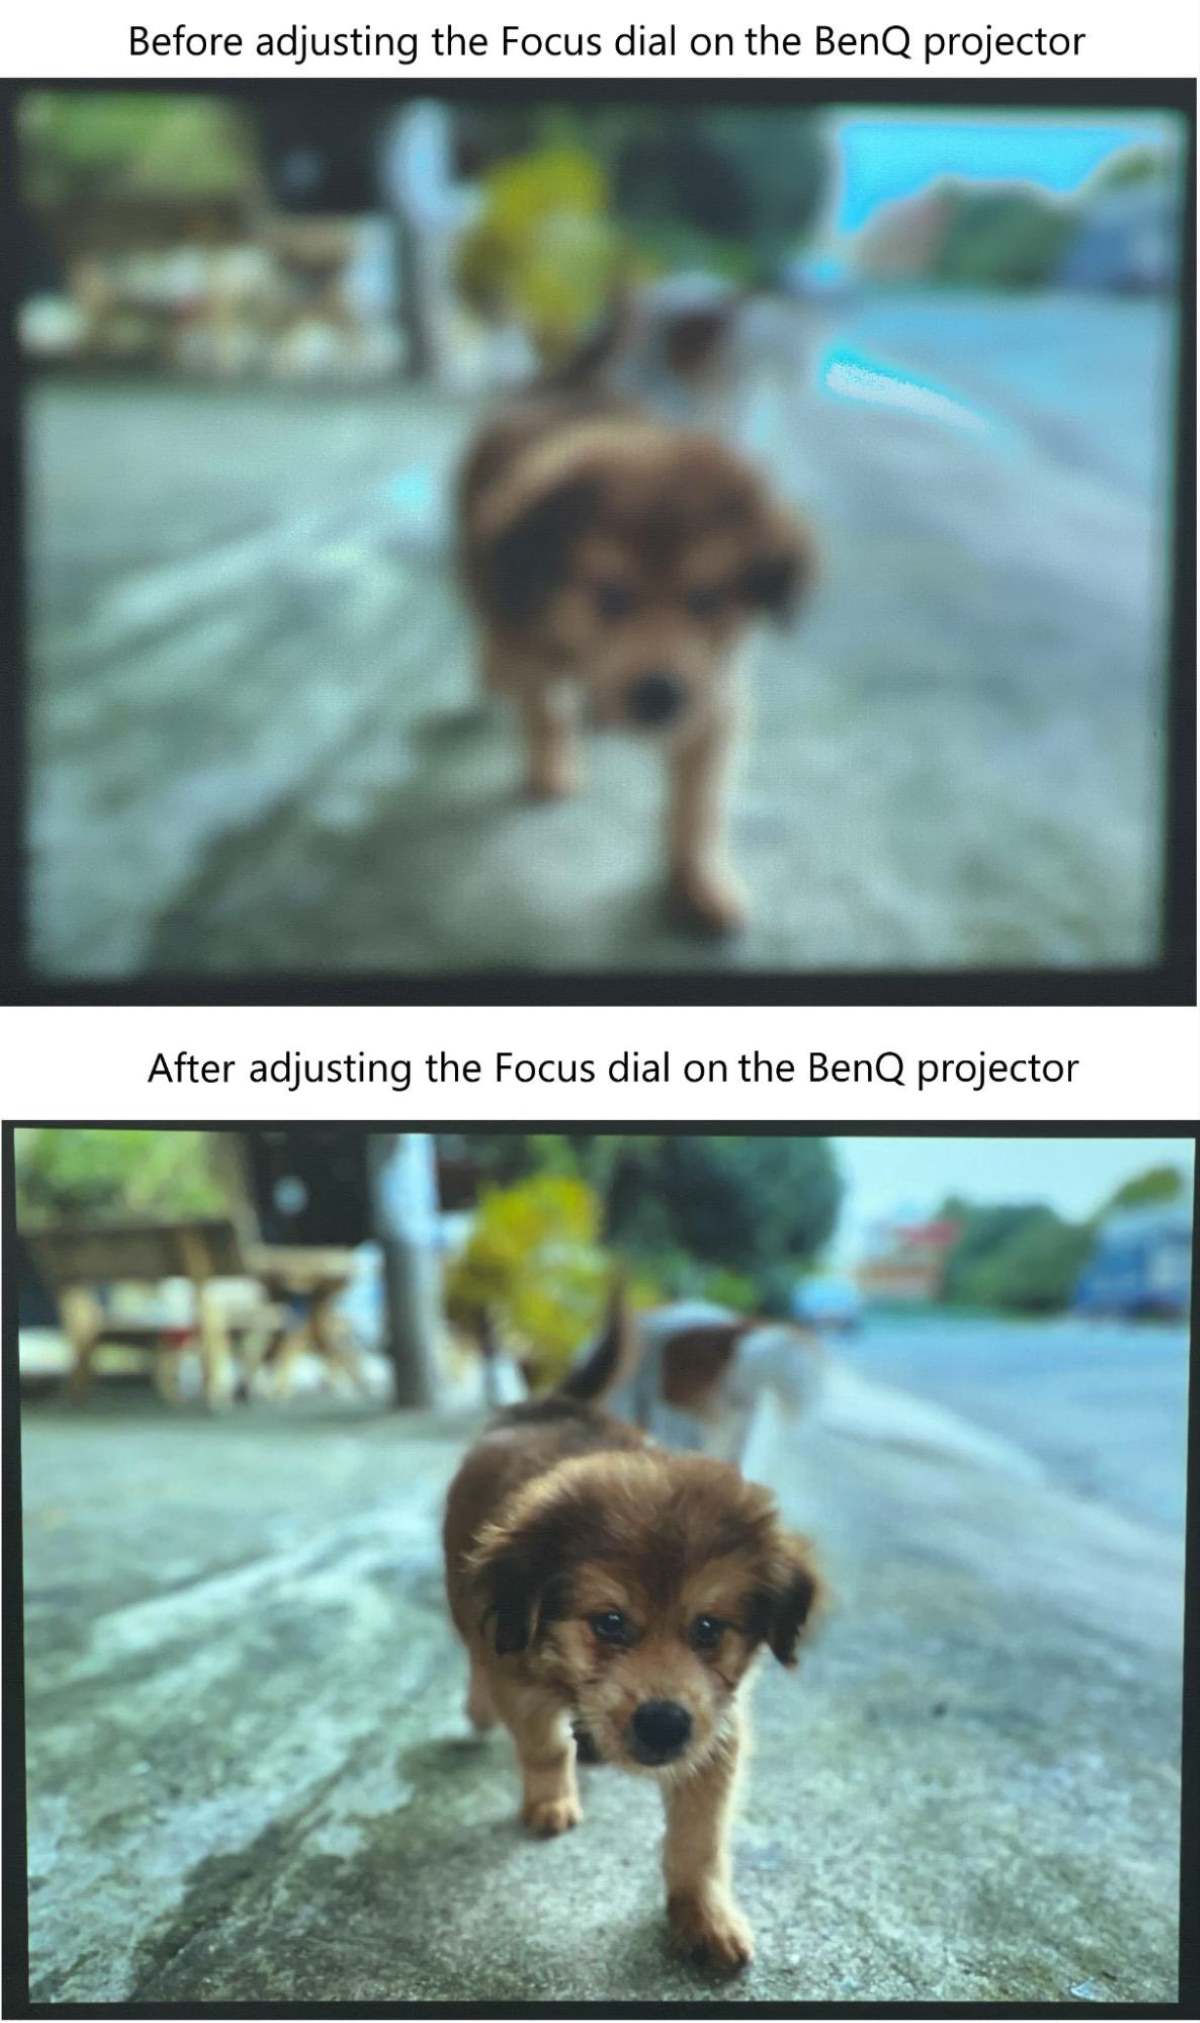
Step 3: Rotate the projector’s focus ring until the picture turns sharp and apparent, as shown below.


Getting the focus right by turning the ring is essentially trial and error. You may have to rotate the ring to the right or left until proper image sharpness is achieved.
Besides using an image from your phone or laptop, you may use your projector’s test pattern to focus the projected image. We’ve discussed it later in this article.

Method 2: Using the Auto-Focus Button
Some BenQ projectors, such as this portable BenQ GV30, come with auto-focus capability, meaning you need not manually set the lens in focus.
The projector uses a dedicated focus button to set the feature in action. Hit the auto-focus button on any random image on the projection screen to adjust the focus automatically.
The built-in auto-focus system alters the image’s frequency values to offer the best image quality. It takes the projector a couple of seconds to achieve the effect.
The auto-focus usually works accurately. In certain rare cases, however, you may manually focus the lens to provide the finishing touches or effect some minor fine-tuning by pressing the right or left keys on the remote while the screen still shows the focus guide.
When the automatic focus doesn’t get it right, it’s likely due to extrinsic factors like lighting conditions, distance between the projector and projection screen/wall, the projected content’s clarity, and even the projector model.
For visual instructions, watch the video below:

Bonus: Test Pattern
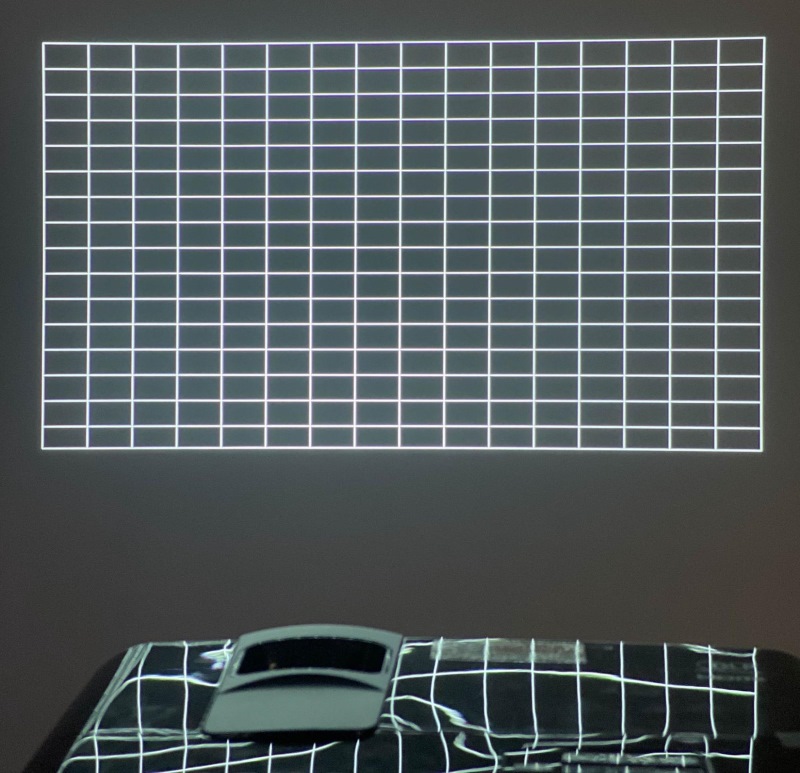
As mentioned earlier, let’s discuss the “test pattern.” The built-in image testing is a chain of test pictures shown on the screen for different calibration and setup tasks.
For focus adjustment, the test pattern usually includes grids, sharp edges, lines, and other elements to help fine-tune the focus for optimum image sharpness.
You may use your BenQ projector’s grid test pattern to alter the picture and mitigate distortion.
The test pattern could also be used instead of an image from your phone or laptop to focus your projector.
Here are the steps to use the test pattern:
Step 1: Turn on your BenQ projector’s test pattern feature. Click on this link to learn how to access and enable the setting.
Step 2: Adjust the focus ring until the pattern becomes clear and sharp, as shown below.
Troubleshooting: Projection Images Look Blurry
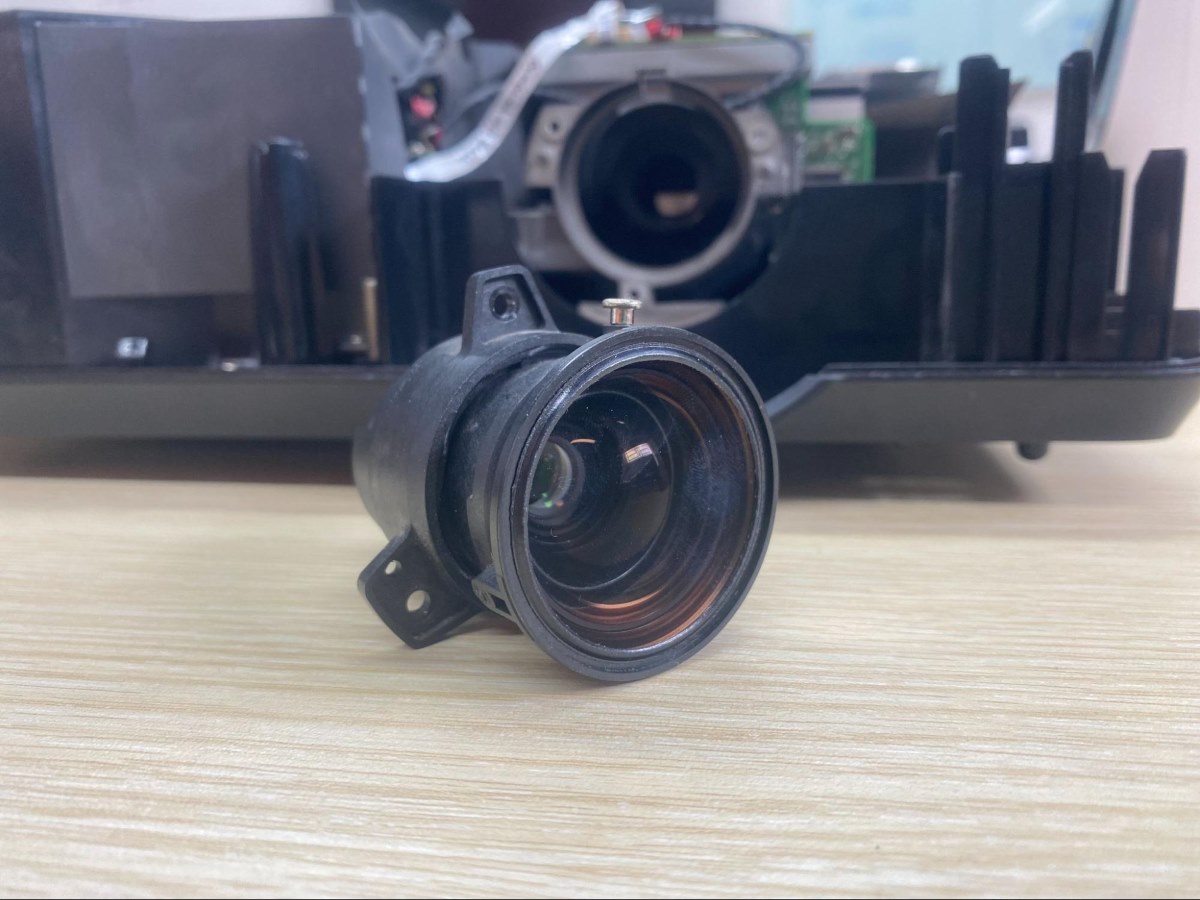
1. The Projector Lens is Dirty
Your projector lens is your unit’s eyes. Keeping it pristine and dust-free is critical for achieving a crystal-clear image on the screen.
Since the projector lens is a piece of glass that can easily get scratched, tidy it up with care. And do it often.
Use a soft, clean microfiber cloth and a non-abrasive, alcohol-free cleaning liquid. The solution’s non-abrasive nature ensures zero damage to the lens during cleaning.
To start cleaning, spray an adequate amount of the solution onto the soft cloth. The microfiber cloth mustn’t be dripping wet. At the same time, it shouldn’t be dry to the touch. It must be just moist.
Take the doused cloth and clean the projector lens in circular movements to thoroughly clean the lens, including the periphery. When you use linear swipes, the edges may get missed.

Circular motions also help reduce the likelihood of visible lines or streaks forming on the surface of the lens.
If the lens is particularly dusty, start with a compressed air can. Hold the can several inches away from the lens and activate the nozzle intermittently to release air in short bursts.
Because the compressed air is highly pressurized, holding the can close to the lens or continuously spraying air can damage the lens.
Conclude the cleaning with the mild solution, allow the lens to dry completely, and then turn on the projector.
2. The Projector Lens is Scratched
Improper cleaning or handling (carrying the lens without its carrying case) could damage or scratch the lens.
A projector lens with microabrasions or tiny scratches won’t be visible to the naked eye. But they’ll show when you use the projector. There’ll be picture quality issues – focus concerns could be one of them.
A scratched projector lens unfortunately cannot be repaired. You’ll have to replace the lens.
You can buy the lens online on Amazon or at your local projector store. The local store may also help with the replacement process.
To avoid inadvertently scratching the lens in the future, always put the lens cap on when not using the projector and use its carrying case during transportation. Most importantly, never handle the lens with your bare hands.
3. The Projector and Screen are Not Lined Up
Your BenQ projector and screen may need to be aligned if the picture is out of focus.
Move the projector around slightly to line it up with the projection surface. Ensure the projector and the screen’s center point are the same height.

Using the projector’s test pattern is a solid way to ensure the screen and projector are placed correctly. Use the pattern grid for guidance. Darken the room so that the grid is visible.
To learn more on the topic, click here.
4. You Need to Adjust the Sharpness
Adjusting projector sharpness is critical to achieving the clearest image quality. Here are the steps to set it right:
Step 1: Hit the Menu key on the projector control panel or remote to open your projector’s menu settings.
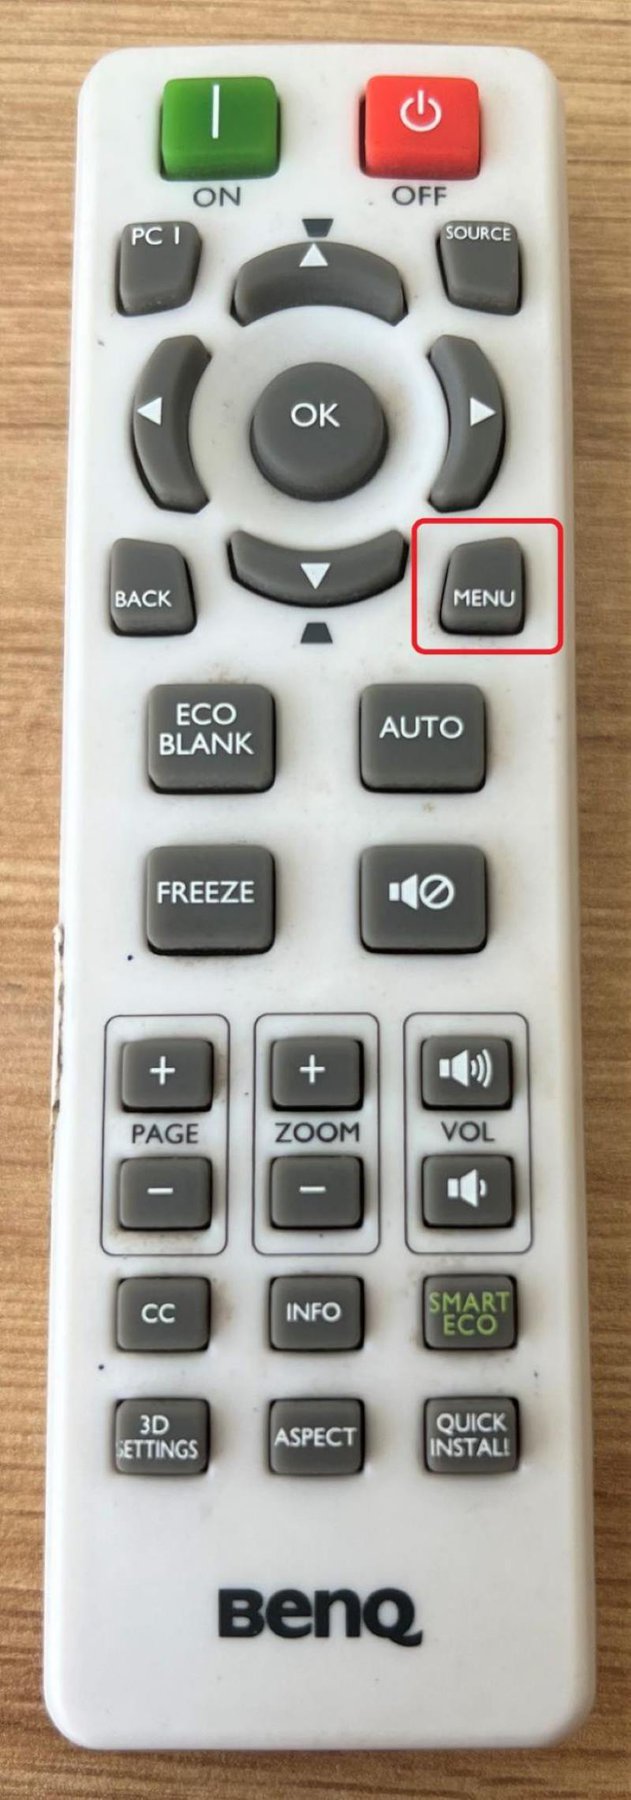
Step 2: Go to the Picture tab and choose Sharpness.
It’s worth noting that the Sharpness feature becomes available only when a Video, Component, or S-Video signal is chosen.

Step 3: Change the Sharpness value till the picture on the screen is clear enough. The greater the value, the more defined the image will be. Lower values mean softer pictures.

5. Check Your Wi-Fi Network Signal Strength
Some innovative BenQ projector models come with built-in Wi-Fi support to seamlessly connect the device to the internet and stream online movies, TV shows, etc.
But, because a Wi-Fi signal could be weak or the speeds can be below average, those factors can cause the online video to look pixelated or blurry.
Check your internet bandwidth and signal strength if your Netflix or YouTube videos look soft or blurry.

If the Wi-Fi router is positioned a bit too far from your projector, bring it closer. You may also set up a mesh Wi-Fi system if you live in a multi-storeyed space.
Conclusion
If the focus is not correct, how big, bright, and colorful the projection is will not matter. Sharp and clear images are paramount.
Unlike TVs, projectors lose focus easily as the lens is a moving, removable part or not as endogenous to the device.
Often, the user is expected to set the focus right. Although BenQ projectors have automatic focus, they may not always hit the nail, necessitating manual intervention.
With this article, you hopefully know how to set the focus of your BenQ projector right and adequately use the auto-focus function.
If you still have doubts, refer to your projector’s user manual or contact BenQ. If you have issues focusing on the image with your BenQ projector and the above instructions don’t help, the lens is most likely broken.

Catherine Tramell has been covering technology as a freelance writer for over a decade. She has been writing for Pointer Clicker for over a year, further expanding her expertise as a tech columnist. Catherine likes spending time with her family and friends and her pastimes are reading books and news articles.