
How To Adjust an Epson Projector To Fit Screen Step By Step

What To Know
- Utilize Epson’s “Screen Fit” feature on compatible projectors to automatically adjust the image size, shape, focus, and position.
- For precise image adjustments, use the “Quick Corner” and “Keystone Correction” tools to fine-tune the image’s rectangular shape and alignment on the screen.
- Resize images by moving the projector to match its throw ratio, using the Wide/Tele buttons or Zoom ring/button, or altering the aspect ratio to match the source device.
Are you struggling with an Epson projector that won’t fit the screen just right? Our guide is a beacon for those seeking solutions for projector screen adjustments.
Whether it’s tweaking the size, mastering full-screen settings, or navigating the intricacies of Epson’s features, this article is meticulously designed to resolve these common yet frustrating issues.
Quick Navigation
3 Ways to Make Your Epson Projector Full-Screen
If you want to resize your image to fit the screen, you can use the Screen Fit function and the Quick Corner function. Both functions are found on the remote control.
However, in some Epson projectors, you will have to do it manually by going to the settings menu.
1. Screen Fit
Epson projectors offer a convenient feature called “Screen Fit” that ensures your image fits your screen perfectly.
This intelligent function automatically corrects the screen size, shape, focus, and position all at once, saving you time and effort.
However, not all Epson projectors have the Screen Fit feature, and if yours supports the feature, you still need to follow the requirements below for your Epson projector’s sensor to be able to detect the screen size and shape:
- Make sure your projector is not mounted on the ceiling.
- For screens that are 100 inches (254 cm) or smaller.
- Avoid using the “Screen Fit” function in overly dark rooms or spaces that receive excessive daylight.
- Ensure your screen’s surface is not patterned or deflects the sensor strangely.
- Place your projector within the recommended distances and angles below.

Here’s how to correct the image size using Screen Fit:
- On your remote control or the projector control panel, press the Screen Fit button.
- Move the projector as needed so that it displays the image in the middle of the screen.
- Zoom the image until you see a yellow frame that extends beyond the screen edges.
- Now, press the Screen Fit button again, and it will then show you a pop-up with the message saying that the images on the screen can be adjusted using the Arrow Up or Down button on the control panel.
- Perfect the image shape and size using the arrow buttons and press Esc once it’s to your liking.
2. Quick Corner
Quick Corner will help you resize your image to achieve a perfect rectangular shape by moving the four corners of an image. This is how to go about it:
- Turn on your projector and connect it to any source device (a Roku player, a laptop, etc.)
- Press the Menu button on your Epson projector panel or its remote.
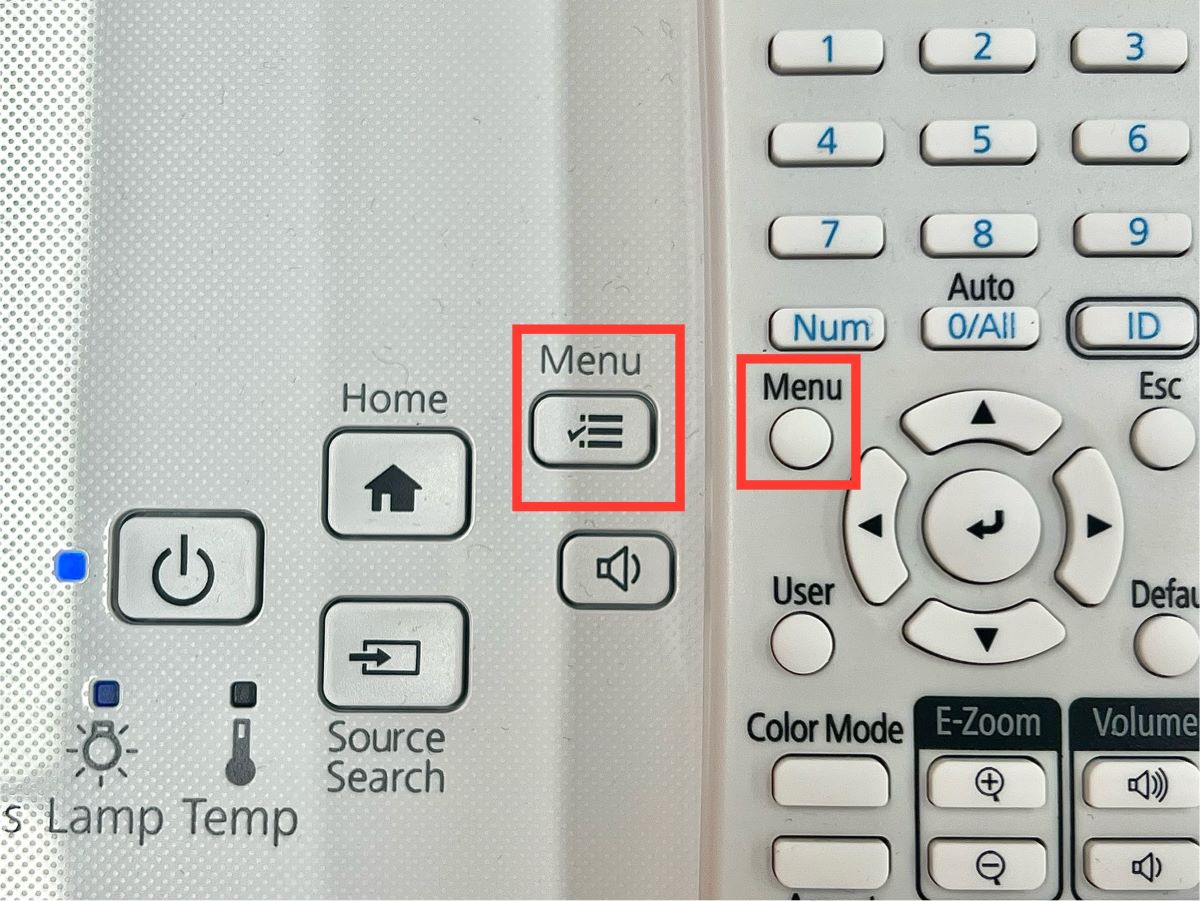
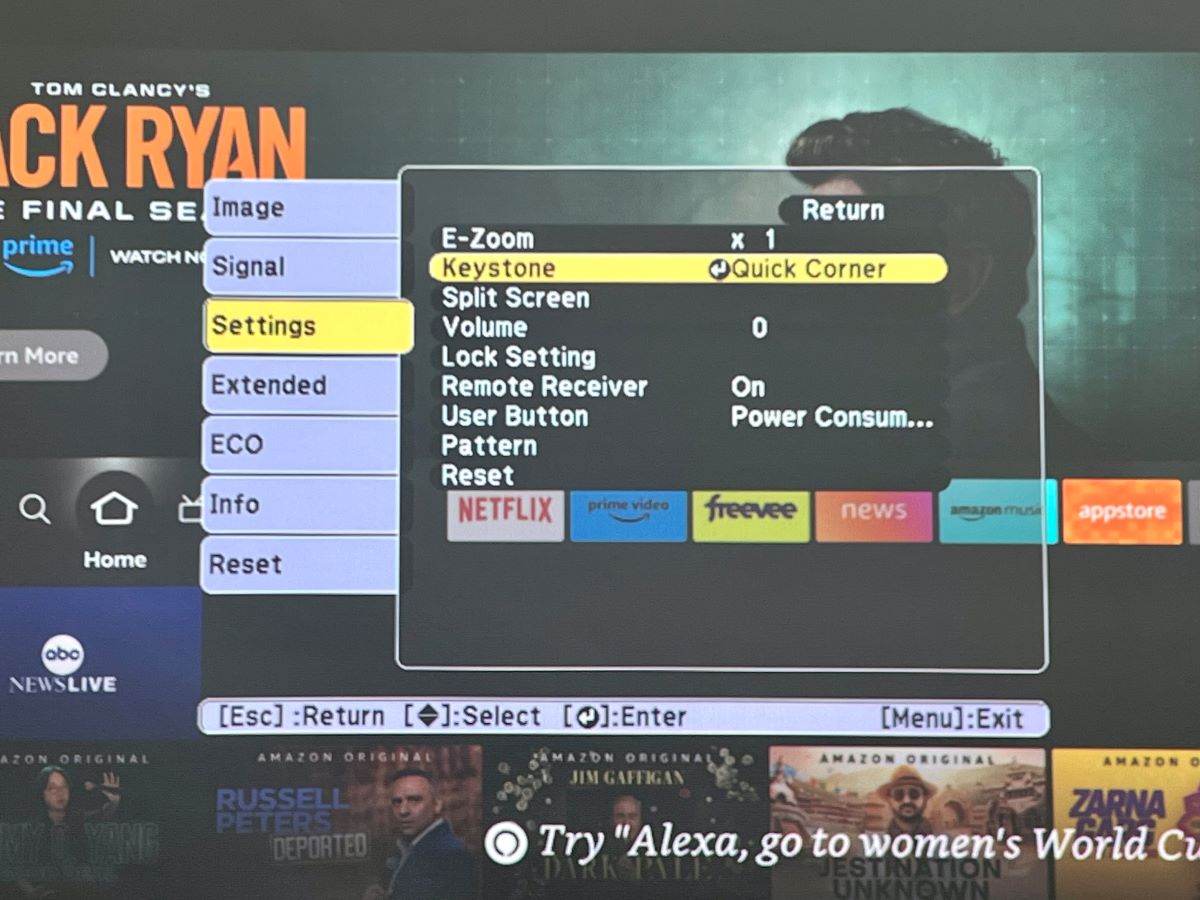
- Head to Settings, and then select Keystone.
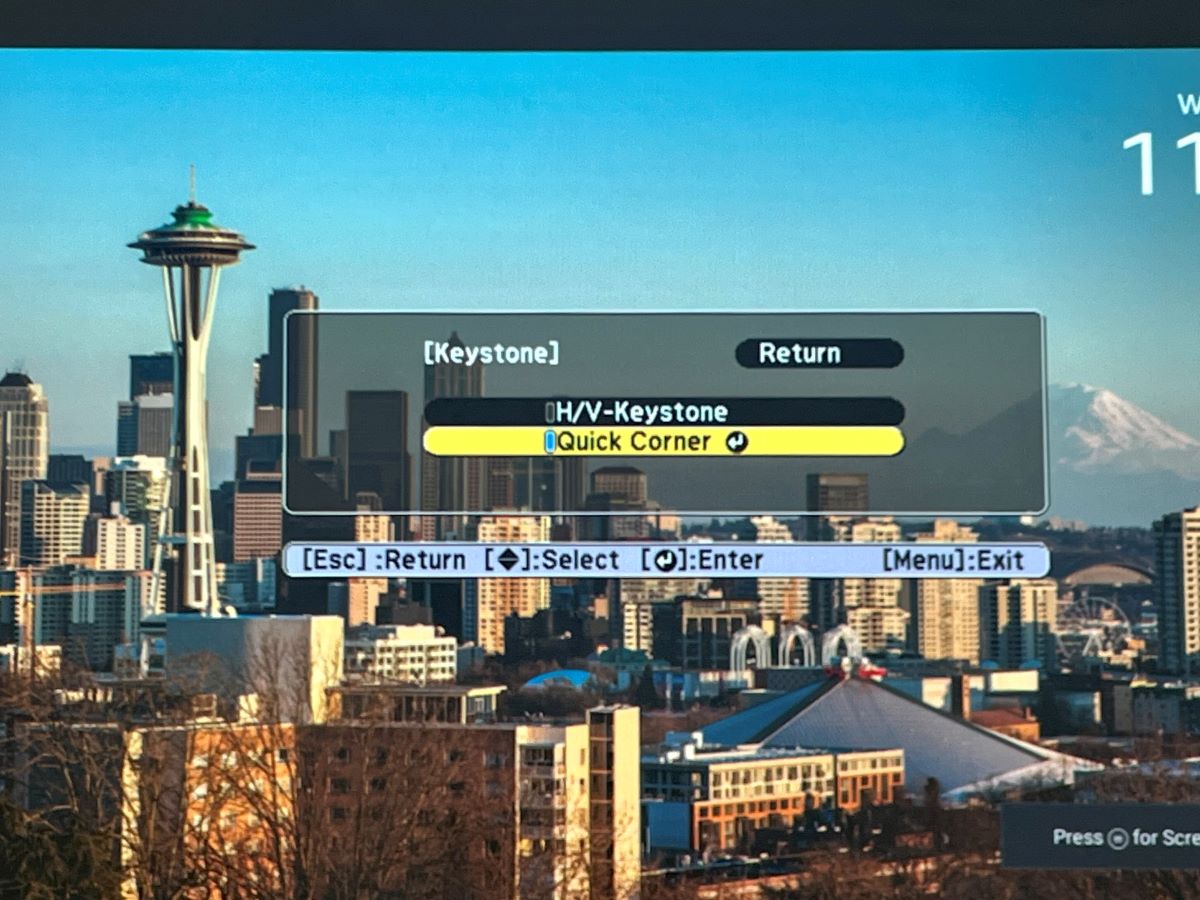
- Choose Quick Corner. Press Enter again to see the Quick Corner adjustment screen.
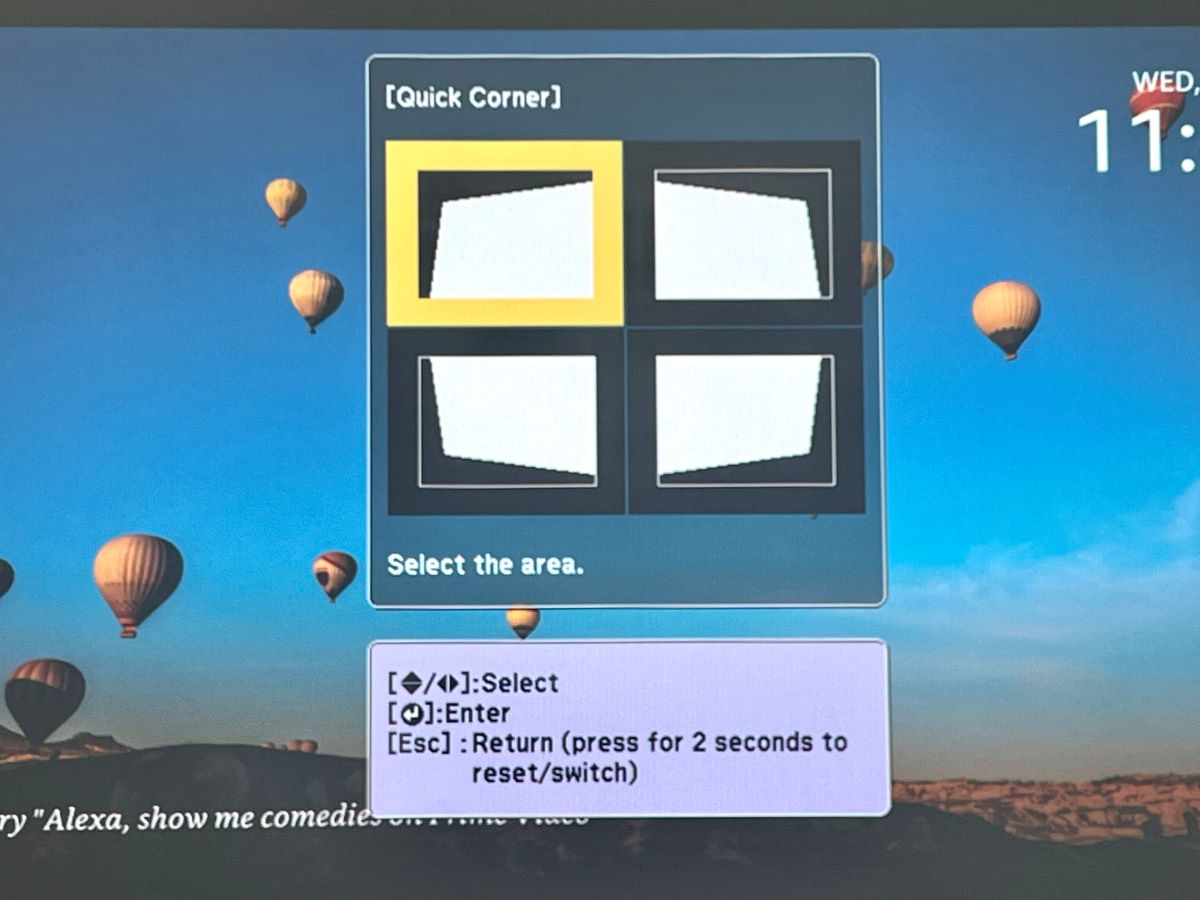
- Use the Arrow keys, and adjust four corners accordingly to make it full-screen.


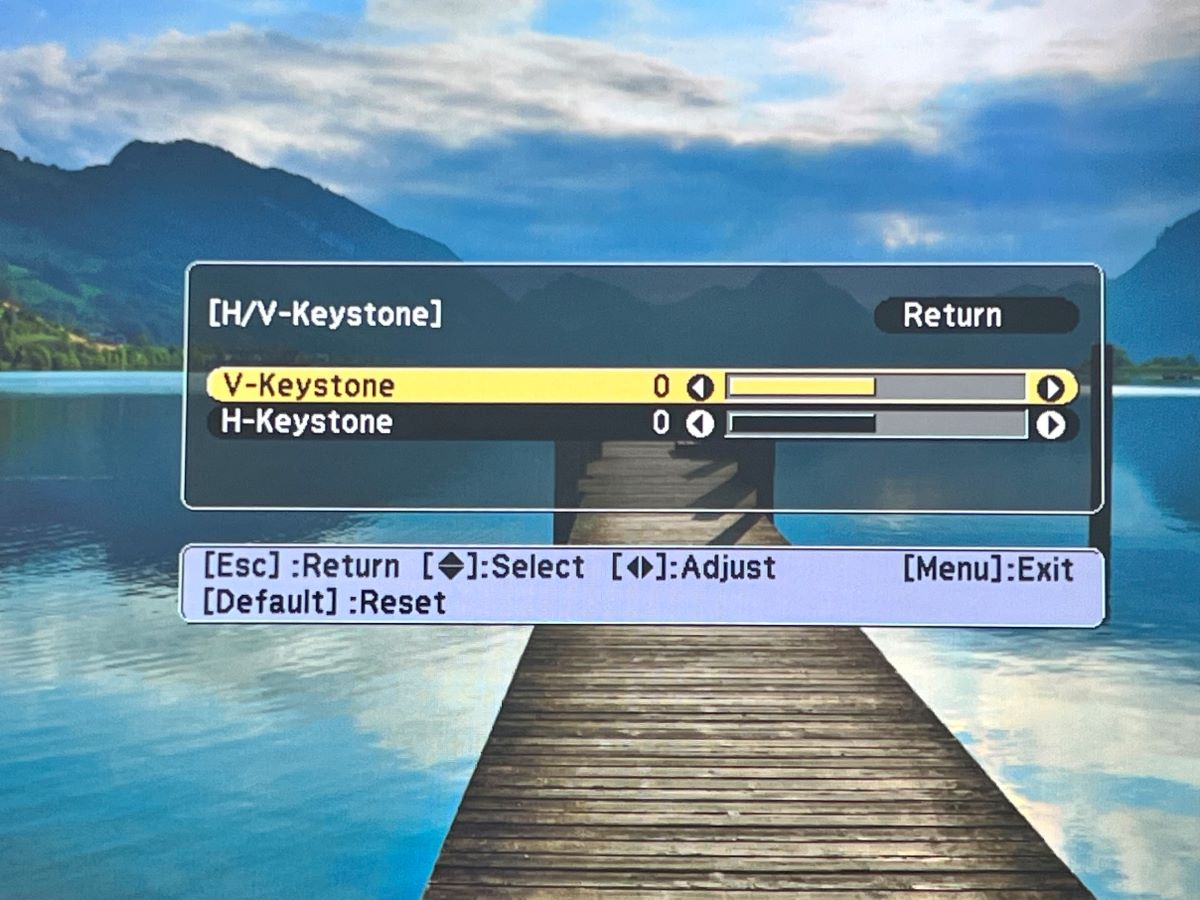
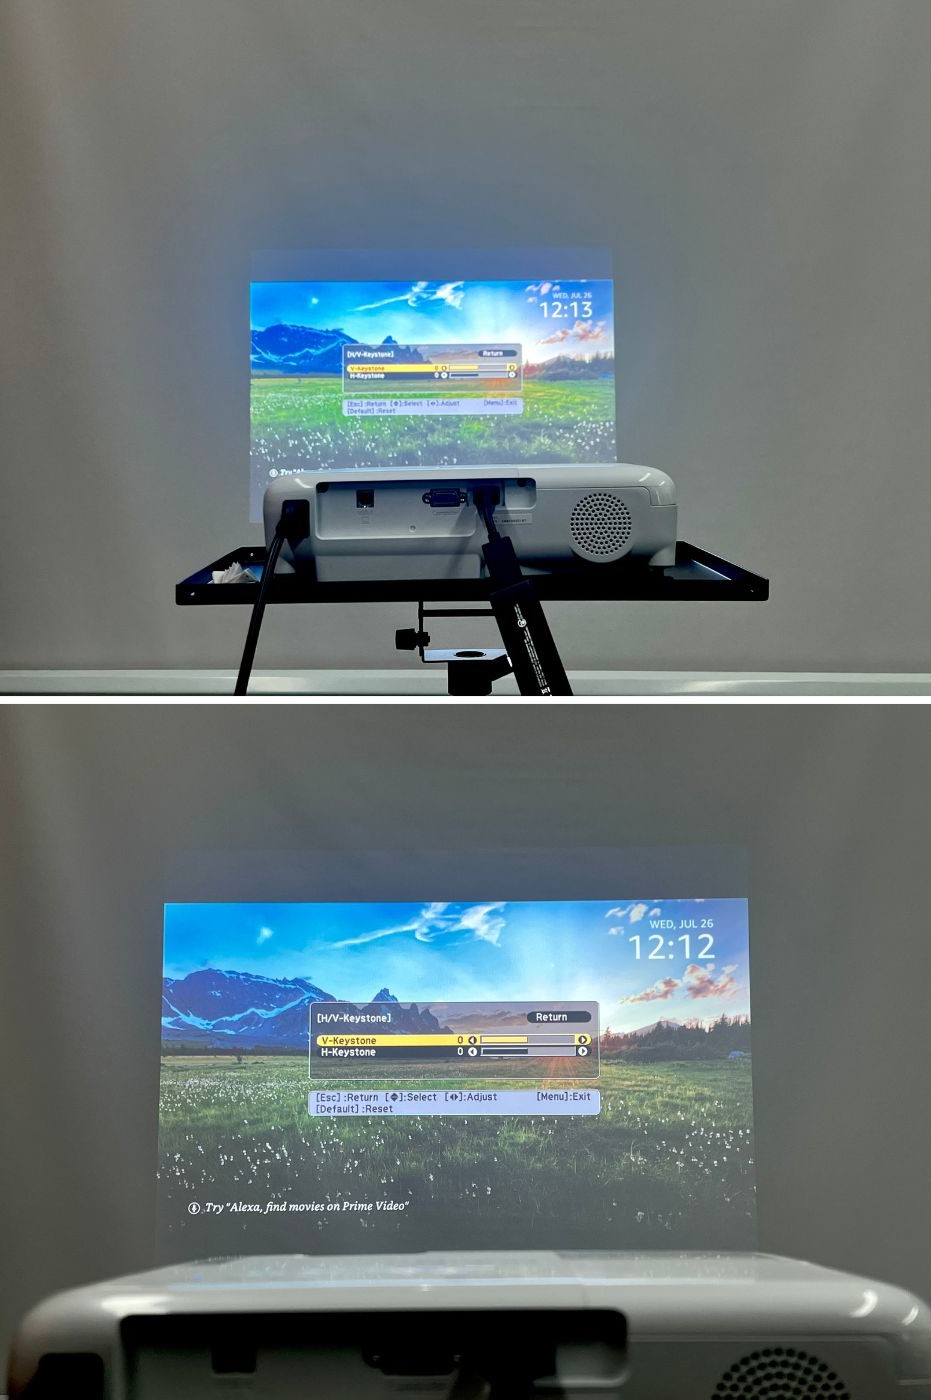
3. Keystone Correction
So, you’ve got all four corners adjusted, but they are not properly lined up. You have an image that almost looks like a trapezoid.
What’s next?
Use the Keystone correction tool to align the bottom and top corners. All Epson projectors have this tool.
The two vertical keystone corrections will align the top and bottom of the image, while the horizontal keystones will align the left and right sides to make a perfect rectangular-shaped image.
Here is the ultimate guide to adjusting your Epson keystone using the menu settings:
- Turn on your projector and connect it to any source device (a Roku player, a laptop, etc.)
- Press the Menu button on your Epson projector or its remote.
- Head to Settings, and then select Keystone.
- Choose H/V-Keystone, Press Enter again to see the Keystone adjustment screen.
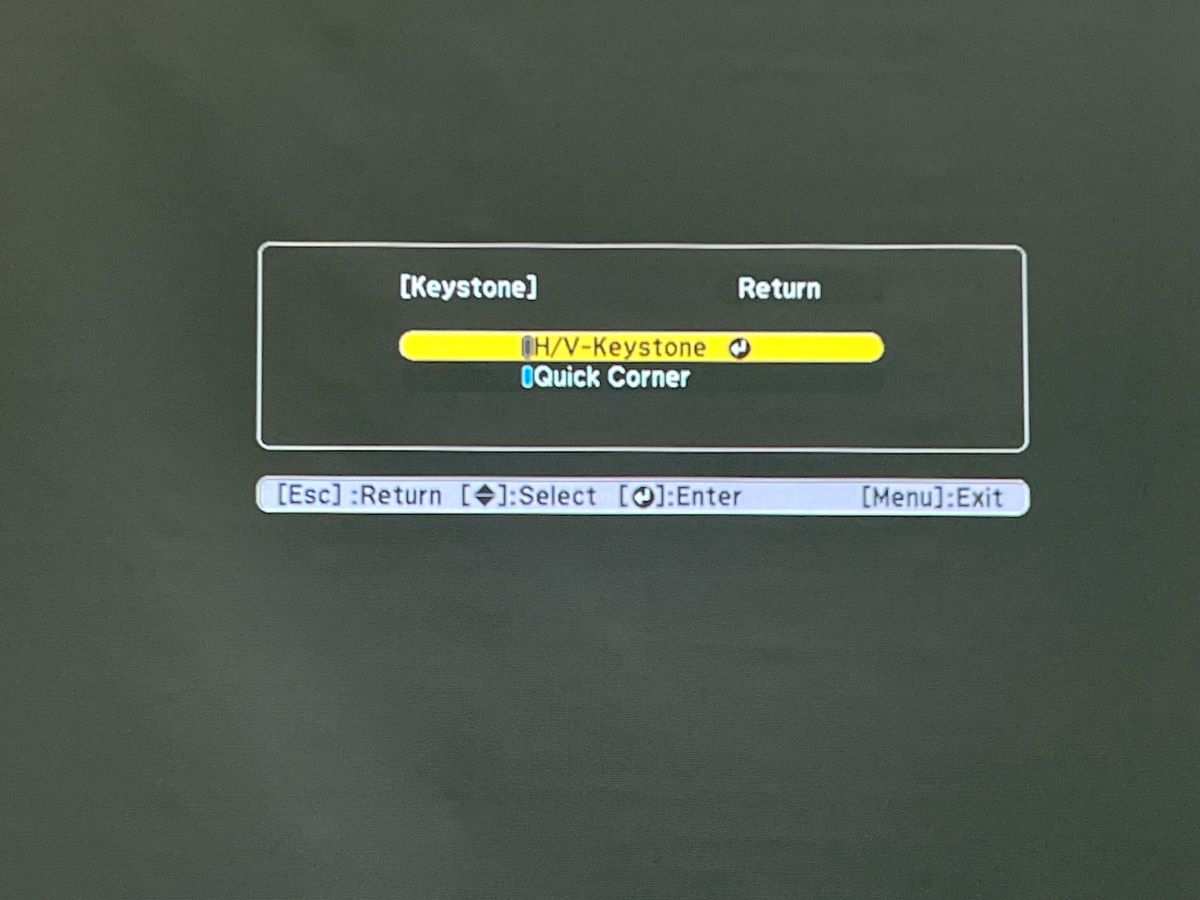
- Now, adjust your projector screen horizontally and vertically to your liking.


How to Resize the Image on Your Epson Projector
There are two main ways of resizing images on Epson projectors as mentioned earlier. However, you can also adjust the image size and shape through the menu settings. We will therefore explore all these options.
The options are:
- Moving your Epson projector.
- Using the Wide and Tele buttons (not available on all Epson projectors).
- Using the Zoom ring/button (not available on all Epson projectors).
- Changing the aspect ratio.
1. Adjust the Distance Between Your Projector & the Screen
One of the quickest ways to modify the size of the image projected is to adjust your projector. Ideally, you adjust the distance between the screen and the projector to match the throw ratio.
Every Epson projector has a throw ratio indicated and is calculated by determining the throw distance against the width of the image.
The throw distance is the distance between the tip of the projector lens and the screen, while the throw ratio is the width of the image relative to the throw distance. The throw ratio is often indicated as D/W (distance divided by screen width).
So, for instance, if your projector throw ratio is 2.1. That simply means to project an image that is 1 foot wide, your projector needs to be two feet away from your screen.
The throw ratio is a simple formula that you can use to either enlarge your image size or shrink it.
To increase the image size on your screen, you will move the projector away from your screen, and similarly, to reduce the image size, you will move the projector closer to the screen.
While this is a quicker method to adjust the image size, it is not viable for wall and ceiling mount projectors.
The other quick method to adjust the size of the image is by playing around with the Wide-angle (W) and Telephoto projector (T) buttons.
However, only some Epson models possess these two buttons.
Follow these steps to enlarge and shrink the image size using Tele and Wide buttons:
- Power on your projector and connect your laptop to your projector (just to display the image).
- Locate the Wide and Tele buttons on your projector panel (they’re the left and right buttons on the panel).
- Press the Tele button to make the image smaller. To make the image bigger, press the Wide button. Once you’ve got your desired image, press Esc to exit the menu.
3. Using Zoom Ring/Button
On some Epson projectors, there may be a zoom ring or slider instead of buttons that you can use to adjust the W and T buttons.
Simply push the zoom ring left or right to increase or reduce the image size.
Alternatively, press the Zoom button on your Epson remote continuously until you get the desired image size.

Remember to leave your projector on for at least 30 minutes if turning it on before using the Zoom function.
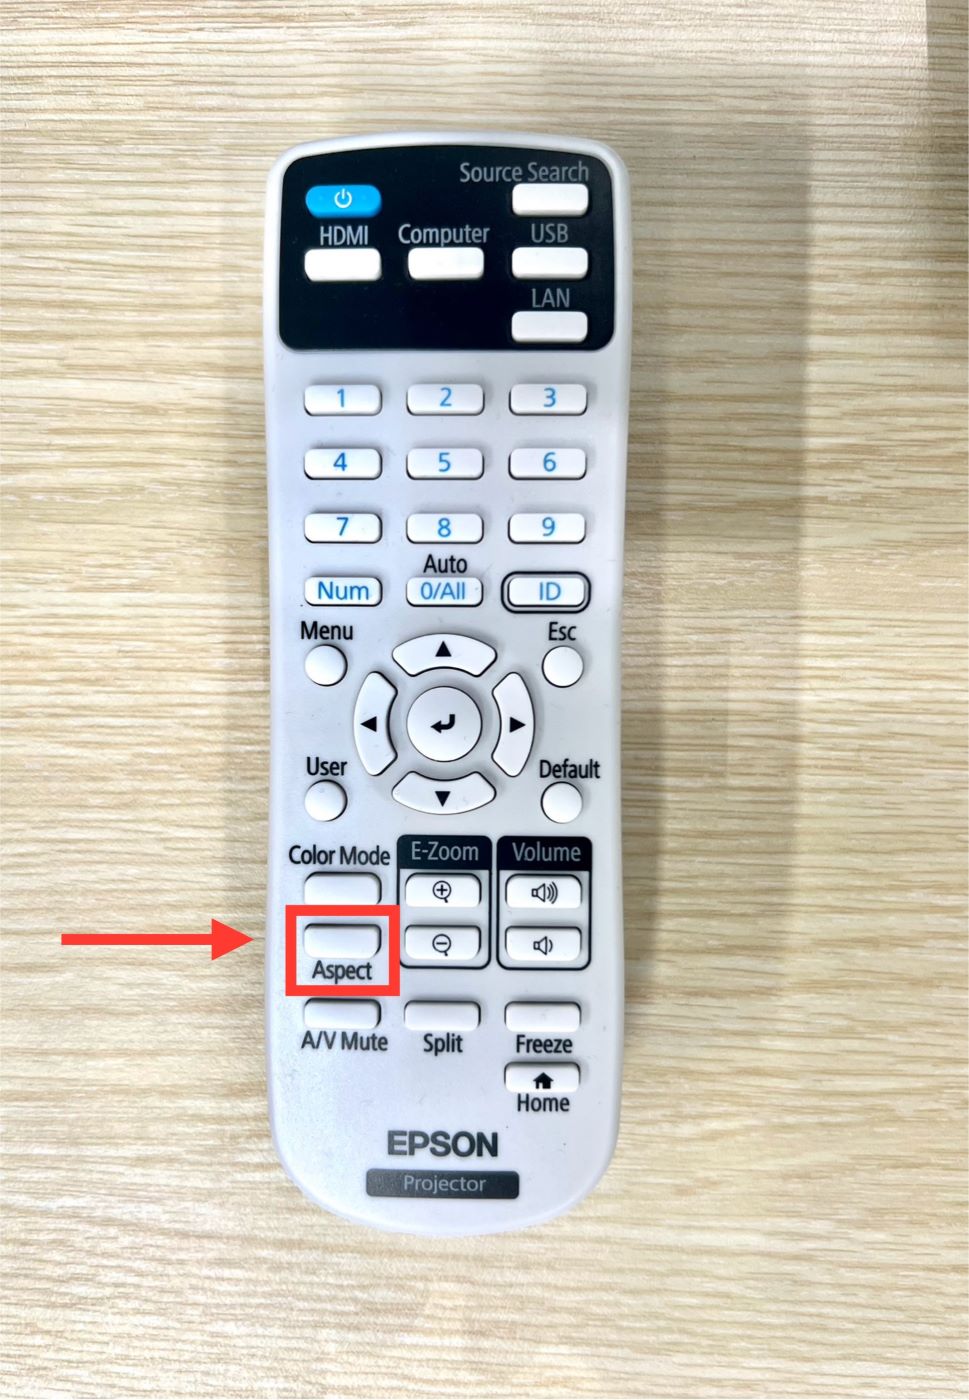
4. Resizing the Image by Changing the Image Aspect Ratio
You can also resize the image on your Epson projector by adjusting the image aspect ratio. The aspect ratio is the ratio between the image width and height.
Even though it does not directly affect the projected image size, when the aspect ratio of the projector does not match the ratio on the viewing screen, the size and shape are distorted.
To resize the image by changing the aspect ratio, here’s how to do it:
- Turn on your projector and plug in a laptop or any source device to display images.
- On your remote control, press the Aspect button, we advise you to choose the aspect ratio that is the closest one to the source device (for example, choose a 16:9 ratio if you’ve plugged in a laptop with a 16:9 or 16:10 ratio).
Conclusion
It may take a whole lot of fiddling to find the perfect image size for you that is neither too small nor right in your face. There is no shortcut to that.
However, it gets much easier when you know precisely what buttons and settings to press. And this is where our step-by-step guides are helpful.
And since we have detailed several ways to adjust your size, this should be pretty fast and easy.
And don’t forget to make angle adjustments to ensure that your image is appropriately lined up.
What is your experience with making your projector full-screen?
Let us know in the comment section below!

Duy Anh is a seasoned technical editor specializing in helping readers troubleshoot TV, projector, and Wi-Fi issues. He’s always been drawn to logical problem-solving. His ability to approach matters from various angles with a neutral mindset enhances his technical expertise.