
Temporary Internet: 4 Ways to Get Short-Term Wi-Fi Access Right Away

- Seek free temporary Wi-Fi in public venues such as libraries, cafes, and malls, as well as city-sponsored networks like LinkNYC; using a VPN for added security is advisable.
- For personal, temporary internet access, sign up for short-term mobile data and use your phone as a hotspot to connect other devices.
- Consider purchasing a Wi-Fi USB dongle/mobile router or courteously ask to access others’ hotspots when necessary.
You’ve just gotten a call from your Wi-Fi provider, and much to your chagrin, they have informed you that it will be at least another month until they can come to install a router in your home.
Like any respectable, modern citizen, you work from home and when you’re not working, you enjoy surfing the web and streaming your favorite TV series.
In short, you use the internet 24/7. So, you need to figure out a way to connect to the internet as soon as possible.
How can you get temporary internet?
Keep reading to find out!
Quick Navigation
1. Find Nearby/Public Wi-Fi Network

Public Wi-Fi networks are a convenient and cost-effective way to access free internet while you’re out and about.
These places are ideal for checking and replying to emails, as well as quickly connecting to the internet while traveling abroad to quickly search for something.
Public Locations
At the top of your to-do list is to simply look around and see if you can spot a nearby place that might offer free Wi-Fi. These days, businesses of all kinds are jumping on the bandwagon and providing complimentary internet access.
Public libraries are a reliable option for free Wi-Fi hotspots, and some even provide comfortable workspaces where you can settle in with your laptop.
Popular café and restaurant chains like Starbucks and McDonald’s have embraced the power of free Wi-Fi to attract customers. While it may be necessary to make a purchase, the cost of entry is minimal when you consider the benefits of high-speed internet.
Shopping malls or supermarkets provide Wi-Fi in guest mode, allowing you to browse without buying anything. Feel free to find a convenient spot to connect to the Wi-Fi and do some quick searches or send messages.
Public plazas often offer free Wi-Fi to enhance foot traffic and promote local businesses, but the connections are mostly slow.
Trains, buses, stations, and airports are equipped with wireless networks, although they may have data limits to ensure fair usage.
Universities and colleges are bustling, making it easy to tap into free Wi-Fi spots. Students are usually willing to share the password without hesitation.
Fitness centers often offer free internet access, so you can stay connected while you work on your fitness goals.

However, for competitive reasons, Wi-Fi networks in these locations are getting faster to attract more consumers and please their loyal customers.
Please note that networks that are especially easy to connect to are also less secure since hackers frequently use them to access other users’ devices and personal information. However, these risks can be mitigated by using a VPN.
All things considered, if you’re desperate to connect to the internet, using a nearby public network isn’t a bad choice. But, you will only be able to use the Wi-Fi as long as the location is open. So, if you need to access the internet late at night, it’s best to check out the next solutions.
City Websites
Some cities even provide free Wi-Fi hotspots throughout their historic downtown areas, plazas, and popular tourist attractions, catering to both business and leisurely travelers.
These platforms not only grant you access to Wi-Fi but also serve as valuable resources, offering insights into local attractions and dining options.
Finding free Wi-Fi in cities such as New York, Barcelona, or Paris will be a breeze.
While connecting to Wi-Fi networks, it’s common for access points to request your email address during registration. However, the steps for connecting may vary across different locations.
Before your next trip, it’s wise to do some research by searching for “city name + free Wi-Fi” to gather information about available networks and their connection processes. This preparation ensures you can conveniently access Wi-Fi during your travels.
This guide provides instructions on connecting to LinkNYC’s Wi-Fi in New York.
iOS devices
Step 1: First, navigate to Settings on your device, select Wi-Fi, and then choose LinkNYC Free Wi-Fi from the available network options.
Step 2: Enter your email address, then tap Connect.
Step 3: Choose Private or Public Wi-Fi.
Please note that devices running iOS 11.3 and later versions do not offer the option to connect to the Private Network.
If you have a compatible device that supports private Wi-Fi mode but you’re not seeing the option to connect to the private network, you can follow these steps to gain access.
Step 4: You are now accessing the free Wi-Fi of LinkNYC!
When you are near a Link, your device will seamlessly join the network, ensuring hassle-free browsing for you.
Other devices
Step 1: First, navigate to Settings on your device, select Wi-Fi, and then choose LinkNYC Free Wi-Fi from the available network options.
Step 2: Enter your email address and tap Connect.
Step 3: You are now accessing the free Wi-Fi of LinkNYC!
When you are near a Link, your device will seamlessly join the network, ensuring hassle-free browsing for you.
For a detailed tutorial on how to connect to LinkNYC, check out the video below.

Bonus 1: How To Secure Your Connection With VPN
Be aware that networks that offer easy connectivity often come with drawbacks, such as slower speeds and decreased security. Hackers tend to target these networks to gain access to other users’ devices and personal information.
However, there are measures you can take to reduce these risks, such as utilizing a VPN (Virtual Private Network) with end-to-end encryption.
1.1.1.1
The 1.1.1.1 app is a powerful VPN tool that prioritizes privacy and speed for a seamless internet browsing experience.
Special features:
- The app replaces your device’s default DNS resolver to ensure faster page loading times and a smoother browsing experience.
- 1.1.1.1 has a user-friendly interface and built-in ad blocker, making it easy for anyone to set up and use without any invasive ads.
- The best part is that this app is completely free, and you don’t have to sign up for an account. However, this app won’t enable you to select the server of your choice from a specific country to establish the desired VPN connection.
You also have the option to upgrade to the Plus package, which offers faster internet routes for just $4.99 per month.
Here’s how to get started with 1.1.1.1:
Step 1: Download 1.1.1.1 from the App Store and Google Play Store.
Step 2: Launch the app and consent to its Terms of Service.
Step 3: Simply tap the WARP button in the middle of the page to connect to the VPN service.
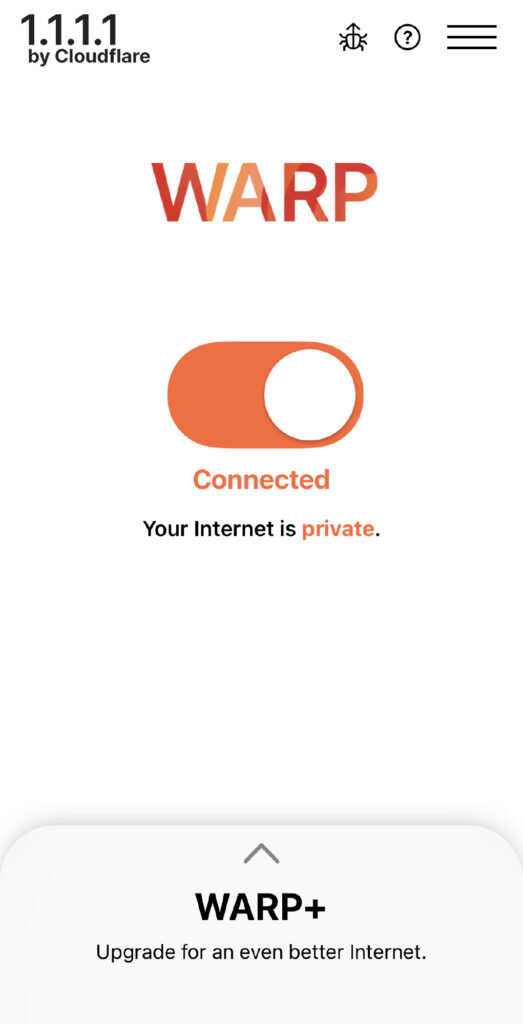
Step 4: Install the VPN profile that allows your phone to connect securely to the Internet via 1.1.1.1.
Your internet connection and DNS queries are now safeguarded for enhanced security.
NordVPN
NordVPN is a trusted VPN app used by millions of users to ensure a high level of privacy and protection during your internet browsing experience.
Special features:
- Advanced encryption protocols and a vast network of servers spread across the globe, ensuring fast and secure connections. Unlike the 1.1.1.1 app, you can freely select your preferred server to connect to with NordVPN.
- By utilizing double VPN capability, your internet data is routed through two separate servers, providing an extra layer of encryption for enhanced security.
- A strict policy is in place to ensure that no records are kept, ensuring the privacy and anonymity of your online activities.
- CyberSec protects against malware and intrusive advertisements.
- An automatic kill switch safeguards your data in case of VPN disconnections.
Here’s how to get started with NordVPN:
Step 1: Download NordVPN from the App Store and Google Play Store.
Step 2: Sign in to your current account or establish a new one by providing your email address.
Step 3: Follow the instructions given in the email sent to your registered account to confirm your email address.
Step 4: To gain access to the VPN services, you need to choose and subscribe to its monthly or yearly plan. Monthly subscriptions cost $8.00-$13.00/month, while yearly plans most often go for $6.00-$7.00/month.
But here’s the good news: you can enjoy a totally free 7-day trial by signing up on an Android device (and later use the VPN on any device you prefer).
You have the option to choose a standard subscription and take advantage of their 30-day money-back guarantee to maximize your benefits.
This means you have the freedom to explore and test it out without any cost, ensuring you’re satisfied with your decision.
You can read this article for more detailed information about the trials.
Step 5: Choose a country server or use the Quick Connect feature to establish your internet connection.
To access a comprehensive tutorial on utilizing NordVPN, you can watch the video provided below.

Bonus 2: How To Spot Wi-Fi Hotspots
You already know there are places that offer free Wi-Fi, but now you’re aimlessly wandering the streets or endlessly zooming in and out on a map, hoping to stumble upon a nearby coffee shop with a Wi-Fi connection.
The task can be quite time-consuming, particularly when you desire a fast internet connection. But here’s the ultimate solution for you: hotspot database websites and apps.
These incredible tools are like magic wands that can help you quickly locate Wi-Fi networks, and some even provide passwords, all with just a few taps.
Facebook’s Find Wi-Fi Feature
In 2017, Facebook introduced a fresh feature aimed at assisting you in locating nearby free and public Wi-Fi hotspots.
Step 1: Open your mobile Facebook app and sign in.
Step 2: Find the Menu icon positioned at the lower right corner.
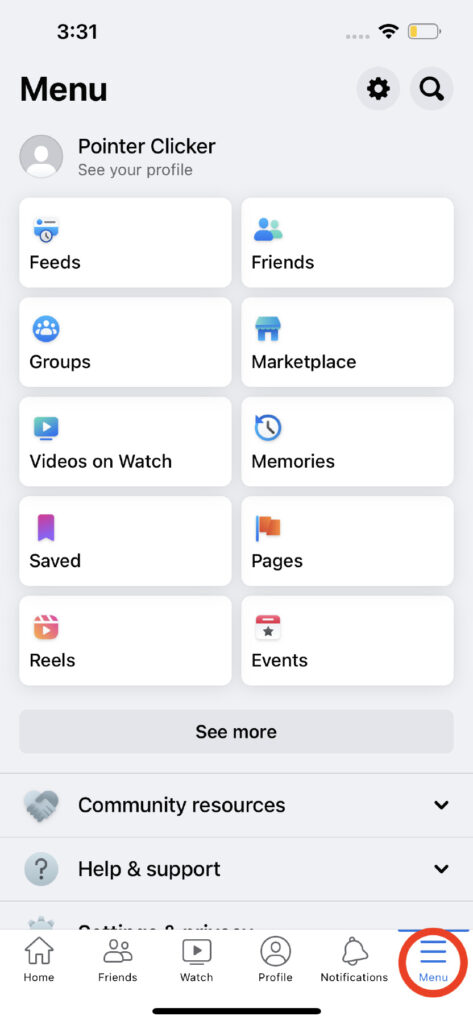
Step 3: Scroll down to the Settings & privacy section.
Step 4: Within this section, you’ll find a button labeled Find Wi-Fi.
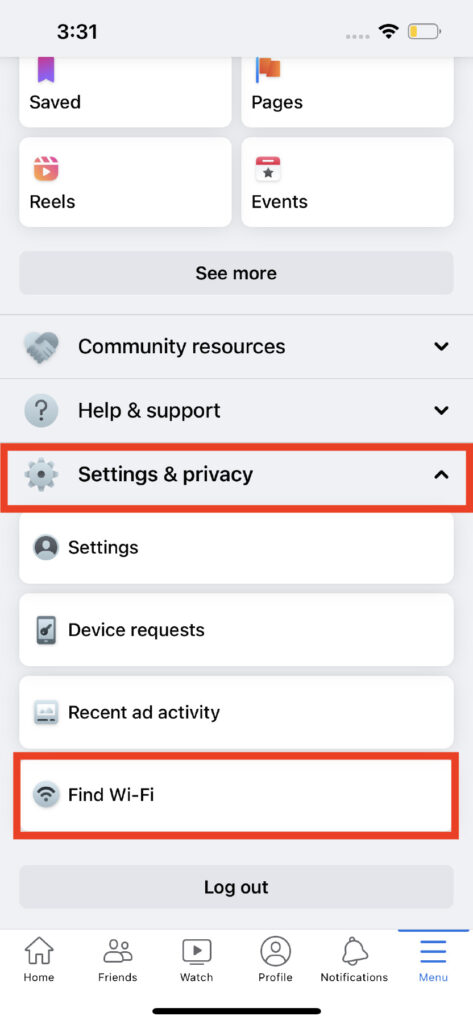
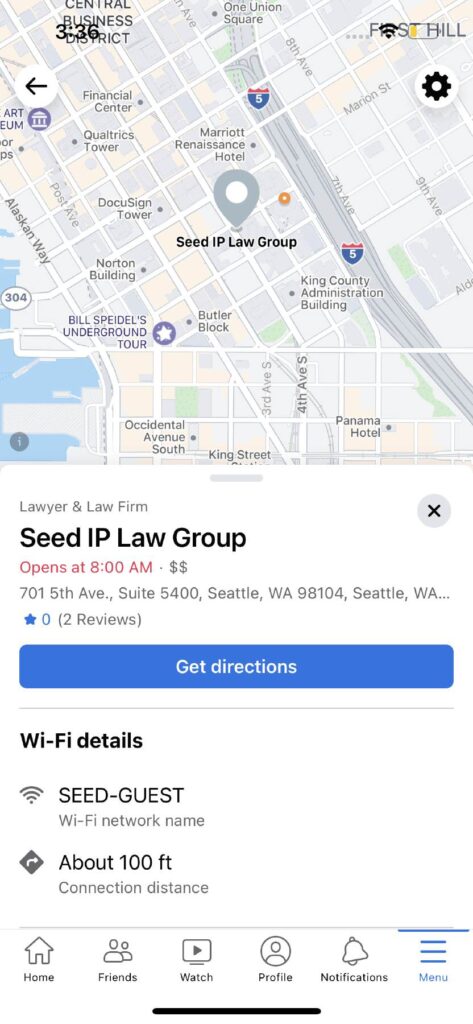
Give it a tap, and a map will appear, showcasing all the available free Wi-Fi hotspots nearby.
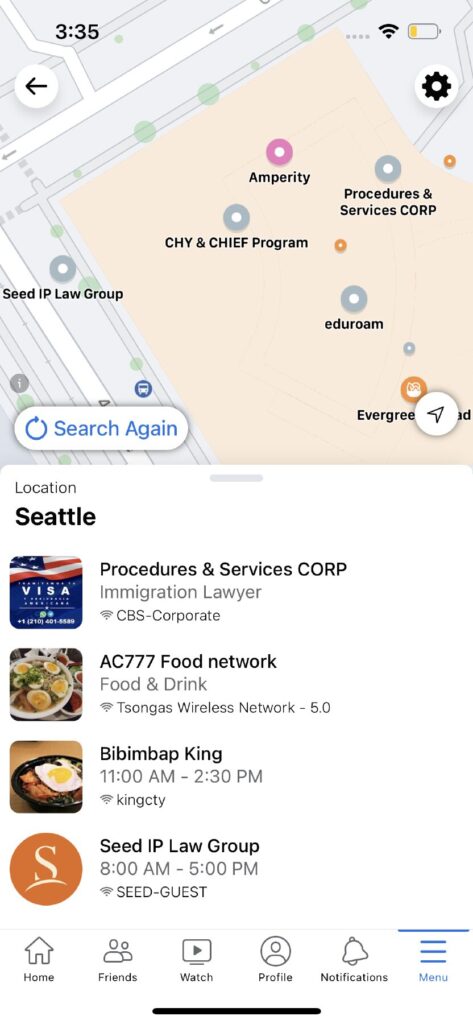
Step 5: Select a specific location on the map and you can access details such as opening hours and directions to reach that particular hotspot.
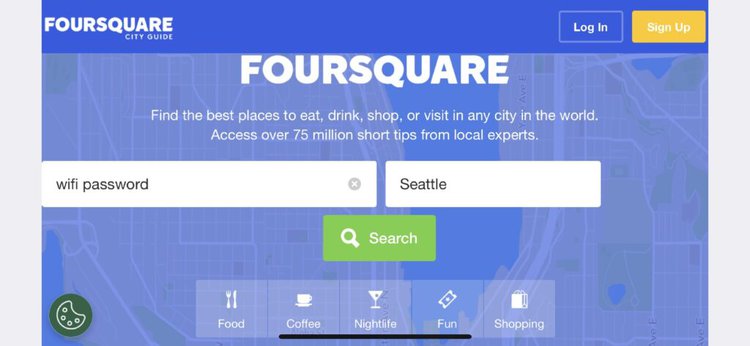
Foursquare City Guide
Foursquare City Guide is a mobile app designed to help you discover and explore exciting local attractions and recommendations based on your browsing and check-in history.
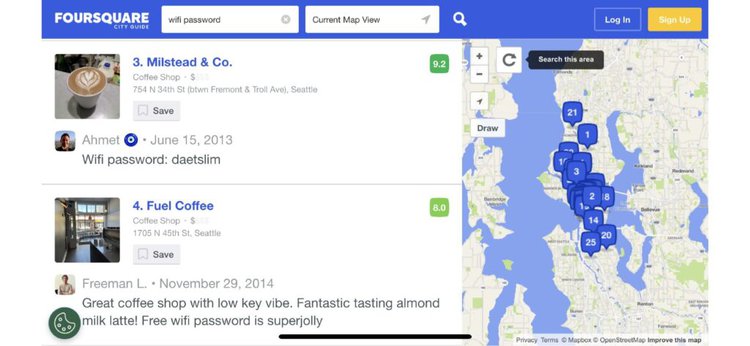
If you check the comments of a coffee shop or other locations you’re going to visit, there’s a good chance some users have listed those Wi-Fi passwords on Foursquare.
Step 1: Go to foursquare.com/city-guide.
Step 2: Type in keywords related to getting Wi-Fi connections (“free Wi-Fi,” “Wi-Fi password”, etc.) in the “I’m looking for” search bar and your desired area in the second box, and click Search.
Now you can see all the comments that mention Wi-Fi passwords of the nearby locations with star ratings. You can enjoy a latte while sending your urgent email.
Wi-Fi Finder Apps
When it comes to finding free Wi-Fi hotspots, the market is flooded with numerous apps, but we’ve handpicked our top 2 recommendations.
These apps rely on crowd-sourced information, meaning users constantly add, test, and verify networks.
The best part? No sign-in is required, although they may ask for your location to search for nearby hotspots.
With user-friendly Wi-Fi maps, these apps provide not only the available networks but also the passwords and directions to your desired Wi-Fi destinations from your current location.
Wi-Fi Map
Wi-Fi Map can be found on the Apple Store or Google Play Store.
Pros
- The app has an integrated VPN feature to protect your privacy. You can choose the duration you need.
- It shows Wi-Fi health with color-coded indicators: green for “high” and gray for “dead,” indicating whether a Wi-Fi hotspot is still accessible or not
- The app offers additional travel tools such as a currency converter, tip calculator, world clock, and internet speed test.
- Wi-Fi Map sets itself apart from other apps by allowing easy Wi-Fi hotspot searches in different domestic and global locations through a convenient “Where to?” search bar, eliminating the need for constant location navigation.
Cons
- Without subscribing to their Pro package, you may need to spend a bit of time watching ads to activate the VPN. The longer duration of VPN you require, the more ads you’ll need to watch.
Wi-Fi Map also provides you with its global eSIM service that supports 70 countries with different packages valid for 30 days from $4.99 to $29.99, offering Wi-Fi Finder, Offline Maps, and No Ads features.
Instabridge
You can download Instabridge on the Apple Store and Google Play Store.
Pros
- You can earn and redeem coins by checking in daily or watching videos to receive 500MB Degoo Cloud Storage for 4 months.
- Instabridge eSim global mobile data packages are cheaper, ranging from $4.79 to $16.49, but provide wider coverage of 118 countries.
Cons
- The Wi-Fi map is not on the front page. To access the Wi-Fi map, go to Menu > Wi-Fi > Map.
- While viewing Wi-Fi passwords, you may encounter ads, but you can usually skip them in 5 to 30 seconds.
Here’s a neat trick for using these apps:
If you’ve previously accessed the app while connected to the internet, you can still use the offline map without a subscription.
Just make sure to open the app whenever you have Wi-Fi, and you can save your precious data and still navigate the map without any issues.
2. Use Your Cellular Plans

As internet access has become a necessity rather than an indulgence, telecommunications companies have released tons of short-term data plans that allow people to get temporary internet. These plans can last anywhere from one day to a month. They also have long-term plans that last a year.
These plans can offer limited or unlimited data, depending on your budget and preferences.
Turn Your Smartphone/Tablet Into a Hotspot
Your smartphone and tablet can be used as a Wi-Fi hotspot for other devices, such as your smart TV, laptop, computer, console, etc. Others can also connect to your Wi-Fi hotspot, which is great if your Wi-Fi-less friend needs to send a quick email when you’re out and about.
Hotspots consume more data than normal 4G, especially if the connected devices are performing high-bandwidth activities. So, if you have a limited data plan, be mindful of how much data the hotspot is consuming.
You can also make use of the Data Saver feature on your phone or apps to keep track of and limit your data usage.
Follow the instructions below to set up a hotspot on iOS or Android devices.
iOS Devices
Step 1: Go to Settings.
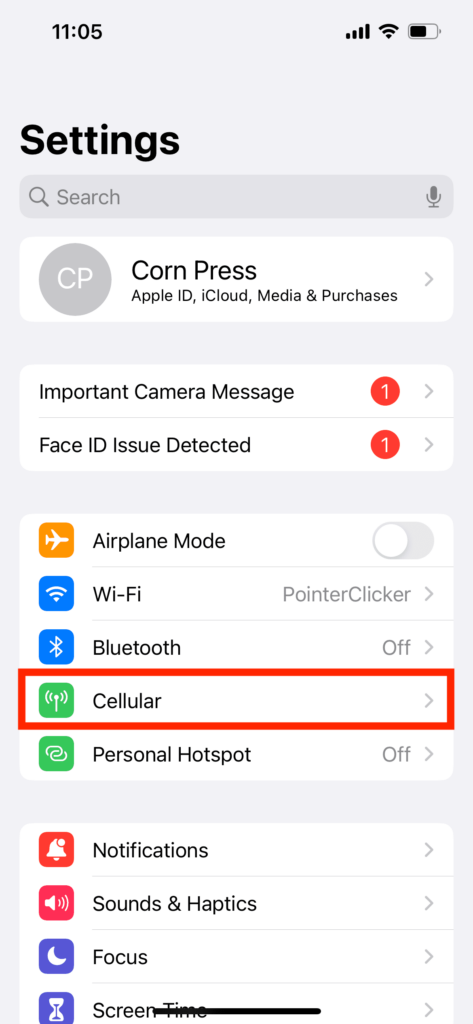
Step 2: Go to Cellular and turn on Cellular Data.

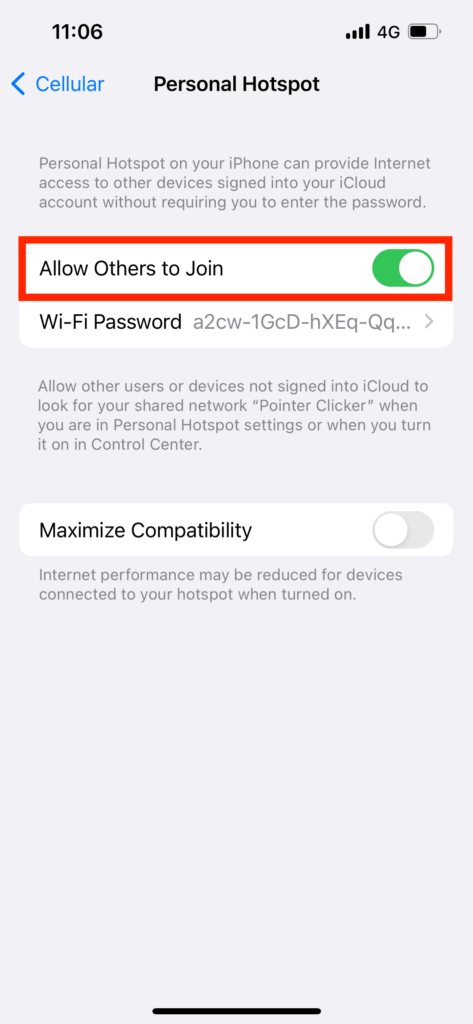
Step 3: Tap Personal Hotspot, then tap Allow Others to Join.
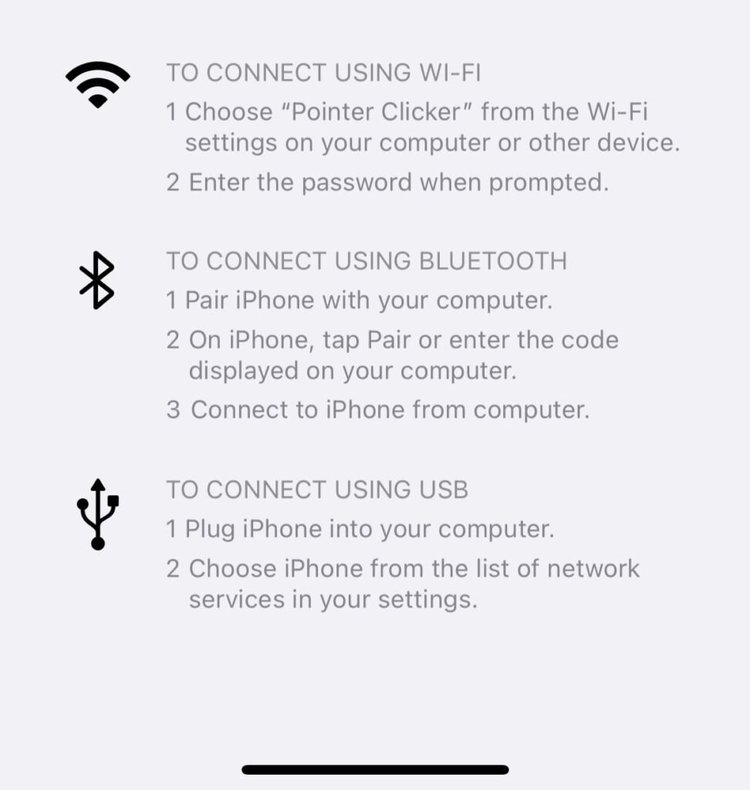
Afterward, you can establish a connection using Wi-Fi, Bluetooth, or USB (Detailed instructions will be displayed on the screen).
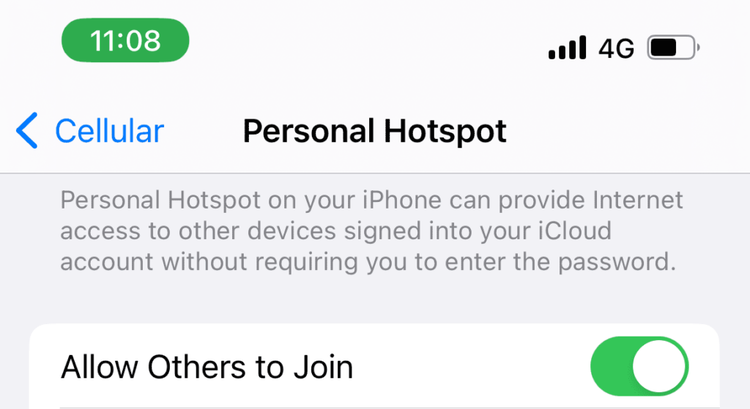
Once your device is successfully connected to your Personal Hotspot, you will notice a green status bar or a green box appearing behind the time indicator.
Android Devices
This process will vary depending on which Android phone brand you have (e.g. Samsung, Google, Xiaomi, etc).
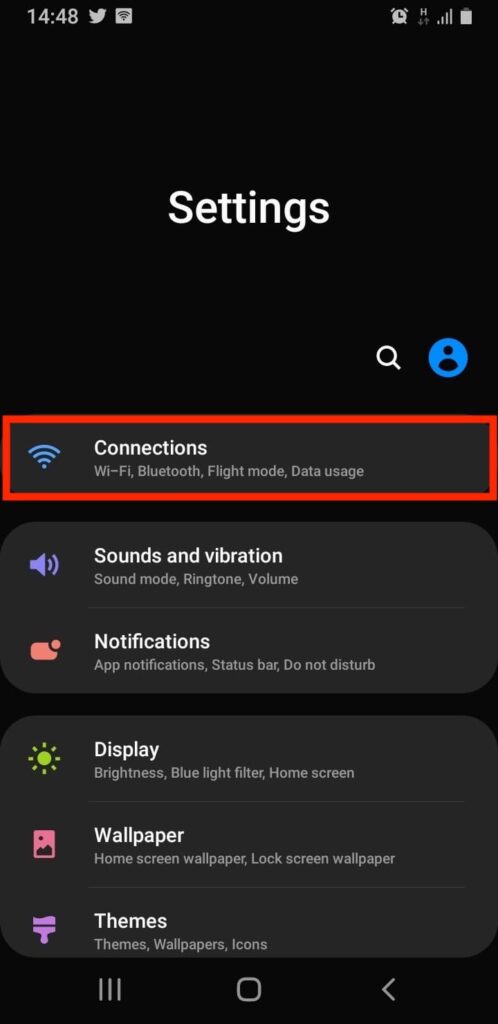
Step 1: Go to Settings, then locate Connections.
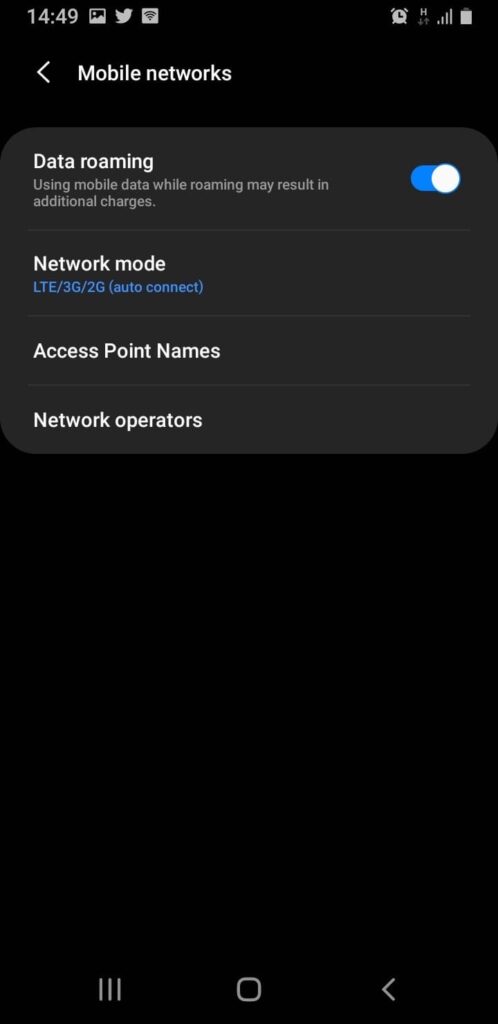
Step 2: Navigate to the Mobile networks settings and toggle the slider next to Data roaming to activate it.
Step 3: Return to Connections and head to Mobile Hotspot and Tethering.
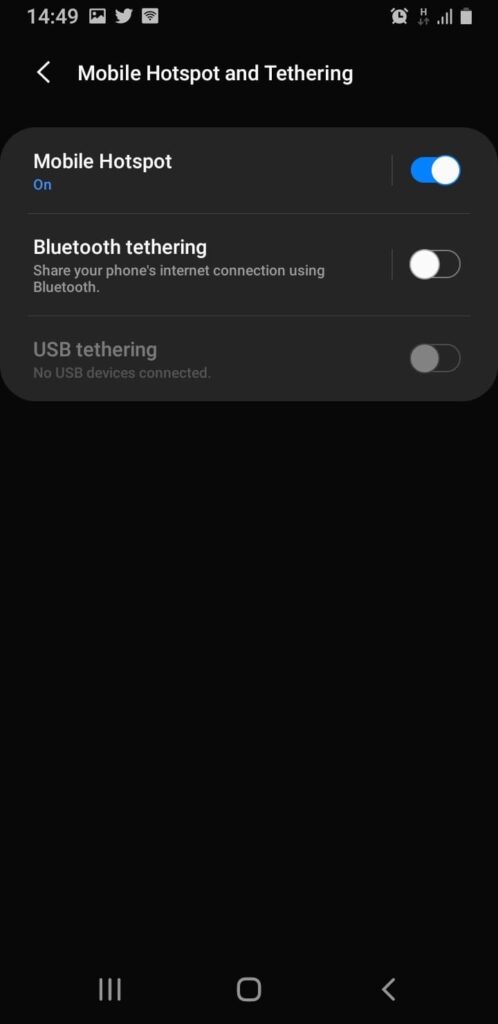
You can then connect to the hotspot via Wi-Fi. For Bluetooth and USB connections, you will need to tap the corresponding slider to turn it on.
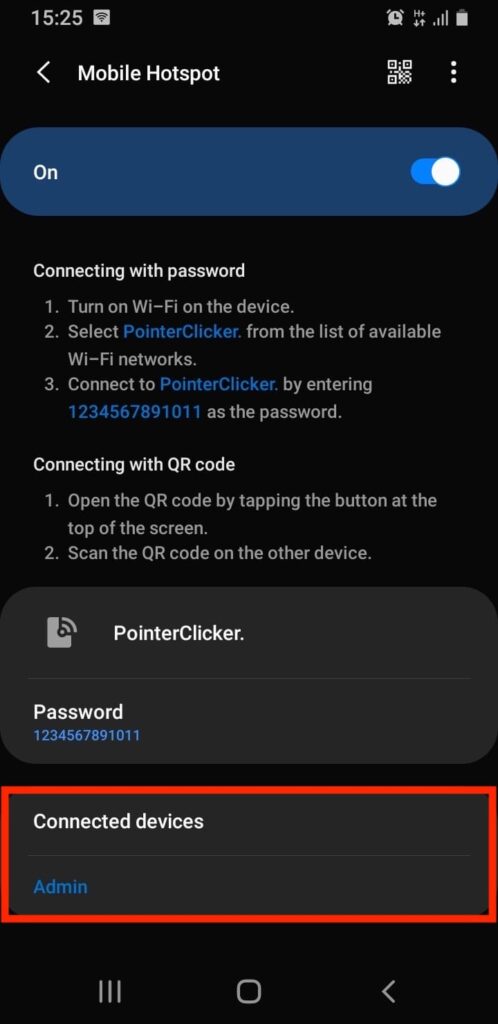
To see who’s using your hotspot, return to Connections > Mobile networks > Mobile hotspot and scroll down to the Connected devices section.
3. Purchase A Wi-Fi USB Dongle/Mobile Router
Mobile hotspots are great, but they consume your phone’s battery too quickly. So, you may need to find an alternative.
Consider trying a Wi-Fi USB dongle or a mobile router. These nifty devices use a SIM card with cellular data to create a Wi-Fi network.
The great thing about them is that they’re compact in size, with the USB dongle being small enough to put in your pocket and take on the go. Additionally, the USB dongle does not need to be plugged into power. So, all you have to do is plug it into a USB port before connecting your devices to it.
Some USB dongles, like the Mini 4G Dongle USB can support up to 10 devices at a time, which is the same number of devices an average hotspot can support. However, unlike a hotspot, you won’t have to worry about it draining your phone’s battery or cellular data.
If you’re looking for something a little more mobile, check out the TravelWifi Sapphire 3 Mobile Hotspot . Unlike the USB dongle, this nifty device does not need to be plugged into anything as long as it’s charged. So, you can slip it into your purse or backpack and take your hotspot with you wherever you go.
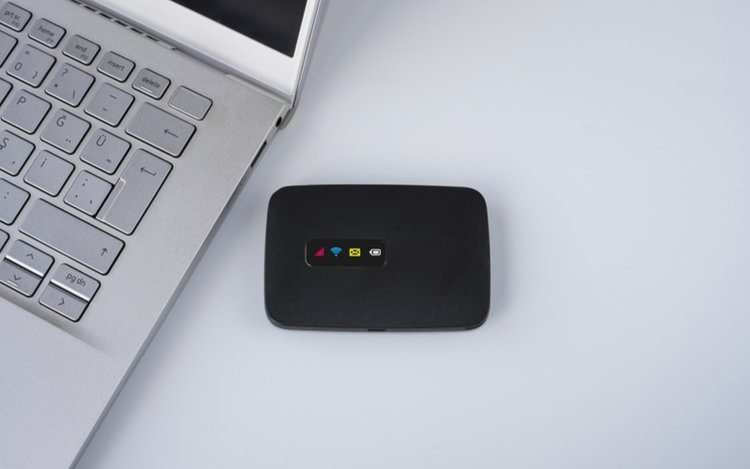
If you’re worried about it losing charge, consider investing in a power bank to keep it powered when you plan on using it for an extended period.
USB dongles are best for smart working and streaming since these activities are usually done at home or in a coffee shop, where you’ll have access to a USB port to plug the dongle into. On the other hand, mobile routers are great for traveling since they work completely wirelessly, allowing you to connect your phone/tablet to them no matter where you are.
Remember, you will have to purchase a SIM to put into either of these devices. So, if you plan on using them for all of your internet-based activities, consider getting a plan with a generous data allowance or investing in an unlimited data plan.
4. Ask For Other’s Hotspots

When you’re outside and have tried everything to find available Wi-Fi nearby or if you’re in a hurry, don’t hesitate to ask a friendly stranger or try using a random café’s Wi-Fi.
Believe it or not, the kindness of strangers can often be the fastest and most effective way to get free Wi-Fi. People are usually happy to share!
When you’re at home, you might be tempted to use your neighbors’ Wi-Fi without permission, but it’s important to know that this is illegal in most countries.
Instead, consider visiting your neighbor, giving them a call, or sending a friendly text message to ask if you can use their Wi-Fi.

Meet Vance. He’s a proud dad, a seasoned Electronics Engineer, and an avid tech lover. His proficiency in electronics and troubleshooting skills were instrumental in crafting Pointer Clicker. Vance is passionate about simplifying tech for those who aren’t well-versed in it.

Duy Anh is a seasoned technical editor specializing in helping readers troubleshoot TV, projector, and Wi-Fi issues. He’s always been drawn to logical problem-solving. His ability to approach matters from various angles with a neutral mindset enhances his technical expertise.