
How to Duplicate Screen on a Projector (with Shortcut Keys)?

Specific screen modes will allow you to do certain things when pairing a projector to your computer. For example, you can duplicate your screen on your projector from your Mac or PC. Duplicate Mode allows you to have the same thing on your projector and your computer.
However, you can also extend your computer screen. You also have Computer Only and Projector Only modes on your PC.
You have similar choices on a MAC. In any case, we’ll show you how to create a duplicate screen on a projector and go over the other screen modes for both MACs and PCs.
Quick Navigation
How to Duplicate Screen on a Projector
Let’s start with duplicating your screen on a projector using a PC. We’ll include shortcut keys as well.
Duplicating a Screen on a Projector using Windows 10

There are a couple of ways you can duplicate your screen on a projector using windows.
The easiest way is to right-click on your desktop. When the menu appears, choose Display Settings. Now, you’ll notice a different menu appear. Scroll down until you see a section called Multiple Displays.
If you want to duplicate your screen onto your projector, select Duplicate Display here.
Duplicate a Screen on a Projector using Windows 7
If you’re using Windows 7, right-click anywhere on your desktop to bring out the menu.
Now, select Screen Resolution from the menu.
Near the bottom of the display, you’ll notice a drop-down menu called Multiple Displays. Click on it. Then, select Duplicate these Displays.
Shortcut Keys for Duplicating your Screen
The fastest way to the display menu is using keyword shortcuts. The shortcut key for the display menu is Windows + P.
Hold down the Windows key on your keyboard. While you’re holding the Windows key, press the letter “P.” This will populate the display menu.
You’ll have multiple options to choose from at this point. You can select Duplicate (which is the one we want.) Or you can choose Extend, Computer Only, or Projector Only.
Click on Duplicate to duplicate your screen onto your projector.
An Alternative for Display Screens Menu
If you’re wondering why your menu looks different, we have an alternative.
From your desktop, right-click on any empty space. Once the menu appears, navigate towards the NVIDIA Control Panel and select it.
A new NVIDIA panel will appear. At this point, you’ll notice the left-hand side has multiple choices.
Look for the section titled Display. Under Display, locate Set Up Multiple Displays and click on it.
Once you’ve clicked on Display, the right side of the menu will change to reflect your choice.
Here you have the option to select the displays you’ve connected to your computer. In our case, it should say the name of your computer and your projector.
Make sure both your projector and your computer are selected in the choices you have.
Navigate to the bottom of the menu and right-click on Display 1. In the new menu, click on Duplicate with 1 (Use 1 as Source.)
If you happen to use 2 as your main source for your projection, you’ll have to right-click on 2 and choose Duplicate with 2 (Use 2 as Source.)
Click Apply at the bottom of the window to apply all changes.
Here’s a small segment from a Youtube video showing you how to use multiple displays inside the NVIDIA panel just in case.

Other Screen Modes (Extended, Computer Only & Projector Only)
If you’re interested in using Extend mode, Computer Only, or Projector Only, we’ll show you how. As a side note, Windows 10 recently changed their screen mode names. Their screen modes are now called Extend, PC Screen Only, and Second Screen Only.
Now that you understand how to navigate to the proper menu, we’ll leave that part out.
Depending on which version of Windows you have, you will click Windows + P or right-click on your desktop and navigate to Display Settings or Screen Resolutions.
From here, the choice is yours. Are you extending your screen to your projector? Do you want to use your computer only or your projector only?
Choose the appropriate item.
How to Duplicate Screen on a Projector using MACs

Assuming you’ve connected your MAC to a projector in the past, you’ll have a dedicated icon at the top right of your MAC, near the clock.
Click on the icon and wait for the menu to open. Within the menu, navigate towards the Turn on Mirroring option and click it.
However, if this is your first time, and you haven’t set up a projector before. Keep on reading.
Duplicating Screens (or Mirroring) Using MACs
When mirroring a screen onto a projector, you’ll need to plug the projector into the MAC before powering it on. Once it’s connected, please turn on your projector and your MAC. It will allow your MAC to find the projector.
To duplicate your MAC screen onto your projector, navigate to the Apple icon at the top left of your screen.
Click on the Apple icon.
Scroll down to System Preferences.
Navigate to the Displays icon.
Depending on which OS version you’re on, you’ll have to either click on Detect Displays or hold the Option key to view and sync your displays.
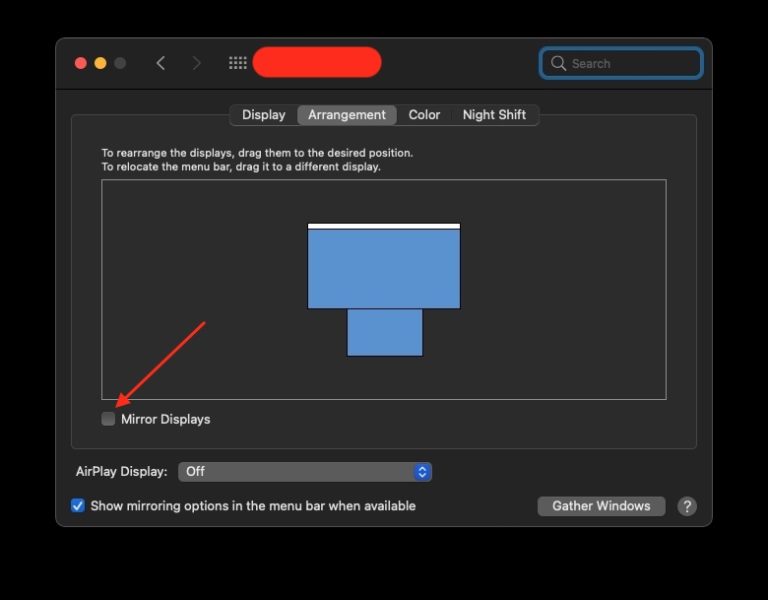
Now, click on the tab that reads Arrangement.
Near the bottom of the screen, you’ll notice a box you can click with the words Mirror Display next to it. Click on it to Mirror (or duplicate) your screen.
From here, adjust your resolution as you see fit.
If you’re a visual learner and prefer a video, here’s a quick YouTube video on how to Mirror and extend your screen using a MAC.

Duplicating your Screen Using a MAC (Shortcut Keys)
If you need to navigate back to the Mirror Display menu on your MAC, but you don’t want to navigate through System Preferences to Displays to Arrangements, then finally to Mirror Displays, there’s a simple solution.
Using the Command + F1 key will allow you to jump to this screen automatically.
Extend Mode on Your MAC
If you don’t want to duplicate your screen on your projector using a MAC, you have another option.
Extend Mode allows you to use your projector as an extended version of your MAC screen.
To do this, navigate to the Arrangements tab located under System Preferences.
Once you’ve located the Mirror Display box, uncheck it.
Your projector is now an extended (or secondary) display. Use the projected display by dragging any open windows or videos onto this screen.
There You Have It
These are the ways to Duplicate (or mirror) your screen on a Projector using a PC and a MAC.
We’ve shown you shortcut keys for a quicker way to these menus. As a plus, we showed you alternatives in case your screen looks a little different.
We hope you’ve learned how to duplicate your screen on a projector for both PCs and MACs.

James Quintanilla is a technical copywriter. Although his experience allows him to write on many topics, he loves to focus on tech and travel. As a freelancer, James has worked on projects with Pointer Clicker, Lonely Planet, and the Travel Channel. When he’s not writing or planning his next adventure, he’s watching a scary movie.