
9 Fixes for Flickering Woes: From Epson Projectors to All Brands

- Basic Troubleshooting: Check if the ECO mode is on (dims brightness); replace old bulbs; ensure auto iris functions properly.
- Other Solutions: Examine cables/ports for damage; ensure stable power supply; avoid prolonged use to prevent overheating; match projector and source resolutions.
- Advanced Troubleshooting: Update firmware and GPU drivers; inspect other projector components.
You power up your Epson, anticipating a movie night, but the image keeps flickering or sometimes even blinks on and off.
This guide dives deep into these hiccups, addressing common problems like HDMI connection glitches and more.
Note: While this article focuses specifically on Epson projectors, these solutions can be applied to any projector model. However, the necessary steps for navigating the settings may vary.
Quick Navigation
- 1. ECO Mode Is Enabled
- 2. Expired Bulb
- 3. Auto Iris Function Is Broken
- 4. Faulty/Broken Cables or Ports (HDMI & VGA Connection)
- 5. Unstable Electricity Supply
- 6. Overheating Projector
- 7. Unmatched Resolution and Refresh Rate
- 8. Outdated Projector Firmware or Laptop GPU Drivers
- 9. Other Components Are Broken
- Other Solutions To Try
1. ECO Mode Is Enabled
ECO mode is a useful function that promotes the longevity of your projector bulb’s lifetime by decreasing the brightness. However, it’s recommended to only turn on this mode after you’ve used your projector in standard mode for the first several hours of usage.
Epson advises waiting until you’ve used your projector for at least 50 hours to enable ECO mode, though you can also try setting it to ECO mode every 10 hours of usage to see if that helps.
Prematurely setting your projector to ECO mode can cause it to flicker as several users have found.
So, it’s best to disable ECO mode on your Epson projector by following the steps below.
Step 1: Hit the Menu key on your projector’s control panel.
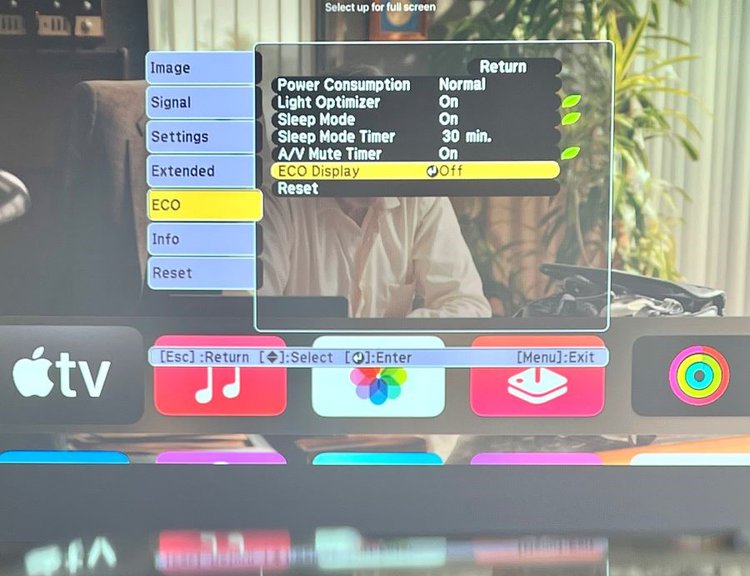
Step 2: Go to ECO.
Step 3: Navigate to Power Consumption and adjust it to Normal.
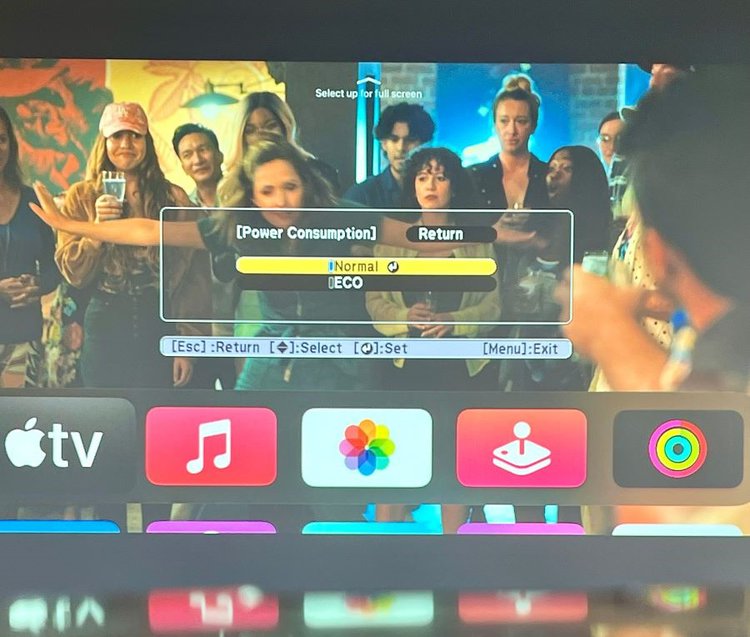
Step 4: Then, head to ECO Display and toggle it Off.
2. Expired Bulb
Even if you’ve taken excellent care of your projector and done everything you can to prolong its lamp life, the bulb will eventually break one day.
Projector bulbs usually need to be replaced every 1500 hours of usage, however, some bulbs may last longer depending on their models and how well you’ve taken care of them.
Many projector brands, Epson included, have a lamp life timer which can help you determine if an expired bulb is the reason your unit is flickering. Follow the steps below to check your Epson projector’s lamp timer.
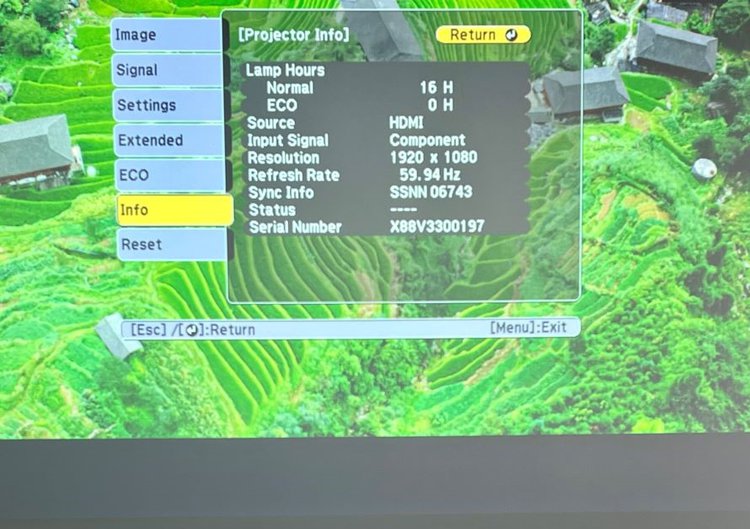
Step 1: Press the projector’s Menu button.
Step 2: Go to Info.
Step 3: Head to Projector Info.
Step 4: See the value under Lamp Hours.
Watch the video below demonstrating how to verify your unit’s lamp life.

If your projector bulb has expired or is nearly expired, you’ll often see a “LAMP REPLACE” message on-screen accompanied by a red/orange warning light that flashes when your turn the unit on.
Luckily, changing your projector lamp at home is an easy task. Just remember to purchase a compatible replacement that will work seamlessly with your unit.
Follow the steps below to replace your Epson projector’s bulb and adjust its settings to reset the lamp life timer.
Step 1: Power off your projector, and once it’s completely shut off (i.e. the cooling fan has stopped), unplug it from power. Wait for it to completely cool for an hour or so before proceeding to the next step.
Step 2: Find the screwdriver provided in the lamp replacement’s packaging and use it to loosen the lamp cover’s screw.
Step 3: Slide the lamp out of the projector and put it aside. If you find that the bulb has shattered inside the lamp compartment, cautiously remove any shards of glass, being careful not to cut yourself.
Step 4: Inside the lamp compartment, you will find two screws holding the lamp in place. Use the same screwdriver as before to loosen them. They can not be completely removed.
Step 5: Depending on which lamp your projector is fitted with you must:
- Gently raise the lamp’s handle before pulling the lamp straight out of the compartment.
- Use the lamp’s raised sections to pull it out of the compartment.
Please be sure to perform this step with the utmost caution to avoid damaging the lamp or projector. Also, please note that lamp bulbs marked “Hg” contain mercury and must be disposed of according to regional laws. They can not be thrown away with other waste.
Step 6: Without touching any of its glass, carefully slide the replacement bulb into the compartment. It should fit seamlessly into the compartment. If the lamp is not sliding into the compartment smoothly, ensure it’s positioned correctly.
Step 7: Ensure the lamp is securely in place before tightening the screws to fasten it.
Step 8: Finally, slide the lamp cover back in place and re-tighten the screw. If the lamp cover can not slide back in place, ensure the lamp is properly screwed in place.
Watch the video below demonstrating how to replace an Epson projector lamp.

Once you’ve successfully replaced the projector lamp, you must reset the lamp timer to get rid of that pesky “LAMP REPLACE” message on-screen.
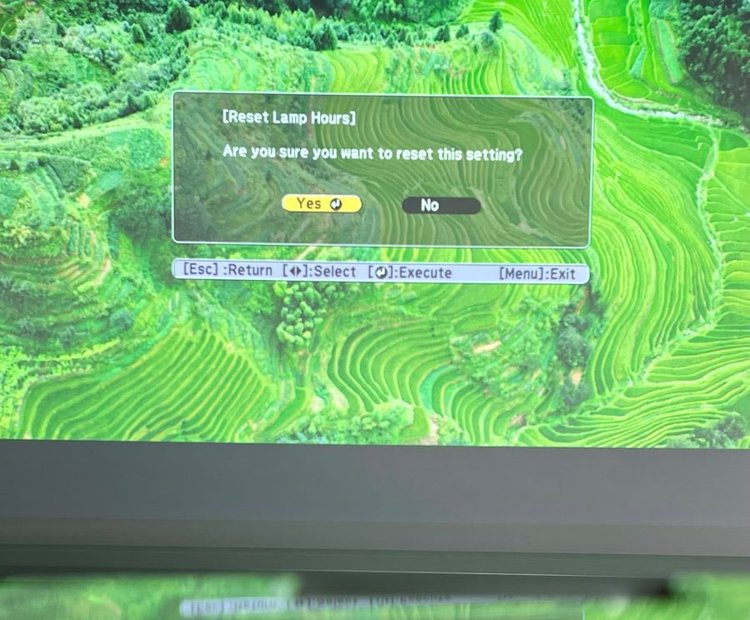
Step 1: Press the projector’s Menu key.
Step 2: Navigate to Reset.
Step 3: Click on Reset Lamp Hours, and then select Yes to confirm.
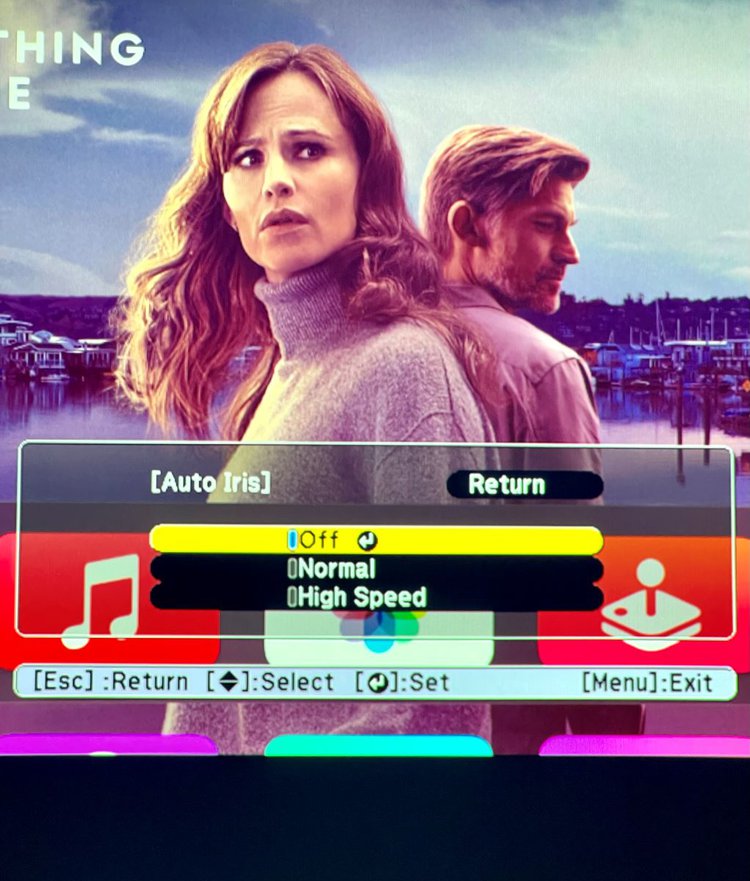
3. Auto Iris Function Is Broken
Your Epson projector’s auto iris feature automatically controls the image’s brightness according to the scene.
In turn, this prompts your projector to widen its iris during dark scenes to let in more light and closes its iris during bright scenes to contain the light. This handy function keeps the image’s brightness more or less even throughout a film even during very dark and very bright scenes.
However, the auto iris function can malfunction, causing the projector to flicker. So, it’s best to try turning it off to see if it resolves the problem.
Step 1: Click the Menu button on your projector.
Step 2: Navigate to Image.
Step 3: Go to Auto Iris and toggle it Off.
4. Faulty/Broken Cables or Ports (HDMI & VGA Connection)
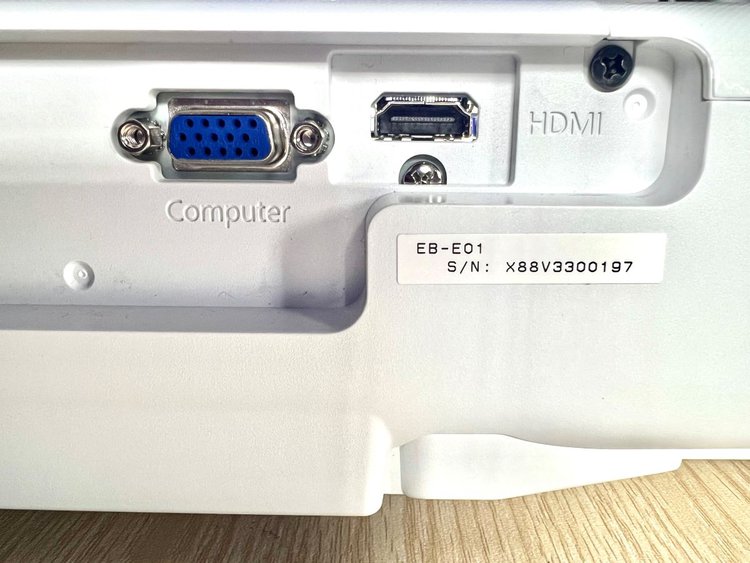
A faulty HDMI or VGA connection is one of the most common causes of a flickering image.
No amount of setting adjustments will resolve your flickering issue if there’s a problem with the hardware, so before trying any more of our troubleshooting tips, it’s imperative to check your cables and ports for any damage.
- Try using different ports on your projector and laptop. If that doesn’t work, you may even try using a different connection altogether (e.g., VGA instead of HDMI).
- Try hooking up your laptop to a TV with the same HDMI/VGA cable and HDMI port and observe the results. If the image continues to flicker on your TV, then there may be something wrong with your laptop’s port or the cable.
- If you can, try connecting another VGA/HDMI-compatible device (e.g. gaming console, streaming stick, laptop) to your projector to see if your projector is the root of the problem. If this new setup works well, then there may be something wrong with your input device instead.
5. Unstable Electricity Supply
An unstable power supply can cause your projector to flicker, even if there’s nothing wrong with the hardware or settings.
First, try plugging your projector into another wall outlet, making sure not to use a surge protector or power strip since these devices can become faulty and prevent any connected devices from receiving sufficient power.
You may also want to check your projector power cable’s condition to make sure it’s not damaged and replace it if it is.
6. Overheating Projector
Projectors, especially those with high lumen counts, are prone to overheating as they’re emitting mass amounts of light. Overheated projectors may randomly crash, make a loud whirring sound, and at times, produce a flickering image.
Since this is a common issue, we’ve already written an article about how to identify if it’s happened to your projector and, most importantly, how to resolve it.
Read our article Projector Overheating: How Do I Cool Down My Projector? to learn how to fix your overheated projector.
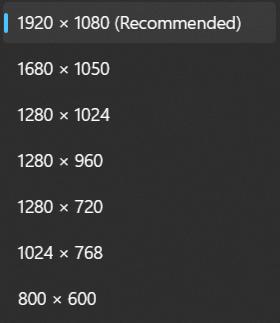
7. Unmatched Resolution and Refresh Rate
Projectors will flicker if their resolutions and refresh rates are incompatible with those of the input devices (e.g. laptop, streaming device, etc.). This applies to all projector brands, including Epson.
So, it’s best to try every single resolution your laptop can output until you find one that’s compatible with your projector and produces a smooth image.
Windows
Follow the instructions below to change your Windows laptop’s resolution.
Step 1: Click the Start button in the bottom left corner of the screen.
Step 2: Navigate to the Settings.
Step 3: Head to System.
Step 4: Click on Display.
Step 5: Go to Display resolution and try each option.
MacBook
Step 1: Launch the Apple Menu.
Step 2: Open System Preferences.
Step 3: Head to Display.
Step 4: Go to Resolution.
Step 5: Tick the Scaled box and try each resolution and refresh rate to see which works best.

8. Outdated Projector Firmware or Laptop GPU Drivers
Manufacturers frequently release updates that not only improve a device’s UI and add extra features but also offer bug fixes to display glitches, like a flickering screen.
This is why you may see some new updates right after you’ve just installed a new update. These smaller updates will fix any minor errors reported in the previous update, ensuring the device’s software is running smoothly.
If the flickering first appeared on your projector after a significant update, then it’s likely that installing the latest patch will resolve these firmware bugs.
So, check if there are any new firmware updates available on your Epson projector then install them accordingly following the instructions outlined below.
Warning: Updating your projector’s firmware can be risky. Make sure to follow all of these steps exactly as written. Failure to do so could permanently damage your projector.
Step 1: To check which firmware version your Epson projector is fitted with, hit your projector’s Menu button.
Step 2: Navigate down to open the Info menu. Then, take note of your projector’s current firmware version and see if it’s the same as the latest firmware update. If your projector is fitted with an earlier version than the firmware update, proceed to the next steps to update it.
Step 3: Power off your projector and wait until the cooling fan stops moving before disconnecting it from power.
Step 4: Then, head to epson.com/lasercinemafirmware (for U.S. users) or epson.ca/lasercinemafirmware (for Canada users) in a browser on your laptop. Find and install the compatible update for your laptop’s OS (Windows or Macintosh).
Step 5: Plug one end of a mini-USB cable into your projector’s Service port. Then, plug the cable’s USB-A connector into your laptop’s USB port.
Step 6: With one hand long-pressing your projector’s Power key, use the other hand to simultaneously plug it into a wall outlet with its power cable.
Step 7: Only remove your finger from the power button once the Temp and Laser lights become a solid orange and the power and status lights turn blue. Don’t be alarmed if the unit’s cooling fans produce a loud whirring sound.
You should also see an EPSON_PJ folder pop up on your computer. If you don’t see this notification, find and open this file in your laptop’s file organizer (e.g., Computer on Windows, Finder on Mac).
Step 8: Find the firmware package in your file organizer, extract it, and only copy the EPSONPJ_vXXXX file to the projector’s EPSON_PJ folder.
Avoid renaming the firmware file as this will prevent the projector from installing the update.
Step 9: Then, eject your projector from the laptop before removing the mini-USB cable from both devices. Do not unplug your projector from power. Now, you should see the unit’s LED lights start blinking, indicating the firmware update is being installed.
You’ll know the update has been successfully installed once your projector powers off.
Step 10: Then, press the projector’s Power button followed by the Menu button.
Step 11: Head to the Settings menu.
Step 12: Go to Panel Alignment.
Step 13: Click on Reset before selecting Yes, thereby resetting the unit’s panel alignment.
Step 14: Finally, go back and check your projector’s firmware version once more to ensure it’s the same as the update you’ve just installed.
Just like that, you’ve updated your Epson projector!
However, if your input device is a Windows laptop/PC, its graphic card driver’s incompatibility could be contributing to your projector’s image issues as these drivers can affect display quality.
Luckily, uninstalling or updating your laptop’s graphic card drivers can stop your projector from flickering. Follow the steps below to uninstall/update your PC’s drivers.
Step 1: Go to your laptop/PC’s Start menu.
Step 2: Type Device Manager into the search bar.

Step 3: Head to Display adapters and right-click on one of the installed drivers.
Step 4: From here you can choose either Update driver or Uninstall device. I recommend selecting Uninstall device, though do note that you must restart your laptop/PC to automatically re-install it.

9. Other Components Are Broken
Unfortunately, individual components inside your Epson projector can break, leading to issues with the display and other mysterious problems.
So, if you’ve tried all the solutions listed above as well as the first two solutions below (Soft Reset Your Projector and Reset All Configs), but are still experiencing this problem, you could have a more serious issue on hand.
I don’t recommend fixing broken components yourself, especially if you’re inexperienced with the ins and outs of projector hardware as you risk electrocuting yourself or further damaging the unit.
In this case, it’s best to reach out to a professional technician or jump to Solution #3 (Contact the Manufacturer) to have someone with the proper skillset take a look at it for you.
Other Solutions To Try
None of the other solutions have worked for you, but don’t give up hope just yet!
Try our three bonus solutions to fix your pesky Epson projector.
1. Soft Reset Your Projector
Small glitches can sometimes cause big problems. A minute software glitch or a loose connection can drastically affect your projector video output.
Luckily, soft resetting your projector and reconnecting all of its cables is an effective way to fix this problem in a jiffy!
Disconnect any cables plugged into your Epson projector, including its power cord and source device’s cable (e.g., laptop, PC, phone, gaming console, etc.). Leave everything unplugged for at least 30 seconds.
Then, reconnect them to your projector and see the results.
2. Reset All Configs
You’ve recently installed a bugger firmware update and, much to your dismay, Epson has yet to release the debug patch.
Don’t worry. There’s a way you can fix your flickering projector without waiting for the next update.
Instead, you can reset all the configs on your projector by following the steps below.
Step 1: Disconnect any external devices plugged into your projector (e.g., input source, speaker, etc.).
Step 2: Then, hit the projector’s Menu key.
Step 3: Navigate to Reset.
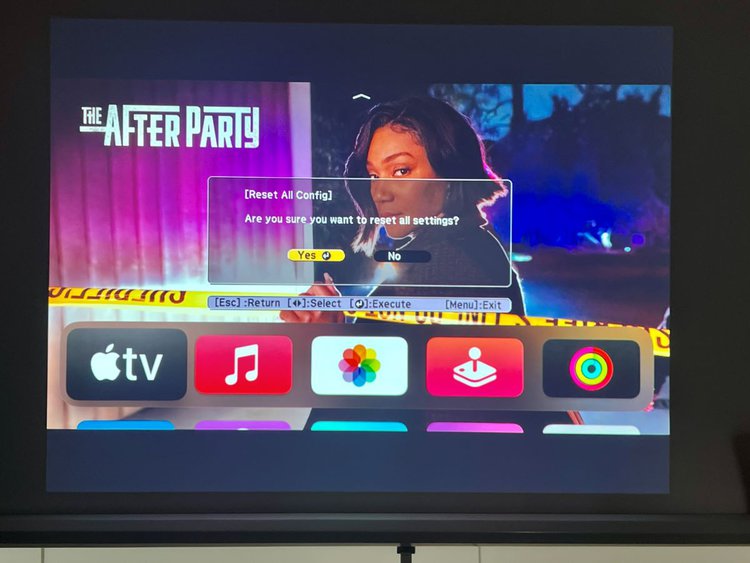
Step 4: Click on Reset All Config or Reset All, depending on your Epson model.
Step 5: When prompted, confirm your choice to reset the unit. Then, reconnect your input source device and play a video to see the results.
3. Contact the Manufacturer
You’ve come to the end of the road, and your projector is flickering more than ever before.
Fortunately, Epson customer care will come to your rescue. Contact their customer service by calling (562) 276-4394.
You can also send an email with your inquiry by heading to Epson’s Projector Support page, selecting your projector model, and clicking on the Email Us option.
If you’ve come to this article for guidance for another projector brand, you can reach out to their manufacturer’s customer support by following the links below.
- Sony customer support
- LG customer support
- Philips customer support
- JVC customer support
- Xgimi customer support

Yesenia Achlim is a technical copywriter and editor with a focus on AV equipment. She aims to break down complicated topics and make technology accessible, no matter your technical expertise. When she’s not teaching you how to replace a projector lamp, you can find her reading and baking.

Duy Anh is a seasoned technical editor specializing in helping readers troubleshoot TV, projector, and Wi-Fi issues. He’s always been drawn to logical problem-solving. His ability to approach matters from various angles with a neutral mindset enhances his technical expertise.