
13 Temporary Projector Mount Ideas

Looking for a quick and easy way to set up your projector?
You’re in the right place!
In this guide, we’ll explore 13 simple and temporary projector mount ideas that are perfect for any situation, whether you’re hosting a movie night or presenting in a meeting.
Quick Navigation
1. Tabletop

The tabletop method is as straightforward as it gets – just place your projector on a table.
I’ve used this setup for movie nights in my living room.
It’s flexible – you can move the table around to get the best angle.
Remember to clear the table to avoid any accidental spills or bumps.
It’s a hassle-free approach that works in almost any space.
2. Existing Shelf

Sometimes, the simplest solutions are right in front of us.
An existing shelf can be an excellent spot for your projector.
I’ve done this in my study room, where the shelf was at the perfect height for projecting.
Just make sure the shelf is stable and at an appropriate height for your viewing area.
3. Books and a Chair

Books and a chair can team up to create an effective projector stand.
Stack books on a chair to get your projector to the ideal height.
I’ve used this method in my living room when I needed a quick setup for a spontaneous movie night.
Opt for thicker books to ensure better stability.
Just make sure the books are well-balanced on the chair.
4. Using Your Bed Headboard

Using your bed headboard can be a cozy solution for bedroom setups.
If your headboard is sturdy, it can serve as a great spot to place your projector.
It’s ideal for late-night movies or lazy weekend binge-watching.
Just ensure the projector is secure and won’t fall.
5. A Projector Stand or A Tripod

Opt for the simplicity and security of a projector stand or tripod for your temporary projector mount.
These stands, often resembling camera tripods, offer an easy setup without the need for drilling – just a bit of floor space.
They are height-adjustable to suit your room and screen, and many even include a convenient shelf for your laptop, streamlining device connections.
Ensure you select a durable stand to support your projector’s weight and place it in a spot safe from accidental bumps for stability.

Alternatively, a camera tripod can be a quick, handy option.
Make sure it’s sturdy enough to hold your projector and consider weighing down the base for extra steadiness.
Yet, for long-term use, investing in a dedicated projector stand might be the wiser choice to ensure consistent support and stability.
6. Bedroom Bench

Have you considered using a bedroom bench as a projector stand?
It’s an inventive and functional use of furniture. I found this particularly useful in small bedrooms where space is limited.
Place the projector on the bench at the foot of your bed for an easy and effective setup.
It’s a simple yet clever way to enjoy your favorite films
7. Existing Hooks
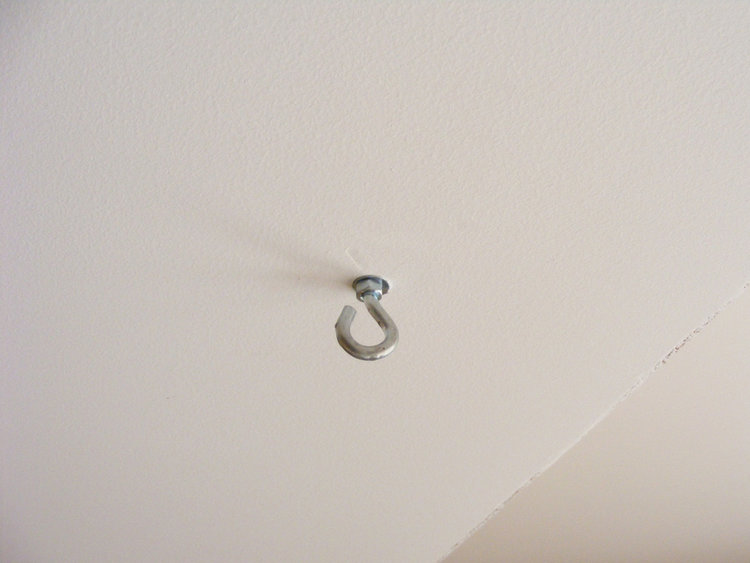
If your room has hooks in the ceiling, they could be just right for mounting your projector.
Look for two strong hooks that are close together.
If there’s only one, you might think about putting in another.
Keep in mind, though, adding a hook usually means drilling a new hole in the ceiling.

You can craft a DIY wooden platform equipped with a secure hanging mechanism to create a stable base for your projector.
Once constructed, simply and safely hang it on the hooks.
It’s a bit of a DIY project, but using these pre-existing hooks makes it a reliable and solid choice.
8. No-Drill Wall Shelves

No-drill wall shelves are great for small, portable projectors, offering just enough space without overwhelming wiring needs.
These shelves adhere to the wall with special adhesive pads.
I found them ideal for not just mini projectors but also for displaying some decorations.
They come in various sizes and styles, blending seamlessly with your room’s decor.
9. Clamp Mount
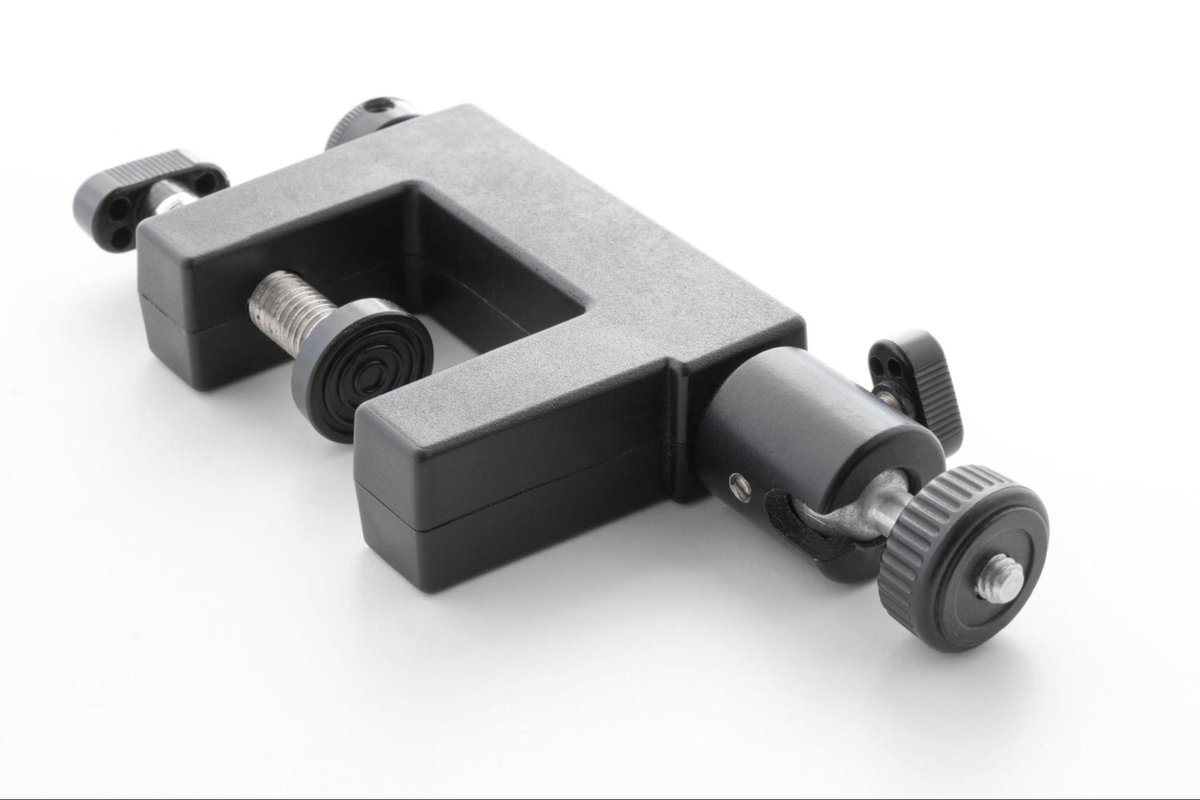
Clamp mounts are a simple and versatile way to set up your projector.
They’re designed to attach securely to solid surfaces like your desk, without needing screws or nails.
I’ve found this mount from KDD to be really handy since I can use it as a camera or webcam holder when I want to utilize it for other purposes.
Just make sure whatever you’re clamping onto is sturdy and stable, so your projector stays safe, even if it gets bumped.
10. Hanging Strips 
Mounting your projector can be easy and budget-friendly with special hanging strips and hooks from brands like Command.
It’s crucial to weigh your projector to ensure you choose adhesive strips that can reliably support its weight.
For wireless projectors, wall mounting is a convenient option.
However, if your projector requires wired connections, wall mounting may be restrictive, making ceiling mounting a more practical alternative.
I’d recommend caution with this approach for full-sized, heavier projectors, as their weight could pose a challenge.
Typically, a home projector weighs under 20 pounds, so opting for heavy-duty strips rated for 20 pounds or more is a wise choice.
To set up your projector using hanging strips, start by thoroughly cleaning the wall or ceiling.
Then, apply enough strips to the surface to adequately support the weight of your projector.
Allow the strips to set for an hour to ensure a strong bond, and then you’re all set – voilà!
Always double-check the mount’s strength for peace of mind before leaving your projector up for a while.
11. Suction Cup Mounts
")
Suction cup mounts are great when you’re projecting across a window.
They stick well to the smooth glass, giving a strong hold.
Just make sure to get the sturdy kind with at least three cups for a good grip.
It’s wise to test their strength before any long movie sessions and remember, it’s best to set them up only when needed and take them down afterward for safety.
12. Over-Door Mount Rack

Over-door mount racks offer a clever way to set up your projector without permanent fixtures.
They easily hang over any door, providing a sturdy base for your projector.
All you need is a flat piece of wood, cut to fit your projector, which then you can place it on the hooks. attach to the rack with simple hooks.
Just keep in mind that using this setup means the door will need to stay closed during your movie time – it’s perfect for a closet or a door you don’t often use.
13. Use a Headboard Mount

Mounting a projector on your headboard is a clever, space-saving solution.
Simply fix a small mount to the headboard and set your projector there.
Now, you can comfortably watch movies and shows from your bed.
Wrapping Things Up
There you have it, thirteen easy and inventive ways to mount your projector temporarily.
Each method offers a unique blend of simplicity, convenience, and creativity, ensuring there’s a solution for every space and situation.
Remember, the best projector setup is one that fits seamlessly into your life and living space, without any hassle.
So, pick the idea that resonates with you, set up your projector, and get ready to enjoy your favorite movies and shows like never before.

Meet Vance. He’s a proud dad, a seasoned Electronics Engineer, and an avid tech lover. His proficiency in electronics and troubleshooting skills were instrumental in crafting Pointer Clicker. Vance is passionate about simplifying tech for those who aren’t well-versed in it.