
15 Placement Ideas for Projector Mounting
After purchasing your projector, what’s next?
Do you just turn it on and point it towards your screen?
Projector placement is very important.
If your projector isn’t placed right, the image will not fit well on the screen.
How do you decide where to mount a projector? The options are numerous!
This article contains a list of 15 places to mount your projector, including bedroom, living room, and home theater ideas.
We also include DIY mini projector mount ideas, ceiling mount ideas, hidden projector mounts, outdoor projector mount ideas, projector wall mount ideas, and tips on how to hide your projector effectively.
Quick Navigation
- Mounting Your Projector
- Meditate on the Ideal Room Layout
- 15 Good Ideas for Where To Mount Your Projector
- 4. Or Hide It in a Cabinet
- 5. Hide It Behind a Wall
- 6. Build a Soffit For It
- 7. Build a Custom Bracket Around It
- 8. Put The Projector Behind The Screen
- 9. Place It on a Tripod
- 10. On A Mobile Stand
- 11. Place the Projector on a Table
- 12. Or Put It on a Chair
- 13. Wall Mount It Above Your Bed
- 14. Use a Headboard Mount
- 15. The L-shaped Stand Method
- How To Determine the Best Location To Mount
- Conclusion
Mounting Your Projector

Wondering where to mount a projector? You can mount your projector in any of three ways:
- On the ceiling
- Against the wall
- On table or tripod stands
These three methods allow a variety of styles for mounting your projector. Now let’s review these methods.
Ceiling Mounts
Projectors can be mounted on the ceiling. A ceiling-mounted projector can be visible or hidden out of sight.
Visible ceiling mounts are often hung up by brackets attached to the ceiling. The invisible ones are tucked up above the ceiling.
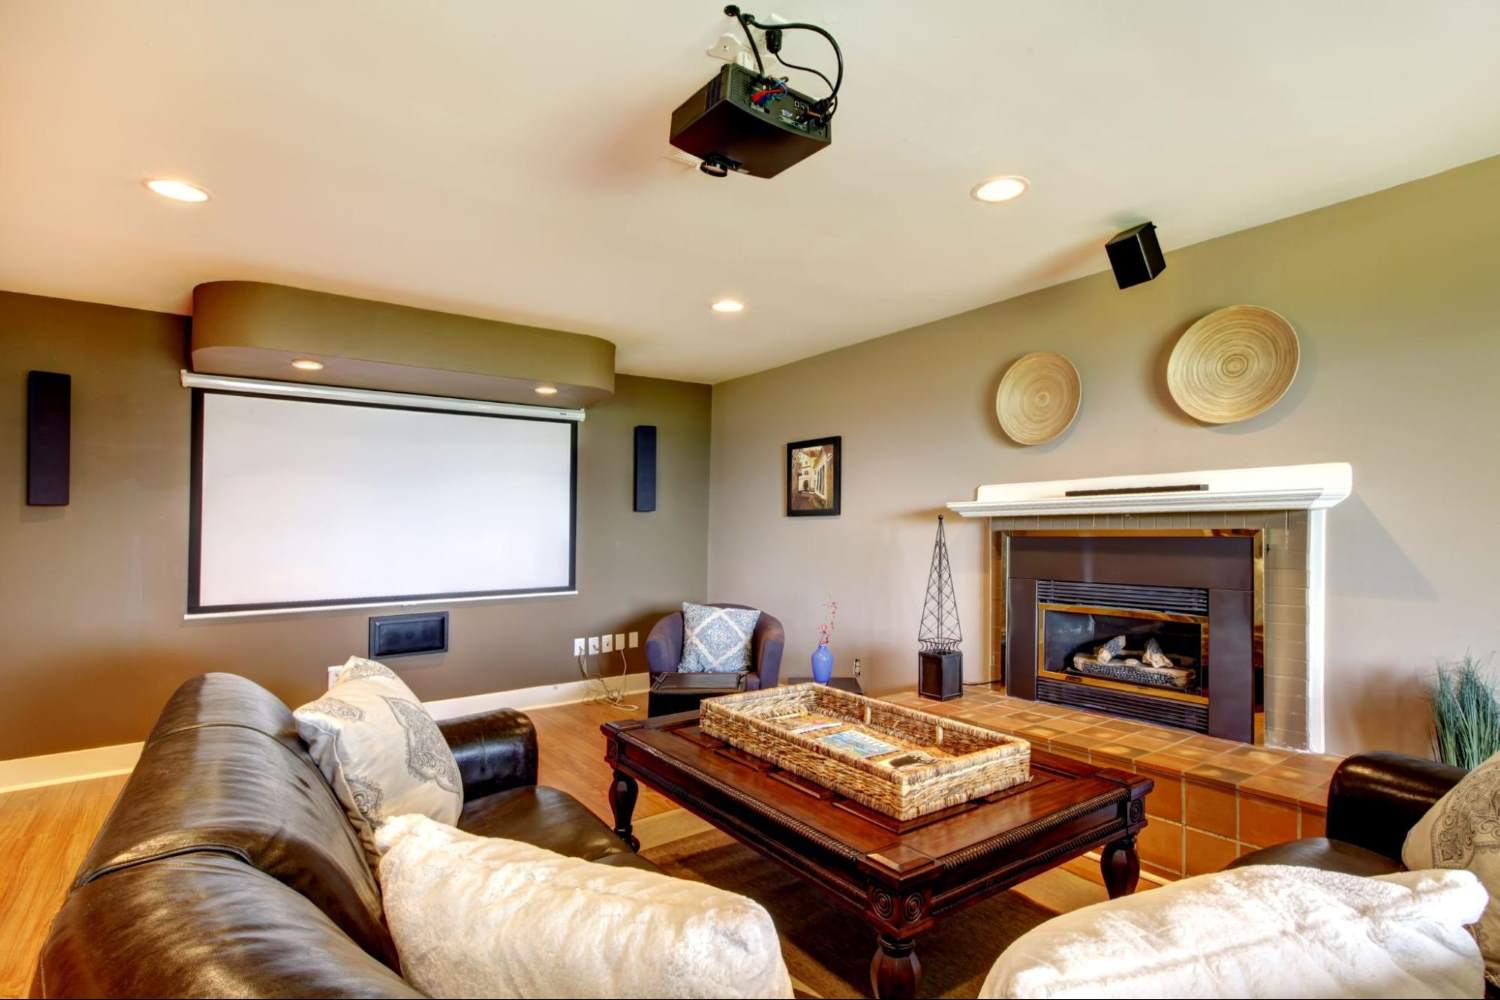
Shelf or Wall Mounts
As the name implies, these mounts hold your projectors against the walls. The projectors are often placed on shelves attached to the wall.
Some mounts are cleverly hidden, maintaining a minimalist look, while others are visible, each adding a touch of elegance and charm to your home or projection space.
Standing Mounts
Some projectors come with specialized stands of their own. These are often pico or portable projectors designed to be used on the go.
For this reason, they come with convenient stands that let you mount them anywhere and anytime.
Meditate on the Ideal Room Layout

When setting up the ideal room layout for your projector, think about making it cozy and just right for movie nights or presentations. Remember, the little things make a big difference.
First things first, think about the light in your room.
Too much sunlight or bright lights can mess with your projector’s image, so choosing a wall that’s not too sunny is a smart move.
Plus, remember to shut those curtains if you’re watching during the day!

Next up, let’s talk about where to put that projector. If you’re going for a ceiling mount, make sure it’s adjustable.
You don’t want to be craning your neck up or down, right? Comfort is key here.
And here’s a pro tip: start with your current furniture layout.
It’s way easier to figure out the best spot for your projector if you’re not moving all your stuff around.
Just imagine kicking back on your favorite couch, and placing the projector so it fits into your space just right.
Trust me, a little planning goes a long way in making your movie nights awesome!
15 Good Ideas for Where To Mount Your Projector
Here are some ideas for mounting your projector:
1. Hide It Above The Ceiling
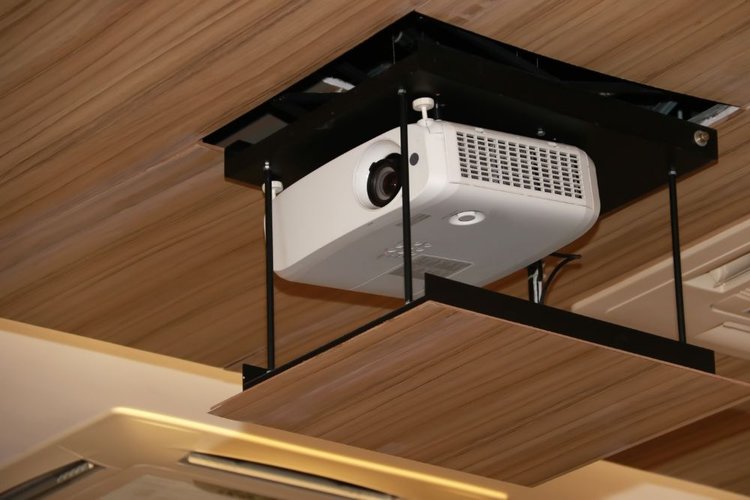
Hidden projectors are often tucked above the ceiling. They are hard to spot because they are built right into it.
They are cradled by motorized contraptions called lifts. These lifts hold them up and lower them down when they are to be used.
With a remote, these lifts slowly descend from the ceiling. Balanced within them is the projector pointing towards the screen.
After viewing, the lift tucks the projector right back up into the ceiling.
Pros
- It is a very out-of-the-way solution
- It is convenient to use as the lift is motorized
- There is no chance of anyone getting in the way and casting shadows.
Cons
- You need a ceiling with enough space above it to house your lift.
- It may require cooling equipment depending on how the lift is designed.
- You will need electrical fixtures in the ceiling to power the electrical lift
- Can be expensive to install
2. Hang It From The Ceiling

Sometimes projectors are mounted visibly from the ceiling. You can see them hanging down and angled towards the projection screen.
Special equipment called brackets are needed to attach them firmly to the ceiling.
The brackets come in two sections called plates. One plate is to be attached to the ceiling, and the other, to the projector itself.
The process of joining both plates together is the trickiest. You have to make sure the screws are tightened while your projector is angled right.
Pros
- They are less expensive to install.
- The projectors are not covered up so there is no chance of overheating.
Cons
- Depending on the bracket, the process can be quite complicated.
- Extra expenses go into buying cables to reach the power outlets below.
- Cheap ceiling mounts can shift over time and ruin the angle of your picture.
3. Place It on a Shelf
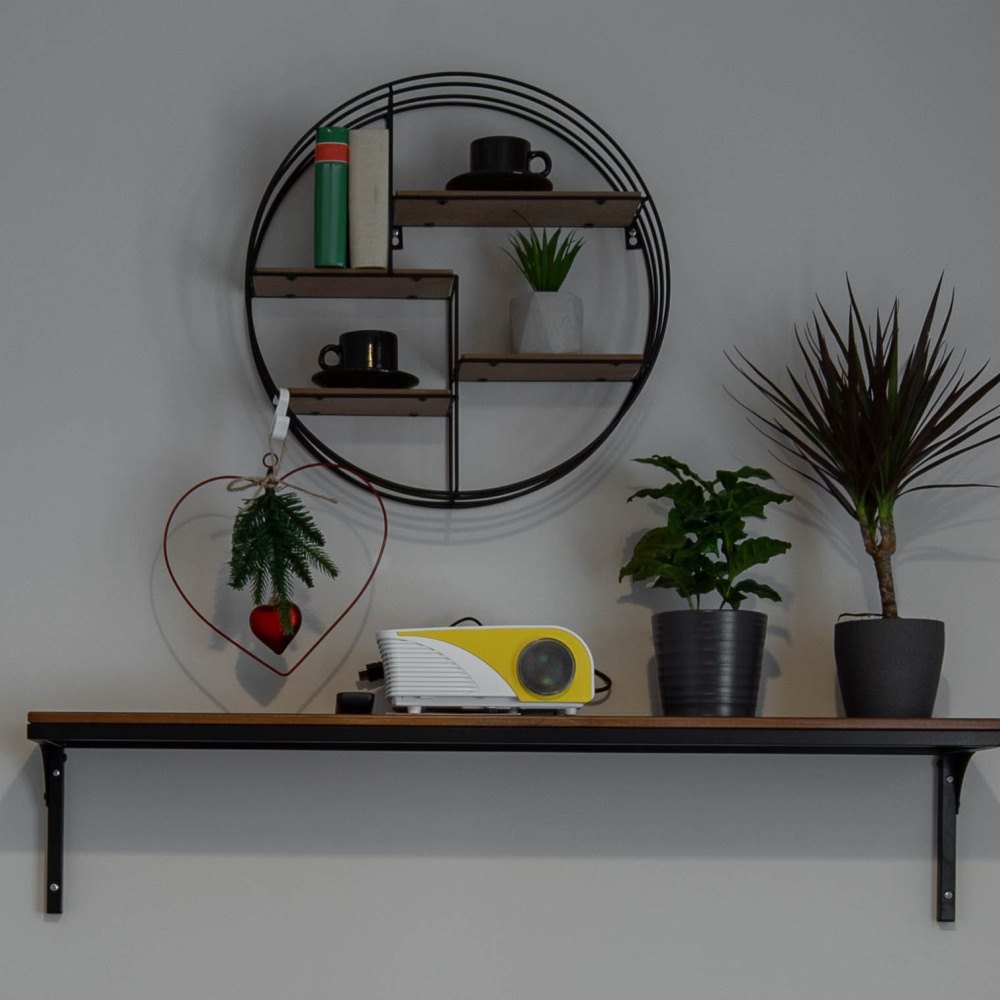
If you’ve got some floor shelves in your room already, or if you’re up for installing a cool floating shelf, just set it up on the wall opposite your projector screen.
It’s a perfect spot for your projector.
And guess what?
When you’re not in the mood for movies, you can switch the projector with some stylish decorations.
It keeps your space looking great and functional at the same time.
4. Or Hide It in a Cabinet

Think about switching it up with a floating cabinet instead of a regular shelf.
It’s a neat trick to keep your projector tucked away and out of sight when you’re not using it.
Then, when you’re ready for movie time, just open up the cabinet doors, fire up the projector, and settle in for some fun.
5. Hide It Behind a Wall
You know, mounting your projector behind a wall is another cool option, kind of like those ceiling mounts.
The trick is to have some space behind the wall – maybe it’s another room or even a closet.
Just set up a sturdy stand or a cabinet back there to hold your projector.
The only thing you’ll see from your screen room is the projector’s lens. When it’s showtime, the projection beam just shines through that little hole.

6. Build a Soffit For It

Projector soffits are like wooden box houses for a projector. Most designers of home theater systems use this.
The box is built to the specifications of the projector. It also has enough room and openings to ensure ventilation.
Sometimes, cooling fans are also built into the soffit.
You can design the soffit to match the interior decor of the projection room before fixing it to the wall.
Like the hidden wall mounts, a soffit covers up every part of the projector except the lens.
However, it comes with a small door through which the projector can be taken out if the need arises.
7. Build a Custom Bracket Around It
In many ways, these brackets resemble soffits. The only difference is that they are totally open in front.
The projector is visible to everyone but mounted against the wall and bracketed by a wooden barrier.
With this kind of mount, there’s no need for external cooling fans. The heat shouldn’t build up.

8. Put The Projector Behind The Screen
For this setup, you’ll need a specific screen called a rear projection screen.
This screen works differently because the projector is placed behind it, either on the wall or the ceiling.
It’s a see-through screen, which allows the image to be seen from the front.
Keep in mind that you’ll need some extra space behind the screen for this to work, so it’s best for bigger rooms.

9. Place It on a Tripod

Have you thought about placing your projector on a tripod? It’s super handy and works great with all sorts of gadgets, including projectors.
The best part? You can tweak the height and angle to get that perfect view. Plus, it’s a breeze to move around.
10. On A Mobile Stand
, Rolling Cart with Ventilated Tray, Heavy Duty, Height Adjustable Laptop and Projector Presentation Trolley, Black")
You may consider using a mobile stand, which works much like a tripod. This stand isn’t just for your projector; it also has space for your laptop.
This is super handy, especially if you’re streaming movies or presentations from your laptop.
Plus, the best part? The stand has wheels! So, you can smoothly roll it from one room to another without any hassle.
It’s a simple, yet effective solution for your projector setup.
11. Place the Projector on a Table

For a quick and easy setup, placing your projector on a table can be a great choice.
It’s as simple as it sounds: just find a stable table and set your projector on top. This way, you have a secure and accessible spot for your projector.
There’s no need for extra equipment or complicated installations, ust place it, plug it in, and you’re ready to go.
12. Or Put It on a Chair

Using a chair as a stand for your projector is another easy and effective solution. Simply choose a sturdy chair and place your projector on it.
This setup is perfect when you need a quick solution or if you’re short on space. You can add some books below to adjust the projector’s height to your liking.
13. Wall Mount It Above Your Bed

Wall mounting your projector above your bed can create a cozy movie theater experience right in your bedroom.
It’s a neat and space-saving solution.
You can easily install a mount on the wall and place your projector there.
This setup is perfect for those lazy evenings when you just want to lie back and enjoy a movie.
Just make sure the mount is securely attached to the wall for a worry-free viewing experience.
14. Use a Headboard Mount

Mounting your projector on a headboard is a smart and efficient idea, especially in smaller spaces.
It’s all about making the most of what you have. Just attach a small mount to your headboard and place your projector there.
This way, you can enjoy your favorite films or shows right from the comfort of your bed.
15. The L-shaped Stand Method
")
Think outside the box and use a coat rack stand to hold your projector.
It’s an unconventional but clever way to repurpose something you already have.
This method is particularly handy when you’re looking for a temporary setup or if you’re short on space.
It’s straightforward and doesn’t require any complex installation.
How To Determine the Best Location To Mount

There are a number of things to consider before mounting your projector. The most importantnt is the projector’s throw distance.
This is a measure of the projector’s distance from the screen while displaying an image of a given size.
This measurement tells you how far away from the screen to mount your projector.
You have to mount your projector at a distance that will give you the image size you desire. Mounting a projector too far or too close to the wall may give you a blurry or small image.
Projectors often come with their throw distances (or throw ratios) specified in their manual.
Here’s how to calculate the best distance for your projector:
Projector throw ratio × Horizontal length of the screen (in inches).
The result is the distance you should put between your screen and your projector.
For instance:
Throw ratio = 2.3
Screen length = 100″
Ideal projector distance = 2.3 × 100 = 230″
The measurement should be done from the screen to the center of the projector’s lens.
After you’ve calculated the distance, you can decide whether to mount on the wall or install a ceiling mount.
Other factors to consider are your lens shift, and the presence of power outlets.
Some projectors don’t have lens shift or keystone correction functions. They have to be installed directly in front of the screen to display the picture perfectly.
Conclusion
Wrapping up, we’ve explored a variety of creative and practical locations to mount your projector, each with its own unique benefits.
Remember, the perfect spot depends on your room’s layout and your viewing needs.
Feel free to experiment with different placements until you find the one that brings the best cinematic experience to your space.
Here’s to many movie nights and gaming sessions enhanced by your ideally placed projector!

Gabriella ‘Diogo is a technical writer with a vested interest in tech hardware and equipment. She shares her knowledge and processes in an easy-to-grasp, lighthearted style. When she’s not testing or researching device performance, you’ll find her writing short stories or rewatching episodes of her favorite sitcoms.

Huy ‘Anyxel’ Pham is a Pinterest marketer and writer. He’s curious about how the human mind works and how people grow mentally. These interests shape his writing, making it useful and valuable. When he’s not working, Huy enjoys the peace he finds at his favorite Buddhist temple or while reading a good book.