
Samsung TV No Headphone Jack? 4 Audio-Out Routes to External Speakers

What To Know
- Newer Samsung TVs lack headphone jacks but have Optical ports for high-quality sound output
- Use a Digital to Analog Audio Converter (DAC) to connect wired headphones or speakers with a 3.5mm AUX connection to the Optical port on Samsung TVs.
- Other connection methods include HDMI ARC for soundbars and Bluetooth for wireless headphones or speakers.
In this guide, I’ll show you four ways to connect headphones or speakers to your Samsung TV without a headphone jack.
Let’s dive in!
Quick Navigation
Do Samsung TVs Have Headphone Jacks?
No, newer Samsung TVs do not have headphone jacks.
While some older Samsung TVs do have headphone jacks (or 3.5mm audio ports), newer Samsung TVs are made without them.
This may be because most Samsung smart TVs support Bluetooth connectivity, allowing users to wirelessly connect their Bluetooth headphones or speakers.
Additionally, newer Samsung smart TVs are fitted with digital audio (Optical) ports, which foster slightly better sound quality than 3.5mm audio ports.

The Optical ports on Samsung TVs support wired connections to external headphones, speakers, or amplifiers, enabling users to enhance their TV setups with high-quality audio.
For users who have a preference for using wired headphones or speakers, especially those with a 3.5mm AUX connection, refer to the first solution “Use a Digital to Analog Audio Converter” below.
4 Better Ways for Samsung TV Sound Output
For Samsung TV owners looking to enhance their audio experience, there are four effective methods to achieve better sound output.
1. Use a Digital to Analog Audio Converter
A popular and efficient way is through the use of a Digital to Analog Audio Converter (DAC).
This device is ideal for connecting wired headphones or speakers, especially those that only support a 3.5mm AUX connection, to your Samsung TV’s Optical output port.

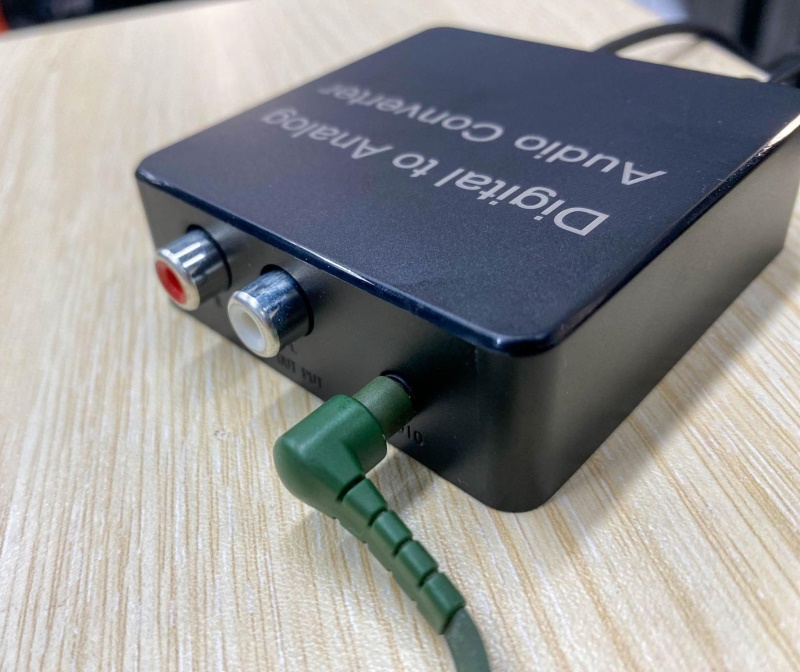
The DAC comes equipped with an Optical input port (SPDIF), designed to link directly to your TV’s Optical output.

On its output side, the DAC offers both a 3.5mm AUX port and RCA left (white)/right (red) ports.

These ports allow for a versatile range of audio equipment connections, including headphones, speakers, and even soundbars.
An excellent DAC model to consider is the PROZOR Digital to Analog Audio Converter.

- PROZOR 192KHz Digital to Analog Audio Converter: Converts coaxial or toslink digital PCM audio...
- Input Audio Connector: 1 x Toslink, 1 x RCA (Coaxial); Output Audio Connector: 2 x RCA(R/L), 1 x...
- Up to 192KHz/24bit: Supports Sampling Rate at 32KHz, 44.1KHz, 48KHz, 96KHz, 192KHz; 24bit S/ PDIF...
Last update on 2024-04-10 / Paid Link.
Setting up the DAC with your TV and headphones or speakers is a straightforward process:
Step 1: Begin by powering on the converter.

Step 2: Connect one end of an Optical cable to the DAC’s SPDIF (Optical input port).

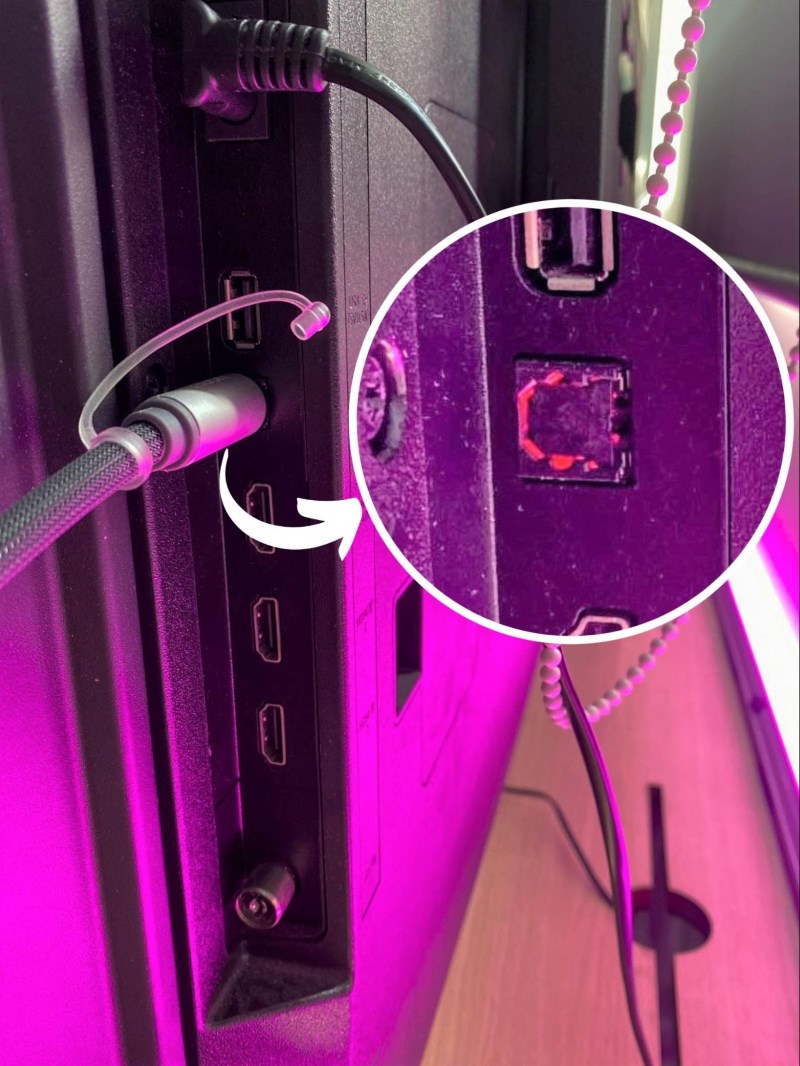
Step 3: Attach the other end of the Optical cable to your TV’s Optical port.

Step 4: Depending on your audio device, connect your wired headphones or speakers to the DAC using the 3.5mm AUX connector.
For the soundbars, a 3.5mm AUX cable may be necessary.

After completing these steps, it’s important to check that the sound is correctly being output to your headphones or speakers.
If you encounter any issues like unclear sound or intermittent output, first ensure that all cables are securely connected and in good condition.
Additionally, you may need to adjust your TV’s sound output settings to select the Optical option, ensuring optimal audio transmission.

2. Use HDMI ARC
Enhancing your Samsung TV’s audio quality is simple with the HDMI ARC method.
This approach involves using the HDMI port with ARC (audio return channel) support on your TV to connect it to external audio devices like a soundbar.
For example, when I connected my Samsung UA43AU7002 TV to an LG SN8Y soundbar, the process was straightforward:
Step 1: Plug one end of an HDMI cable into the HDMI ARC/eARC port on the soundbar.
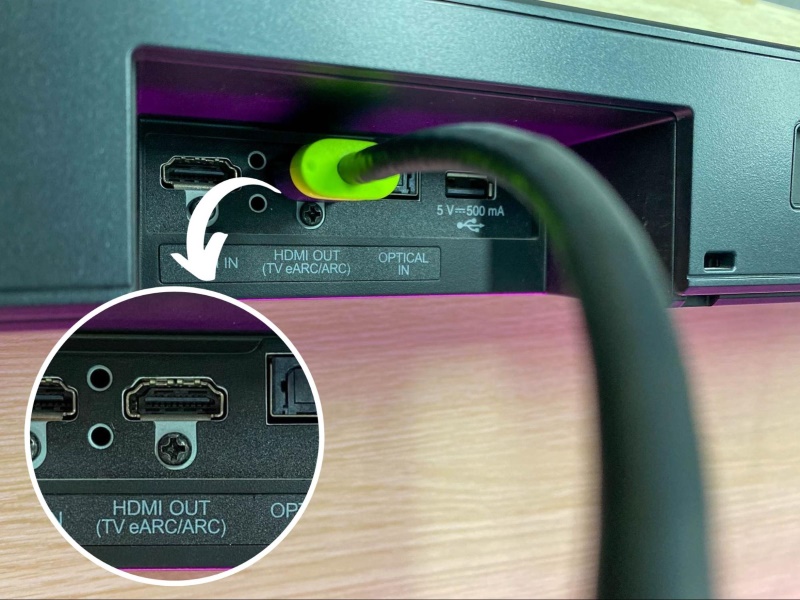
Step 2: Attach the other end of the cable to the HDMI ARC/eARC port on your Samsung TV.

Step 3: You’ll need to adjust the settings on your soundbar.
Set the connection method to HDMI ARC/eARC to ensure it communicates correctly with the TV.

Step 4: After that, it’s time to tweak the TV settings.
Go to the main Settings menu, find the Sound settings, and navigate to Sound Output.


Step 5: Finally, select the soundbar – Receiver (HDMI-eARC) option to change the Sound Output to your soundbar.

3. Use Optical
One effective method to improve the sound quality of your Samsung TV is by utilizing an Optical connection.
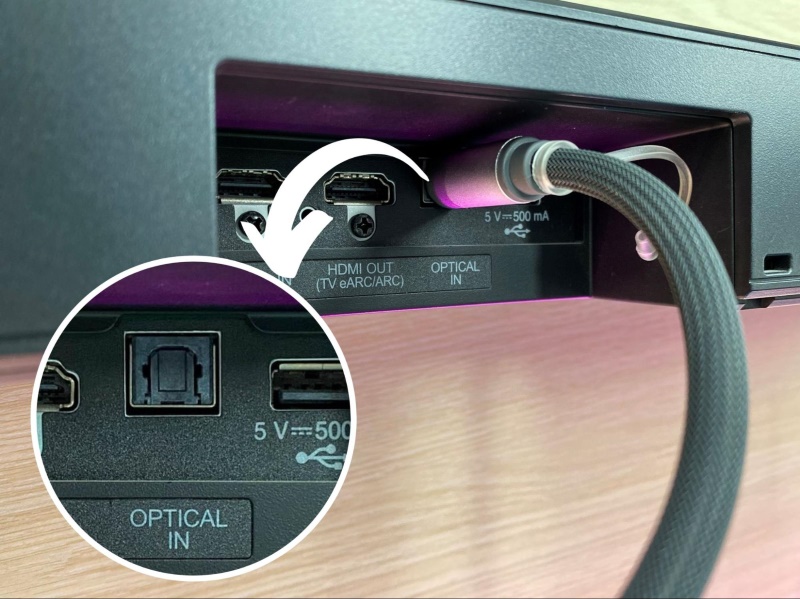
If you have a soundbar, such as the LG SN8Y like mine, which is compatible with Optical input, you can easily connect it to your TV.
This is done by using an Optical cable that links your TV directly to the soundbar, enabling the sound to be output through the soundbar instead of the TV’s built-in speakers.
To make this setup work, it’s essential to adjust a few settings.
First, on your Samsung TV, navigate to the audio output settings and select the Optical option.
This directs the TV’s audio to flow through the Optical cable.
Next, ensure that your soundbar is also set to receive input via the Optical connection.

Once these settings are in place, you’ll notice a significant enhancement in your TV’s audio performance, providing a more immersive viewing experience.
4. Use Bluetooth
One of the best ways to improve your Samsung TV’s sound experience is to use its Bluetooth capability.
This awesome feature lets you connect your TV wirelessly to cool audio devices like Bluetooth headphones, speakers, or soundbars, making your watching experience way better without any messy wires.
For instance, I can easily pair my Samsung UA43AU7002 TV with my Samsung Galaxy Buds Live wireless earphones.


Here’s how to do it:
Step 1: First, get your headphones or earphones ready to connect by putting them in pairing mode.
If you have Samsung Earbuds like mine, just press and hold both earpieces for about 5 seconds, and they’ll be ready to pair.
Step 2: Next, grab your Samsung TV remote and navigate to Settings. Then, go to Sound.
Step 3: After that, select Sound Output and choose Bluetooth Speaker List.

Step 4: Finally, just pick your headphones or speaker from the list that appears on your TV.


This simple process will link your audio device to your TV, and voilà! You’re all set to enjoy your shows with great sound.

Hai Huynh, an Electrical & Electronics Engineering graduate from Ho Chi Minh City University of Technology, is a passionate technical editor. He discovered his love for technology when he started playing Pokemon on a Gameboy as a child. Now, he writes and edits technical articles, focusing on smart TVs and streaming devices, to help readers solve problems.
Thank you so much! This was the best website to explain this! I’ve been searching everywhere!❤