
4 Proven Solutions for Your Optoma Projector Fan Locked Issue

- The “FAN LOCKED” message on an Optoma projector indicates a potential fan malfunction, which could lead to the projector lamp overheating.
- Common fixes include removing physical obstructions from the fan, cleaning the fan and other internal components, or replacing the fan.
- If basic troubleshooting fails, it’s recommended to consult a certified technician or check the warranty for professional assistance.
Are you facing a “FAN LOCKED” message on your Optoma projector?
Do not worry.
In this article, I will show you four tested solutions to get your projector’s fan back in action.
Let’s dive in!
Quick Navigation
Understanding the Optoma Projector Fan Locked Issue
Understanding why a “FAN LOCKED” message has appeared on your Optoma projector screen can help shed some light on what the fan’s purpose is and how it affects your unit’s functionality. So, before outlining our solutions to fix this problem, let’s discuss what this mysterious message means.
When a projector (including Optoma units) is in use, their fans are running to circulate cool air throughout the unit and cool the projector lamp (which can reach up to 300 degrees Fahrenheit).
If the fan stops working, there’s a high risk of the projector lamp overheating, causing it to burn out and potentially damaging it along with other internal components.
Needless to say, a broken projector fan can cause a host of problems and even potentially break your projector.
To protect itself from any further damage, your projector will automatically display a “FAN LOCKED” message before shutting down, as shown in the picture below.

Optoma projectors also have a temperature indicator (marked by a thermometer icon) on their control panels. This indicator’s LED light will flash red when your projector is overheating.

While it won’t hurt to factory reset your projector when this problem arises, it should be noted that this solution is most commonly used for software-related problems. However, your projector fan locking is a result of faulty hardware and will unlikely be resolved by factory resetting it.
Instead, you must try different solutions that specifically target your fan’s hardware. Keep reading to learn our tried and true solutions to fix the “FAN LOCKED” issue.
How To Fix the Optoma Projector Fan Locked Issue
Now that you understand your projector fan’s importance and what issues may arise if it stops working, including a “FAN LOCKED” message, let’s delve into a few solutions to fix this issue!
1. Remove Obstacles Stuck in the Projector Fan (If Any)
Loose or broken internal components can become lodged in the projector fan or block it, preventing proper airflow. This can happen if your projector lamp has broken, as the shards may become stuck in the fan blades, stopping it from spinning normally.
While physical obstructions are rare, they can do a good amount of damage to your projector fan, so it’s a good idea to open your unit and check for any obstacles.
Follow the instructions below to open your Optoma projector and check for obstructions.
Step 1: First, turn off, unplug, and carefully disassemble your projector, following the steps outlined in our guide. Be mindful not to misplace/lose any small parts of screws – you’ll need them later when reassembling the unit.
Note: Your projector may be hot, so ensure your projector is completely cooled before disassembling it to avoid burning yourself.
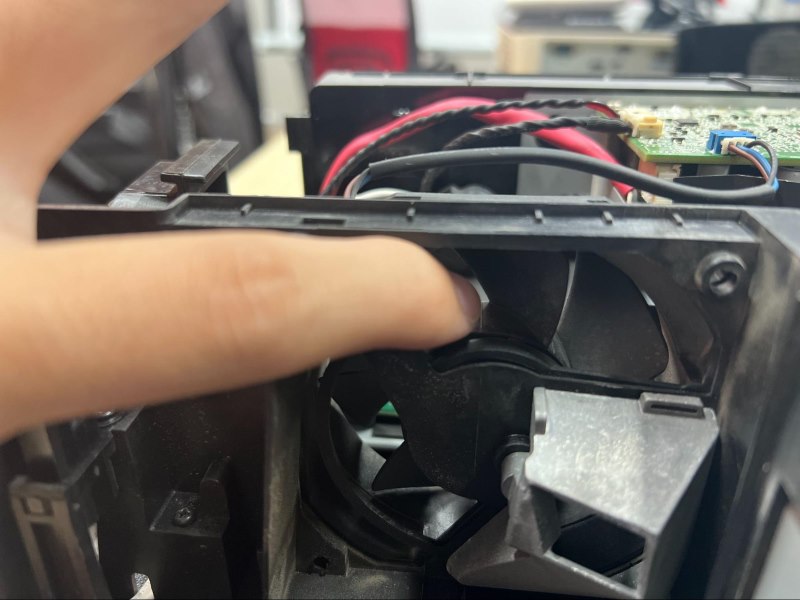
Step 2: Once you’re able to access the fan, see if you can delicately spin it with your hand. If the fan’s blades do not move smoothly, something may be jamming them. Please do not attempt to forcefully spin the fan if it is obstructed, as you may damage the blades.
Step 3: Find the object obstructing the fan’s movement and carefully remove it. You may need a long pair of tweezers to grab it if it’s a particularly hard-to-reach spot.

If you notice your projector fan is looking a little dusty, proceed to the next solution to learn how to clean it.
2. Clean the Projector Fan
If your projector is in a particularly dusty environment or hasn’t been cleaned in a while, the fan may have become clogged with dust and debris, causing it to malfunction or stop working altogether. In some cases, you may notice your projector’s vents are also dusty, suggesting the fan may be dusty as well.
To ensure your projector fan is being clogged by any dust bunnies, resulting in a “FAN LOCKED” message, follow the instructions below to clean it.
Step 1: Once you’ve disassembled your projector following the instructions in our guide and have access to the fan, you’re ready to start cleaning! Use a professional compressed gas duster or paintbrush to gently remove any dust and debris from the fan’s axle and blades. Make sure to blow or brush the dust out of the unit, rather than onto your projector’s other components.

Step 2: While you’re at it, it’s a good idea to clean the rest of your projector’s internal components, like its dust/air filters, lens, and vents. This will increase your projector’s lifespan and ensure its optimal performance.
This process can be delicate, so check out our comprehensive guide on how to properly clean an Optoma projector.
3. Replace the Projector Fan
Once you’ve cleaned your fan, try turning it on and seeing if it works normally. If you still are presented with a “FAN LOCKED” message, it may be time to replace your projector fan.
Projector fans can become damaged or wear down over time, as is the case with most electronic components. While this does mean you’ll have to purchase a fan replacement, bear in mind that this process will likely be much cheaper than buying a new projector.
Follow our instructions below to replace your Optoma projector’s broken fan.
Step 1: Unplug your projector from power and allow it to cool completely before disassembling it, following the steps in our guide. Locate the unit’s motherboard and disconnect the control wire connecting it to the fan.

Step 2: Using a Philips screwdriver, unscrew and remove the fan from the projector’s body. (Don’t lose these screws, you’ll need them later!)

This process can be slightly complex. To ensure you complete each step correctly, watch the video below demonstrating how to remove an Optoma projector fan safely.

Step 3: Replace your projector’s old fan with a new, compatible Optoma fan. It’s a good idea to reach out to the unit’s vendor to double-check that the fan is compatible with your specific projector model before buying it offline.
Note: Please note that, depending on your warranty service, repairing and replacing certain components may void your warranty.
4. Seek Professional Assistance or Warranty Service
If you’ve tried dislodging any obstructions, cleaning, and replacing the fan but still cannot rid yourself of that infuriating “FAN LOCKED” message, there could be an issue with one of your projector’s other components, like its motherboard.
While it is possible to replace your unit’s motherboard yourself, it is a highly technical process. So, unless you have prior experience fixing projectors, I strongly recommend bringing your unit to a certified technician.
You may also want to check if your warranty is still valid, and if it is, contact the warranty service, as they may replace the fan for you free of charge.
As this is likely a result of a more complex problem, it’s best to consult a technician who can formally diagnose the issue for you and propose a solution that’s more advanced than basic troubleshooting tricks.
Wrapping Things Up
Unfortunately, the “FAN LOCKED” issue can not be resolved by simply restarting or even factory resetting your projector. This message is usually a hardware-related issue, and thus, you must adjust or fix your projector’s hardware to resolve it.
Open up your projector, remove any obstacles blocking the fan (if any), and clean it. If these adjustments don’t fix the problem, the fan may need to be replaced.
If none of these solutions get rid of the “FAN LOCKED” message, something may be wrong with one of your projector’s other components, and you should bring it to a technician to be fixed. Alternatively, you can reach out to the warranty provider to see if they’ll cover the cost of repairs.
What’s your experience with a “FAN LOCKED” message on your Optoma projector? And how were you able to fix it?
Let us know in the comments below!

Yesenia Achlim is a technical copywriter and editor with a focus on AV equipment. She aims to break down complicated topics and make technology accessible, no matter your technical expertise. When she’s not teaching you how to replace a projector lamp, you can find her reading and baking.