
Why Does My Resolution Shrink When I Connect to a Projector? MacBook & Windows Guide

What To Know
- Resolution shrinkage typically happens when the laptop’s output resolution doesn’t match the projector’s native resolution, like a 1280×720 output to a 1920×1080 projector, causing the projector to adjust the image, leading to a smaller or altered display.
In this article, we’ll explore why resolution shrinkage occurs when connecting a laptop to a projector and offer effective solutions to align their resolutions for an optimal display.
This common issue, often stemming from mismatched resolutions, can be resolved with a few simple adjustments.
Let’s delve into fixing this frustrating problem and enhancing your viewing experience.
Quick Navigation
Understanding the Resolutions Mismatch

As the laptop and projector spring to life, the excitement quickly fades when you notice that the resolution has shrunk.
This occurs when the native resolution of the projector and the resolution of your laptop’s display fail to align.
For example, let’s say your projector boasts a crystal-clear resolution of 1920×1080 pixels, but your laptop is sending a lower resolution signal of 1280×720.
In an attempt to adapt, the projector adjusts the image to fit its native resolution, resulting in a smaller-sized image on the screen.
To avoid this issue, it is important to ensure that the resolution settings for your projector match the resolution of your input source. Let’s explore some solutions to this problem.
Different Cables Will Output Different Resolutions

The type of cable you use to connect your projector can affect the resolution of the projection.
Common display connections on projectors include VGA and HDMI. It’s important to note that VGA has a limited resolution range compared to HDMI.
If you’re using a VGA cable for the connection, the resolution may be lower compared to an HDMI connection. HDMI supports a higher resolution range and provides better image quality.
The table below shows the maximum resolutions for VGA and HDMI cables:
| Type of Cable | Resolution |
| VGA | 640 × 400 |
| HDMI 1.4 | 3840 × 2160 |
| HDMI 2.0 | 5120 × 2880 |
| HDMI 2.1 | 7680 × 4320 |
Choosing the right cable for your setup can ensure that you achieve the desired resolution when connecting to a projector.
How to Change Projector Resolution on Windows 10
If you’re using Windows 10 or higher, you can easily change the resolution of your projector.
By adjusting the resolution settings on your Windows 10 device, you can ensure that the projected image appears as intended.
Follow these steps:
Step 1: Connect your projector to your laptop using an HDMI cable.
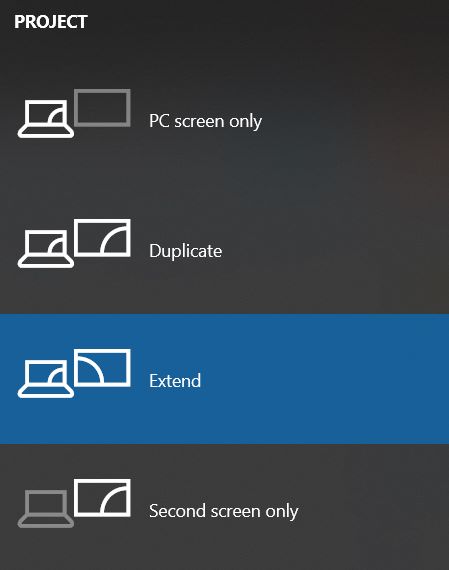
Step 2: Press the Windows + P keys on your keyboard and select “Extend” to display the image on the projector.
Step 3: Right-click on your desktop and select Display Settings from the menu.

Step 4: In the Display settings, select the screen corresponding to your projector and scroll down to the Display resolution.
Choose the recommended resolution for your projector, as suggested by the system.

Checking Projector Resolution on Windows 10, 11
Confirming the resolution of your projector on Windows 10 and 11 allows you to ensure it aligns with your desired setup.
Follow the steps below:
Step 1: Ensure that your projector is connected to your computer.
Step 2: Right-click on your desktop and select Display Settings.
Step 3: In the Display window that appears, scroll down and select Advanced Display Settings.

Step 4: Change the display to your projector, and all the information about your projector’s resolution will be displayed below the settings.
The Desktop resolution is the display resolution of your projector. In my case, you can see the resolution of my Epson projector is set at 1024×768.

Mac Resolution Shrinks When Connected to a Projector/TV
When you connect your Mac to an external display, the resolution on your Mac either shrinks or changes entirely.
This is because the resolution on the projector or TV and the resolution on your Mac are different.
But don’t worry! You can change the resolution for both your Mac and the connected projector or TV. Here’s how:
Step 1: Connect your Mac to the projector or TV via HDMI ports.
Step 2: Select the Apple menu on your Mac’s desktop and choose System Preferences.

Step 3: In the System Preferences window, select Displays → Display Settings.


Step 4: Choose either “Extend” or “Mirror” depending on your needs.
Step 5: On the left sidebar, you’ll see the name of your MacBook and the connected projector or TV.

Step 6: To change the resolution on your Mac, select the MacBook and choose the appropriate resolution under Scaled.

Step 7: To change the resolution on the projector or TV, switch the display settings on the left sidebar.
Step 8: Under Scaled, select the resolution that fits your projector or TV.

Additional Tips and Considerations
In addition to the steps mentioned above, here are some additional tips and considerations to keep in mind when connecting to a projector:
- Update your graphics drivers: Ensure that you have the latest drivers installed for your graphics card, as outdated drivers can sometimes cause resolution issues.
- Experiment with different resolutions: If the recommended resolution doesn’t provide the desired results, try experimenting with different resolutions to find the best fit for your setup.
- Check projector settings: Some projectors have their own settings that allow you to adjust the resolution. Consult your projector’s manual or menu options to explore these settings.
- Use a compatible aspect ratio: Ensure that the aspect ratio of your input source matches that of the projector to avoid stretching or distorting the image.
Conclusion
Resolution changes when connecting to a projector can be frustrating, but with the right knowledge and steps, you can address this issue effectively.
To ensure that your projected image appears as intended, it is important to have a thorough understanding of resolution mismatching, select the appropriate cables, and make necessary adjustments to the settings on Windows 10, 11, and Mac.
Additionally, considering additional tips can further enhance your projection experience.
Remember to always check the resolution of your projector and input source and make the necessary adjustments to avoid any unexpected changes in resolution.

Tai “Ty” Luu, an Electronics Engineering graduate from Sheridan College, is a passionate technical editor with a deep love for technology and gaming. He constantly seeks new challenges to expand his expertise in the tech and gaming fields.