
5 Tested Solutions To Stop HDR From Turning Off on Windows 10 & 11

- Verify that both your integrated or external display and graphics card support HDR, ensuring they meet the minimum specifications like 1080p resolution, 400 nits brightness, and at least 10-bit color depth.
- Disable the setting that turns off HDR when running on battery mode to prevent automatic HDR deactivation during power optimization.
- Switch to “Extend These Displays” mode for external HDR displays and check NVIDIA Control Panel settings to prevent HDR from disabling automatically, especially when playing games or watching movies that support HDR.
In this article, I will present five proven solutions to help you resolve the issue of HDR continually turning off on your laptop or PC running Windows 10 or 11.
Let’s get started!
Quick Navigation
- 1. Check Whether Your Laptop/PC Supports HDR
- 2. Turn Off the “HDR Disable When Running on Battery Mode”
- 3. Switching to the “Extend These Displays Mode” When Using an External HDR Display
- 4. Check the Settings in the NVIDIA Graphics Card Control Panel
- 5. Are You Playing Games or Watching Movies That Support HDR?
- Conclusion
1. Check Whether Your Laptop/PC Supports HDR
If You Are Using a Built-In Display (Laptop)
Note: This applies to laptops only.
The built-in display and integrated graphics must support the HDR function to enable and enjoy HDR visuals on your laptop screen.
In other words, the display must be 1080p or more, sport a maximum brightness of at least 400 nits, etc.
Similarly, the GPU must be able to process and display HDR content without relying on software processing. For example, Iris XE Graphics or an APU (Accelerated Processing Unit) with Radeon Graphics should suffice among the many other built-in video cards used in laptop computers.
1. Make Sure the Integrated Graphics Card Supports HDR
To check your device’s built-in video card is HDR-compatible, follow these steps:
Step 1: Press the Windows and R keys simultaneously on your computer keyboard.
Step 2: Type “dxdiag,” and click OK. (DirectX Diagnostic Tool (DxDiag) helps test and troubleshoot video- or audio-related hardware concerns.)

Step 3: In the System tab, choose Save All Information.

Step 4: Click Save to save the DxDiag file to a location of your choice.

Step 5: Go to the folder where the DxDiag file is stored. Open the file to see Display Topology: Internal information.
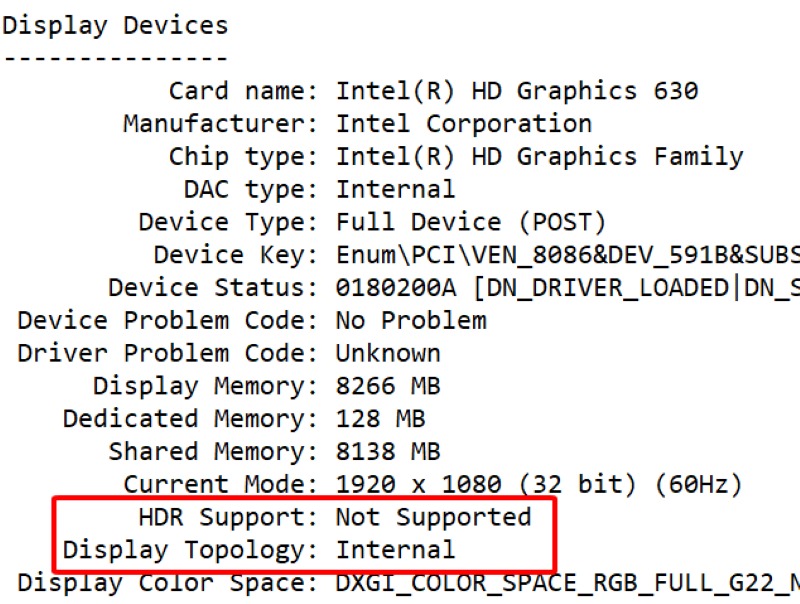
If the HDR Support line says Supported, the integrated graphics card is HDR-compatible. If it says Not Supported like in the image above, the built-in graphics doesn’t support HDR.
2. Make Sure the Built-In Display Supports HDR
Next, confirm that the integrated display is HDR-compatible.
Here are the steps to do that on Windows 10:
Step 1: Go to Settings > System > Display > Windows HD Colour Settings.

Step 2: Next, go to Choose display.

Step 3: Select Display 1: Internal Display.

Step 4: Under Display capabilities, see the Use HDR section. If it says Yes, your computer’s built-in display is HDR-compatible. If it’s mentioned No, then it’s not.

In case you’re using Windows 11, the steps to determine the display’s HDR support will slightly differ. Here are the steps:
Step 1: Open Settings on your Windows laptop.
Step 2: Select System and then click Display.
Step 3: Click the HDR section.
Step 4: Go to Select a display to view or change its settings section and choose Display 1: Internal display.
Step 5: Look for the Use HDR section under Display capabilities. If it says Supported, the display is HDR-capable. If it says Not supported, then it’s not.
Alternatively, click System > Display > Advanced display. If the Bit depth is “8-bit” and Color space is mentioned as “Standard dynamic range (SDR),” the display is not HDR-compatible.

HDR needs a color bit depth of at least 10. To learn more, read our article, “Is HDR 8-Bit or 10-Bit?”.
Another way to check if the display supports HDR is to play an HDR video on YouTube and check if the Quality under the video’s Settings says HDR. If it does, your display is HDR-compatible.
Play the following video to confirm:

If You Are Using an External Display
In case you have a custom or prebuilt PC connected to an external monitor, or you are using an external display with your laptop, ensure the external display and the PC or laptop’s external graphics card support HDR. The two must synchronize to enable HDR.
1. Make Sure the External Graphics Card Supports HDR
External or discrete graphics cards are usually robust enough to support HDR. However, to confirm, look up the particular video card online and ascertain if it supports HDR.

Visit the card manufacturer’s website and read the graphics card’s specifications. For example, my laptop’s NVIDIA GeForce GTX 1060 graphics card supports HDR.
2. Make Sure the External Display Supports HDR
Next, check if the external display is HDR-compatible.
Follow these steps if you are using Windows 10 OS:
Step 1: Go to Settings > System > Display > Windows HD Color Settings > Choose display.

Step 2: Under Choose display, choose the external display connected to your PC or laptop.

Step 3: Check the Display capabilities section. If the display supports HDR, it should say Yes or Supported. If not, it will state No or Not Supported.

In case you are using Windows 11 OS, follow these steps:
Step 1: Open Settings.
Step 2: Go to System and then Display.
Step 3: Select HDR.
Step 4: Head to Select a display to view or change its settings and choose the external display.
Step 5: Under Display capabilities, Use HDR must say Supported or Not Supported.
Note: Kindly ensure switching to Extend These Displays under Multiple Displays so that Windows doesn’t automatically duplicate the desktop on both screens. When that happens, HDR won’t be supported on both screens. More on that later in the third section below.
2. Turn Off the “HDR Disable When Running on Battery Mode”
Your Windows laptop has a setting to disable HDR when it’s in its battery-saving mode.
Since HDR consumes more processing energy and display brightness, turning off the feature helps prolong the time spent using the laptop on battery power.
Check if the setting is enabled on your laptop. If it is, expect HDR to disable on your laptop whenever it enters power optimization mode.
Turn off the setting if you don’t want HDR to deactivate. Alternatively, plug in your laptop to restore HDR. To turn off the feature, follow the steps below:
Windows 10
Step 1: Open Settings. Choose System, and then Display.

Step 2: Choose Windows HD Colour settings.
Step 3: Under Choose display, choose an HDR-capable display.

Step 4: Next, under Battery options, select Optimise for battery life. Uncheck the check box denoting Don’t allow HDR games and apps to use the battery.

Windows 11
Step 1: Go to Settings. Select System and then Display.

Step 2: Under Brightness & color, choose HDR.

Step 3: Head to Select a display to view or change its settings to select a capable HDR display.

Step 4: Go to Battery options; choose Optimize for battery life, and then tick the Allow HDR games, videos, and apps on battery check box.

3. Switching to the “Extend These Displays Mode” When Using an External HDR Display
Your Windows OS, by default, resorts to duplicating the desktop when your laptop or PC is connected to an HDR-enabled external monitor or television.
The biggest drawback is that duplication and HDR don’t go together. This roadblock, however, can be overcome by “extending (not duplicating)” the desktop across the multiple screens.
Here are the steps to do it:
Step 1: Hit the Windows logo key on your keyboard and choose Settings.

Step 2: Next, choose System and then Display.

Step 3: Go to Multiple displays and choose Extend these displays.

Your Windows laptop/PC is now configured to support HDR on both screens.
4. Check the Settings in the NVIDIA Graphics Card Control Panel
According to a user, turning on the NVIDIA color settings under Display settings in the NVIDIA Control Panel tool could cause HDR to disable automatically.
I checked this on my computer and faced the same issue. To confirm the Use default colour settings option is enabled or switch to it from Use NVIDIA colour settings, follow these steps:
Step 1: Search and launch the NVIDIA Control Panel app.

Step 2: Select Display under Select a Task on the left, then click Change resolution.

Step 3: In the center column under Apply the following settings, select Use default colour settings. If it’s already enabled, leave the option alone.

Step 4: Hit Apply to save the setting.

Any irregularities or automatic disabling caused by your NVIDIA graphics card should now be fixed.
5. Are You Playing Games or Watching Movies That Support HDR?

If you play non-HDR games or watch movies that do not support HDR, Windows may automatically disable HDR.
This behavior is abnormal since the Microsoft operating system can handle non-HDR content on an HDR display with aplomb.
Windows resorts to tone mapping to adapt non-HDR content and mitigate color underexposure or overexposure to ensure a pleasing and balanced viewing experience on an HDR-compatible screen.
But, at times, the OS may falter or cause the HDR setting to turn off unintentionally.
If it happens when you play games or watch movies on your device, ensure the movies or games are HDR-supported. To check if the games you play support HDR, click here.
In case your game supports HDR but is not mentioned on the particular website linked above, you can manually add the title.
To be sure if the movies you watch are 4K HDR titles, check out this page on the IMDb website.
Conclusion
Mostly, HDR on your Windows laptop or PC behaves as per intended. It automatically or abruptly turning off is usually a rare occurrence and a sign of something inherently off.
If the HDR automatically turns off on your device, it’s likely a graphics card or display issue. Operating system glitches or the content played could also be the causes.
Fortunately, the problem can be fixed. Just implement the remedial actions listed above. Since the exact cause is hard to determine, you must take the try-and-test approach. There’s no circumventing that.
Hopefully, you are able to detect and fix the issue with your computer as quickly as possible and little effort.
If you checked your computer against all the above factors and the HDR log-out issue persists, contact Microsoft or the hardware manufacturer.

Catherine Tramell has been covering technology as a freelance writer for over a decade. She has been writing for Pointer Clicker for over a year, further expanding her expertise as a tech columnist. Catherine likes spending time with her family and friends and her pastimes are reading books and news articles.