
5 Simple Ways To Add Extra HDMI Ports to Your TV
What To Know
- Utilize an HDMI switch or matrix to connect multiple devices to a single HDMI port on your TV, enabling you to switch between devices with ease.
- Consider an AV receiver for connecting several HDMI devices through one port; ideal for high-quality home theater systems, though it is a more costly solution.
- For a single additional HDMI device, adapt existing composite, component, or S-Video ports on your TV using appropriate converters, capped at 1080p resolution.
Are you struggling with a TV that can’t hold all your gadgets?
We’ll guide you through simple, wallet-friendly ways to connect everything from your game console to your streaming stick to your TV with limited HDMI ports.
Quick Navigation
Quick Guide
| Solution | Cables/Converters Needed | How to Connect |
| HDMI Switch or Matrix | Input Source → HDMI Cable → HDMI Switch → HDMI Cable → TV | |
| AV Receiver | Input Source → HDMI Cable → AV Receiver → HDMI Cable → TV | |
| Convert Composite/RCA Ports | Input Source → HDMI Cable → HDMI to Composite/RCA Converter → Composite Cables → TV | |
| Convert Component Ports | Input Source → HDMI Cable → HDMI to Component Converter → Component Cables → TV | |
| Convert S-Video Ports |
|
|
1. HDMI Switch or Matrix
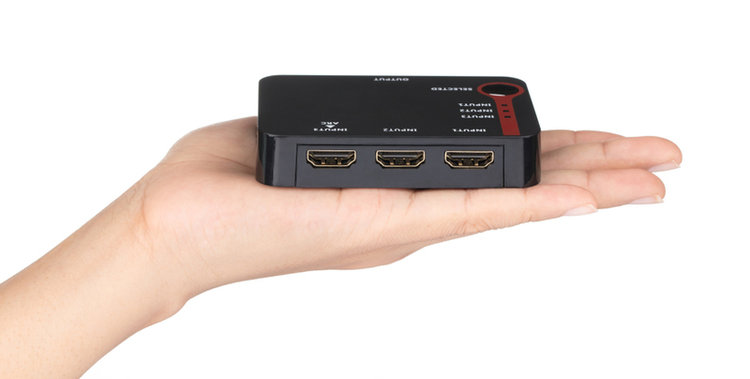
The first option is to use an HDMI switch or matrix, which is by far the cheapest (and easiest!) way to plug more HDMI-compatible devices into your TV, especially if you don’t have or want an AV receiver.
Additionally, an HDMI matrix is a great option if you’re planning on getting an HDMI splitter in the future since it acts as a switch and a splitter. This makes it a very versatile option.
When shopping for HDMI switches, you may notice some values on the packaging, such as 3:1,4:1, 8:1, 4:2, and 8:2. These ratios indicate how many HDMI-compatible devices can be connected to the switch as an input and output.
The first number represents the number of inputs the HDMI switch can support while the second number indicates how many devices the switch can output the input’s video and audio to.
So, if you see the ratio of 3:1 on its box, you know you can connect three devices (streaming stick, PS4, XBOX, etc.) to it and display their input on 1 TV, projector, etc.
Let’s learn how to use an HDMI switch or matrix!

Materials
- HDMI Switch or HDMI Matrix
- HDMI Cables (quantity depends on the number of devices)
- USB Wall Plug (for the power supply of HDMI Switch)
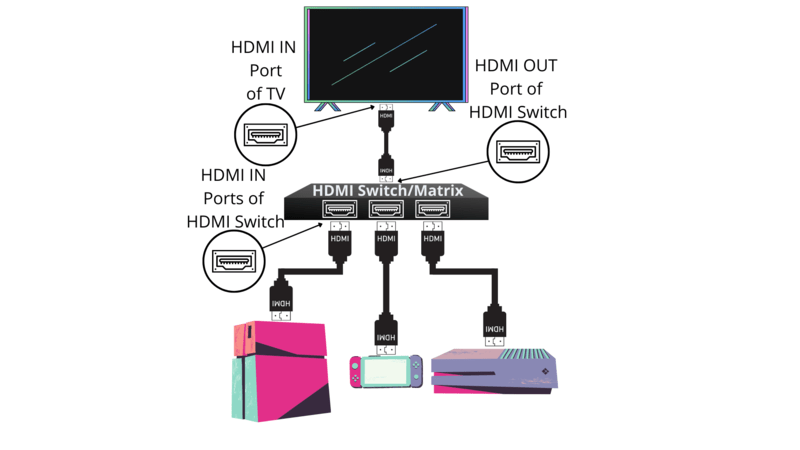
Step 1: Connect an HDMI Cable to Your Input Devices
Gather the devices you want to connect to your TV (e.g. DVD players, game consoles, Chromecast, Roku, etc.) and find their HDMI ports. Plug one end of an HDMI cable into each of their HDMI ports.
You will need an HDMI cable for every device you plan on connecting to your TV.
Step 2: Connect the Input Device’s HDMI Cables to Your HDMI Switch
Your HDMI switch should have an HDMI port for each of the devices you plan on connecting.
Plug the other end of the HDMI cables you’ve connected to your input devices into the HDMI switch’s HDMI IN port.
You must ensure the port is labeled HDMI IN, or else your setup will not function correctly.

Step 3: Plug an HDMI Cable into Your HDMI Switch’s HDMI OUT Port
Now that your input devices are all connected to your HDMI switch, you’re ready to start connecting it to your TV.
Find your HDMI switch’s HDMI OUT port. Remember, this process will not work if you plug the HDMI cable into the HDMI IN port.
If you plan on connecting your HDMI switch to multiple devices, you can plug another HDMI cable into the second HDMI OUT port.
Step 4: Connect the HDMI Switch to Your TV
Locate one of your TV’s HDMI OUT ports, found either on the side or back of the unit.
Then, plug the HDMI cable connected to your HDMI switch’s HDMI OUT port into the corresponding port on your TV.
Ensure your TV’s HDMI port is functioning correctly.
Step 5: Connect Your HDMI Switch to Power
Find your HDMI switch’s micro USB cable and plug it into its micro USB port.
Then, plug the USB end of the cable into a USB adapter. Next, plug the adapter into a working wall outlet.
Step 6: Connect Your Input Sources to Power
Connect your input sources to power using the appropriate cables. Ensure both ends of the cable are secured.
Please be mindful when using power strips when connecting all of your devices to power to ensure you do not overload it.
Make sure your TV is also connected to power.
Step 7: Change Your TV’s Input
Check which HDMI port your HDMI switch is plugged into (e.g. HDMI 1, HDMI 2, etc.). Now, using your TV’s remote, adjust the input source to the corresponding HDMI port.
Step 8: Change Your HDMI Switch’s Source
You may notice that your HDMI switch comes with a small remote featuring a few numbered buttons. These buttons correspond to the switch’s HDMI ports, which are numbered.
So, if you want to use your PlayStation 4 plugged into the HDMI 1 port, press 1 on your remote.
If your TV’s input is correctly set, your PlayStation’s screen should appear on the TV.
2. AV Receiver

Do you have an old AV receiver laying around or are interested in investing in one?
AV receivers are just great at handling high-quality audio, they can also be used to plug multiple HDMI-compatible devices into one of your TV’s HDMI ports.
However, they are quite expensive, so we only suggest investing in one if you’re planning on using it for a high-quality home-theater setup.
Let’s learn how!

Materials
- AV Receiver
- HDMI Cables (quantity depends on the number of devices)
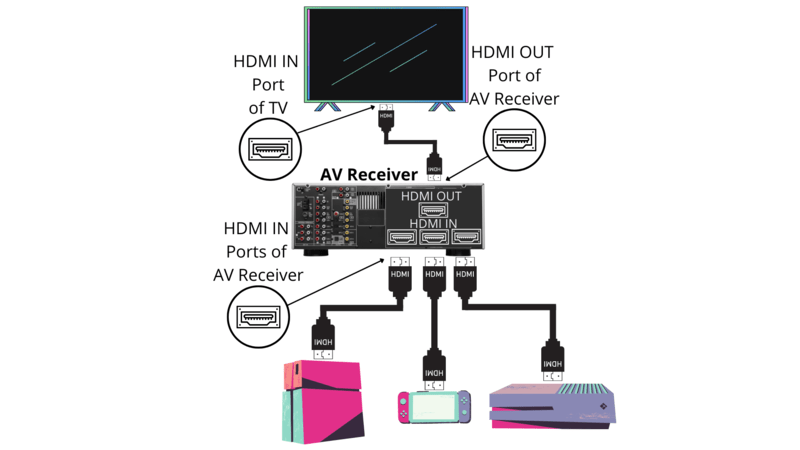
Step 1: Connect HDMI Cables to Input Devices
You will need multiple HDMI cables for this process: one for each device you plan on connecting and another to connect your AV receiver to your TV.
So, plug one HDMI cable into each of the input sources’ HDMI ports.
Step 2: Plug the Input Source’s HDMI Cables into the AV Receiver
Now, you can plug the input source’s HDMI cables into the AV receiver’s HDMI IN ports.
The AV receiver linked above has HDMI IN ports. Each one is labeled (e.g. DVD, Game, Blue-Ray) to help keep your cables organized. However, you can plug any HDMI-compatible device into them even if it doesn’t correspond to the label.
Step 3: Plug an HDMI Cable into the AV Receiver’s HDMI OUT Port
It’s time to connect the final HDMI cable to your AV receiver. Locate the receiver’s HDMI OUT port and plug an HDMI cable into it.
Step 4: Plug Your AV Receiver into the TV
Now, you can plug your AV receiver into your TV. Find your TV’s HDMI port that you want to use, and plug the AV receiver’s HDMI OUT cable into it.
Make sure the cable is not being tugged on or bent.
Step 5: Connect Your AV Receiver to Power
You will notice that your AV receiver comes with an AC plug.
Plug the AC power cable into the unit’s power port, found on its back. Then, connect the plug to a wall outlet.
You will know it’s properly connected to power when the power LED indicator light turns on.
Step 6: Plug the HDMI-Compatible Devices into Power
Gather your input device’s power cables and plug them into their corresponding devices. Then, plug them into wall outlets.
If you’re using a power strip, remember not to overload it.
Step 7: Adjust Your TV’s Input
Change your TV’s input or source using the remote’s Input button or the Input/Source menu to the same HDMI port your AV receiver is plugged into.
If you don’t see your AV receiver’s input pop-up on the screen, double-check the HDMI port’s label or check all of the sources, as they are sometimes labeled incorrectly.
Step 8: Select Your AV Receiver’s Input
Now, you can select which of your AV receiver’s inputs you want to watch. On the front of the receiver, you will see several numbered buttons, which correspond to the HDMI ports on the back.
Press the button of the input source you want to see. The AV receiver linked above does not come with a remote, so you will need to physically press the receiver’s buttons each time you want to change the input.
Use Converters for Existing Ports on the TV
If you only need one extra HDMI port and don’t want to invest in an HDMI switch or AV receiver, you can use existing ports on your TV with HDMI adapters.
Below, we have listed the steps for connecting an HDMI-compatible device to composite/RCA, component, and S-Video ports. However, you can use other HDMI adapters if you’d like to connect your device to another port on your TV.
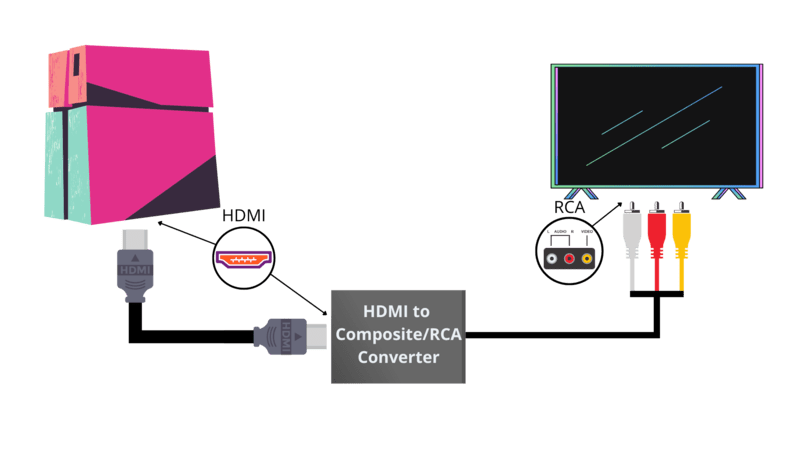
3. Convert Composite/RCA Ports
Composite or RCA ports are known for their white, red, and yellow-rimmed ports which can transmit both audio and video.
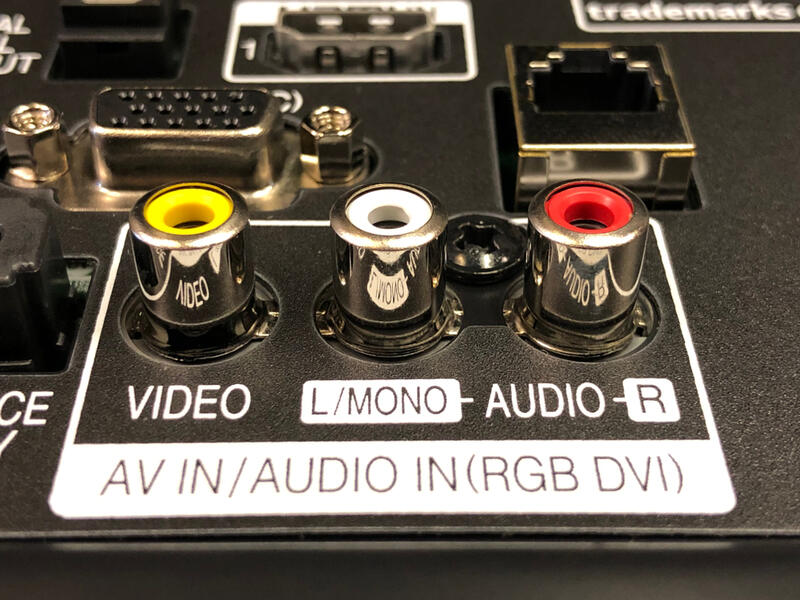
Please note that the converter has a maximum resolution of 1080p, so you will not be able to watch 4K content using this solution.
Let’s learn how to connect an extra HDMI-compatible device to your TV via its composite ports!
Materials
Step 1: Connect an HDMI Cable to Your Input Source
Insert an HDMI cable into your input source’s HDMI port. If you’re using a streaming stick that already has an HDMI connector attached to it, you can skip this step and proceed to the next one.
Step 2: Plug Your Input Device into the Converter
Plug the other end of the HDMI cable attached to your input source into the converter’s HDMI port.
You can plug it directly into the converter if you’re using a streaming stick or another device with a built-in HDMI connector.
Step 3: Plug the RCA Converter into Your TV
Plug the RCA converter’s three RCA cable’s into your TV. Remember, these cables are color coded for a reason, as two of the cables deliver audio and one delivers video.

So, make sure to plug them into their respectively colored ports. Ensure they’re firmly in place by applying a small amount of force them plugging them into your TV.
Step 4: Connect the RCA Converter to Power
The RCA converter comes with a micro USB cable, which must be plugged into the converter’s port labeled Power.
Then, plug the power cable’s USB into a power adapter plugged into an electrical outlet.
Step 5: Plug Your Input Source into Power
Plug your streaming stick, game console, etc., into a stable power source.
Some streaming sticks may be powered by your TV’s USB port.
If your input source’s power cable has a USB connector, you can plug it into the same wall outlet as your converter using a dual or tri-port wall charger, like the one linked above.
Step 6: Adjust the Converter’s Mode According to Your Geographic Location
There is a switch on the converter labeled NTSC and PAL.
NTSC is for North and South America, while PAL is for Asia and Europe.
The converter will not work if the mode is set incorrectly.
Step 7: Adjust Your TV’s Source to Your RCA Converter
Your setup is complete and looks beautiful. Now you just need to adjust your TV’s input to Composite or RCA.
Once you’re on the right input source, you should see your input source’s screen on your TV screen.
If it doesn’t come up on-screen, double-check all of the power cables and ensure you’ve set the mode correctly.
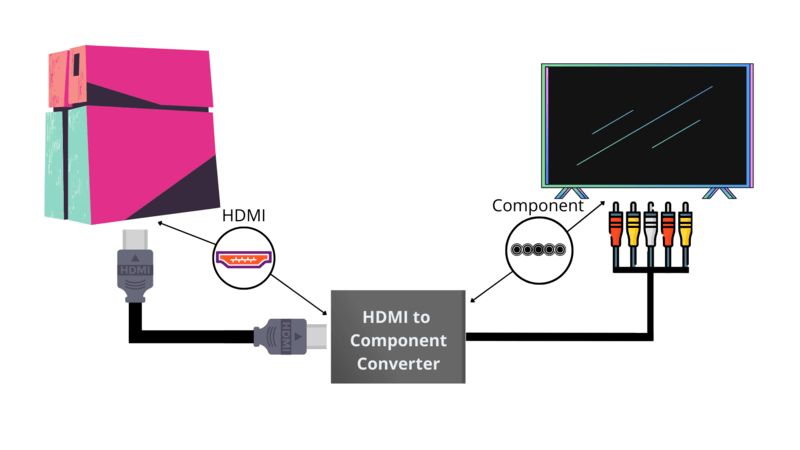
4. Converting Component Ports
If your TV doesn’t have a composite port, it’s likely that it will have component ports instead, which you can also use to connect an HDMI-compatible device to your TV.
What do component ports look like? You should see five ports, two should be red, while the remaining three will be green, blue, and white.
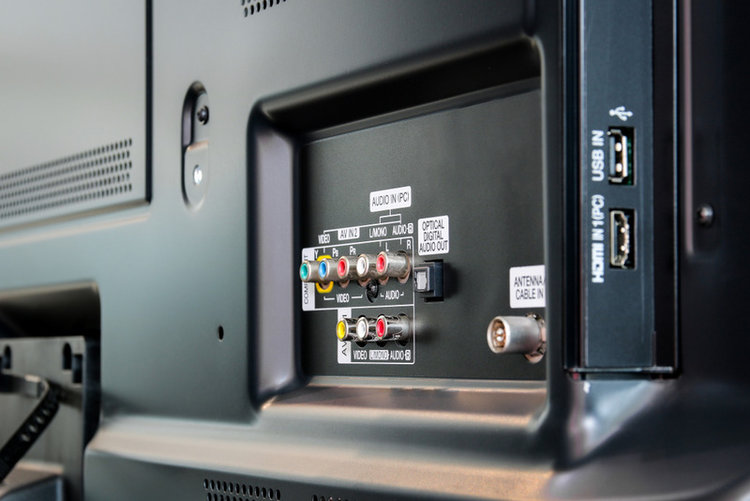
You can only connect one HDMI-compatible device to these ports using a converter. Your component converter can only transmit 1080p video, so you may want to consider other solutions if you want to watch 4K content.

Materials
Step 1: Plug an HDMI Cable into Your Input Source Device
Connect an HDMI cable to your HDMI-compatible device. Ensure it’s firmly secured inside the HDMI port.
Step 2: Connect Your Input Source to Your Component Converter
Connect your input source and component converter by plugging the source’s HDMI cable into the converter’s HDMI IN port. It’s important to plug it into the HDMI IN port for this solution to work.
Alternatively, you can plug the input source’s attached HDMI connector directly into the converter.
Step 3: Plug the Component Converter into Your TV
Now you can plug the converter’s component cable into your TV’s component ports. Ensure the cables are connected to ports of the same color.

You may want to press them gently to ensure they’re fully locked into the port.
Step 4: Plug the Component Converter into Power
You will find a DC power cable included with your component converter.
Plug it into the converter’s circular port found on its side. Then connect the cable to a USB power adapter, which must be plugged into a wall outlet.
Step 5: Connect the Other Devices to Power
If you haven’t done so already, ensure your TV is connected to power.
Your input device should also be connected to power, so plug it into a wall outlet or your TV’s USB port, depending on its cable and power needs.
Step 6: Change Your TV’s Input
Now, you’re ready to change your TV’s input and start streaming or playing games.
Click your remote’s Input button until you see Component on-screen. You should also see your input device’s homepage.
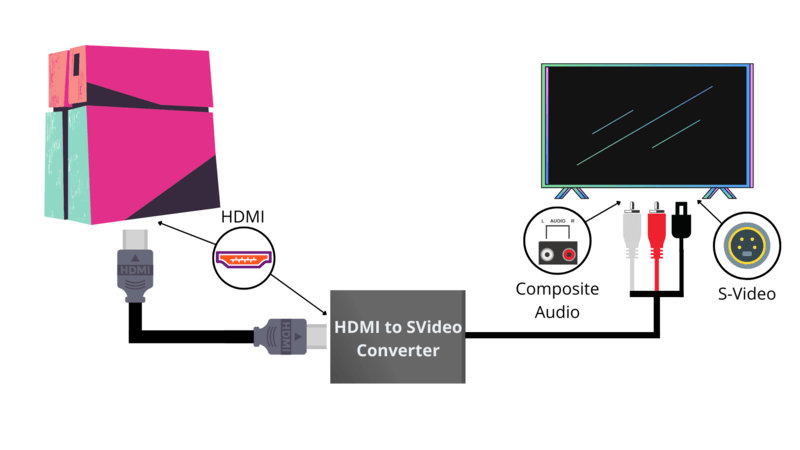
5. Converting S-Video Port
Finally, you can use your TV’s S-Video port.
This option will offer the best video quality, however, you will still only be able to watch 1080p content and add only one extra input device. You will also need to use two of your TV’s composite ports for audio.
Let’s learn how!
Materials
- HDMI to S-Video Converter (This converter includes an HDMI and power cable.)
Step 1: Connect Your Input Device to an HDMI Cable
If your input device has an HDMI cable connected to it, you can go ahead and plug it into the converter. Otherwise, you will need to plug an HDMI cable into the device’s HDMI port.
Many HDMI-compatible devices come with their own HDMI cable, but if you’ve lost the original, the converter listed above comes with a cable.
Step 2: Plug the Input Device into the Converter
Once you’ve plugged one end of an HDMI cable into your converter source, you can connect the other end to the converter’s HDMI IN port.
Step 3: Plug the S-Video Cable into Your TV
It’s time to plug the converter into your TV. Find the converter’s S-Video cable which, unlike the composite cables, is black.
Plug this cable into your TV’s S-Video port. This type of cable features several pins that must align with the port’s pin holes. So, if the connector isn’t fitting into the port, try turning it until the pins and pinholes are lined up.

Step 4: Plug the Composite Cables into Your TV
Now that the video cable is plugged into your TV, it’s time to turn our attention to the audio cables.
Notice the converter’s three composite cables colored red, white, and yellow. Next, find these same colored ports on your TV. There should be a small label next to the ports marked Composite or RCA.
Plug the cables into ports of the same color.
Step 5: Plug the Converter into Electricity
Like the other converter’s mentioned in this article, this converter also needs to be plugged into electricity. It comes with a micro USB power cable, but you can use any micro USB cable to power it.
You must plug the cable into a USB power adapter, which is included.
Step 6: Change the Converter’s Mode
This converter has an NTSC/PAL switch on its side.
Flick the switch to NTSC if you live in North or South America, and to PAL if you live in Asia or Europe.
Step 7: Change the TV’s Input
Use your remote or your TV’s control panel buttons to change your TV’s input to S-Video.
Now, sit back, relax, and get ready to enjoy your amazing TV setup.

Yesenia Achlim is a technical copywriter and editor with a focus on AV equipment. She aims to break down complicated topics and make technology accessible, no matter your technical expertise. When she’s not teaching you how to replace a projector lamp, you can find her reading and baking.