
7 Quick Fixes for Sound Delay on Your Roku TV

What to Know
- Use the Roku app’s ‘Adjust Audio Delay‘ feature to automatically correct audio-video sync issues.
- Altering the audio output format to ‘Passthrough’ or ‘Stereo’ in the Roku TV settings can fix sound delay problems
- For persistent sync issues, rebooting the Roku TV using a secret code on the remote (Home button five times, Up once, Rewind twice, and Fast Forward twice) can offer a solution by resetting the system without a full factory reset.
In this guide, I will help you fix the issue that many of us have encountered at least one about sound delay on Roku TV.
I have gathered and tested the solutions with images make sure you can follow by just looking at the images.
Let’s get your Roku TV’s audio back in sync.
Quick Navigation
Things You Should Try First
Disable the Sound Mode: While watching the content press the Star (*) button on your remote and select Sound Mode, then switch the feature to Off or Standard.
Reinstall the app: If sound delays on your Roku TV occur only with certain apps, like Netflix, DisneyPlus, or Max. If you’re facing this issue, try fixing it from the app’s perspective: navigate to the home menu on your Roku TV, uninstall the problematic apps, and then reinstall them.
Replug the connection between Roku TV and the external soundbar: The lip sync issue can be resolved simply by unplugging and then replugging the HDMI or optical cable. For safety, make sure your device is turned off before doing this. Wait a few seconds before reconnecting the cable to allow the connection to reset properly.
Factory reset your Roku TV: Performing a factory reset on your Roku TV can resolve lip sync issues by reverting any settings changes.
Fix Sound Delay with Adjust Audio Delay Feature
Many users of Roku TV and Vizio soundbars have reported ongoing lip sync issues.
Despite this problem’s persistence, I’ve discovered a reliable solution: the ‘Adjust Audio Delay‘ feature within the Roku app.
I’ve personally tested this method and can confirm its effectiveness.
Follow this straightforward guide to easily resolve sound delays on any Roku TV.
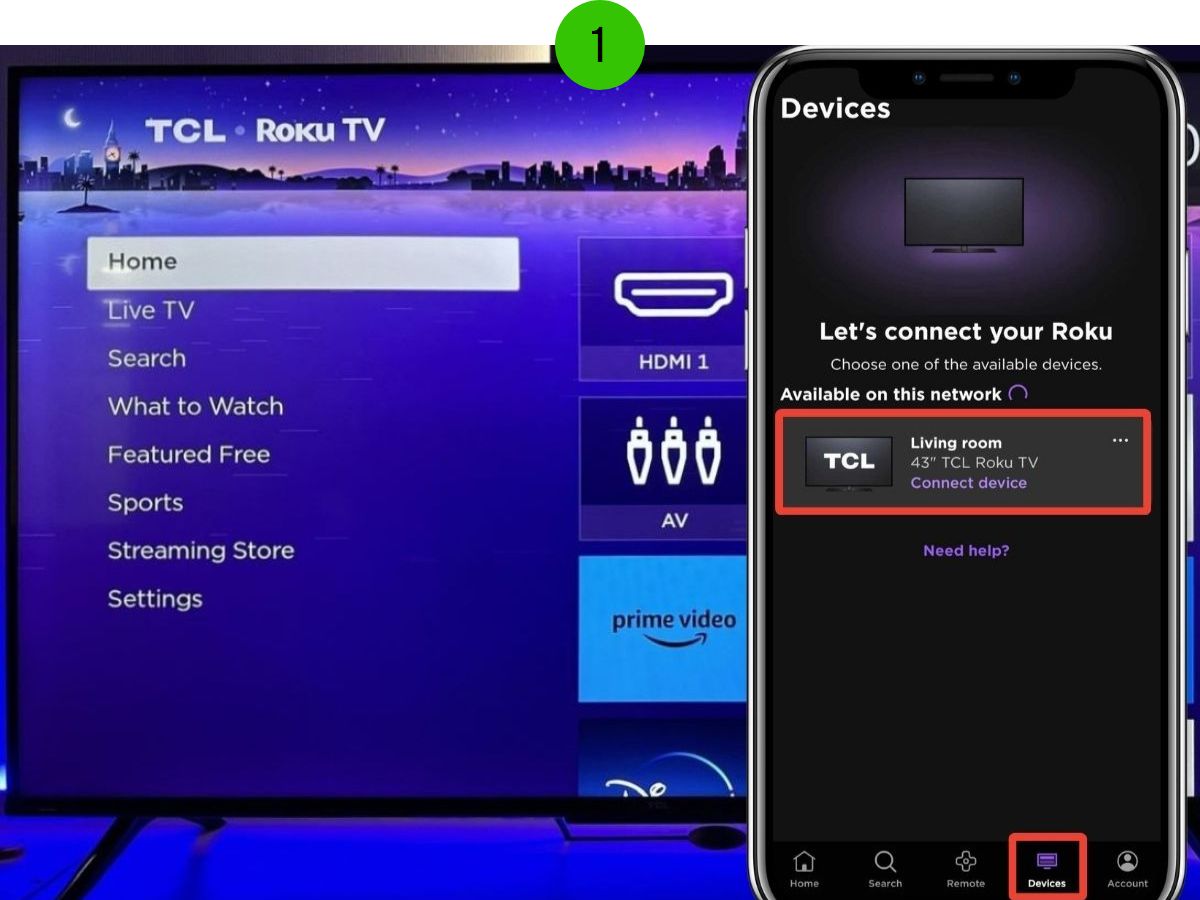
Step 1: Download the Roku app on iOS or Android.
Step 2: Ensure your smartphone and Roku TV are connected to the same Wi-Fi network.
Step 3: On the Roku app, select the Devices tab and connect to the available Roku TV.
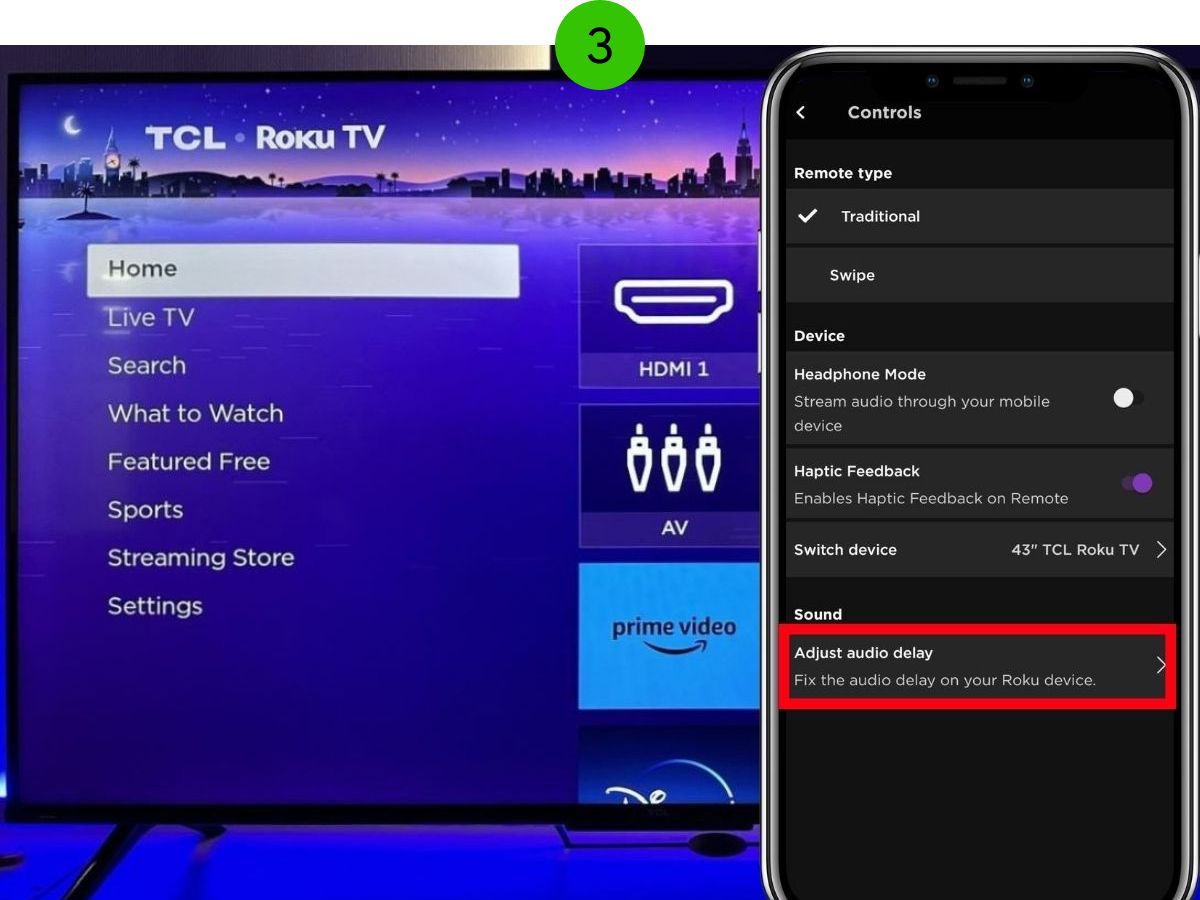
Step 4: After connecting the Roku app to your Roku TV, select the Remote tab in the app and then navigate to the settings by tapping the gear icon.

Then select Adjust Audio Delay
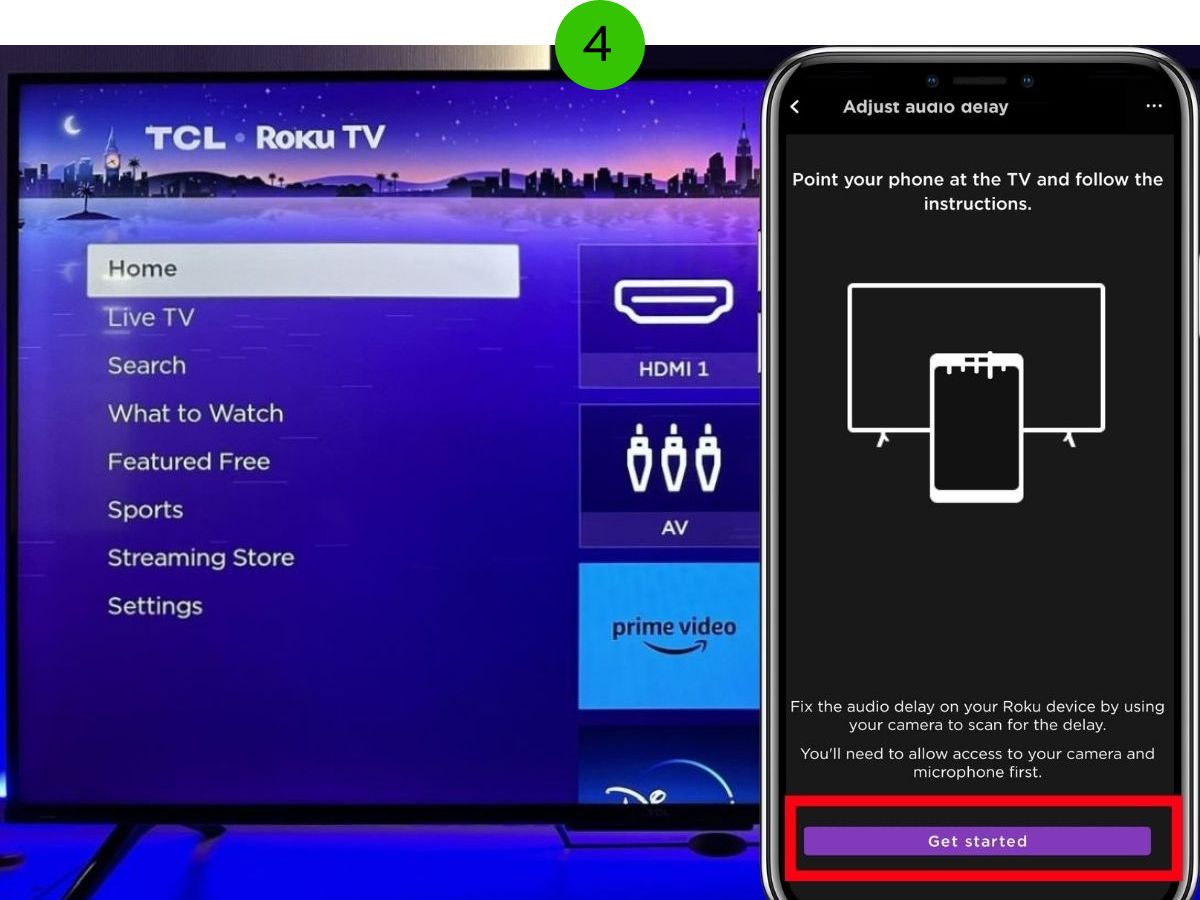
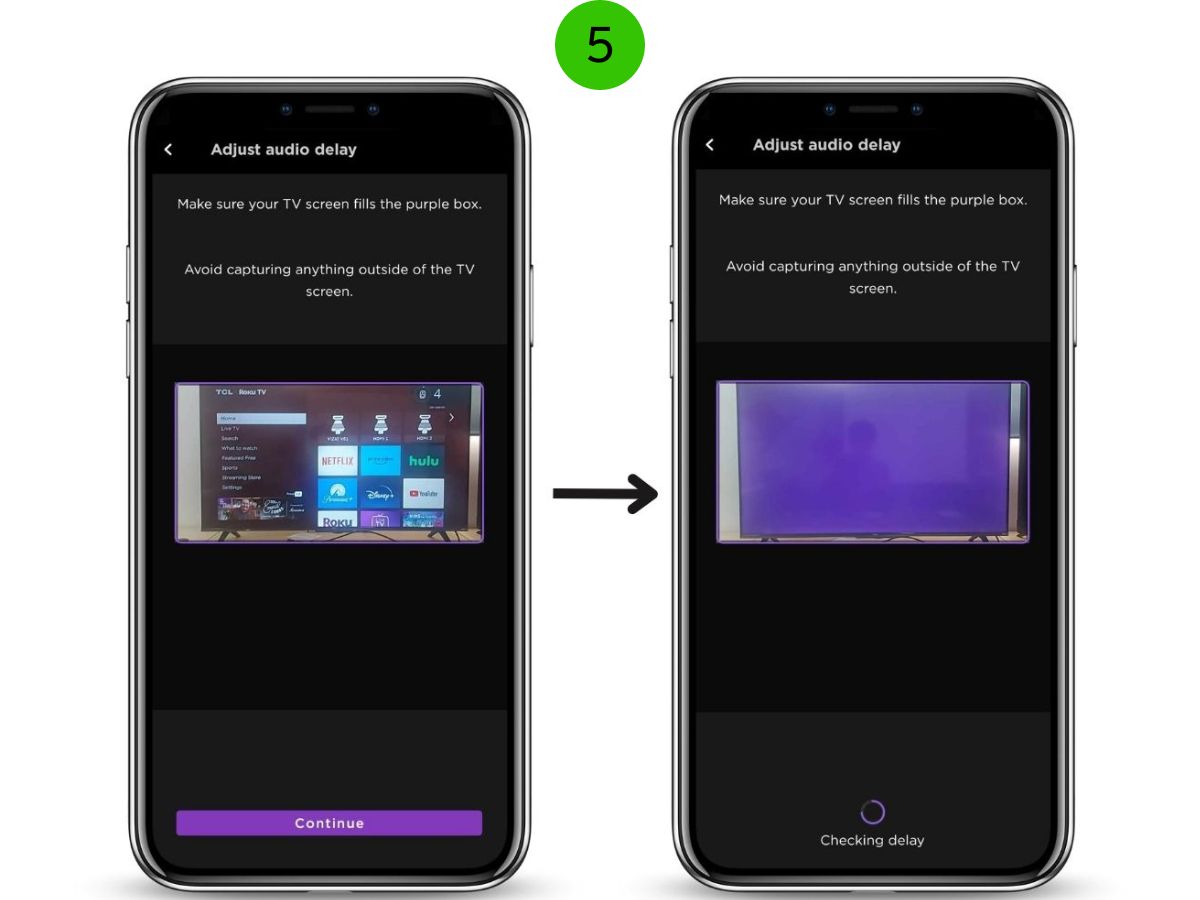
Step 5: Point your phone towards the Roku TV, ensuring that the TV’s image completely fills the square box shown in the Roku app. This action will activate the A/V Sync feature, designed to automatically adjust and correct any audio-video delay issues with your Roku TV.
Change Audio Output Format
Connecting a Roku TV to a Vizio soundbar often results in a lip sync issue.
Although using the adjust audio delay feature often provides a quick fix, the issue tends to return after some time.
A better solution, especially if you’re looking for a long-term fix, is to adjust the sound output format to ‘Passthrough’ via your Roku TV settings.
Many users have successfully tested and confirmed that changing the audio output format quickly resolves the issue.
Here’s how you can change the audio output format to solve this problem.
Step 1: Go to Settings → Audio → Digital output format

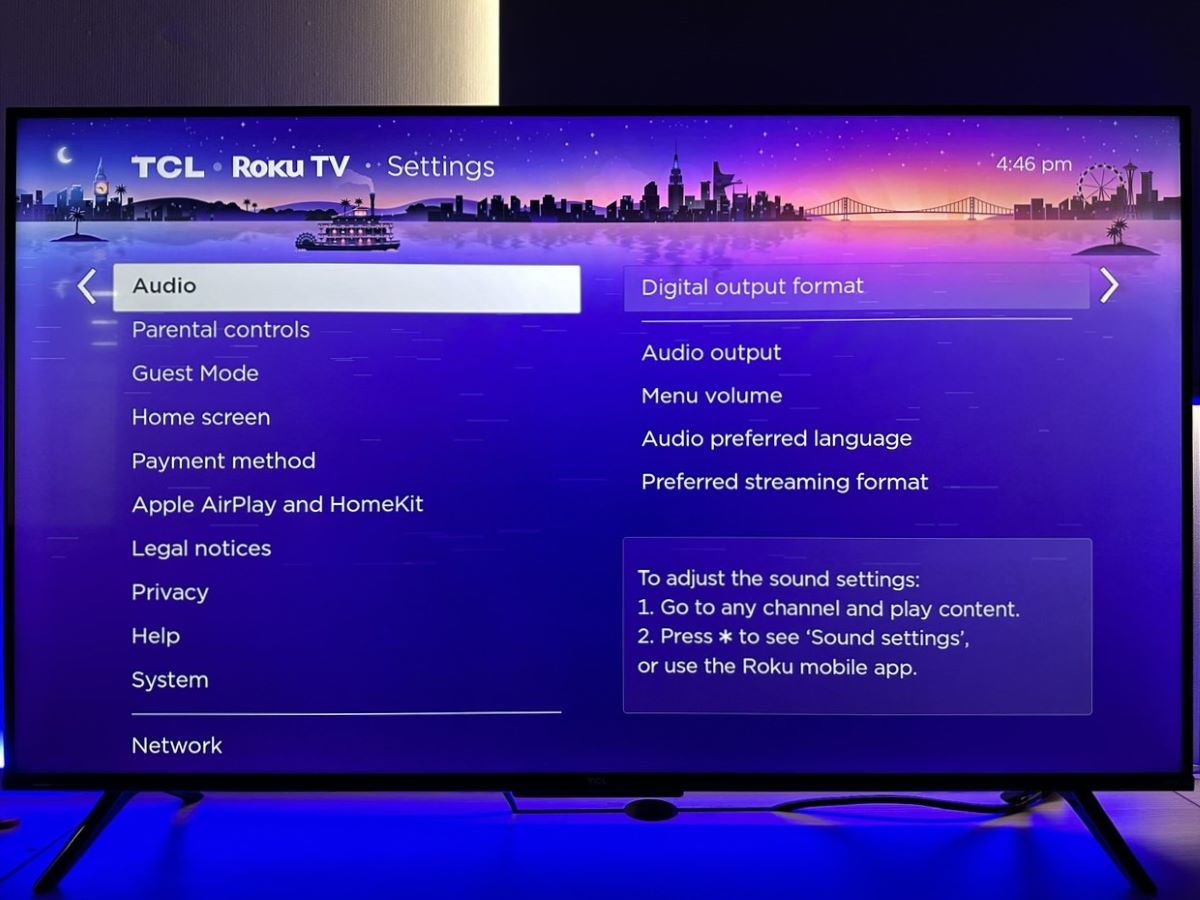
Step 2: At the format, there are 4 options
- Auto
- Passthrough
- Stereo
- Custom
Try switching your audio output format to either Passthrough or Stereo to resolve your issue. Many users report that ‘Passthrough‘ often fixes the problem, but ‘Stereo‘ has also been a successful solution for some.
You can share your experience in the comments section below. Let us know which option – Passthrough or Stereo – resolved your issue.
Reset Your Roku TV Audio/Picture Settings Back to Default
If you’ve found yourself in a situation where tinkering with the audio and picture settings on your Roku TV has led to sound delay issues, and the thought of a factory reset seems daunting due to the hassle of re-entering your streaming service credentials, there’s a simpler solution.
You can reset just your audio and picture settings to their default values, which often resolves the lip sync problem without affecting your account logins.
Here’s how to do it:
Step 1: Go to Settings → System → Advanced System Settings
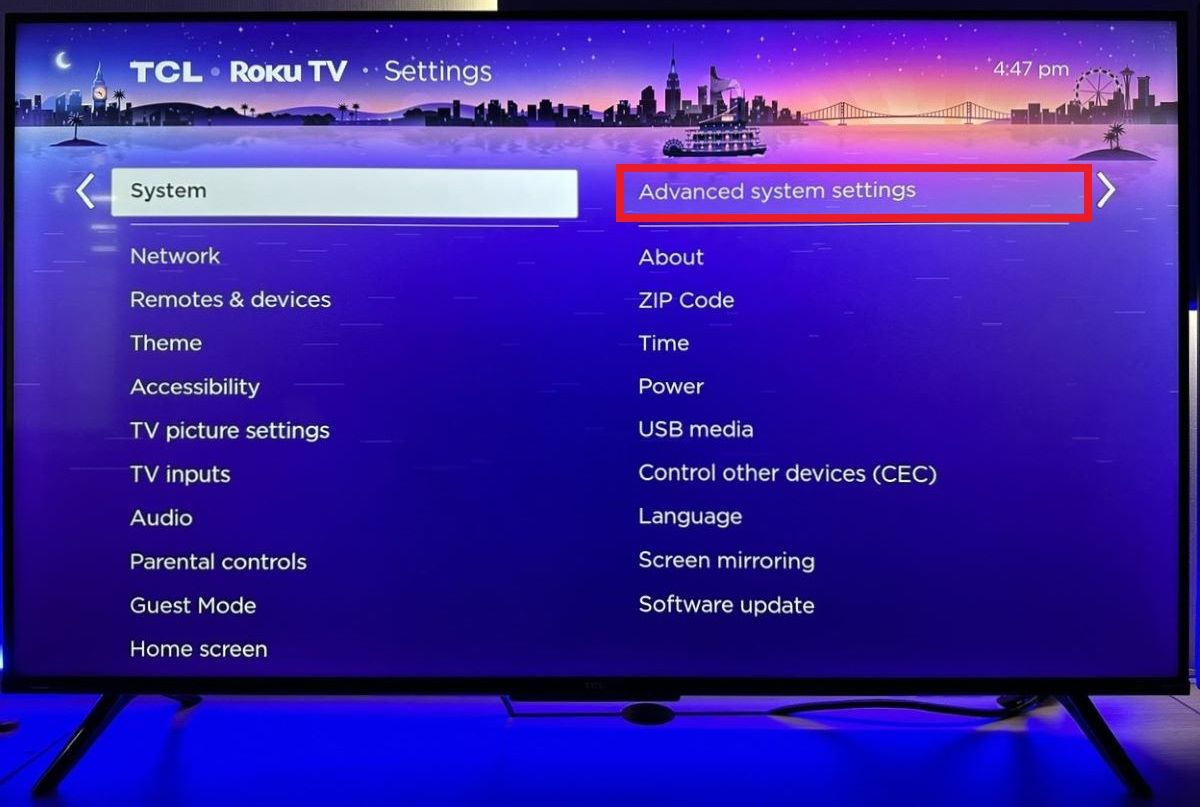
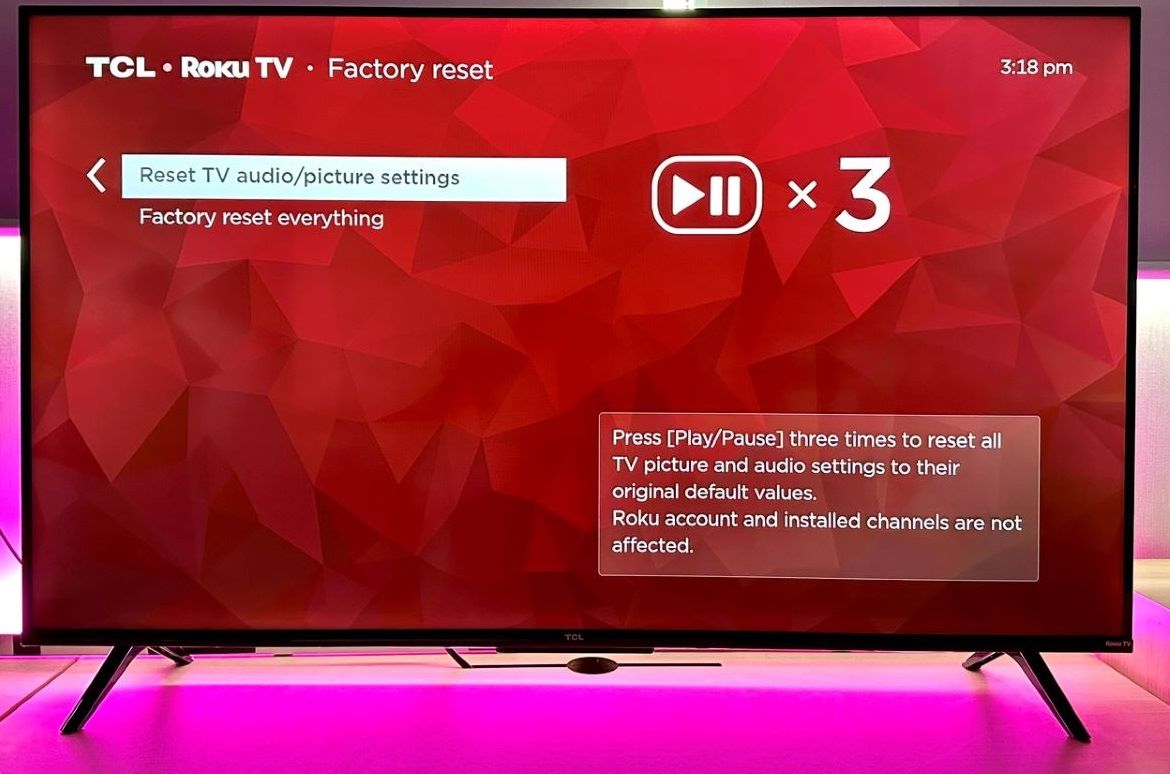
Step 2: Select Factory reset → and select Reset TV audio/picture settings
You will then need to press the Play/Pause button 3 times to reset the settings
Reboot Your Roku TV with the Secret Code
If you’ve already tried both a soft and a factory reset on your Roku TV but are still experiencing annoying sync delays, there’s another technique you can try: rebooting your TV using a secret code on your remote.
Here’s the procedure: Press the Home button on your Roku remote five times → then press Up once → Rewind twice, and Fast Forward twice.
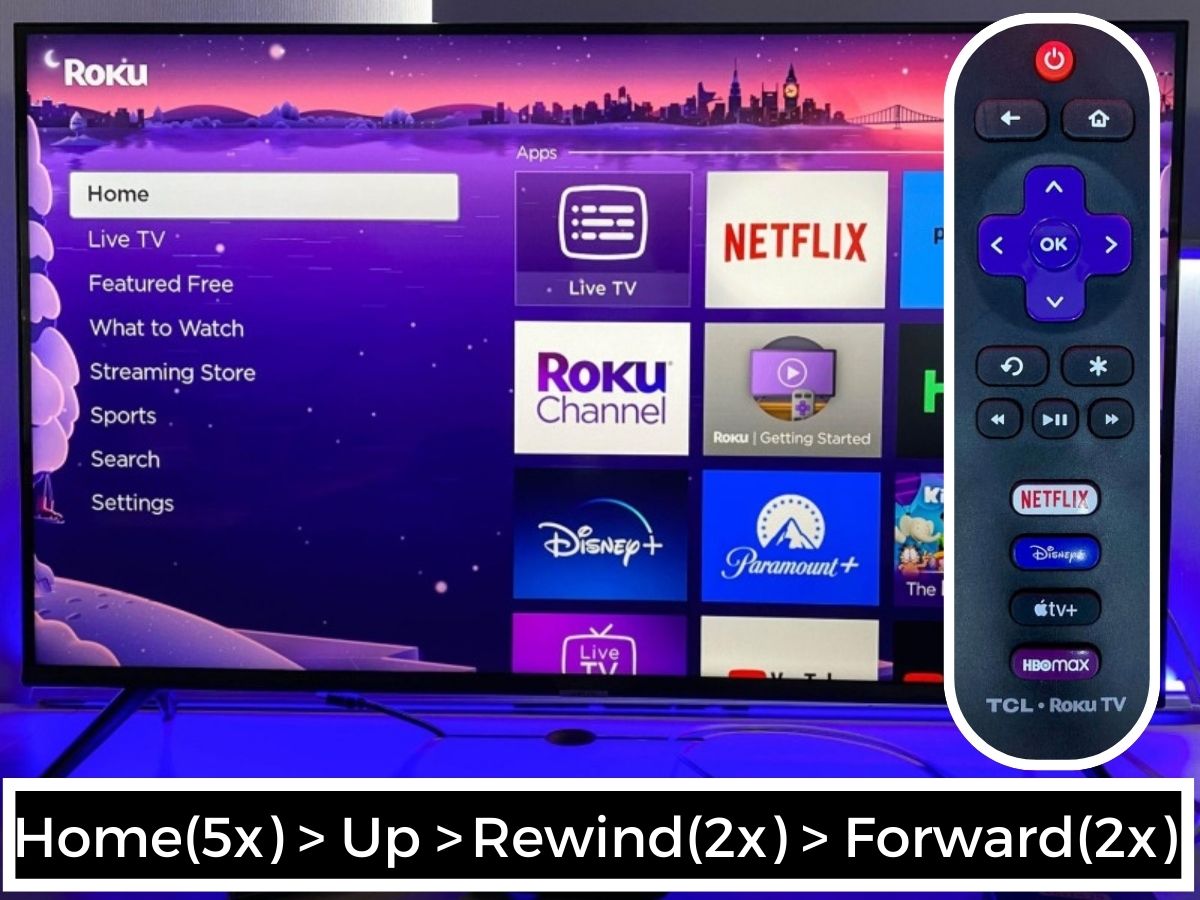
After completing these steps, your Roku TV will briefly freeze for about 10 to 15 seconds before automatically powering off and then on again. This reboot might help resolve the sync delay issue.
Common Solutions That Might Work
1. Restart your Router

Consider restarting your router if your internet connection is weak, unstable, or completely unavailable. A restart fixes several fundamental problems, including overheating.
Restarting your router can give it the speed boost it needs and allow it to reload and select the most robust network channel, plugging you into a much stronger internet connection. It also gives your router time to cool off and, simultaneously, helps clear the cache overloading the processor.
Step 1: Unplug the router from its power source.
Step 2: Give the router 30 seconds – or more – to cool off and clear its memory.
Step 3: Plug your router back into the power source, and after it reconnects to the network, check if the audio is still out of sync.
2 Restart Your Roku TV
![]()
This action can help rid the TV of bugs or corrupt files.
Step 1: Power off your TV and unplug it from the power source.
Step 2: Give the TV 30 seconds to cool off.
Step 3: Plug the power cable back in and switch the TV on.
3. Clear the Cache
Cache data is a temporary memory file containing information on sites and channels that your device has previously visited. This information helps it access and navigate those sites faster.
Accumulated cache data can affect a device’s processing strength and speed. Follow the steps below to clear the cache data on your Roku TV.
How to Clear the Cache on Roku and Firestick – and WHY to do it
Here’s a shortcut to clearing your Roku cache:
Step 1: Turn on your Roku TV and stay on the Home tab.
Step 2: Press the Home button five times.
Step 3: Press the Up navigation button once.
Step 4: Press the Rewind button two times.
Step 5: Finally, press Fast Forward twice.
About 10 to 20 seconds after completing these steps, your Roku TV will restart.

Tai “Ty” Luu, an Electronics Engineering graduate from Sheridan College, is a passionate technical editor with a deep love for technology and gaming. He constantly seeks new challenges to expand his expertise in the tech and gaming fields.
I’m tired of the audio being off sync please fix it.