
7 Ways To Connect a Roku to a Projector (Wired & Wireless)
")
What To Know
- To wirelessly connect Roku to a projector: Use a wireless HDMI extender kit > Connect Roku to the HDMI input of an audio extractor > Link the extractor’s output to the extender kit for a neat and flexible setup.
- There are six wired methods to connect Roku to a projector, depending on the ports available on your projector. These include HDMI, VGA, Composite, DVI-D, S-Video, and RCA ports.
Connecting your Roku device to a projector has never been easier, whether it’s a Roku Stick or Roku Express.
This guide will walk you through simple and effective methods to link your Roku with various types of projectors.
Get ready to enjoy your favorite Roku channels on the big screen with ease and flexibility!
Quick Navigation
1. Wireless Solution: Use a Wireless HDMI Extender
You can wirelessly connect a Roku to a projector!
This makes your setup neater and frees up your choices regarding Roku and projector placement.
It can be convenient for projecting in spaces where the projector is far from the sound system.
Before you can have a wireless Roku projection setup, you’ll need a wireless HDMI extender kit . This is what facilitates the wireless connection.

- 【ZERO LATENCY & 4K@30Hz】Using the latest wireless HDMI technology, this kit can extend and...
- 【HD DIGITAL AUDIO SUPPORT】This kit supports 3D, supports Dolby Digital (Dolby Digital), Dolby...
- 【STABLE PERFORMANCE】Although 60GHz is less for home use, this kit supports 60GHz wireless...
(Paid Link.)
To wirelessly connect your Roku’s video to a projector, you can follow these steps:
- Turn on your projector.
- Plug one end of the HDMI cable to your Roku, if it needs a cable.
- Plug the Roku into the HDMI input port of the audio extractor.
- Connect another HDMI cable to the HDMI output port of the audio extractor.
- Connect the other end to the wireless HDMI extender kit. The video will now be connected.
- Connect whatever audio cables work for your audio extractor to your sound system.
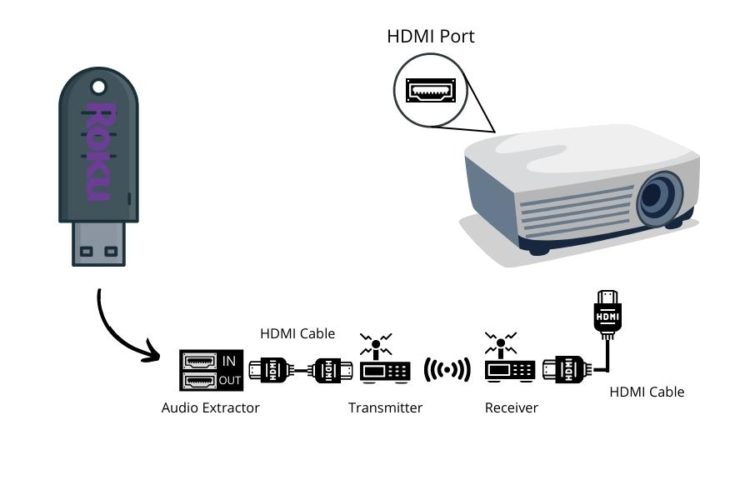
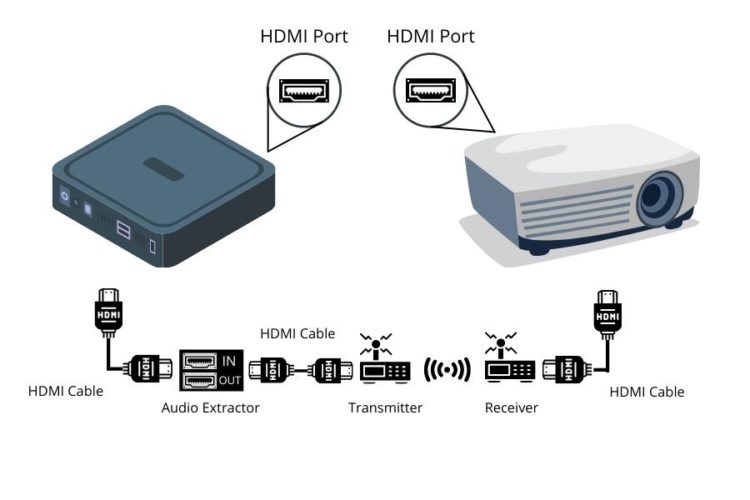
You should now be able to see and hear your projection with fewer wires!
2. Connect Via the HDMI Port
The most convenient video connection is HDMI when you want to connect your Roku to a projector.
All Roku models come with built-in HDMI output ports, making it very easy to connect them to any display.

To connect your Roku using an HDMI cable, you can follow these simple steps:
- Turn on your projector.
- If you have a Roku stick, you can plug it directly into the HDMI input port of the projector.
- If you have another kind of Roku device, use a premium HDMI cable to connect the Roku to the HDMI input port of the projector.

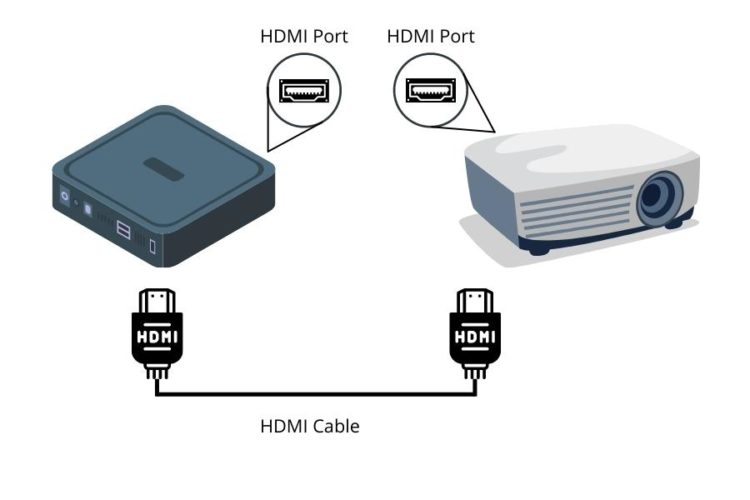
It’s essential to use a premium HDMI cable to connect your Roku to the projector.
This will maintain the video quality throughout the connection so your projection has the highest resolution possible.
3. Connect Via the VGA Port
If you have a projector with only a VGA input port, you’ll need to get an HDMI to VGA adapter that has an audio output .
Since VGA does not carry audio, the audio output allows you to connect it to your sound system separately.

- Supports VGA and Component (YPbPr) output conversion
- Compliant with HDCP 1.1, and DVI
- Built-in EDID
(Paid Link.)
To connect your Roku to a projector using a VGA connection, you can follow these steps:
- Turn on your projector (Plug one end of the HDMI cable into your Roku if it needs a cable).
- Plug the Roku into the HDMI to VGA adapter.
- Plug one end of your VGA cable into the adapter.
- Plug the other end of the VGA cable into your projector’s VGA input port.
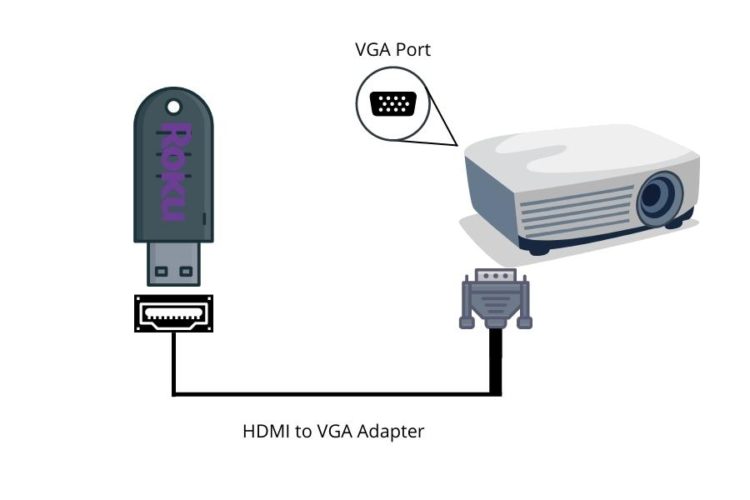
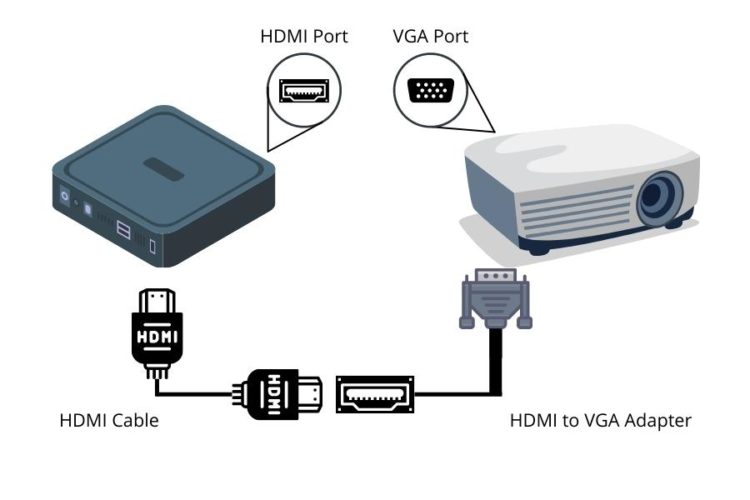
You can then connect the audio to your projector separately, depending on how your HDMI to VGA adapter works.
4. Connect Via the Component Port
This is a rare case nowadays, but it may happen that you’ll need to use a component connection for your projector.
This is more common for very old models or if you can’t use other connections for whatever reason – whether they’re connected to something else or damaged.
In this case, you will need an HDMI to a component adapter that has a separate audio output . Like with VGA, this will allow you to connect the audio to your sound system.

To connect your Roku to a projector using a component connection, you can follow these steps:
- Turn on your projector (Plug one end of the HDMI cable into your Roku, if it needs a cable).
- Connect the Roku to the component adapter.
- Plug the component cables into your adapter.
- Plug the other end into your projector.
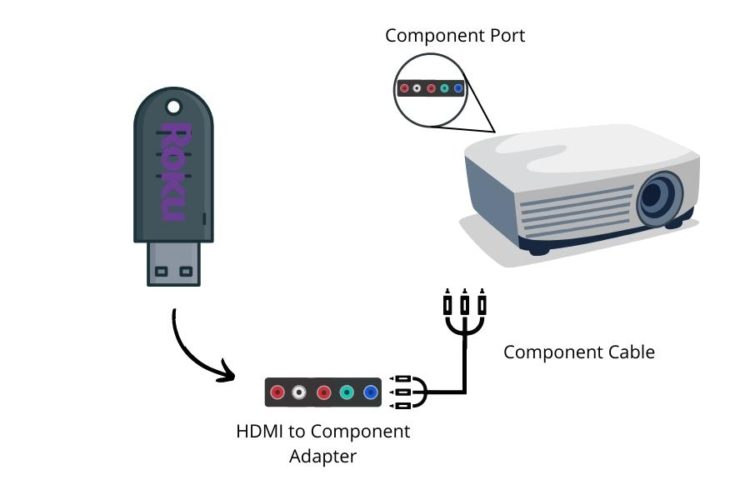

You should now be able to project videos from your Roku!
5. Connect Via the DVI-D Port
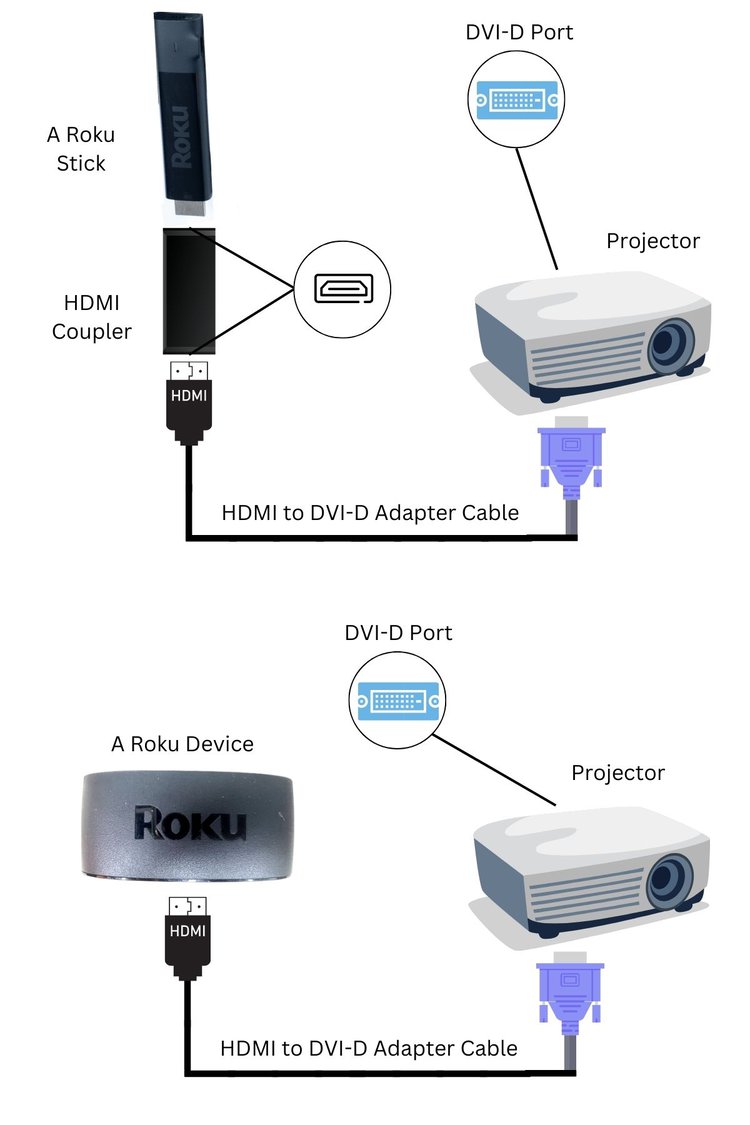
Materials needed:
- HDMI to DVI-D Adapter Cable
- HDMI Female to Female Coupler (for the Roku Stick only)
Instructions:
- Ensure both your Roku device and BenQ projector are powered on.
- Connect the adapter’s HDMI connector to the Roku device.
(For Roku Stick users) Insert the Roku Stick and the adapter’s HDMI connector into the coupler. - Connect the adapter’s DVI-D connector to the projector’s DVI-D port.
6. Connect Via the Composite Ports

Materials needed:
- HDMI to RCA Adapter
- RCA Cable
- HDMI Cable (Roku Stick doesn’t require this cable)
Instructions:
- Power on your Roku device, BenQ projector, and the adapter.
- Connect the HDMI cable to the HDMI ports of the Roku device and adapter.
For Roku Stick users, plug the Roku Stick into the adapter’s HDMI port. - Connect the three RCA cables to their corresponding ports on the projector and adapter.
7. Connect Via the S-Video and RCA Ports
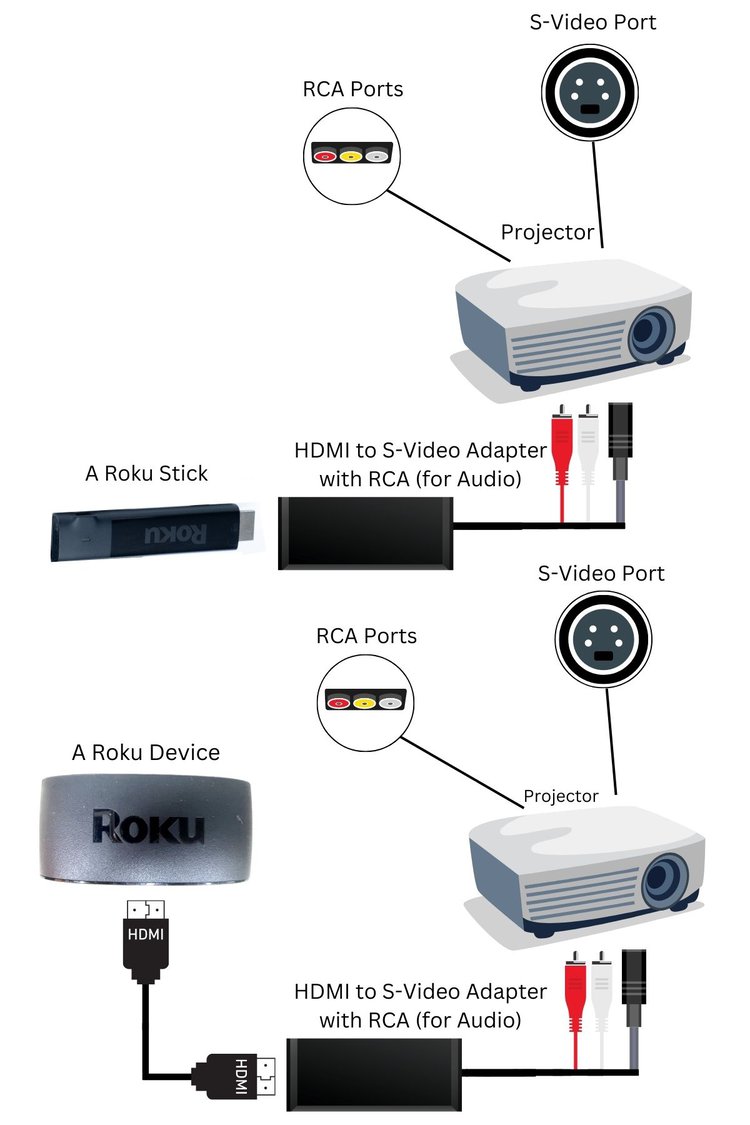
Materials needed:
- HDMI to S-Video Adapter with RCA (for Audio)
- RCA Cable (Included)
- S-Video Cable (Included)
- HDMI Cable (Roku Stick doesn’t require this cable)
Instructions:
- Ensure your Roku device, BenQ projector, and adapter are powered on.
- Connect the HDMI cable to the HDMI ports of the Roku device and adapter.
If you’re using a Roku Stick, plug the Roku Stick into the adapter’s HDMI port. - Plug the S-Video cable into the S-Video ports of the adapter and projector.
- Plug the RCA cable (only the red and the white cables are required) into the corresponding ports of the adapter and projector.

Meet Vance. He’s a proud dad, a seasoned Electronics Engineer, and an avid tech lover. His proficiency in electronics and troubleshooting skills were instrumental in crafting Pointer Clicker. Vance is passionate about simplifying tech for those who aren’t well-versed in it.

Duy Anh is a seasoned technical editor specializing in helping readers troubleshoot TV, projector, and Wi-Fi issues. He’s always been drawn to logical problem-solving. His ability to approach matters from various angles with a neutral mindset enhances his technical expertise.