
HDMI Out of Range Error: Understanding What It Means and How to Fix It

What To Know
- The “HDMI out of range” error indicates that the signal transmitted from a device is incompatible with the receiving monitor or TV’s resolution or refresh rate.
- To fix this issue, reboot into safe mode, adjust the resolution to match your monitor or TV’s capability, and ensure the refresh rates of connected devices are compatible.
- Updating drivers, checking HDMI cables and ports, and matching the output device’s resolution to the monitor or TV’s native resolution are key steps to resolve the “HDMI out of range” error.
In this article, I’ll explain the “HDMI Out of Range” error: what it means, what causes it, and how to fix it.
Let’s dive into solving this HDMI hiccup!
Quick Navigation
HDMI Out of Range: A Brief Overview
The HDMI “out of range” error message on your monitor or external display means your computer or input device is transmitting a signal that the output device cannot interpret and disseminate.

When monitor resolutions were fixed at the software level, the “out of range” issue was not expected.
With the advancements in display technologies and modern devices being able to output content at varying resolutions, it has become essential to match the picture resolutions of the devices connected via HDMI.
If the screens on the two devices are outputting data at varying refresh rates, that could also cause the above “HDMI out of range” problem.
Even when external monitors of yore (when they weren’t heavily “computerized”) were connected to computers with different display resolutions and/or refresh rates, they outputted the input signal as scrambled visuals instead of popping up an error message.
Why Does My Monitor Say, “HDMI Out of Range”?
Here are a few reasons your monitor could pop the “out of range” error.

When the screen’s resolution is set above the hardware capability of the monitor, the “out of range” error could pop up.
For instance, if the display can support up to FHD (1920×1080) resolution but the video card on the desktop computer it’s connected to is capable of up to 2K (2560×1440), setting display sharpness at 2K would exhibit the error.
Lowering the resolution and restarting the computer would fix the problem.
Generally, when the monitor is not at its native resolution, it pops up the error. When you’re connecting an external monitor to a laptop computer and the display resolutions of the two screens are not set to match, the error occurs.
How to Fix HDMI Out of Range on Your PC?
If the error is due to a video resolution mismatch between the monitor and your graphics card or a laptop it’s connected to, reboot your device and enter safe mode in Windows.
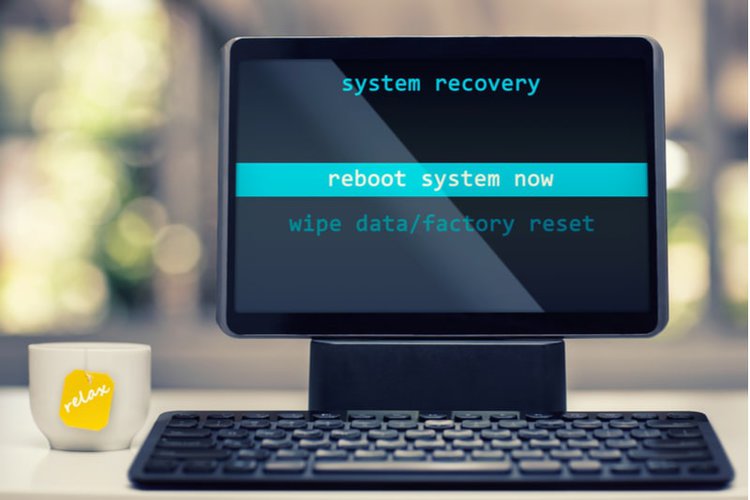
Safe mode boots Windows in its primary state, employing a minimal number of drivers and files. The mode helps narrow down the problem’s source and troubleshoot it.
To boot into safe mode in Windows 10/11 on the laptop connected to the monitor, here are the steps:
- Press the Windows key and R.
- In the dialog box that pops up, type “msconfig” and press Enter.
- In the “System Configuration” window that appears next, click on the “Boot” tab.
- Under “Boot options”, check the “Safe boot” box and click on “Apply”, and then “OK”.
- Choose the Restart option that appears in the System Configuration box.
Your device shall now boot into safe mode.
After entering safe mode, change the screen resolution by:
- Clicking on Start > control panel > “Adjust screen resolution” under the “Appearance and Personalization” link.
- Click on “Resolution options” from the drop-down list; choose the resolution you want; and click “Apply”.
- Click on “Keep” to save the setting, and restart your PC.

If you’re on Windows 11, the steps to change the resolution are a bit different:
- Click on Start and then Settings.
- Click on the “System” menu on the left side of your screen.
- If it’s already selected, click on the “Display” option.
- In the “Display resolution” option under “Scale & layout”, choose the resolution from the drop-down box.
- After the selection is made, a dialog box shall appear seeking confirmation. Click on Keep to set the resolution as default.
- Restart your computer to conclude the process.
Kindly note to enter safe mode on an external monitor hooked to your desktop PC or to address compatibility concerns between the monitor and your computer’s GPU, the above steps will not apply. Follow the below-mentioned instructions instead:
- Unplug all your monitors except for one (if you have multiple screens plugged into your computer).
- Now, turn off the computer manually and then turn it on. You shall see Windows loading on the monitor.
- When Windows is at its loading stage, displaying its characteristic progress circle, turn off the computer again. Once the system is turned off, turn it on again.
- Keep turning off and on your computer, three to four times or until the text “Preparing Automatic Repair” appears on the Windows loading screen under the progress circle.

After loading in, the Automatic Repair blue screen shall appear.
- On that page, click on Advanced options > Troubleshoot > Advanced options > Startup Settings > Restart.
Once your computer restarts, you will be on the Startup Settings page.
On that page, select “Enable Safe Mode” by pressing the letter F or the key F4 on your keyboard. You would have now entered Safe Mode and can proceed to work on your computer’s video card.
Follow the below steps for that:
- Head to Control Panel, and then click on Device Manager.
- In the Device Manager window that pops up, click on “Display adapters” to expand the option or reveal your video card driver.
- Right-click on your graphics card driver and click on “Uninstall device”. A small pop-up shall appear next.
- Click on “Uninstall” after checking the box for “Delete the driver software for this device”.
- Next, restart your computer. While the system reboots, it will download the appropriate driver for your graphics card automatically.
Your computer is now ready for regular use or to work on the aforementioned screen resolution discrepancies.
Check the Refresh Rates of the Devices
![]()
If the error occurs when connecting an external monitor and a laptop, ensure the refresh rates of the two devices match as well.
The steps to do that are pretty identical to the above. There’s just one difference or additional step.
Head to the “Advanced display” settings on your computer and pick the correct refresh rate under the “Choose a refresh rate” menu.
On a Windows 7 computer, click on “Properties”, “Settings”, and then “Advanced Settings”. You may now change the refresh rate.
Make Sure the PC’s Drivers are Updated
When the above resolution does not work, or if you’re unable to change the display resolution, it could denote your drivers are not up to date. In that case, update your monitor and graphics drivers.
Here is a video showing how to update your drivers:

Please note you cannot update drivers in the safe mode. You may download them but cannot do the installation.
As mentioned earlier, Safe mode is Windows’ diagnostics mode and is meant for troubleshooting purposes only.
To download the new drivers and install them, you must reboot the computer again in normal mode — which is basically how you usually power on your computer to log into.
Changing Display Settings on a Mac
If the “out of range” error is on your Mac computer, you can change the device’s display settings in System Preferences.
- In the app, click “Displays”. The “Built-in Retina Display” window will open.
- In the “Display” tab, select “Scaled” in the “Resolution” option. Scale the resolution according to your requirements.
You can change the resolution for your monitor or external display from within the same window.
- Click on the “Gather Windows” button located at the bottom right corner of the window. A separate window shall open.
- Choose “Scaled” in the window, and a drop-down menu with all available display resolution options shall appear. Choose the one that’s right for your setup.
How Do I Fix HDMI Out of Range on My TV?
Your TV’s “HDMI out of range” issue is also likely due to the device it’s connected to.
For instance, if you want to display content from your laptop computer at a resolution greater than your TV could manage, the HDMI signal may not go through.

Bringing down the resolution on your laptop by fiddling with its display settings and changing it to your TV’s resolution would help set things right.
If the TV is hooked onto a set-top box instead, make sure the STB’s output quality is set to match the TV’s resolution.
If that doesn’t work, check your HDMI cable and the HDMI ports of your TV. Use another cord to ensure the error wasn’t the cable’s fault.
If there are no issues with the HDMI cord, connectors, and ports, and setting the input device’s resolution to match your television’s native resolution also didn’t work, contact the manufacturer.
Changing TV Resolution from Your Laptop

To change your TV’s resolution from your Windows laptop, do the following:
- Access the “Change display settings” feature on your computer.
- If the TV or another display is connected, you will be presented with two screen options.
- Select the TV display from the two to access its resolution settings.
- Scroll down to see the TV screen’s resolution.
- You may modify the resolution setting and set it to a value that matches the configuration of your TV.
- Click on “Keep changes” in the box that pops up right after to apply the chosen resolution permanently. The next time you connect the TV, the resolution settings will remain.
Conclusion
To the novice, an “HDMI out of range” error might seem like a significant issue, which, as explained above, quite clearly isn’t. Although technical, the error message doesn’t require expert intervention.
If you know how to match the display resolutions of the connected devices, you’re good to go. If not, this article would have helped you understand how to change the display resolution on your source device.
And, in case you were tacitly concerned, the likelihood of electrocuting yourself when plugging in and out the cables is extremely low as you’re dealing with HDMI cords and ports.

Catherine Tramell has been covering technology as a freelance writer for over a decade. She has been writing for Pointer Clicker for over a year, further expanding her expertise as a tech columnist. Catherine likes spending time with her family and friends and her pastimes are reading books and news articles.