
How To Get Apple TV on Older Samsung Smart TV?

Apple TV is coming out with countless original movies and TV shows that are only available on the Apple TV app. You know that this app is available on several of the latest Samsung smart TVs, but you’re not sure if you’ll be able to install it on your older model.
Alternatively, you may want to watch Apple TV on your older non-smart Samsung TV that doesn’t have an HDMI port.
In this article, we’ll outline which Samsung TVs are compatible with the Apple TV app and offer a solution for users with non-smart TVs.
Let’s get started!
Quick Navigation
Which Samsung TVs are Compatible With the Apple TV App?
![]()
Several Samsung smart TV models natively support the Apple TV app.
We found that most smart models that support the Apple TV app are released in 2017 or after.
On all of these models, the Apple TV app can be found in their dedicated app store.
Please remember that the available content within the Apple TV app may vary depending on your location, as many of their videos are geo-restricted.
The following Samsung smart TVs support the apple TV app:
- Samsung QLED 8K Q9, Q8 Series (2019, 2020)
- Samsung QLED 4K Q9, Q8, Q7, Qx Series (2017, 2018, 2019, 2020, 2021)
- Samsung UHD 8, 7, 6 Series (2017, 2018, 2019, 2020, 2021)
- Samsung FHD/HD 5500, 5300, 4500, 4300 Series (2017, 2018, 2020)
- Samsung Serif Series (2019, 2020)
- Samsung The Frame Series (2017, 2018, 2019, 2020, 2021)
- Samsung The Sero Series (2019, 2020)
You can find which smart TVs and streaming sticks from other brands support the Apple TV app by heading to Apple TV App–Supported Devices on the official Apple TV website.
Browse their supported devices categorized by brand name or select CTRL + F on your keyboard to search for specific devices by name.
How to Get Apple TV App on Older Samsung TVs?
You can get the Apple TV on an older Samsung TV by using a streaming stick.
Streaming sticks are HDMI-compatible devices that display all of the latest streaming and gaming apps on even the oldest TVs.
They feature a smart interface and come with a smart remote to control them.
Many of these streaming devices support 4K and some of their remotes even have a voice command function.
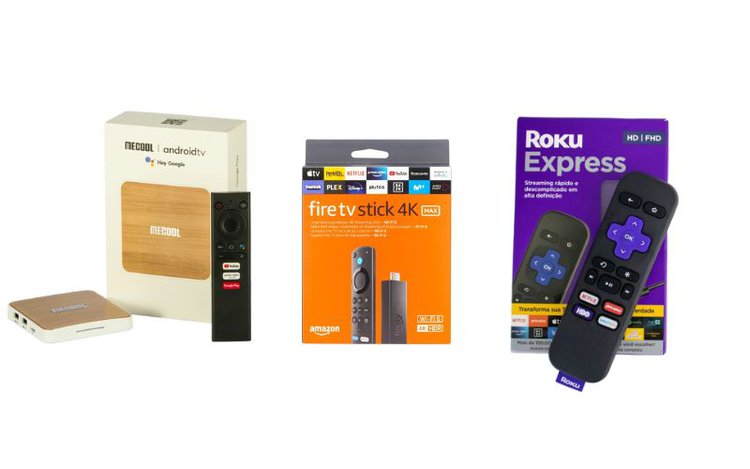
All of the most popular streaming sticks (e.g. Amazon Fire TV, Roku, and Android TV boxes) support the Apple TV app.
While streaming sticks are designed to be used with HDMI-compatible TVs, they can be connected to older non-HDMI-compatible units with a converter. You can use your TV’s other ports (e.g. composite, component, S-Video, SCART) to connect your streaming stick to your TV.
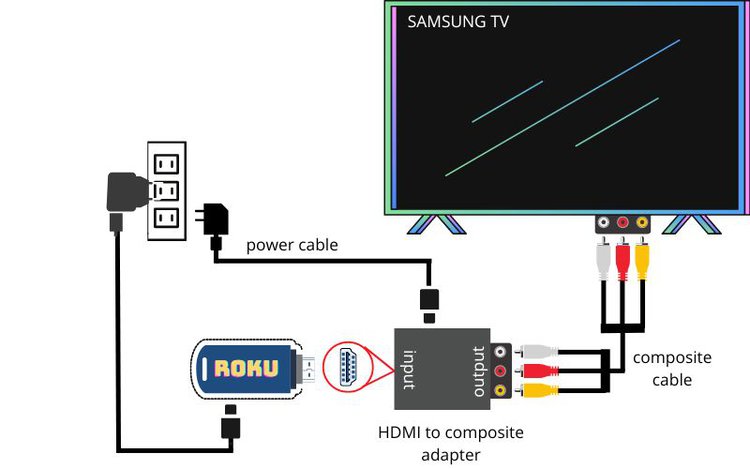
In the example below, we use an HDMI to composite adapter as an example and outline the steps needed to connect a Roku streaming device to your TV. However, you can use any compatible converter you’d like and follow the same steps to connect other streaming sticks to your TV.
To see more detailed instructions on how to connect a streaming stick to a non-HDMI-compatible TV, visit our article How Do I Connect My Roku to My TV Without HDMI?
Let’s learn how to connect your streaming stick to a non-HDMI-compatible TV using its composite ports!
Materials Needed
- HDMI to Composite Adapter
- Roku Streaming Stick
- Composite-Compatible TV
Instructions
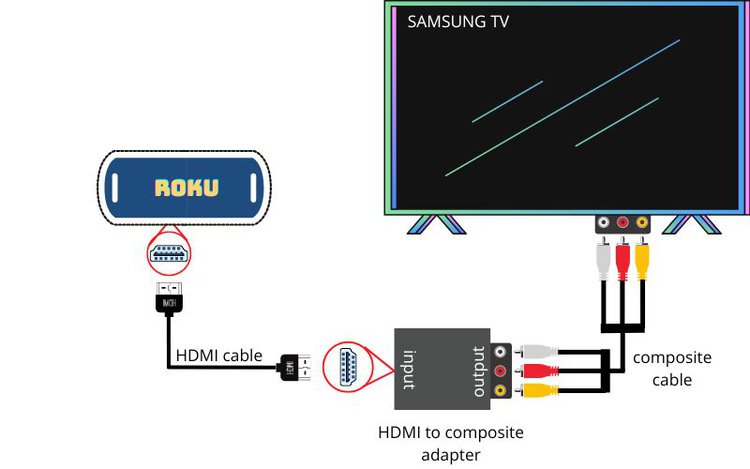
Step 1: Connect Your HDMI to Composite Adapter to Your TV
Plug your adapter’s composite cables into your TV’s composite ports. Composite cables and ports are color-coded based on their function, so ensure you plug the cables into the ports of the respective colors.
Ensure they’re firmly in place. You may need to apply a small amount of pressure until you hear a light-clicking noise.
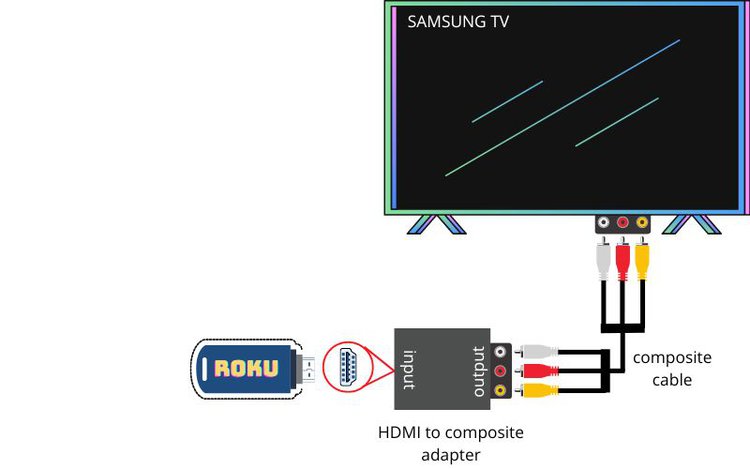
Step 2: Plug Your Roku into the Adapter
If your Roku device does not have an attached HDMI connector, plug one end of an HDMI cable into your Roku and the other end into the HDMI to composite adapter’s HDMI Input port.
If you’re using a Roku streaming stick with an attached HDMI connector, you can plug it directly into the adapter.
Alternatively, you can use an HDMI extender (which Roku will send to you for free) to connect it to the adapter.
Step 3: Plug the Adapter into Power.
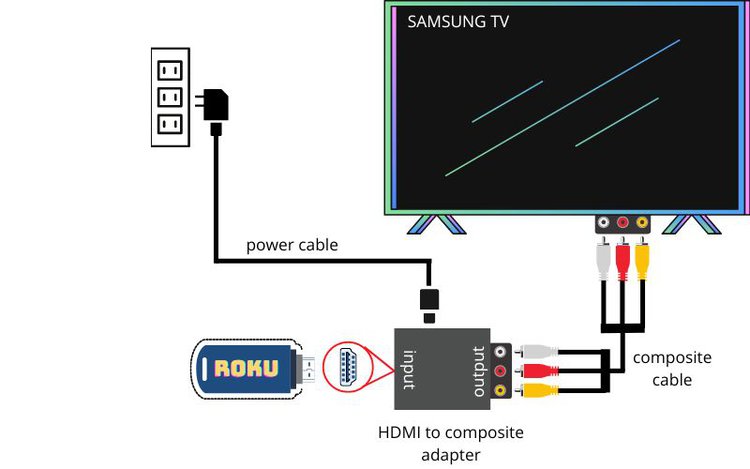
The adapter linked above comes with a micro USB power cable and will not work if it’s not sufficiently powered.
Plug the Micro USB power cable into the adapter’s USB/Power port. Then plug the USB-A end of the cable into a USB power adapter.
Connect the power adapter to a wall outlet nearby.
Step 4: Plug the Roku into Power
Like the adapter, Rokus also needs to be powered with a Micro USB cable. Your Roku will come with a power cable, but you can use any Micro USB cable if you’ve lost the provided one.
Plug the Micro USB end of the cable into your Roku and the USB-A cable into a USB power adapter connected to a wall outlet.
You can also plug it into your TV’s powered USB port. If your TV USB port can’t deliver enough charge, try using a Mission USB power cable .
Step 5: Adjust the Adapter’s Mode
You may notice a switch on the adapter labeled NTSC/PAL.
This switch changed which broadcast frequency your adapter uses based on your region.
Users living in North or South America should set their adapter’s mode to NTSC. Users living in Europe or Asia should ensure the adapter is set to PAL.
Your adapter will not work if it’s set to the wrong mode for your region.
Step 6: Change Your TV’s Input
To display the Roku’s interface on your TV, you must change your TV’s input.
While this process may vary slightly depending on the TV’s make and model, you can usually change its input by pressing the remote’s Input or Source button until Composite is displayed in the top right corner of the TV or until you see the Roku logo on-screen.
Some older TVs also have an Input/Source button located on their control panel, found on the front or side of the unit.
Watch the video below demonstrating how to set up your Roku hardware using an HDMI to composite adapter.

Step 7: Set Up Your Roku
If this is the first time using your Roku, you will need to set up the software. This process involves connecting it to your Roku account and a stable internet network.
Once your Roku has been set up and is displaying the Home page, you’re ready to install the Apple TV app.
Step 8: Install the Apple TV App
Follow the steps below to install the Apple TV app on your Roku.
Step 1: Go to Streaming Channels on the Home page.
Step 2: Click on Search Channels.
Step 3: Using the on-screen keyboard, type Apple TV into the search bar.
Step 4: Select Apple TV once it pops up on the right side of the screen.
Step 5: Click on Add Channel to install Apple TV on your device.
Watch the video below demonstrating how to install and navigate the Apple TV on your Roku device.

Wrapping Things Up
Many Samsung smart TVs natively support the Apple TV app, which you can download from their built-in app stores.
If your Samsung TV is several years old and doesn’t have a smart interface or feature Apple TV within its app store, you can use a streaming stick instead.
While streaming sticks are HDMI-compatible, they can be connected to old non-HDMI-compatible TVs with an adapter. Remember, both the adapter and streaming stick must be powered. Also, don’t forget to adjust the adapter’s mode for your region.
What’s your experience watching Apple TV on an older Samsung smart TV? Do you have a favorite streaming stick brand?
Let us know in the comments below!

Yesenia Achlim is a technical copywriter and editor with a focus on AV equipment. She aims to break down complicated topics and make technology accessible, no matter your technical expertise. When she’s not teaching you how to replace a projector lamp, you can find her reading and baking.