
How To Precisely Calibrate Your Projector: Best Tools & Apps

- Projector calibration steps include adjusting keystone, overscan, brightness, contrast, and sharpness, often using built-in menu options and test patterns, but color calibration may necessitate professional tools like a colorimeter.
- You can easily fine-tune your projector at home using the Datacolor SpyderX Elite colorimeter and its SpyderX Elite software, showcasing the convenience and accuracy of DIY projector calibration.
- There is a variety of projector calibration software/apps, such as CalMAN, Epson Projector Professional Tool, Optoma SmartFIT, and others, offering unique features and interfaces to aid in the calibration process.
In this article, I will show you how to calibrate your projector perfectly and also introduce my top picks of projector calibration tools and apps.
Let’s get started!
Quick Navigation
How to Calibrate Your Projector Properly (With Test Patterns)
Often, projector calibration depends on the following:
- Where you mount your projector (on the ceiling, table, or stand)
- The specifications of the projection screen or surface (its gain and special features — if any)
- The brightness conditions of your projection area
- Any irregularities on the projection surface, such as projecting onto a corner, a cone roof, a curved surface, etc.
The settings menu varies on each projector brand, and the calibration is also specific for each circumstance.
In this guide, I will demonstrate using my Epson projector. You can apply these guidelines to your projector even if it is a different brand.
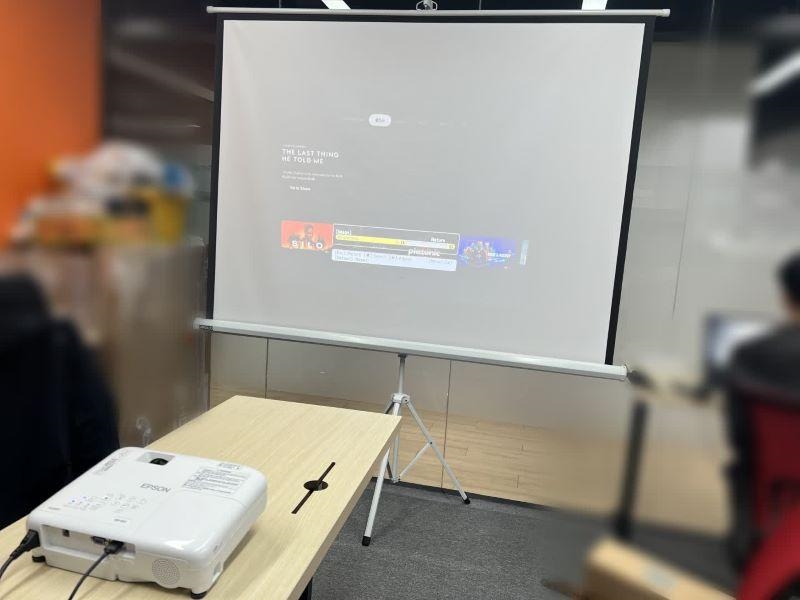
First, I placed my Epson projector on a flat and stable table where there were no obstacles between the projector screen and the projector.
Next, I calibrate my Epson projector using the following steps:
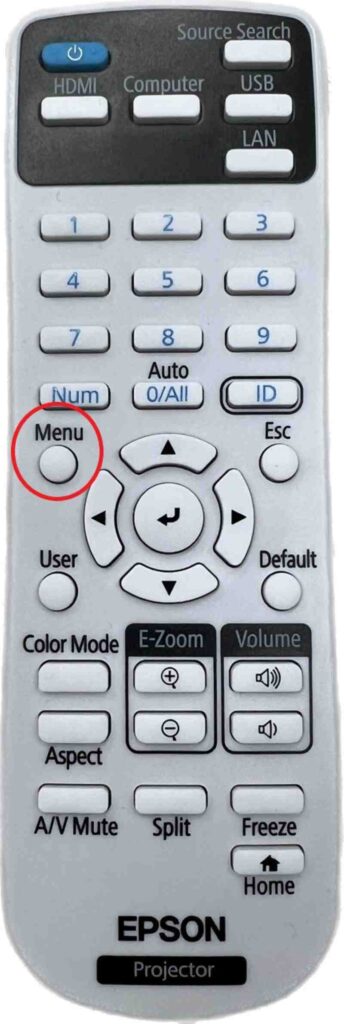
Step 1: Press the Menu button on the remote control to access the Menu settings screen.
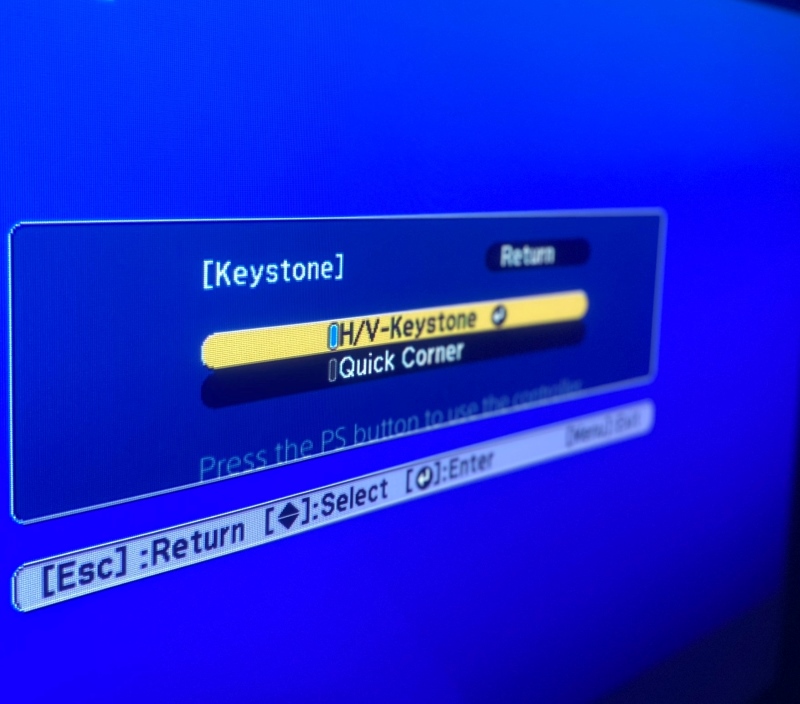
Step 2: From the menu options, select Settings > Keystone > H/V-Keystone to access the Keystone settings screen.
Step 3: Adjust the V-Keystone (Vertical Keystone) and H-Keystone (Horizontal Keystone) until the projection image is an upright rectangle like the one below.
Normally, the projection image is in good shape when the V-Keystone and H-Keystone values are at 0.

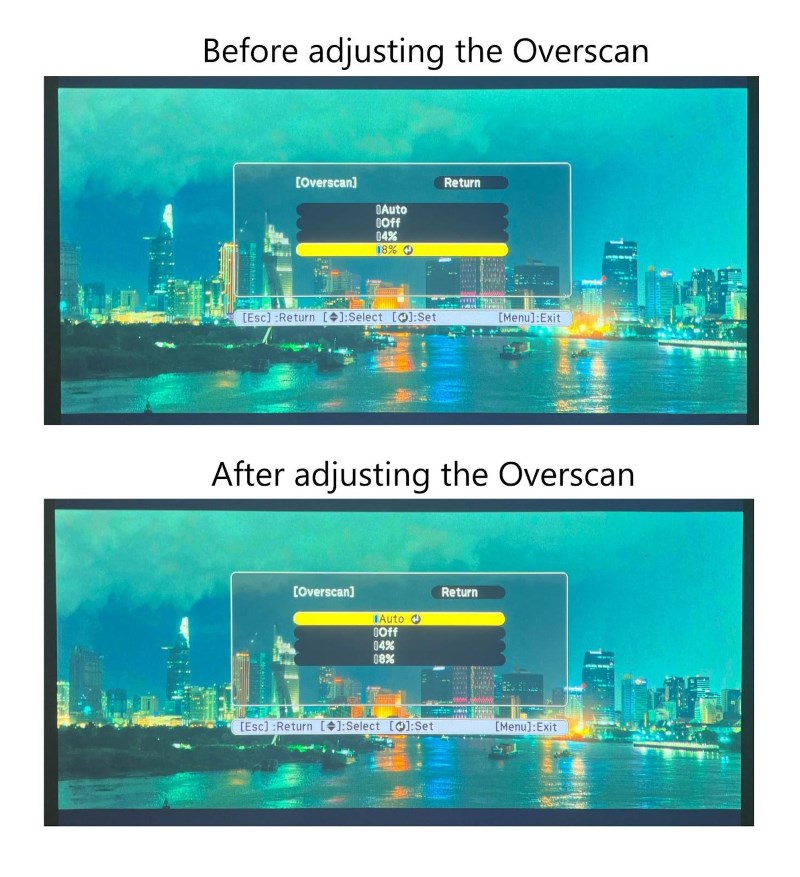
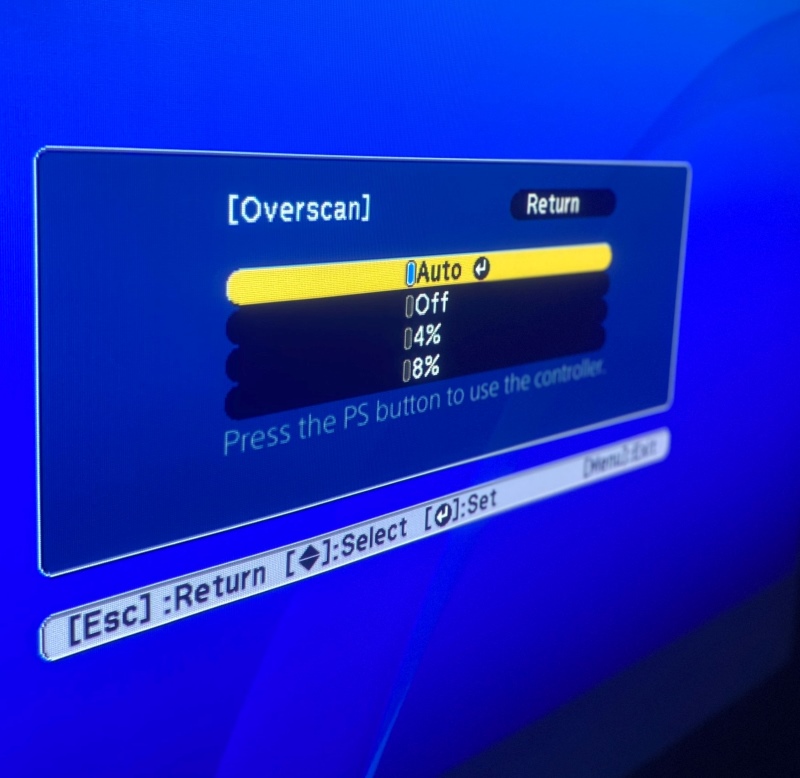
Step 4: Press the Esc button on the remote until you meet the menu options screen again, then select Signal > Overscan to access the Overscan setting screen.
Step 5: Adjust the Overscan until the projector displays a full image — no cropping along the edge.
I switched from 8% to Auto to display the whole projection image.
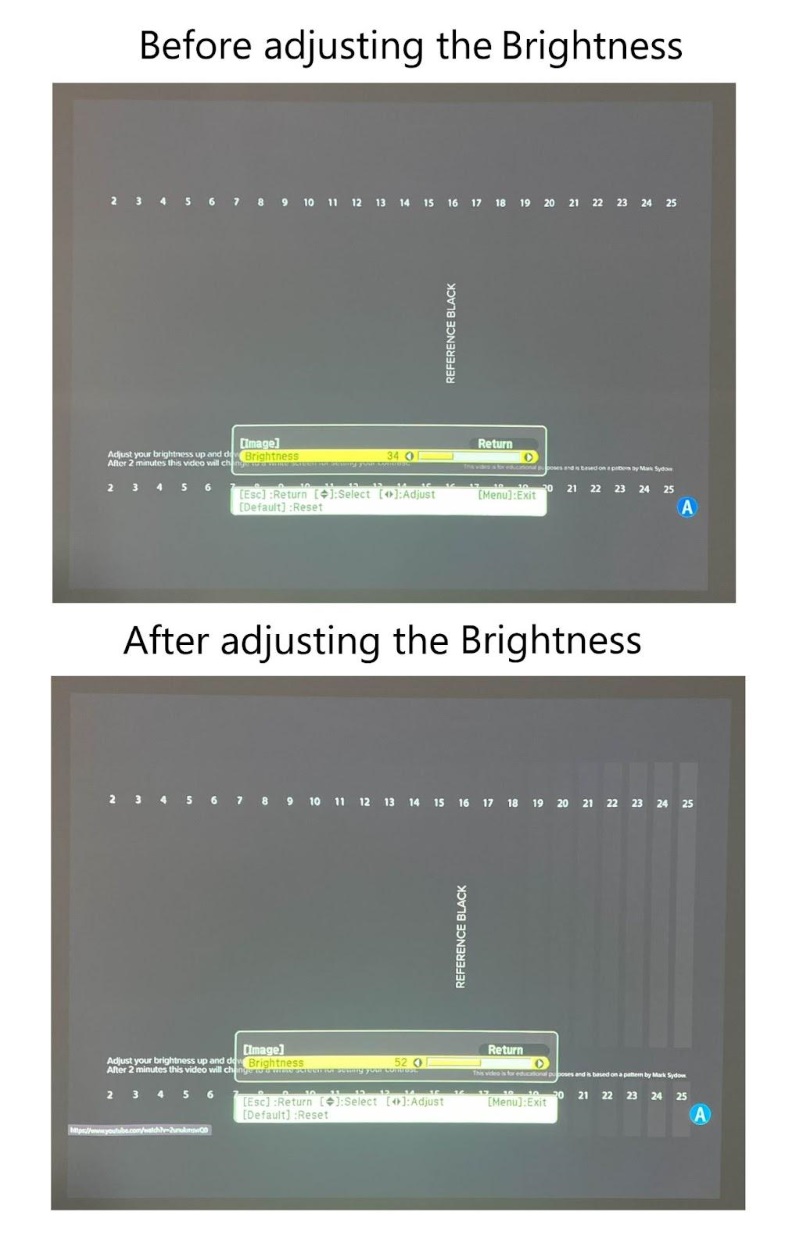
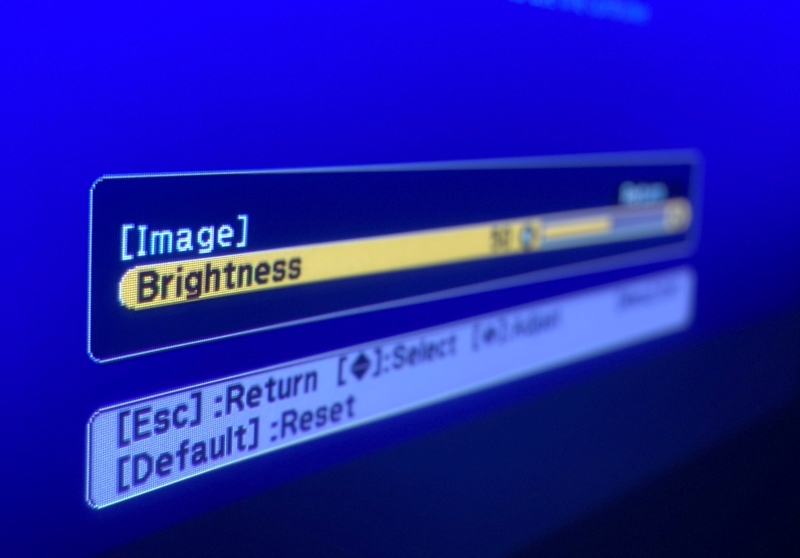
Step 6: Press the Esc button on the remote until you meet the menu options screen again, then select Image > Brightness to access the Brightness settings screen.
Step 7: To adjust the Brightness, I followed this test pattern:
Adjust the Brightness to the lowest level where the “17-25” section still blinks, showing different levels of black (like in the image below).
The Brightness setting on my Epson projector matched the test pattern at value 52.
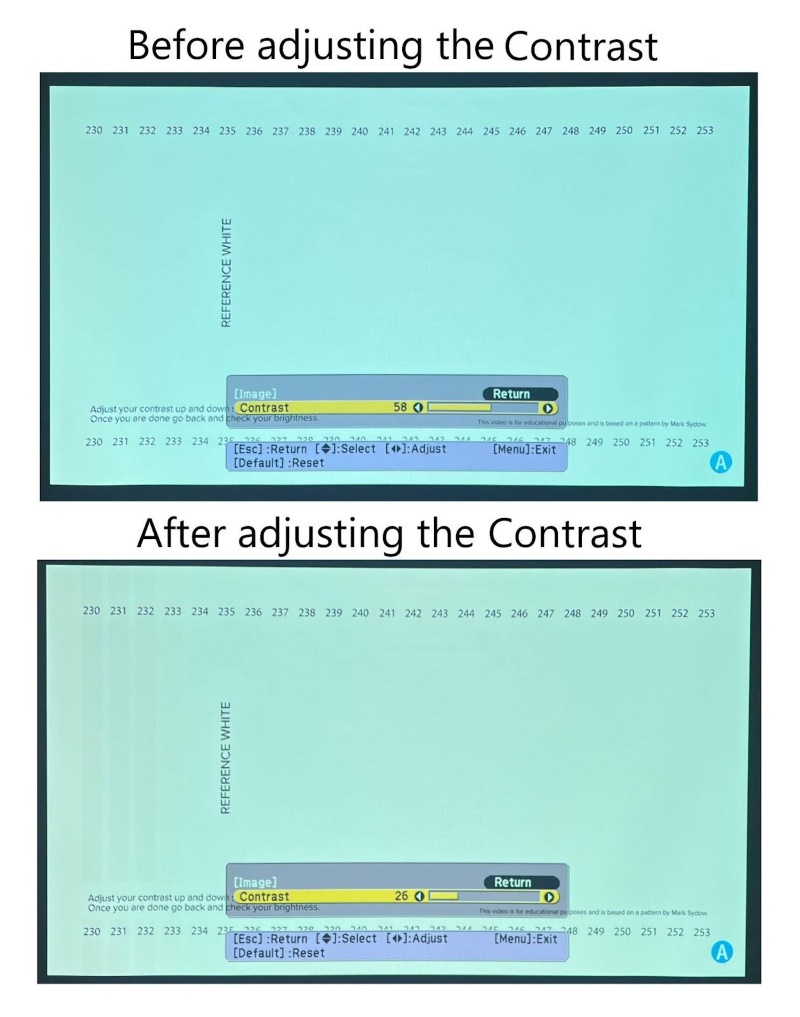
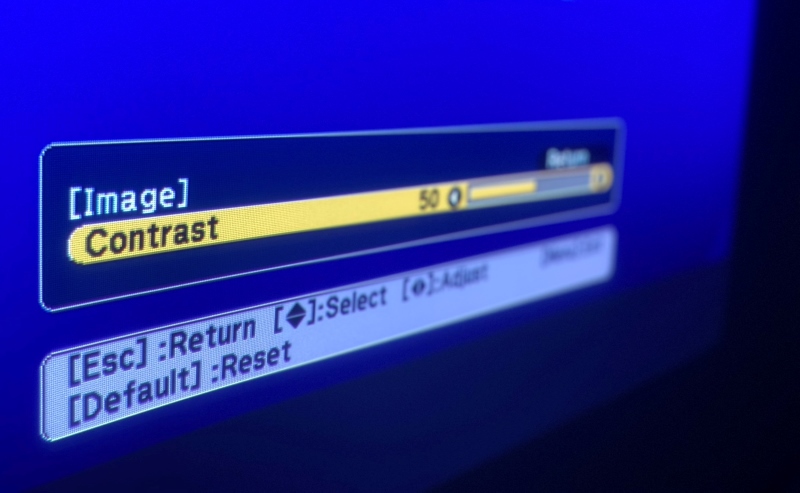
Step 8: Press the Esc button on the remote until you meet the menu options screen again, then select Image > Contrast to access the Contrast settings screen.
Step 9: Follow this test pattern and adjust the Contrast value up or down until the “230-234” section flashes like the one below.
In my case, the Contrast setting matched the test pattern at value 26.
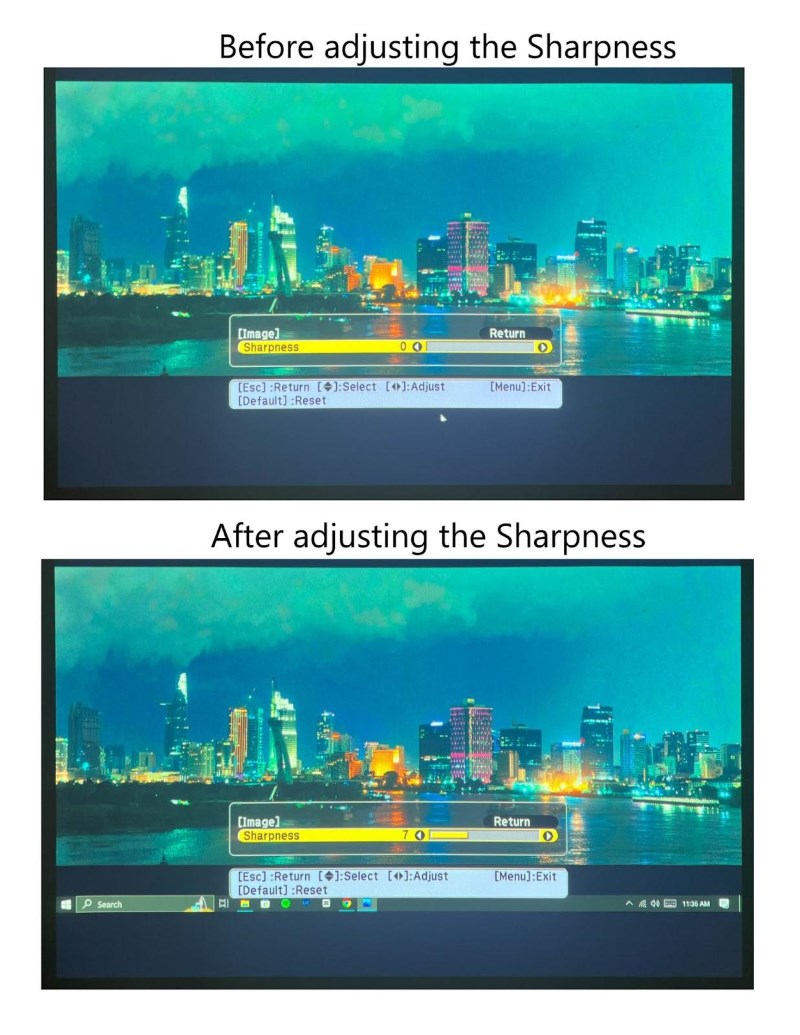
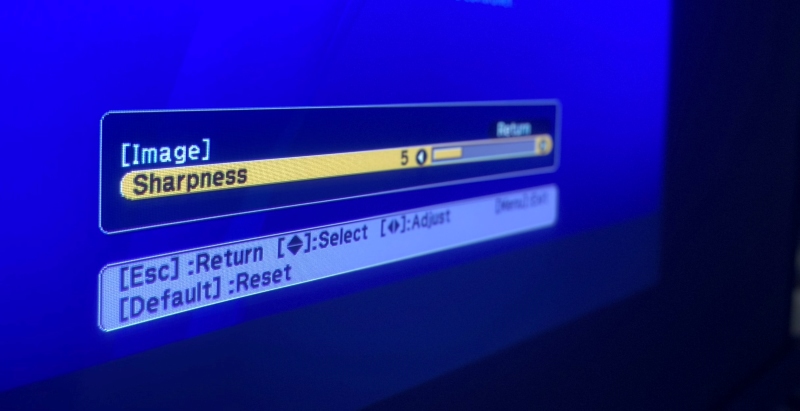
Step 10: Press the Esc button on the remote until you meet the menu options screen again, then select Image > Sharpness to access the Sharpness settings screen.
Step 11: Adjust the Sharpness until the projection image’s details are clear and smooth.
Color calibration is the hardest part of this process and is often left to professional colorists. You’ll need a colorimeter and a tripod stand — in the latter part of this article, we’ll teach you to set up and use both.
Gamma and Uniformity are two factors that are more complicated to adjust. They’ll fit right in once you’ve followed our instructions for the other parameters.
However, if you’re determined to, you can use some of the recommended software, apps, or tools in the following section to calibrate Gamma and Uniformity.
Note: Don’t move your projector or the projection screen after calibrating. Else, you may have to calibrate your projector all over again.
Calibration Software/Apps for Your Projector
Instead of manual calibration, you can use calibration software/apps. Each one has a different interface and unique features. Hence, we will only provide you with the best ones.
You can learn how to use the software/apps in our list from the guidelines on their official websites and YouTube demos.
- CalMAN: Compatible with certain models of Epson, LG, and other projector brands.
- Epson Projector Professional Tool Software: Install it onto your Windows or Mac PC, then follow this user guide to create a control project for your projector.
- Optoma SmartFIT app: Download the app on iPhones and Android to calibrate your Optoma projector.
- BenQ Palette Master Element: Download the version compatible with your PC’s operating system and model.
- JVC Projector Calibration Software: Check for and download one compatible with your JVC projector.
- ImageDirector Software: This works with Sony projectors; check if your projector model and PC are compatible with the software before downloading.
Calibration Tools for Your Projectors
Here’s our recommendation for the 3 best projector calibration tools in 2023:
- Datacolor SpyderX Elite
- X-Rite ColorMunki Display
- X-Rite i1Display Pro
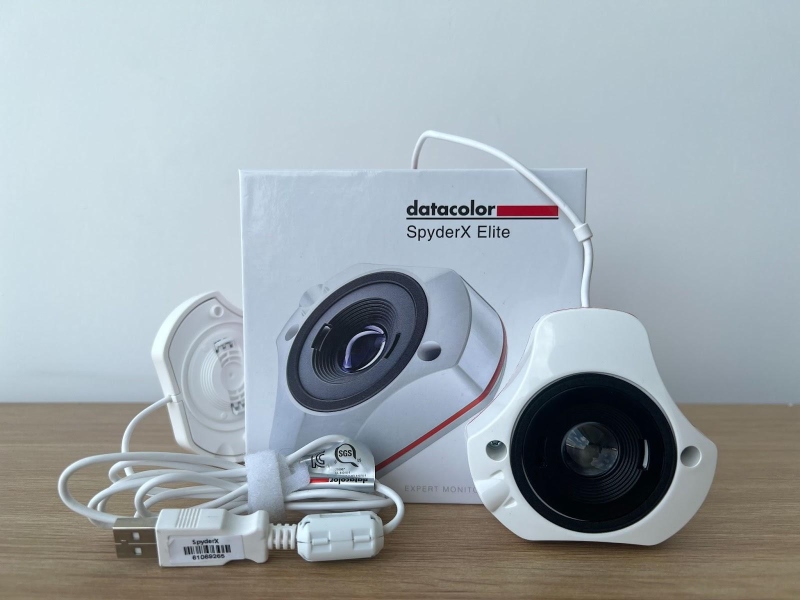
I did a calibration set-up demo for my Optoma projector, using the Datacolor SpyderX Elite colorimeter and SpyderX Elite software. Below is a breakdown of my process:
Material Needs
- Datacolor SpyderX Elite colorimeter
- SpyderX Elite software
Initial Setup
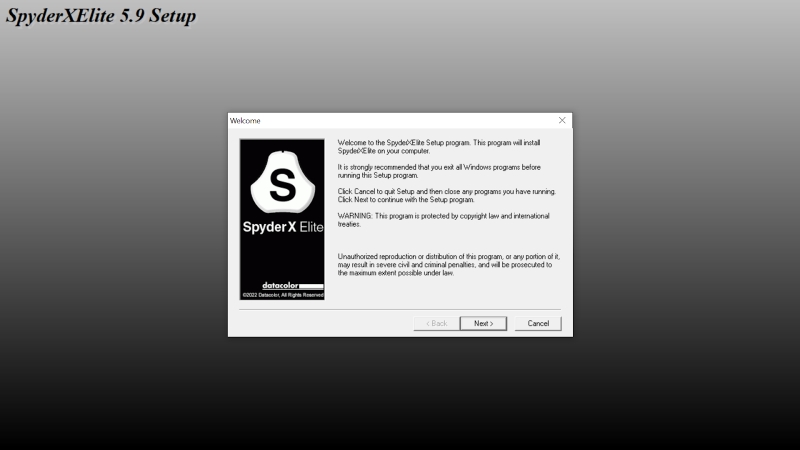
Step 1: Download the SpyderX Elite software and install it on your laptop or computer.
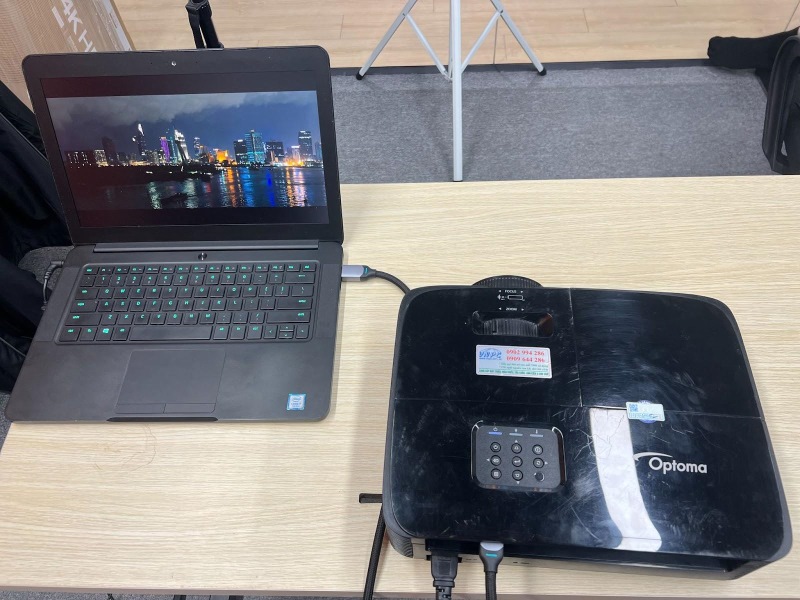
Step 2: Power your computer and projector, then connect them with an HDMI cable. Switch the Input settings on the projector to HDMI if necessary.
Step 3: Set up the colorimeter on a tripod, placing it in the middle of the projection screen with a distance of 30cm/12 inches. Open the colorimeter’s lens cap and face the lens toward the projection screen, as shown below.
Note: The colorimeter lens should be tilted slightly to the right (about 30 degrees) to prevent the colorimeter from scanning its own shadow.

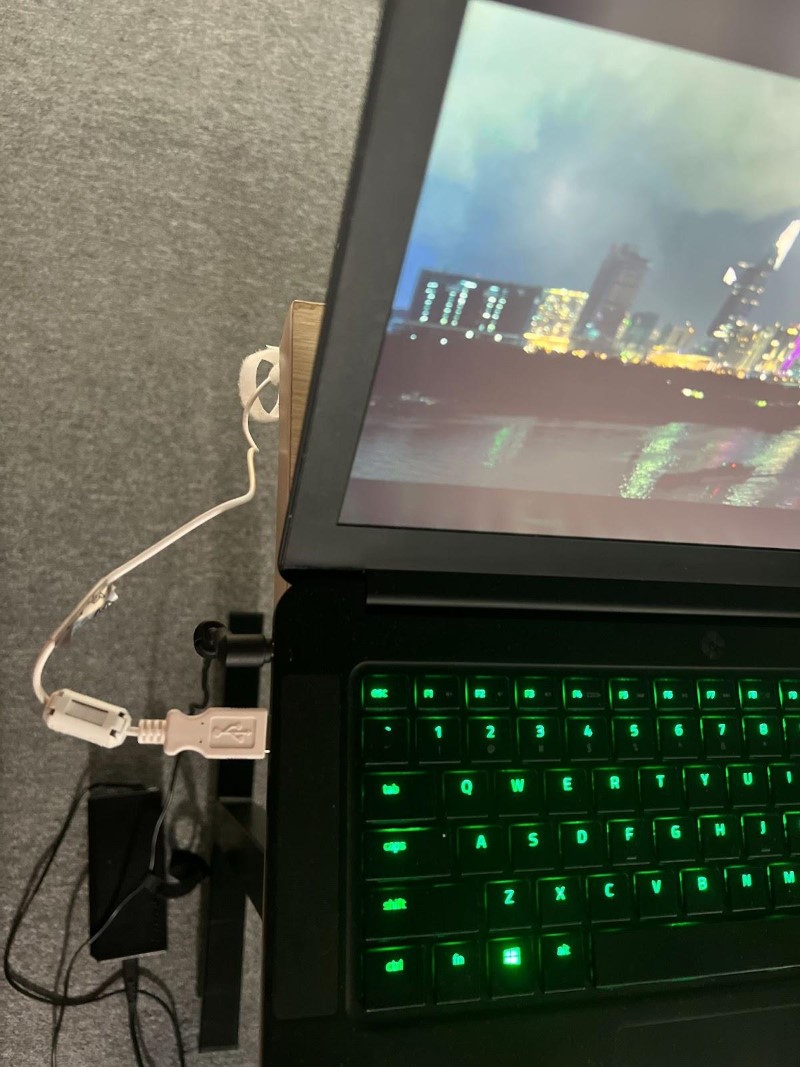
Step 4: Connect the colorimeter’s USB cable to the USB port on the laptop/computer.
Step-by-Step Instruction
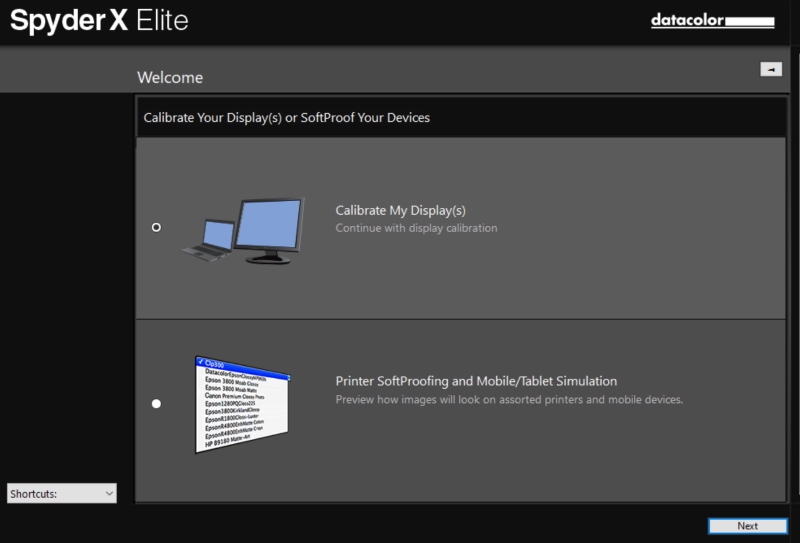
Step 1: Open the SpyderX Elite software on your laptop or computer.
![]()
Step 2: Choose Calibrate My Display(s) and click Next.
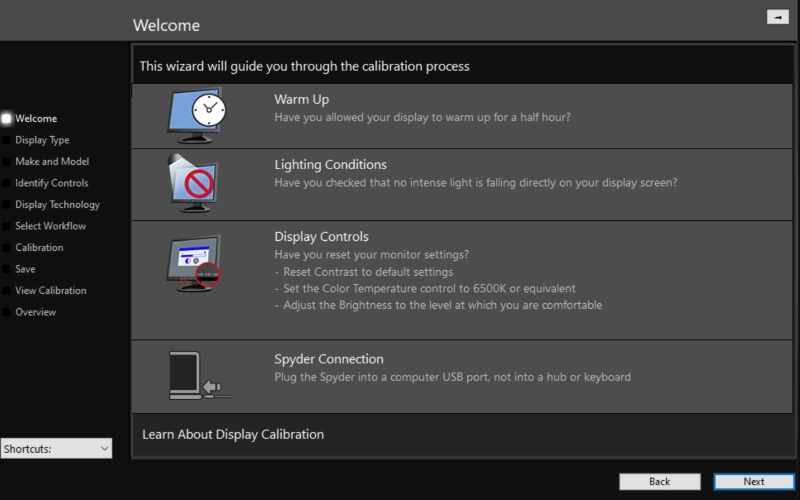
Step 3: Ensure the four conditions below are met, then click Next.
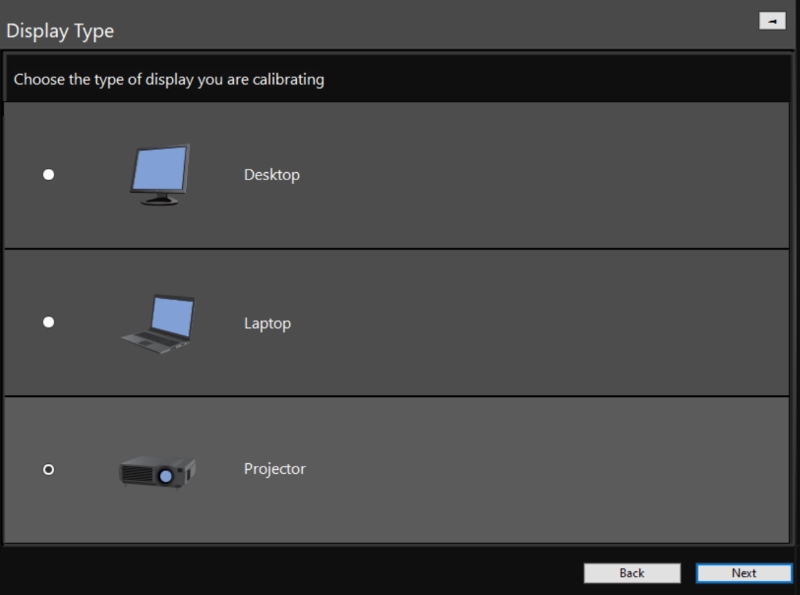
Step 4: Select Projector and click Next.
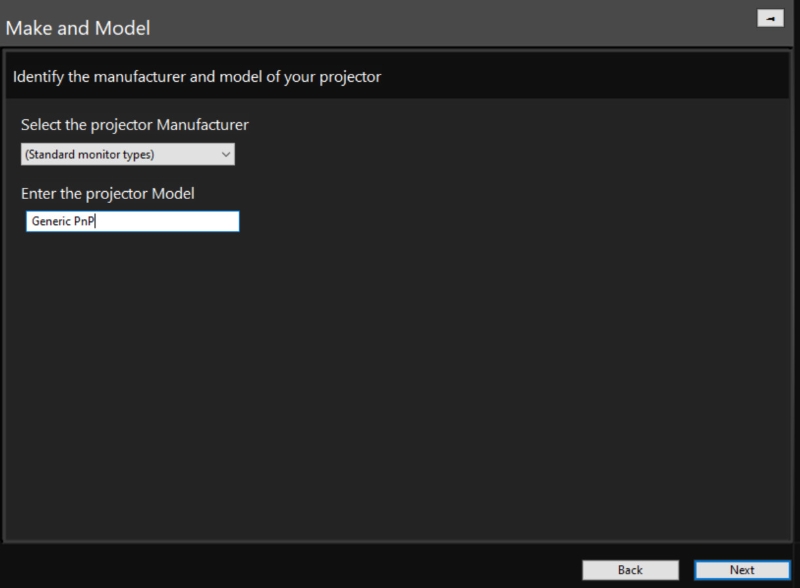
Step 5: On the Make and Model section, input the manufacturer and model of your projector. If you are not sure, leave them at default and click Next.
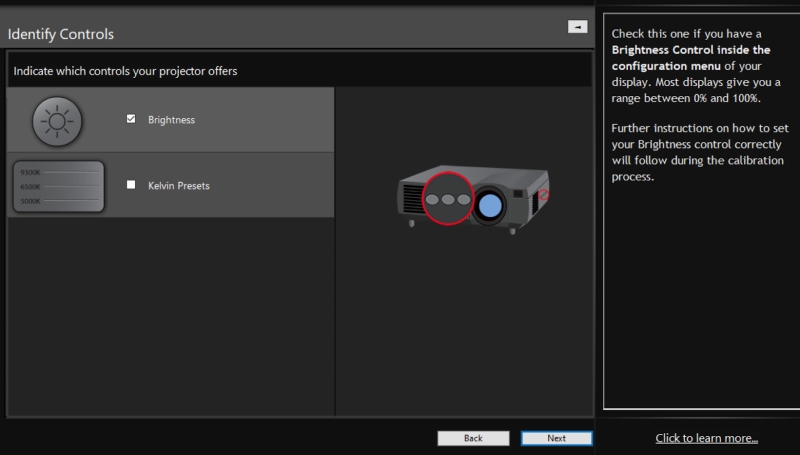
Step 6: On the Identify Controls section, tick Brightness (if your projector supports Brightness settings) and Kelvin Presets (if your projector has color temperature settings).
My Optoma projector only has the Brightness settings, so I didn’t check the box on the Kelvin Presets option.
After checking the boxes, click Next.
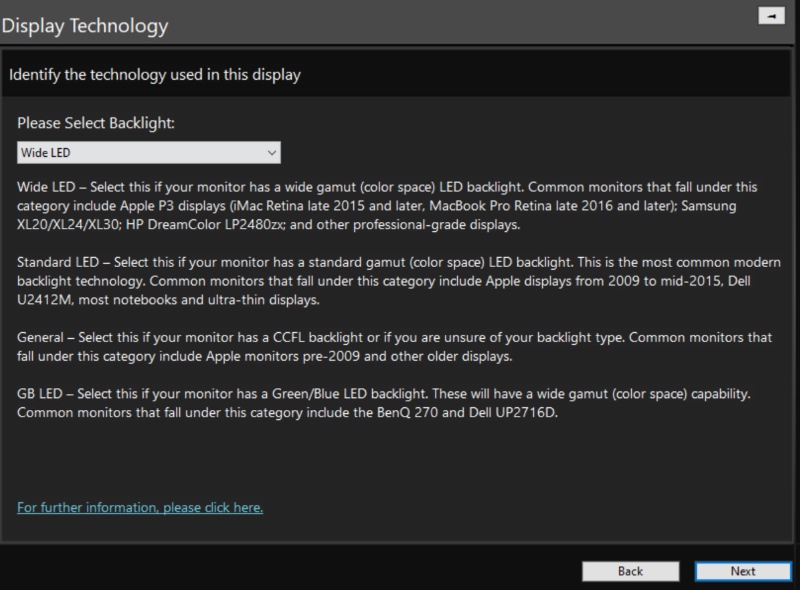
Step 7: Select your PC’s backlight technology in the Display Technology section. Refer to the guide below or search online to identify and select the correct technology for your model.
There are four options for backlight technology: Wide LED, Standard LED, General, and GB LED. My laptop’s display is Wide LED, so I selected that and clicked on Next.
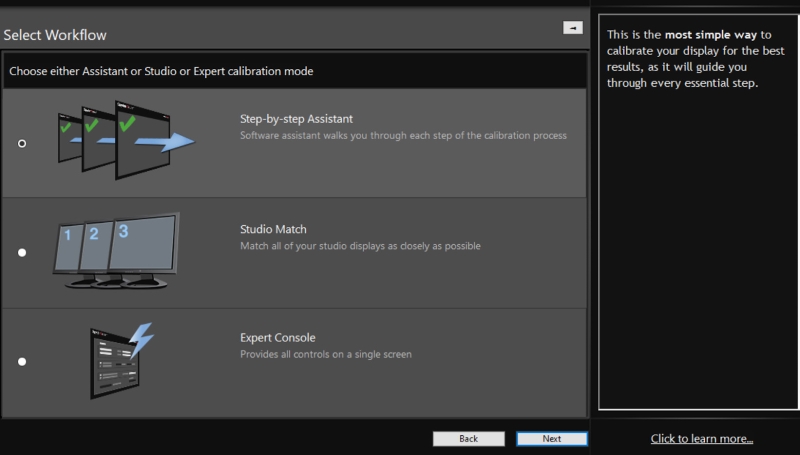
Step 8: On the Select Workflow section, choose Step-by-Step Assistant mode — the simplest mode to start with. You can explore the Studio Match and Expert Console modes later once you get used to the SpyderX Elite software.
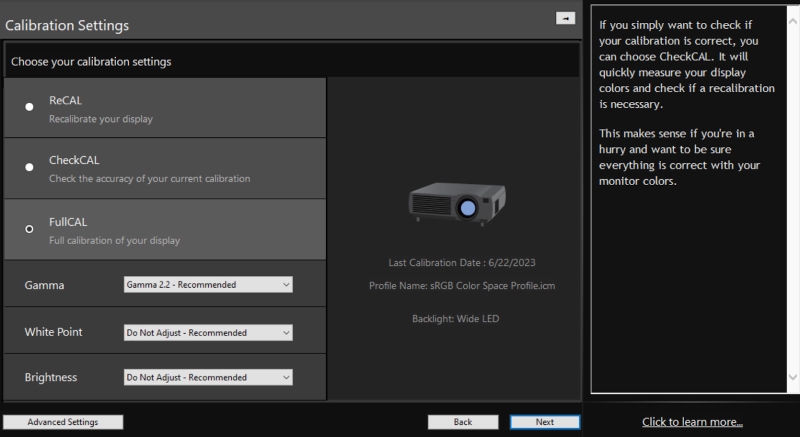
Step 9: Select FullCAL to calibrate your display in the Calibration Settings section. Leave the Gamma, White Point, and Brightness sections in the “recommended” options, then click Next.
Step 10: On the Calibration section, skip the instructions on colorimeter placement, as we have covered that in the Initial Setup section. Click Next to proceed to the next step.

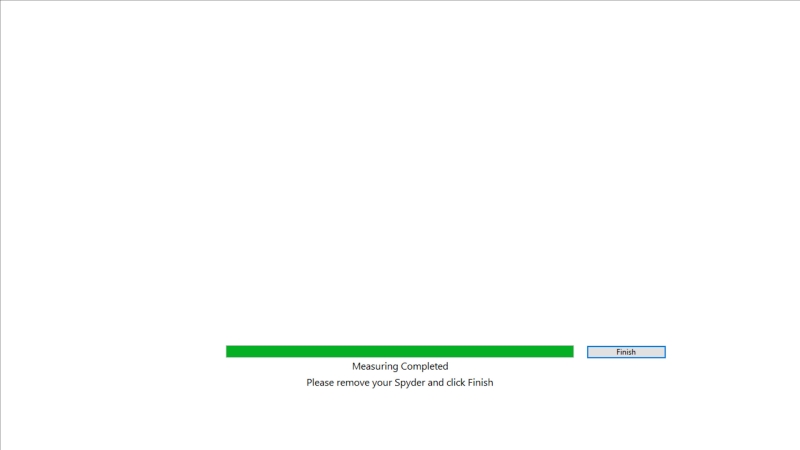
Step 11: The software will run and auto-calibrate your display. Wait until you see the Completed window shown below, then click Finish.
Step 12: Click Save to save the calibration profile for your display.
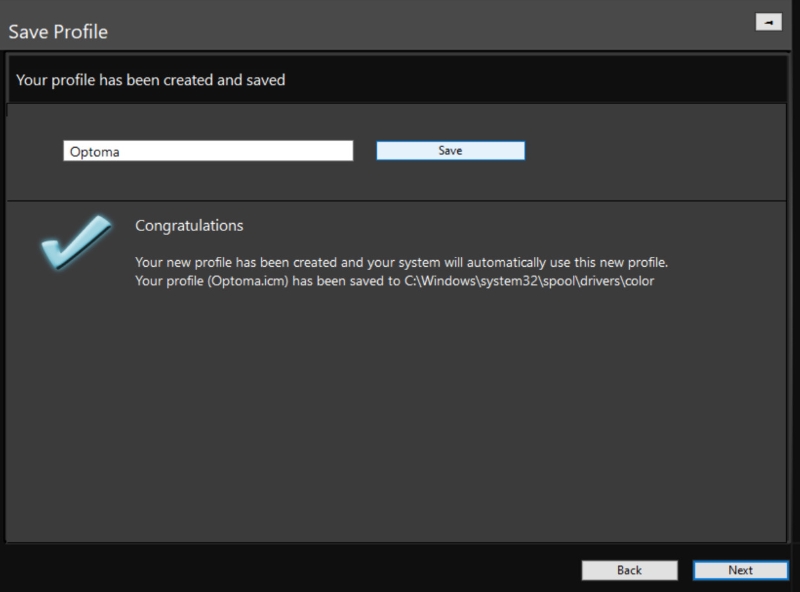
Every time you connect your projector to your PC, this calibration profile will be loaded and applied to your PC’s display, ensuring that the projector shows the best-calibrated images from your PC.
Our Top 3 Colorimeters
Using a colorimeter is the easiest way for a projector owner to calibrate their unit at home. The following are three of our favorite units
1. Datacolor SpyderX Elite

- Calibrating your monitor to achieve color precision now takes just a minute or two - several times...
- Groundbreaking lens-based color engine provides a higher level of color accuracy for multiple...
- SpyderX Elite is intuitive, you don't have to be a color expert. It features a step-by-step...
(Paid Link.)
This colorimeter from Datacolor is the newest to be released and has quickly gained popularity.
There doesn’t seem to be room for anyone but X-Rite and Datacolor in the colorimeter realm and this little unit is the best competition Datacolor has to offer.
What we like:
The SpyderX is riddled with features that our previous entry lacked. The installation and calibration take place in a timely manner and with few hiccups, if any.
The quality of the picture following the calibration is held in high regard by everyone from professionals to the casual home theater owner.
One quality that came up time after time in research was its ability to restore even old and cheap projectors and monitors, renewing the viewing experience to a level that may have been assumed lost to time.
What we dislike:
The largest issue that arises with the SpyderX is its inconsistency.
While customers are satisfied with the calibration that the unit provides, it seems to lack the ability to maintain the same calibration between multiple systems, even if said systems are identical.
While this isn’t overly troubling to a projector owner, as you would rarely have more than two in a household (let alone next to each other), it does raise concern.
It entices the questions: what is causing a different looking calibration between two identical units? And am I getting a true calibration or not?
Overall:
Even though the inconsistency in calibration between two identical systems raises doubt, this problem isn’t always the case and arises only for a handful of owners.
The high reviews that it has been able to maintain on Amazon over a large review count is a clear indication that the SpyderX functions correctly the majority of the time and delivers a superb calibration.
CHECK LATEST PRICE ON AMAZON.COM
2. X-Rite ColorMunki Display

- Perfect for quick & easy display calibration with professional level results – edit, share and...
- Equipped with the same hardware and color engine technology found in X-Rite's industry leading...
- EXCLUSIVE X-RITE TECHNOLOGY! Mobile Friendly - Compatible with X-Rite ColorTRUE mobile app for...
(Paid Link.)
The X-Rite ColorMunki Display is the first of two colorimeters on our list from the manufacturer X-Rite. While the ColorMunki is inferior to its counterpart on this list, there is no doubt it belongs as X-Rite and its calibration devices have been on the leading edge of the calibration game for over a decade.
What we like:
Released in 2011, this modestly priced colorimeter from X-Rite has continued to be a go-to for projector owners.
The picture quality is never questioned, and there is an overall sense of satisfaction in regard to its performance.
This unit is also known for being simple to operate and only taking around five minutes to calibrate your projector or screen.
What we dislike:
While the ease of use and speed of this unit is often praised, this is dependent on the ability to actually get the software installed and running on your operating system.
This seems to be a common issue and unfortunately, X-Rite offers little to no support for this device, which in some cases leaves the user scratching their head.
Another common complaint with this device is that, although basic and easy to use it might be too simple. While the performance is always satisfactory it sometimes leaves customers desiring a few more options.
Overall:
This unit from X-Rite serves its purpose in providing a good quality calibration to projectors and monitors alike.
Being the most inexpensive option on our list can definitely appeal to a projector owner who may be strapped for cash.
Where the ColorMunki falls short is in its lack of options and technical support. With the unit being prone to installation and/or compatibility issues it would be comforting to know that we can be helped through any issues that arise.
CHECK LATEST PRICE ON AMAZON.COM
3. X-Rite i1Display Pro

- Accurately measure Luminance/brightness levels up to 2000 nits.
- Obtain correct neutral detail levels and higher accuracy in dark colors with new black current...
- Included i1Profiler software supports HDR and video workflows while the i1Display Pro Plus...
(Paid Link.)
The i1Display Pro by X-Rite falls last on our list yet it has an undeniable presence in the calibration and projector community.
It does happen to be the most expensive unit by a small margin, but you cannot visit a forum or blog, watch a video, read an article, or speak to a calibration engineer without the i1Display Pro being mentioned.
What we like:
As aforementioned, the i1Display is praised generously and if price is not of concern it is surely to be in contention when searching for a projector calibrator.
If there aren’t any issues with installation, the reliability of the program and speed of calibration is top quality.
Unlike the two other units, there is an abundance of praise from the photography community towards this device.
This can only mean that the quality of the calibration performed by the i1Display is noticeable to the eyes of a professional photographer.
What we dislike:
While the price of this unit is only highest by a small margin, this does have to be considered.
There are also numerous reports of the software not working whatsoever with customer’s projectors or operating systems.
Having to navigate a finicky or confusing software program is undesirable, and the only thing worse is having a program that doesn’t work at all, equating only to a headache and waste of time.
Overall:
There is no question that the X-Rite i1Display Pro can offer you a satisfactory calibration of your projector.
However, the hype around a device must be taken with a grain of salt as it is difficult to tell one’s motivation. Taking into consideration the price and complaints about a completely inoperable colorimeter must also hold weight on one’s decision.
CHECK LATEST PRICE ON AMAZON.COM
9 Parameters to Optimize When Calibrating a Projector
When calibrating your projector, the following nine parameters need to be optimized for your current display location:
1. Brightness: Adjust the brightness level to achieve optimal image visibility without being too dim or excessively bright. Adjust the brightness in lighting most occurring when you use the projector.
If you use it mostly during the day, calibrate it in the daytime to find a brightness setting that holds well in ambient light. If you use it mostly at night, darken the room before adjusting. You can use a test pattern to determine the best brightness level.
2. Contrast: This represents the difference between your image’s darkest and brightest parts. Enhance the contrast ratio to distinguish between dark and light areas of the projection image clearly.
We recommend you adjust contrast after brightness to ensure your blacks still look convincing when the overall image is bright.
3. Color Temperature: By calibrating the color temperature, achieve accurate color reproduction and a neutral white point.
4. Color Balance: This parameter allows you to balance warm and cool colors in your image without any dominant tint.
To avoid oversaturation, prioritize skin tones. Pull up an image that includes humans (without heavy makeup) and adjust the color balance until their skin tones look perfectly natural and accurate.
5. Gamma: Gamma describes how easily black shades transition to white on your projector. Adjust the gamma curve to optimize the gradation of tones and improve overall image depth and contrast.
6. Sharpness: Balance the sharpness so that while the picture is well-defined, it will not have artifacts and look like it has been upscaled. Use an image that includes details like text or lines for best results.
7. Keystone and geometry correction: These settings allow you to fix trapezoidal distortion caused by misalignment. Adjust the image shape to compensate for irregularities or curves in the projection surface.
You can correct in different modes (i.e., horizontal, vertical, perspective, or point correction).
8. Overscan: Sometimes, picture margins are tucked beyond the screen’s borders — as if you zoomed in on the picture. Adjust this setting so the entire image is displayed within the visible screen without cropping at the edges.
Mismatched aspect ratios may also cause an overscan, so adjust the aspect ratio on the projector display to match the source image.
9. Uniformity: Balance the brightness and color uniformity across the entire projection image, minimizing any noticeable variations or hotspots.
Conclusion
Projector calibration is important, but only a few people know they should calibrate their new display devices. A change of environment, projection surface, and even source devices can change the look of your projector’s images.
By calibrating the nine parameters discussed in this article, you can tweak projected images to accurately represent the creator’s work regardless of your projection conditions.
If you’re ready, calibrate your projector manually from the Settings menu or with any of the calibrations recommended and tested above. Love your results? Let us know in the comments!

Gabriella ‘Diogo is a technical writer with a vested interest in tech hardware and equipment. She shares her knowledge and processes in an easy-to-grasp, lighthearted style. When she’s not testing or researching device performance, you’ll find her writing short stories or rewatching episodes of her favorite sitcoms.