
No, HDMI Splitters Aren’t for Extended Dual Monitors, 3 Alternatives Inside!

What To Know
- HDMI splitters cannot extend displays for dual monitors; they can only duplicate the same image across both screens.
- For dual monitors with an extended setup, consider using a USB to HDMI adapter, multiple different graphics ports, or daisy chaining.
- To determine if your PC or laptop can support multiple displays, check the number of graphics ports or consult the manufacturer’s website for detailed specifications.
Understanding how to effectively set up dual monitors can transform your computing experience.
This guide will explain how an HDMI splitter actually works and also introduce you to three other methods for creating an extended multi-monitor setup.
Quick Navigation
What Does an HDMI Splitter Do?
HDMI splitters work by transmitting the AV signals from one source to multiple displays. This allows you to view your source device’s display on several monitors at once in duplicate/mirror mode.
However, HDMI splitters can not extend your screen. So, if you’re looking to expand your workspace with two monitors, then it’s best to try another method.
In case you’re still interested in learning how to use an HDMI splitter for setting up duplicated dual monitors, a step-by-step guide is provided in the final section for your convenience.
3 Alternative Methods to Set Up Dual Monitors
This article answers the question about HDMI splitter for dual monitors, so I assume that you guys have a least two monitors.
However, if you’re currently working with just one (external) monitor, don’t worry—the solutions here are still applicable to you
Note: the methods below work well with both macOS and Windows OS. If you’re unsure about your laptop or PC’s multi-monitor support, proceed to the next section.
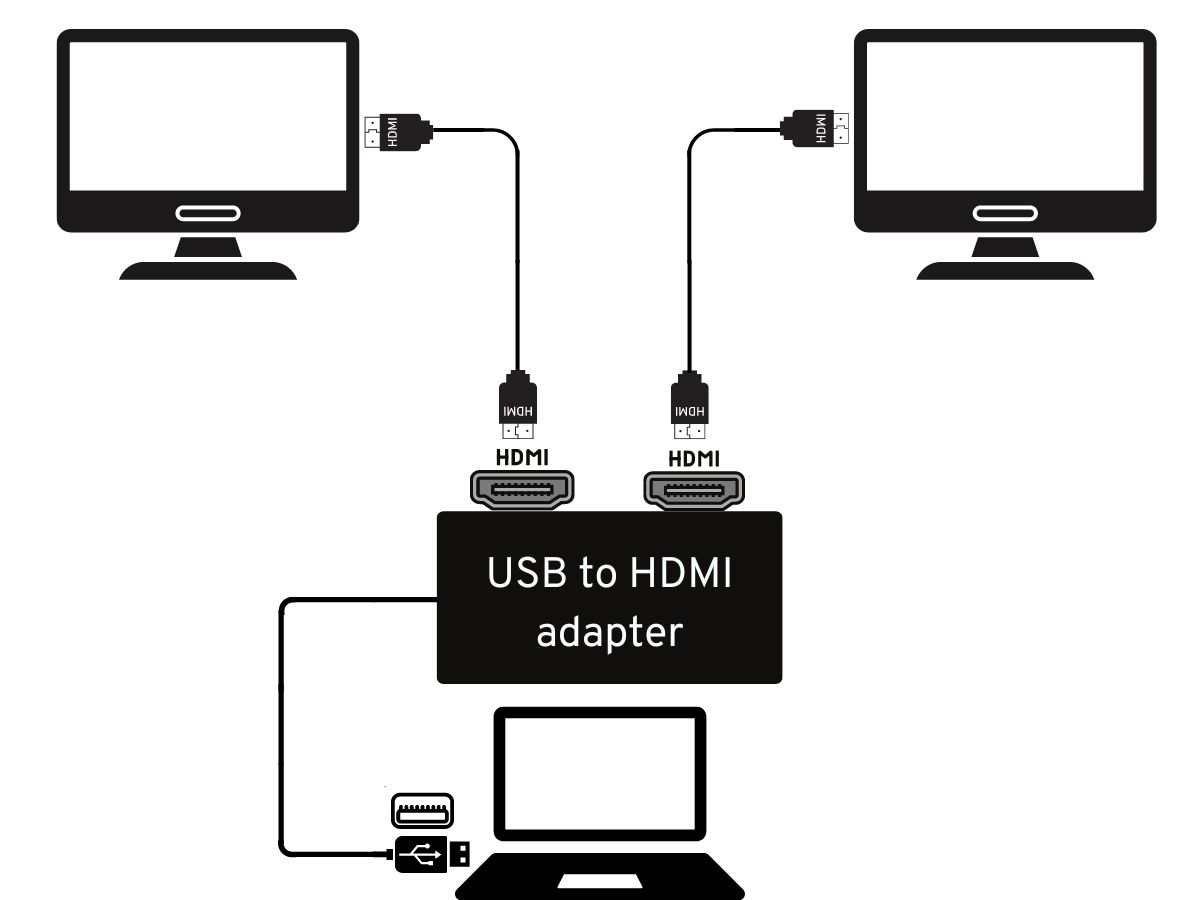
Use a USB to HDMI Adapter or Two Different Graphics Ports

Have you read our dedicated article on this topic? If you’re curious, feel free to explore further by visiting this link. To summarize, the article will be about:
- A USB to HDMI adapter can be a handy tool. It transforms a USB port into an HDMI connection, allowing you to connect two HDMI-compatible monitors simultaneously.
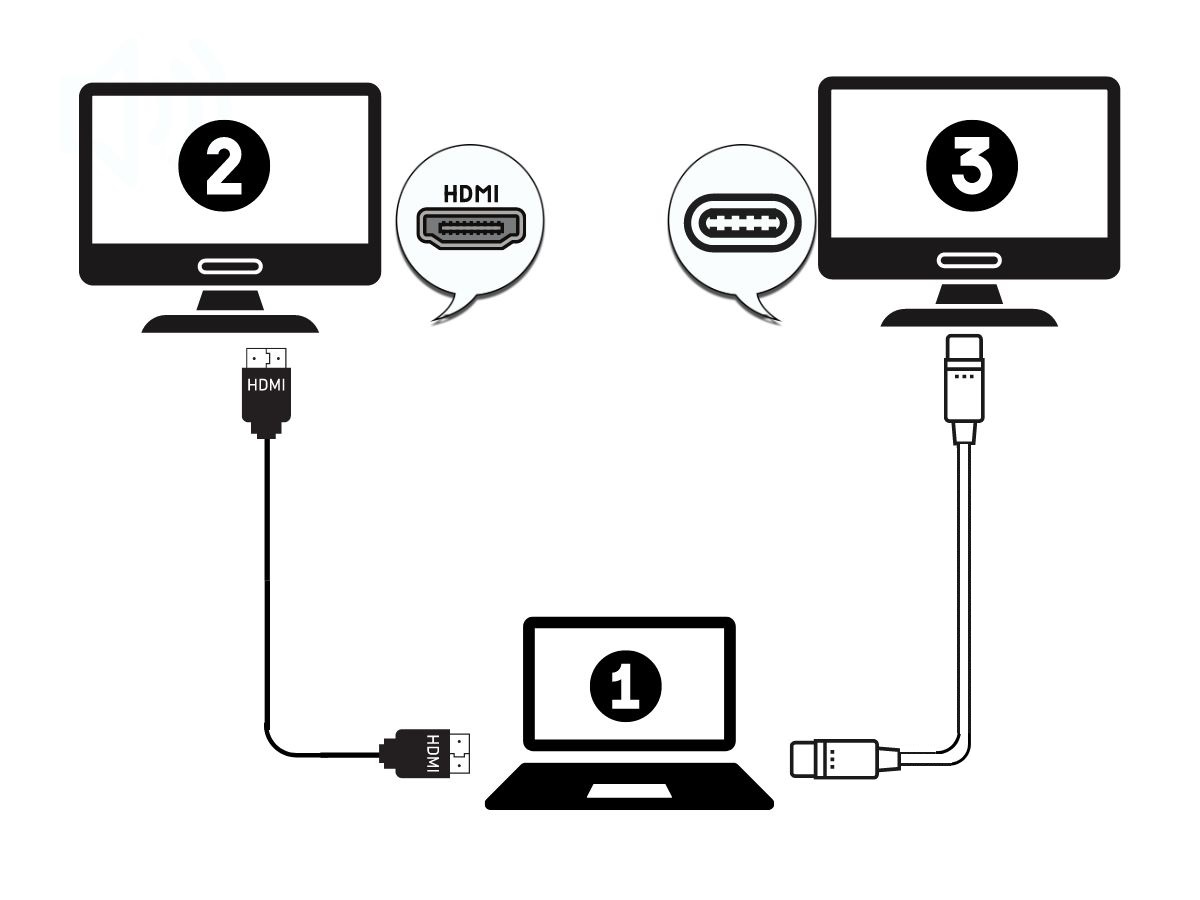
- If your computer is equipped with various types of graphics ports (like VGA, DVI, or DisplayPort), you can connect each monitor using the appropriate cables.


While our featured article mainly discusses HDMI ports, the guidelines are still relevant.
I recommend this versatile docking station adapter, compatible with a variety of ports including HDMI, VGA, DisplayPort, and Thunderbolt.

- Docking Station 3 Monitors: USB C to dual HDMI Adapter 4K (1*60HZ & 1* 30HZ), 1*4K@60HZ DP, 1*1080P...
- USB C Port Fast 100W PD Charging: Laptop docking station dual monitor adapter features a powerful...
- Docking Station 4K Display Adapter: The usb c hdmi hub for multiple monitors adapter with Dual HDMI...
Last update on 2024-07-04 / Paid Link.
Use Daisy Chain
Daisy chaining is an efficient way to link multiple monitors using the fewest cables possible. To successfully implement this method, ensure your devices meet these criteria:
- Thunderbolt 3 or higher
- DisplayPort 1.2 or higher
- Monitors must have at least two Thunderbolt ports or one Thunderbolt port coupled with one DisplayPort
- The laptop must possess either a DisplayPort port, a USB-C port with DisplayPort Alt Mode, or a Thunderbolt port
To set up a daisy chain using Thunderbolt ports, follow these steps:
Step 1: Power on all the devices involved in the setup.
Step 2: Plug the Thunderbolt (USB-C) cable into the Thunderbolt ports of your laptop and the first monitor.
Step 3: Plug the other Thunderbolt cable into the Thunderbolt ports of your two monitors.

For daisy chaining via DisplayPort, the process is as follows:
Step 1: Power on all the devices in the setup, and activate the DisplayPort 1.2 or MST feature of your monitors.
Step 2: Plug the Thunderbolt (USB-C) cable into the Thunderbolt ports of your laptop and the first monitor.
Or plug the DisplayPort cable into your laptop monitor’s DisplayPort Out and the first monitor’s DisplayPort In.
Step 3: Use the DisplayPort cable to link your first monitor’s DisplayPort Out to the second monitor’s DisplayPort In.

How to Check If Your PC/Laptop Supports Multiple Displays
Before you jump into setting up dual monitors, it’s essential to verify if your PC/laptop can handle multiple displays.
For a general check, just count the number of graphics ports on your laptop or eGPU. For a more in-depth analysis, however, you’ll need to refer to the manufacturer’s website for detailed specs.
For instance, my Acer Aspire 7 A715-G42, equipped with a GeForce GTX 1650, has only one HDMI port. Based on a basic check, this suggests I can connect to only one external monitor.

However, the story doesn’t end there. The eGPU (external graphics unit) of my laptop actually supports up to three graphics ports.
This means my laptop is capable of outputting to at least two external monitors, in addition to the laptop’s screen, when used with a docking station.

The discrepancy between the single HDMI port on my Aspire 7 A715-G42 and the three graphics ports supported by the eGPU (as listed on NVIDIA’s website) may be because when installed on a laptop, the number of ports is reduced for a neat design.
But when the GTX 1650 eGPU is installed in a PC, all three ports are available.
Therefore, I’ll guide you through checking your computer’s multi-display actual capabilities, whether yours is Windows or macOS.
Windows OS
Given that most Windows laptops and PCs incorporate an eGPU, I’ll show you how to check its multi-display capability.
Modern eGPUs are primarily manufactured by NVIDIA or AMD, so I’ll demo the guide with my Aspire 7 A715-G42, which houses a GeForce GTX 1650 (G6).
Step 1: Press the Windows button, and type “Device Manager” into the search bar.

Step 2: Click on the Arrow icon next to Display adapters.
The first GPU listed is the integrated one, while the second is the eGPU. Take note of your eGPU model.

Step 3: Visit the manufacturer’s website – in my case, NVIDIA – so I visited their website and looked for my model, which is GTX 1650 (G6).

I knew my GTX 1650 eGPU was a G6 variant because when I looked up my laptop’s specs (Aspire 7 A715-G42), I noticed its Graphics Memory Technology was GDDR6, which meant G6.

Step 4: Navigate to the Multi Monitor row, and you will see two kinds of answers.
With my GTX 1650, the site only confirms it supports multi-monitor setups (with the Yes cell).
This means the number of graphics ports is the exact number of monitors that the GPU supports.
Therefore, I had to count the number of ports listed under Standard Display Connectors, which were three.
For other eGPU models, like the GTX Series 20, you might find a specific number of monitors supported.
The counting method in this case will be wrong as you can see in the image below, the number of graphics ports of GeForce RTX 2070 Super is only two while the Multi Monitor row shows up to four monitors supported.

macOS
Step 1: Open the Apple menu, and choose About This Mac.

Step 2: In the Overview tab, look for your Mac model.

Step 3: Search online for your model name + “specs”, and click on the Apple website.

Step 4: Look for anything related to the external display connectivity.

How to Duplicate Screens Using an HDMI Splitter
HDMI splitters should be used if you want to create a duplicate/mirror setup since the splitter can only duplicate the main screen’s contents, allowing the second screen to display the same image/video.

Follow the steps below to use an HDMI splitter for your dual-monitor setup.
Materials
Instructions
Step 1: Plug the HDMI splitter’s HDMI connector into your source device.
Step 2: Plug one end of an HDMI cable into one of the HDMI splitter’s HDMI OUT ports and the other end into your monitor’s HDMI IN port.
Step 3: Repeat Step 2 with the other HDMI cable and monitor.
Now you’re ready to use your duplicated/mirrored dual monitor setup!
Please note that HDMI splitters will not work for any of the following setups:
- Extend
- PC/Main Screen Only
- Second Screen Only

Duy Anh is a seasoned technical editor specializing in helping readers troubleshoot TV, projector, and Wi-Fi issues. He’s always been drawn to logical problem-solving. His ability to approach matters from various angles with a neutral mindset enhances his technical expertise.
I néed 500 pcs of HDMI splitter(femeale)
Waiting d’or jour repply
Tchammage