
How to Disable HDCP on Your Mac Step-by-Step

What To Know
- Using an HDMI splitter can effectively bypass HDCP issues on MacBooks when connecting to TVs or projectors.
- Booting in Safe Mode or authorizing your MacBook for iTunes content are alternative solutions for resolving HDCP issues.
In this article, I will guide you on how to disable HDCP on your MacBook.
Let’s dive in!
Quick Navigation
First Things To Check
If you’re having a hard time watching movies or videos from your MacBook on a TV or projector, it could be due to an HDCP error.
HDCP is there to prevent unauthorized copying of digital content when it’s transmitted over a connection.
While you’re running into this issue, there are some easy first steps to try.
First, check whether your HDMI cable and the screen you’re using, like a TV or projector, are both HDCP-compliant.
This means they are designed to support the HDCP rules, which help protect movies and shows from being copied illegally.
Many times, problems with HDCP errors happen because the cable or the screen aren’t made to work with these HDCP rules.
If you’re certain that your devices are not HDCP-compliant but still need a workaround, there are other methods to bypass the HDCP block.
We’ll explore these in detail below.
Use an HDMI Splitter (Most Effective Solution)
Experiencing HDCP issues on your MacBook when trying to connect it to a TV or projector can be frustrating.
However, there’s a practical and efficient solution to this problem: using an HDMI splitter.
HDMI splitters are not just for splitting a single HDMI signal into multiple outputs; they can also cleverly bypass these HDCP restrictions.
For more in-depth information on HDMI splitters, including a list of the top 5 recommended models, check out our detailed article.
Now, I’ll guide you through how to use one with my MacBook Pro, Samsung TV, and an HDMI splitter:
Step 1: First, power on the HDMI splitter.

Step 2: Next, connect your MacBook’s HDMI port to the HDMI input port on the splitter using an HDMI cable.

Step 3: Use another HDMI cable to connect one of the HDMI output ports from the splitter to your TV.


Step 4: If necessary, switch the input settings on your TV to HDMI.
Once these steps are completed, your MacBook’s display should be mirrored on your TV screen.
You can now enjoy HDCP-protected content, like movies and shows from streaming services such as Netflix, without any interruption.
This method provides a hassle-free way to enjoy your digital content on a larger screen.

Boot in Safe Mode
Your MacBook has a special feature known as Safe Mode, which is designed to solve various computer issues, including HDCP errors that might prevent you from enjoying movies and shows.
Interestingly, a MacBook user discovered that starting her computer in Safe Mode was effective in overcoming the HDCP issue, and this approach could be a solution for you as well.
To try this method, follow these steps:
Step 1: Begin by completely shutting down your MacBook.
This is different from just closing the lid; make sure your computer is fully turned off.
Step 2: Now, turn your MacBook back on.
Immediately after doing so, press and hold the Shift key.
Holding down this key is a signal to your MacBook to start up in a special way.

Step 3: Continue holding the Shift key until the login window appears.
This may take a bit longer than a normal start-up, but it’s a normal part of entering Safe Mode.
Once you reach the login window, you can let go of the Shift key and log in using your regular username and password.
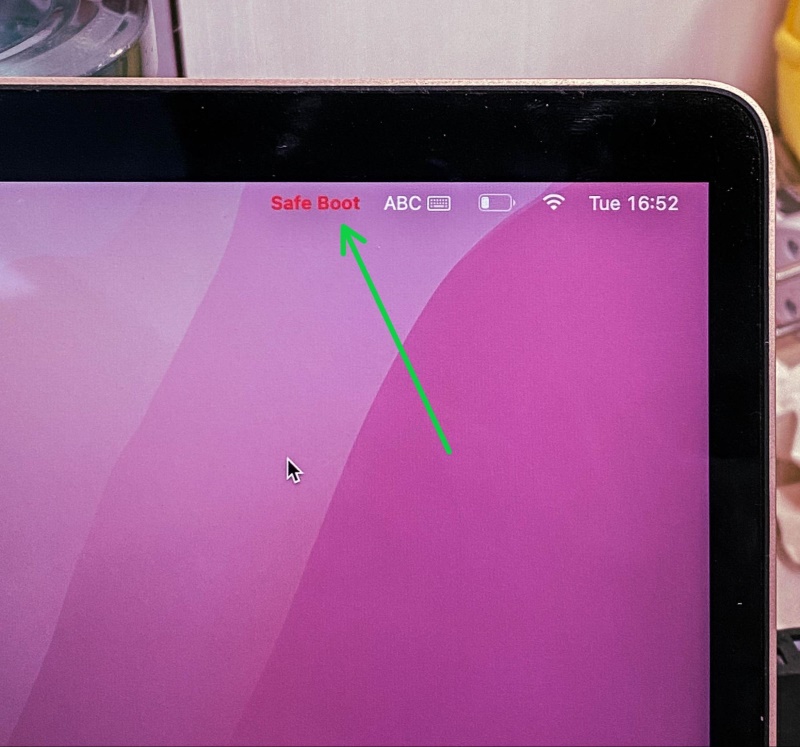
Step 4: Once logged in, look at the top right corner of your screen for a Safe Boot label.
Seeing this label means you’ve successfully entered Safe Mode.
In this mode, your MacBook operates with minimal necessary software, which can help resolve various technical issues.
While in Safe Mode, it’s a good time to check whether you can now do things you couldn’t before, like watching an HDCP-protected movie.
If everything works fine and the HDCP issue seems resolved, Safe Mode has done its job.
To exit Safe Mode and return your MacBook to its normal state, simply restart it.
Knowing how to use Safe Mode is a valuable skill, as it can help fix a range of problems, including potential future HDCP issues.
Authorize Your MacBook
When you authorize your MacBook, you’re basically giving it a ‘digital thumbs up’ to access all your iTunes content.
This is like telling iTunes, ‘Hey, this is my computer, and it’s okay to play my movies here.’
Before you start, make sure your MacBook is up to date with the latest operating system.
This ensures that your computer can handle the latest software and security features.
Then follow these steps:
Step 1: Click on Account in the upper left corner of your MacBook screen.

Step 2: Select Authorizations and then choose Authorize This Computer.

Step 3: Enter your Apple ID login details and click Authorize to complete the process.

Once you’ve authorized your MacBook, try opening the content you want to watch to check whether this method has successfully resolved your HDCP issue.
If everything goes smoothly, your HDCP issue should be resolved, and you can dive back into your iTunes library without any more interruptions.
It’s like unlocking a door that was previously stuck, and now you have the freedom to enjoy your digital content on your own terms.

Meet Vance. He’s a proud dad, a seasoned Electronics Engineer, and an avid tech lover. His proficiency in electronics and troubleshooting skills were instrumental in crafting Pointer Clicker. Vance is passionate about simplifying tech for those who aren’t well-versed in it.