
VGA No Signal on Your Device? Decode & Discover 10 Fixes

What To Know
- The “VGA No Signal” message indicates 10 potential issues, such as faulty VGA cables, incorrect input ports, outdated GPUs, internal computer problems, etc.
- Address the “VGA No Signal” issue with 7 fixes: check cables and connectors, wake your computer from hibernation, verify monitor input source, update GPU, choose the right display output, switch to modern cables, or contact the manufacturer.
- For additional methods: utilize the “Detect Displays” feature on Mac, reboot graphics drivers on both Windows and Mac, or reinstall graphics drivers on Windows.
First, let’s understand what the message means. When your monitor displays “VGA No Signal,” it’s telling you that it’s not currently identifying any video card or GPU that it’s connected to, even though it’s powered on and using electricity.
While this may seem like a serious issue, it’s often a simple fix related to a connection problem.
In this article, I’ll delve into the various factors contributing to the “VGA No Signal” error on your monitor and provide targeted solutions for each underlying cause.
Quick Navigation
- Why Does My Monitor Say “VGA No Signal?”
- How To Resolve “VGA No Signal” Problems?
- 1. Do a Quick Check of Your Cables and Their Connectors (Solve Causes 1, 2 & 3)
- 2. Is Your Computer in Hibernation or Sleep Mode? (Solve Cause 4)
- 3. Double-Check Your Monitor Input Source (Solve Causes 5 & 6)
- 4. Make Sure Your GPU Is Up-to-Date (Solve Cause 7)
- 5. (For Windows Users) Make Sure That Only Your Default Graphics Card Is Enabled (Solve Causes 8 & 9)
- 6. Upgrade to a Better and More Modern Cable
- 7. Contact the Manufacturer (Solve Cause 10)
- Other Methods to Try
- Final Thoughts
Why Does My Monitor Say “VGA No Signal?”
If you’ve ever connected your monitor and booted up your computer only to receive a “VGA No Signal” message across your screen, then you’re not alone.
While it’s nothing to be alarmed about, it’s also a common issue, especially when using older connections like VGAs.
It’s also not an indication that your computer is broken, as that message has something to do with your monitor and the cable connecting it to your desktop.
Depending on your situation, this problem can be a result of the following factors:
- You are using a faulty VGA cable that needs replacement.
- The connection between the two devices is loose.
- The VGA cable isn’t correctly connected to your computer’s monitor.
- The computer ended up turning the display signal off after going into standby or hibernation mode.
- You picked the wrong input port in your computer monitor.
- The VGA cable isn’t correctly connected to your computer’s monitor.
- Your GPU is outdated.
- The computer’s graphics card is trying to output a resolution that your monitor cannot provide or support.
- You chose the wrong display output in your computer’s graphics adapters.
- Your computer or monitor is having an internal issue.
As you can see, while there are many possible causes of this “simple” problem, the reasons are more or less connected to each other.
Furthermore, most of them deal with the connection between your computer and monitor more than they do with the computer itself.
How To Resolve “VGA No Signal” Problems?
Before going into a specific solution, try restarting your laptop/PC in Safe Mode first to verify if this is a result of hardware or software-related issues.
To enter this mode, follow Microsoft Support’s instructions. They provide guidelines for both Windows 10 & 11 with three different methods to access the mode from the Settings, sign-in screen, and black or blank screen.
Once your computer enters safe mode, you can then check whether the issue has been resolved. If it appears after your entry, it’s likely that the hardware is the culprit (go to solutions 1, 3, 6, or 7). Otherwise, try the other solutions.
This is because safe mode will get your computer into a basic state and allow only a limited set of files and drivers. Therefore, if there is nothing happening in safe mode, the default settings and basic device drivers aren’t causing the problem.
1. Do a Quick Check of Your Cables and Their Connectors (Solve Causes 1, 2 & 3)
Causes 1, 2 & 3:
- You are using a faulty VGA cable that needs replacement.
- The connection between the two devices is loose.
- The VGA cable isn’t correctly connected to your computer’s monitor.
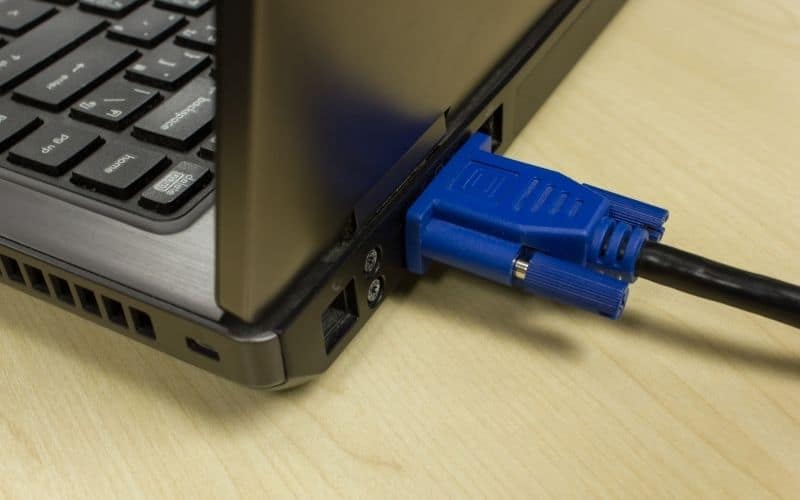
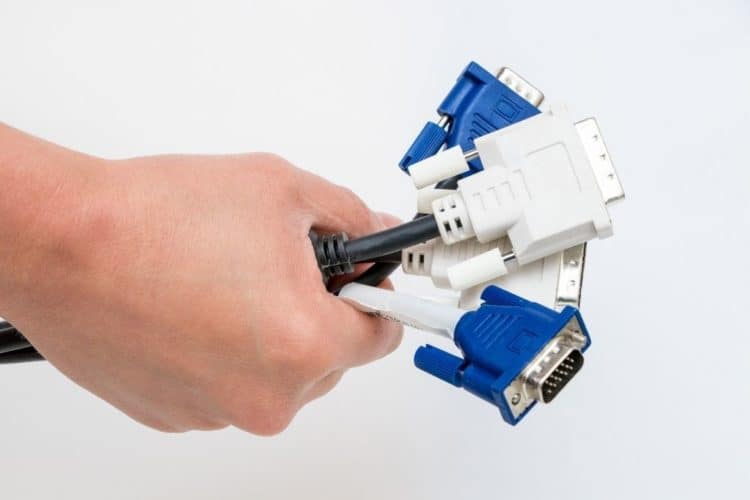
Above all else, it’s important to understand that the “VGA No Signal” message is primarily demonstrating a connection issue. As such, the first fix you can do is to troubleshoot your computer’s cabling.
Start by checking if your VGA cable is connected correctly and isn’t damaged. Then, trace the cable back to the ports on your computer and monitor, and secure the connectors.
If this was the only issue, the problem should be gone when you boot up your computer again. Otherwise, replace any cable that shows noticeable wear and tear.
Remember to tighten the screws on both of the VGA cable’s connectors. Alternatively, you can also remove the VGA cable, wait a few minutes, securely reconnect the wires, and restart your computer.
2. Is Your Computer in Hibernation or Sleep Mode? (Solve Cause 4)
Cause 4: The computer ended up turning the display signal off after going into standby or hibernation mode.
![]()
If your computer has been idle for a while, it will automatically revert to sleep or hibernation mode to save on power consumption. This stops the monitor from receiving any signal, and hence, the “VGA No Signal” message appears.
If this is the case, pressing any key on your keyboard should turn your computer back on and fix the issue.
3. Double-Check Your Monitor Input Source (Solve Causes 5 & 6)
Causes 5 & 6:
- You picked the wrong input port in your computer monitor.
- The VGA cable isn’t correctly connected to your computer’s monitor.
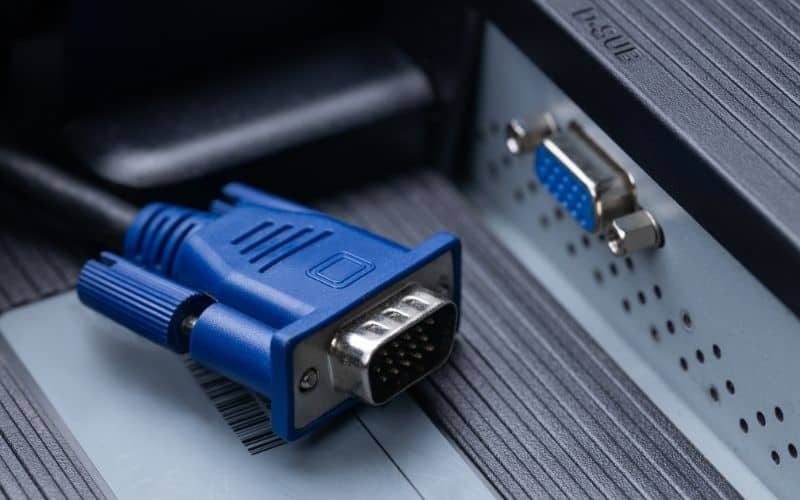
Another reason behind the no-signal error may be that your monitor’s input source isn’t plugged into the right device.
This is more common in modern monitors, as these often have multiple available input ports. If this is the case, simply making sure that your VGA cable is in the VGA port should fix the problem.
And again, remember to tighten the screws on both of the VGA cable’s connectors.
4. Make Sure Your GPU Is Up-to-Date (Solve Cause 7)
Cause 7: Your GPU is already outdated.
GPUs also get regular updates like many devices and technology, so an outdated one might no longer work with your VGA cable and monitor. This is even more likely if the update itself was big or significant.
So if it’s been a while since you last updated your drivers, I recommend checking the manufacturer’s website to check if a new update is available.
If there is, then downloading and installing it should be an easy fix to your monitor’s no-signal woes.
Alternatively, if you’re using a Windows 10 and Windows 7 device, you can set your Device Manager to update drivers automatically. Follow our instructions below to update your GPU
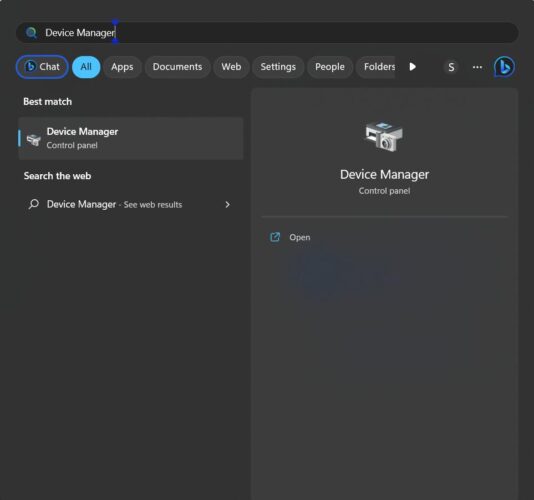
Step 1: Press the Window button, type Device Manager on the search bar, and open it.
Step 2: Then, click on Display Adapters on the left side.
Step 3: Right-click on the pop-up options and select 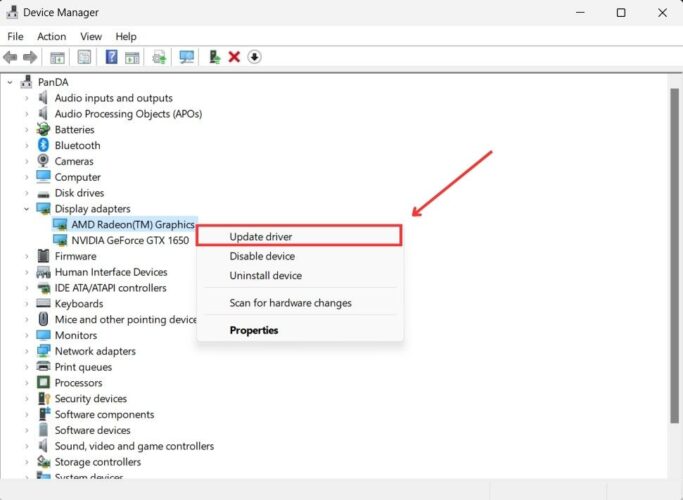
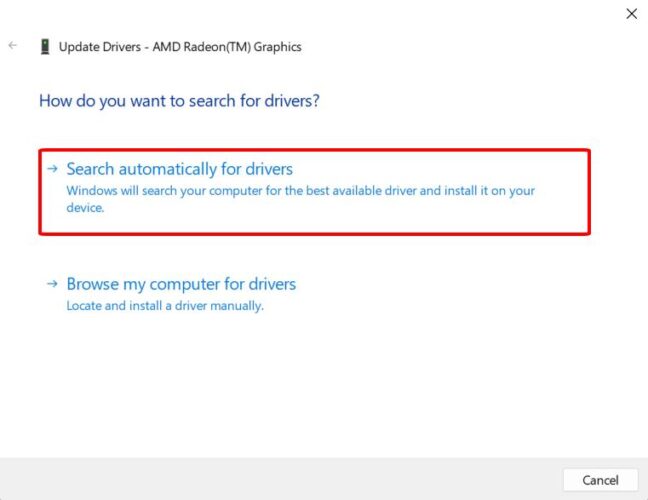
Step 4: Choose Search automatically for updated driver software, and then update (if any patch is available).
5. (For Windows Users) Make Sure That Only Your Default Graphics Card Is Enabled (Solve Causes 8 & 9)
Causes 8 & 9:
- The computer’s graphics card is trying to output a resolution that your monitor cannot provide or support.
- You chose the wrong display output in your computer’s graphics adapters.
Did you know that the standard resolution for VGA technology is only 640 x 480?
So, if your graphics card is trying to output a higher resolution, it could be a big deal. Before adjusting your computer’s settings, it’s a good idea to check your VGA maximum specification online.
If you have two graphics cards, it’s best to disable the better one (removable graphics card). This is because it’s more likely to output a higher resolution that your monitor can’t handle.
Don’t worry, it’s super easy to do – just follow our guidelines below!
Step 1: Press the Window button, and then type Device Manager on the search bar.
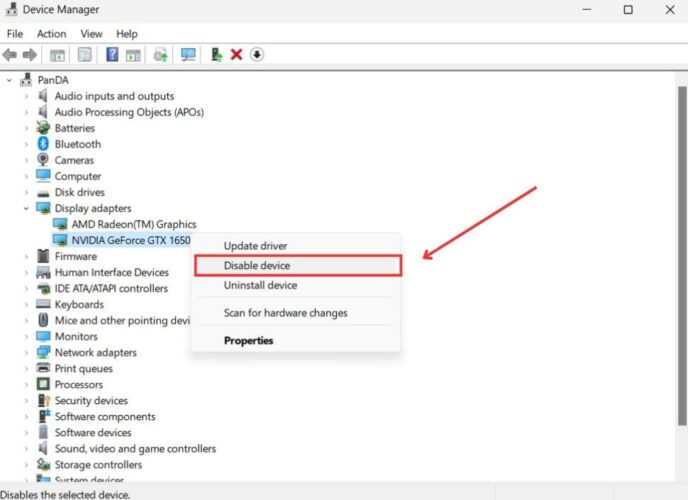
Step 2: Navigate to Display adapters, right-click on your additional graphics driver, and then select Disable device.
Or, you can adjust the resolution and choose which graphics card to output the apps onto the monitor just by following a few steps below.
Step 1: Press the Windows button on your computer, and go to Settings.
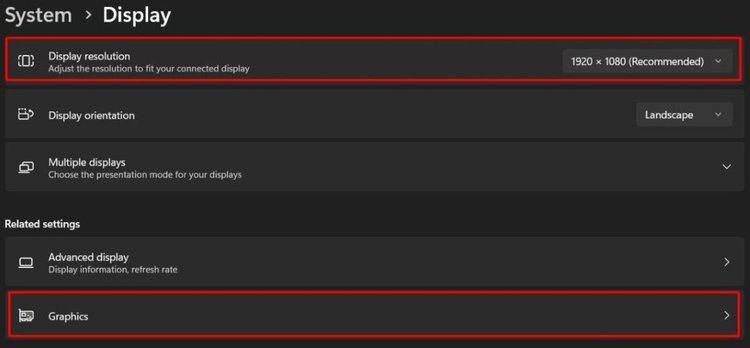
Step 2: The System menu will appear (if not, select it), and you should navigate to Display then.
Step 3: Now, try adjusting your computer resolution to fit the monitor through the VGA cable in the Display resolution. Or go to Graphics to choose the output graphics card for apps.
6. Upgrade to a Better and More Modern Cable
If the problem still exists, then it might be time for an upgrade altogether.
The truth is, VGA is already an obsolete technology, and there are better alternatives you can use. Cables like HDMI and DisplayPort, for example, provide sharper resolutions and better refresh rates.
These cables are also more common these days and are the standard that most modern monitors use.
7. Contact the Manufacturer (Solve Cause 10)
If you’ve gone through all the solutions I’ve presented above and below, but you’re still getting that pesky “VGA No Signal” error, it’s possible that your computer or monitor has an internal issue. Don’t worry, I’ve got one more solution for you to try.
Connect another computer to your monitor to see which device is causing the problem. Once you’ve figured out which device is internally damaged, it’s time to contact the manufacturer for help.
They can provide you with the necessary support and assistance to get your computer or monitor back up and running again.
Other Methods to Try
1. (For Mac Users) Use the Hidden Detect Displays Feature

If you’re encountering the same problem on macOS, you can help resolve this by clicking the Apple logo in the top left corner of the menu bar. From there, go to “System Preferences” and then “Displays.”
Press and hold your Mac’s “option” key and wait for a “Detect Displays” button to appear in place of the “Night Shift” button. Once it appears, click it to see whether it fixes the problem.
2. Reboot Your Graphics Driver
Windows
Sometimes, your computer’s graphics card may become corrupted, leading to a variety of technical glitches and issues. Luckily, resetting and cleaning this should be easy.
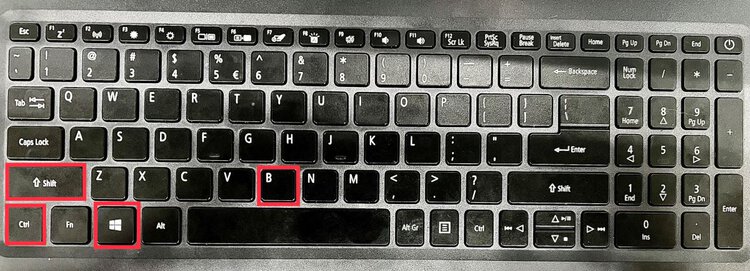
To reboot your graphics card, all you need is to press and hold the “Windows” + “Ctrl” + “Shift” + “B” keys simultaneously until your computer restarts. Once your computer has restarted, check to see if the issue has been resolved.
Mac
The same issue may happen to your Mac’s NVRAM (non-volatile random-access memory) or PRAM (Parameter random-access memory – the older terminology of NVRAM in earlier Mac computer generations).
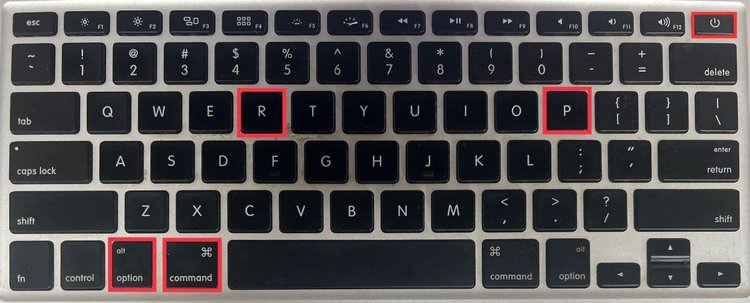
Simply long-press the “Option” + “Command” + “P” + “R” + “Power” keys simultaneously for 10 to 20 seconds, and then restart your Mac computer. Afterward, your Mac has now cleared the NVRAM, and you can go ahead and check whether the problem has been resolved.
3. (For Windows Users) Re-Install Your Graphics Drivers
Your computer’s drivers, including the graphics driver, may conflict with certain apps or sources, or it may simply be a problem with the brand itself. Fortunately, there’s an easy and effective way to fix this issue – just uninstall and reinstall your driver. Simply follow the instructions below to get started.
Step 1: Press the Window button, and then type Device Manager into the search bar.
Step 2: Navigate to Display adapters, right-click on your driver, and then Uninstall it.
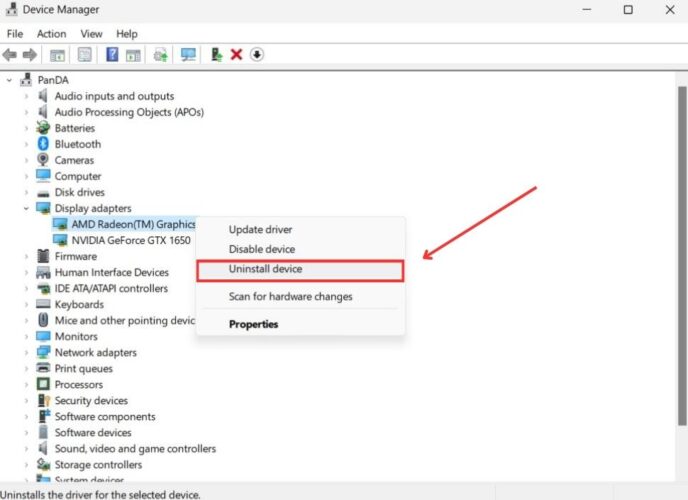
Step 3: Click Yes to confirm. Then, simply restart your computer, and your driver will automatically be re-installed.
Final Thoughts
Whether or not this is the first time you’ve encountered a no-signal error on your monitor, you’ll be pleased to know that it’s a reasonably straightforward issue with easy fixes.
However, if you have exhausted these solutions already and the problem continues, then looking for a replacement cable and monitor might be the best course of action moving forward.

Duy Anh is a seasoned technical editor specializing in helping readers troubleshoot TV, projector, and Wi-Fi issues. He’s always been drawn to logical problem-solving. His ability to approach matters from various angles with a neutral mindset enhances his technical expertise.