
How To Hide Speaker Wires With Hardwood Floors?

What To Know
- Covering speaker wires with adhesive vinyl that matches your hardwood floor is a simple and cost-effective solution.
- Running wires beneath rugs, especially with the help of non-slip pads, can conceal them from view effectively.
- For a cleaner look, ghost wires can adhere to walls and be painted over, or you can use cable clips to secure wires neatly along baseboards.
Our guide to concealing speaker wires with hardwood floors offers simple, stylish solutions to keep your space safe and serene.
We’ll show you effective methods to conceal those wires, maintaining the beauty and functionality of your room.
So, prepare to transform your audio arrangement with our straightforward solutions.
Quick Navigation
1. Cover with Adhesive Vinyl Roll
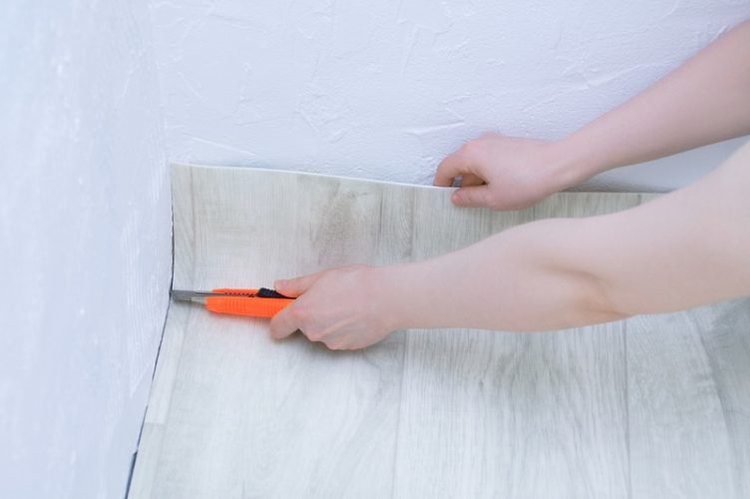
An easy, low-budget way to hide speaker wires is to cover them with adhesive vinyl . These low-cost vinyl rolls are widely available online or at any hardware store.
You can find a large variety of different wood-patterned vinyl rolls so that it blends into your flooring seamlessly.
Not only will this hide the wires, but it will also secure them to the floor so that no one will trip on them.
This is also a great choice if you’re renting since you won’t be at risk of losing your security deposit by drilling holes in the wall. When you move, simply peel off the raceways from your floor and your landlord will be none the wiser!
Before you lay down any vinyl, it’s a good idea to do some measuring.
Measure how wide the vinyl strip will need to be to completely cover the wires, leaving a half-inch (1.25 centimeters) leftover on either side to adhere to the floor. A two-inch (5 centimeters) wide stripe should suffice, but it will obviously depend on the thickness of your wires.
Carefully cut the strips according to your measurements, making them as straight as possible.
Once you’ve measured and cut the strips, place the wires where you want them to lay. We recommend placing them as close to the wall as possible, to avoid having wires running across the middle of your room.
Make sure to leave enough space for the vinyl to lay flat against the floor.
You will also want to ensure that your floors are clean and dry so that the adhesive sticks to the hardwood, rather than dust.
Do not pull or bend your wires throughout this process to avoid damaging them.
Take the vinyl strips and peel away a small bit of the paper before placing the sticky part over the wire, and securing the edges to the wood. Slowly follow the wire, pressing the vinyl over it, and peeling back the paper as you go.
You do not want to tear the entire strip of vinyl from the paper as it could stick to itself and become unusable. So, the key here is to be precise and go slowly.
Once all the vinyl is set in place, you’re good to go!
Pro Tip: If your vinyl has a repetitive pattern, try cutting and placing the strips so the pattern lines up for a polished look.
2. Hide Beneath Rugs

Running wires underneath a rug is a great way to hide cables without investing in additional supplies.
Try strategically placing a rug to cover any exposed wires.
You may also want to consider the rugs’ thickness, as the wire is more likely to be visible under a thinner rug.
We recommend using non-slip rug pads to keep your rug firmly in place so the wire doesn’t slip and slide underneath it.
Check out the for a PVC rug pad that works well on hardwood floors. You can also cut these mats to fit your rug’s exact dimensions.
Lift your rug and position the wires underneath it. You can also use some tape to secure it to the floor if needed. Place the rug and, if you’re using one, a non-slip rug pad over the wires.
If you’re using multiple rugs and there are gaps between them exposing any wires, you can use small strips of vinyl to cover them.
Presto! Now no one will be able to see your speakers’ wires.
3. Use a Ghost Wire

This solution is so nifty, it’s almost paranormal!
Ghost wires are long, flat wires that stick to your wall. They can even be painted over to blend effortlessly into the background.
This amazing technology acts as a wire extension, running electricity through the thin, undetectable ghost wires, instead of through your speaker’s bulky, black ones.
This is a great option if you’re hesitant about adhering anything to your floors, but want to avoid making any holes in your walls. It also prevents the wires from being damaged from repeatedly being stepped on.
Since ghost wires are sticky, you won’t need to worry about gluing them to the wall yourself.
To use ghost wires, place your speaker wires into the connector’s respective ports. Fold back about an inch of the ghost wire’s protective paper and insert the wire into the other side of the connector.
Before you place the ghost wire on your wall, measure how long it should be first. Remember, it’s always better to cut too long of a piece than too short.
Place the ghost wire against a clean, dry wall and remove the protective paper to reveal the glue.
Don’t rush. Removing the wire and re-adhering will be time-consuming and risks damaging the wire.
Once all your ghost wire is secured, you can paint, spackle, or apply wallpaper over it.
That’s it! You successfully hid your speaker wire, no nails or power tools required!
If you’re interested in buying ghost wire for your home, see the FRANKEVER 16-Gauge Hidden Flat Speaker Wire on Amazon.
4. Secure Wires to Your Baseboards Using Cable Clips
Securing speaker wires to your baseboards will ensure they blend into your room and are lifted off the floor. The wire will also run neatly against the wall, which gives your speaker setup a professional feel.
There are two different types of cable clips: adhesive cable clips and nail-in fastener cable clips.
Let’s go over how to install each one!
Adhesive Cable Clips

These cable clips use adhesive to stick to your walls or baseboards. They are easy to apply and remove.
They come in black, white, and clear so you can choose which color blends into your walls best.
Stick the adhesive strip to the back of the cable clips and peel away the protective film, revealing the glue. Place the cable clips along your baseboards or up your walls.
To achieve the cleanest results, evenly space them apart and ensure the clips are straight.
Position your wires inside the clips and squeeze the tabs shut to ensure they stay in place.
If you want to use adhesive cable clips in your home, check out the WIIBROOK 50pcs Cable Clips .
See the video above demonstrating how to install adhesive cable clips in a few simple steps.
Nail-In Fastener Cable Clips

Nail-in fastener cable clips are small C-shaped clips with a built-in nail to hold the wire in place.
They’re very affordable and usually come in packs of one hundred or more. This means that you only have to spend a couple of bucks to hide speaker wires all over your home.
They are also fastened to the wall with a standard hammer, so you don’t have to worry about owning or renting expensive power tools.
Additionally, they can be painted over to blend into your walls. You’ll never have to look at messy speaker wires again!
To install nail-in fastener cable clips, decide where you want your cable to run along the baseboard. Without tugging on the cable, ensure it is taught and laid flush against the wall.
One by one, place the nail-in fastener cable clips over the wire and hammer them into place. For the tidiest results, make sure that all the nails are facing the same direction.
Congratulations, you’ve successfully installed cable clips in your home!
If you’re in the market for nail-in fastener cable clips, check out the 500pcs Cable Clips with Steel Nail in Cable Clips , for a pack of cable clips that come in five different sizes!
5. Connect Wirelessly

Did you know you have the option of connecting your speakers completely wirelessly? It’s true!
Say goodbye to everything you once knew about hiding wires and hello to a completely wireless alternative.
With this solution, you don’t have to worry about messy wires cluttering your home and you can even control your speakers via your smartphone!
This solution uses a Wi-Fi signal to connect the amps to the speakers via a receiver. You can use this with your existing speakers, so you don’t have to buy a completely new sound system.
Every brand of wireless surround sound system must be installed differently, but it usually involves hooking the transmitter up to your surround set and then a receiver up to your speakers.
To ensure a strong signal, make sure the pathway from the transmitter to the receiver is not being blocked by anything (e.g. furniture, decorations, people, etc.).
Wireless surround sound systems are certainly more expensive than the previous methods mentioned, but it’s worth it if you want a high-tech alternative to vinyl, ghost wires, or cable clips.

Yesenia Achlim is a technical copywriter and editor with a focus on AV equipment. She aims to break down complicated topics and make technology accessible, no matter your technical expertise. When she’s not teaching you how to replace a projector lamp, you can find her reading and baking.