
5 HDMI Adapters to Upgrade Your Old TV

Our guide provides the essential HDMI adapter solutions you need to bring your classic TV into the digital age. Read on for the details!
Quick Navigation
Summary Table
| TV Port | Cable/Adapter Needed | How to Connect |
| RF |
|
HDMI Output → HDMI Cable → HDMI to RF Converter → Coaxial Cable → TV |
| AV (a.k.a RCA) |
|
HDMI Output → HDMI Cable → HDMI to RCA Converter → RCA Cable → TV |
| S-Video |
|
HDMI Output → HDMI Cable → HDMI to S-Video Converter → S-Video Cable → TV |
| Component |
|
HDMI Output → HDMI Cable → HDMI to Component Converter → Component Cable → TV |
| DVI |
|
|
1. Connect via the Radio Frequency (RF) Port
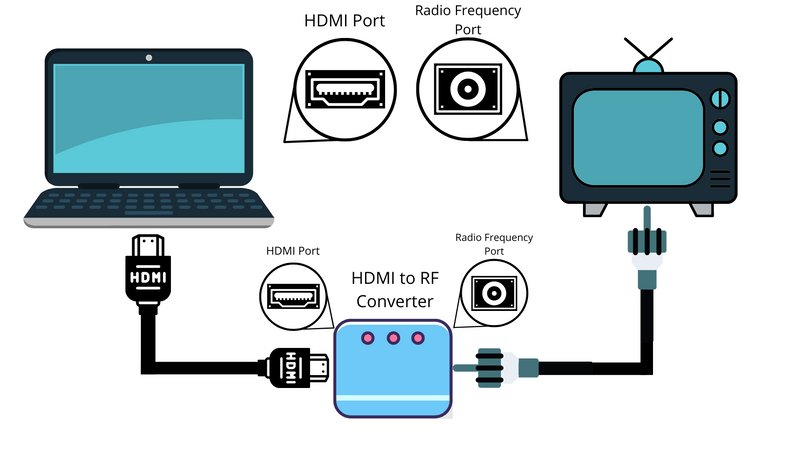
Radio frequency ports are circular ports with a small hole in the middle and are labeled RF IN.
Follow our guide below to connect your HDMI-compatible device to your TV via its radio frequency Port.
Materials Needed
- HDMI to RF Converter
- Coaxial Cable (included)
- Converter Power Source (included)
- HDMI Cable
Step 1: Connect Your HDMI Input Source to the HDMI to RF Converter
First, you must connect your HDMI output source, like your laptop, to an HDMI to RF converter.

- RF Modulator - HDMI to coax converter will hook up your streaming media players ( Apple TV, Amazon...
- HDMI to RF Coaxial Cable Adapter for TV - Convert HDMI digital signals into VHF analog TV ( RF )...
- HDMI Modulator - With the zoom function that you can switch the output screen up and down as well as...
(Paid Link.)
Plug one end of the HDMI cable into your laptop’s HDMI port, and the other end into the converter. Make sure it’s securely placed or the devices will not connect properly.
Step 2: Plug the HDMI to RF Converter into Your TV
Now, you can plug your HDMI to RF converter into your television.
You will notice that your TV has an RF IN port and the converter has an RF OUT port.
Connect the provided coaxial cable to the respective ports, making sure it’s firmly fixed in place.
Step 3: Connect the HDMI to RF Converter to a Power Source
The HDMI to RF converter must be connected to a power source via the provided power cable.
Plug the power cable into the converter’s DC IN port and plug it into an electrical socket.
This step is important as the converter will not work if it’s not connected to a stable power source.
Step 4: Change Your TV’s Input Source
You need to set your TV to the correct source for it to display your HDMI input signal.
Click Input on your remote and set your TV to “Antenna” or “TV” depending on your TV model.
Congratulations! You’ve managed to connect your old TV to an HDMI-compatible device!
Watch the video below to see how to connect an HDMI-compatible device to a TV via its Radio Frequency port following the steps above. The video also demonstrates some helpful troubleshooting tips, just in case you run into any connectivity issues.

2. Connect via the Composite Audio/Video (A/V) Port
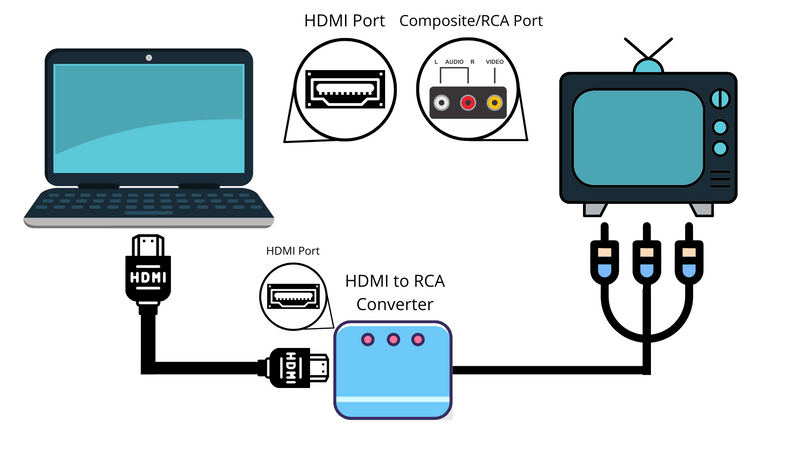
Many old TVs have Audio/Video (A/V) ports, otherwise known as RCA ports. These are three circular ports, which are commonly colored red, white, and yellow.
Let’s learn how to connect an HDMI input source to your TV via its RCA ports.
Materials Needed
- HDMI to RCA Converter
- RCA Cable (included)
- Converter Power Source (included)
- HDMI Cable
Step 1: Connect Your HDMI Input Source to the HDMI to RCA Converter
Use an HDMI cable to connect your HDMI output source to the HDMI to RCA converter.

- HDMI to RCA Converter: Convert HDMI signal to RCA (AV) composite video and L / R stereo audio...
- Plug and Play; No need to install any software; Support Input HDMI Resolution 480i, 480P, 720P,...
- Please NOTE: It not support 4K and 3D(such as PS4). Does not support reverse work, does not Work as...
(Paid Link.)
Plug one end of the HDMI cable into the HDMI output source and the other into the converter.
Step 2: Plug Your HDMI to RCA Converter into Your TV
Find your TV’s RCA ports, commonly found on the side or back of the unit.
Plug the converter’s RCA cables into the TV’s ports. Make sure to plug each cable into the port of the same color (i.e. red to red, yellow to yellow, etc).
Make sure the cables are pushed all the way inside the port, to ensure a stable connection.
Step 3: Plug Your HDMI to RCA Converter into a Power Source
Locate the HDMI to RCA converter’s power cable.
Plug one end of the power cable into the converter’s micro-USB port and the other end into a wall socket.
If you’re using a power strip, make sure it’s not overcrowded.
Step 4: Change the Converter’s Mode
Notice the small switch on the side of the converter marked NTSC and PAL.
Switch it to NTSC if you live in North or South America or flip it to PAL if you live in Europe or Asia.
Step 5: Change Your TV’s Input Source
Using your TV remote, change your TV’s input source by pressing Input or Source.
The correct source will either be labeled “Composite”, “A/V” or “RCA”, depending on your TV’s make and model.
You did it! That wasn’t so hard, was it?
If you prefer to learn things visually, watch the video below demonstrating how to use an HDMI to RCA converter on your old TV.

3. Connect via the S-Video Port
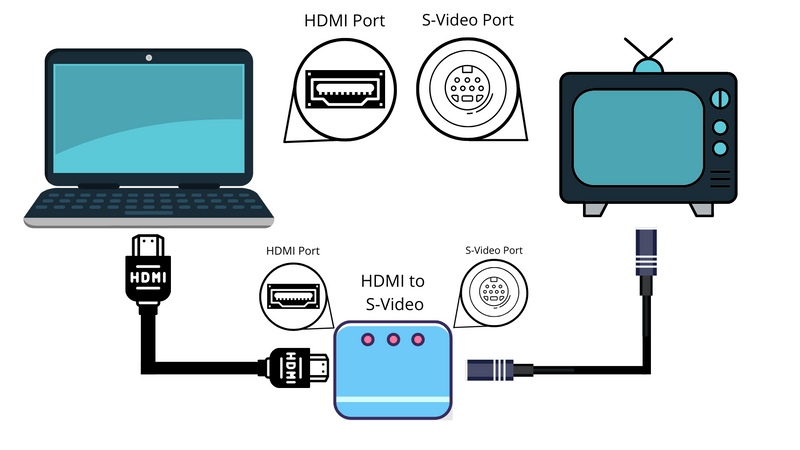
A TV’s S-Video port is characterized by two circular pinholes on either side one rectangular-shaped pinhole.
Follow the steps below to make your TV HDMI compatible via its S-Video Port.
Materials Needed
- HDMI to S-Video Converter
- S-Video Cable (included)
- Converter Power Source (included)
- HDMI Cable
Step 1: Connect Your Device to the HDMI to S-Video Converter
Using an HDMI cable (sold separately), connect your HDMI-compatible device to your S-Video convertor. Plug either end of the HDMI cable into the output source and S-Video converter.

- HDMI to RCA Comverter: Convert HDMI signal to RCA (AV) composite video and L / R stereo audio...
- HDMI to S-video Converter: Convert HDMI signal to S-video analog video and L / R audio. Please note:...
- HDMI Input Resolution: 480p(60Hz), 576p(50Hz), 720p(50Hz/60Hz), 1080i(50Hz/60Hz), 1080p(50Hz/60Hz)....
(Paid Link.)
Step 2: Connect the HDMI to S-Video converter to the TV
Identify the provided S-Video cable. Plug one end of the cable into the converter and the other into the TV.
S-Video ports are usually found on the sides or back of your TV. If your TV is mounted to the wall, be careful when lifting it off the wall to reach the S-Video port.
Step 3: Plug the HDMI to S-Video Converter into Power
Use the S-Video converter’s power cable to connect it to power. Usually, you have to plug the power cable into the converter’s DC IN port, though some brands may also use a micro-USB cable.
Step 4: Select the Correct Mode for Your Region
Since TVs manufactured in different areas of the world are built slightly differently, the converter contains a switch that must be changed depending on where you’re living.
NTSC is for North and South America and PAL is for Europe and Asia.
Step 5: Change Your TV’s Input Source
Use your remote to change your TV’s input to “S-Video”. If that input source doesn’t work, try all your TV’s input sources, since they may be labeled incorrectly.
You’re all set! Kick up your feet and relax. You deserve it.
Watch the video below demonstrating the whole process of connecting a TV to an HDMI to S-Video converter following the steps listed above.

4. Connect via the Component Video Port

A TV’s component ports are five brightly colored ports on the side or back of the TV set.
They’re commonly colored green/yellow, red, blue, and white. They’re usually labeled Component or Video In.
Let’s learn how to connect your HDMI-compatible device to your TV’s component video ports.
Materials Needed
- HDMI to Component Converter
- Component Cable
- Converter Power Source (included)
- HDMI Cable
Step 1: Connect Your HDMI Source to an HDMI to Component Converter
Plug one end of an HDMI cable into the converter’s HDMI IN port and the other end into your laptop or another HDMI-compatible device.

- HDMI to Component Converter: This HDMI to Component Converter can convert HDMI input to analog YPbPr...
- Built-in scaler engine, can easily Up-scales or Down-scales HDMI signal to Component. It can solve...
- Support HDMI interface resolution 1080p/60Hz, 1080i/60Hz, 720p/60Hz,720i/60Hz, 576p/60Hz, 576i/60Hz,...
(Paid Link.)
HDMI cables deteriorate after a few years of use, so consider replacing yours if it’s worn.
Step 2: Connect the HDMI to Component Converter to Your TV
Use a component cable to connect your TV to the converter.
Make sure you plug each cable into a port rimmed with a band of the corresponding color.
Make sure the same cable is plugged into the same port on both the TV and converter.
You must make sure the cables are firmly placed.
Step 3: Plug Your Component Converter into a Power Source
Using your converter’s power cable, connect the converter to a wall socket. You may need to use a USB wall charger if your converter only comes with a USB port.
Step 4: Change Your TV’s Input Source
Simply change your TV’s source to “Component” and you’re all set!
See the video below demonstrating how to connect an HDMI-compatible device to a TV via its component ports.

5. Connect via the Digital Video Interface (DVI) Port
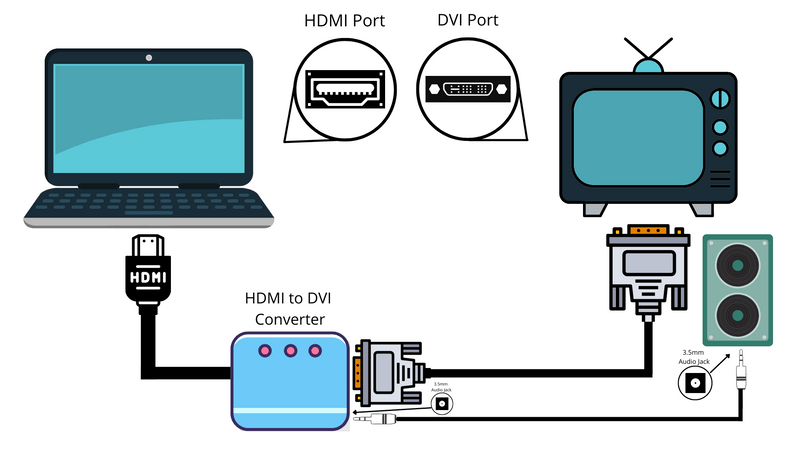
Finally, you can connect an HDMI cable to your old TV via its Digital Video Interface (DVI) port.
You can recognize a DVI port by the lines of small, square pin-holes inside the port.
Let’s learn how to connect your modern technology to an old TV’s DVI port.
Materials Needed
- HDMI to DVI Converter
- 3.5mm Audio Cable (included)
- External Speaker
- DVI Cable
Step 1: Connect Your Input Source to the HDMI to DVI Converter
Many HDMI to DVI adapters come with a built-in HDMI cable. Plug this cable into a working HDMI port on your output source.

- Multifunction HDMI splitter converter cable with audio output, supports HDMI/DVI/vagal(sold...
- Lightweight and portable adapter allows you to display content on your HDTV, monitor, computer,...
- Transmit both Audio and video from computer or tablet to HD display with audio out via HDMI. Support...
(Paid Link.)
Step 2: Connect the HDMI to DVI Converter to Your TV
Use a DVI cable (sold separately) to both your TV and converter. DVI ports can look similar to SCART or VGA ports, so make sure the port is clearly labeled DVI.
Ensure that all the pins line up with the corresponding pin-holes and press them firmly in place.
Twist the DVI cable’s two screws to secure it into the port.
Step 3: Connect a Speaker to Your Converter
DVI ports only carry video, not audio. You will also be unable to use your TV’s built-in speakers while it’s connected to the HDMI to DVI converter.
Because of this, you’ll need to connect your converter to the speakers.
Plug one end of the included 3.5mm audio cable (also known as an AUX cable) into the converter and the other end into an external speaker.
Make sure the speaker is turned on and connected to power if needed.
Step 4: Change the TV’s Input Source
You’re almost done!
Change your TV’s input source to “DVI”. If the “DVI” input source delivers no results, try the other input sources as they could have been improperly labeled.
Watch the video below to see how to connect an HDMI to DVI converter to your TV and external speaker.

Wrapping Things Up
Your old TV may seem like a useless relic from the past, but you can still connect it to the latest devices using an HDMI cable and adapter.
Remember to check if the converter you’re using needs to be hooked up to a power source and change your TV’s input accordingly.
And don’t forget to change the NTSC/PAL switch to the correct setting!
Has our article helped you learn how to give your old TV a new use? What’s your experience making old TVs HDMI compatible?
Let us know in the comments below!

Yesenia Achlim is a technical copywriter and editor with a focus on AV equipment. She aims to break down complicated topics and make technology accessible, no matter your technical expertise. When she’s not teaching you how to replace a projector lamp, you can find her reading and baking.