
Epson Projector Upside Down? Here’s How to Rotate Your Projected Image!

- For Epson projectors, an upside-down image is often due to a setting for ceiling mount projection.
- To rotate an Epson projector screen: Hold the A/V Mute button on the remote until the image flips; or use the Extended Menu option to switch between Front, Front/Ceiling, Rear, and Rear/Ceiling projections.
Discovering your Epson projector screen flipped can be disorienting, especially when a presentation looms.
This guide offers swift, practical solutions for correcting upside-down images, whether you’re navigating a new setup or adjusting an existing one.
Quick Navigation
Why Is My Epson Projector Picture Upside-Down?
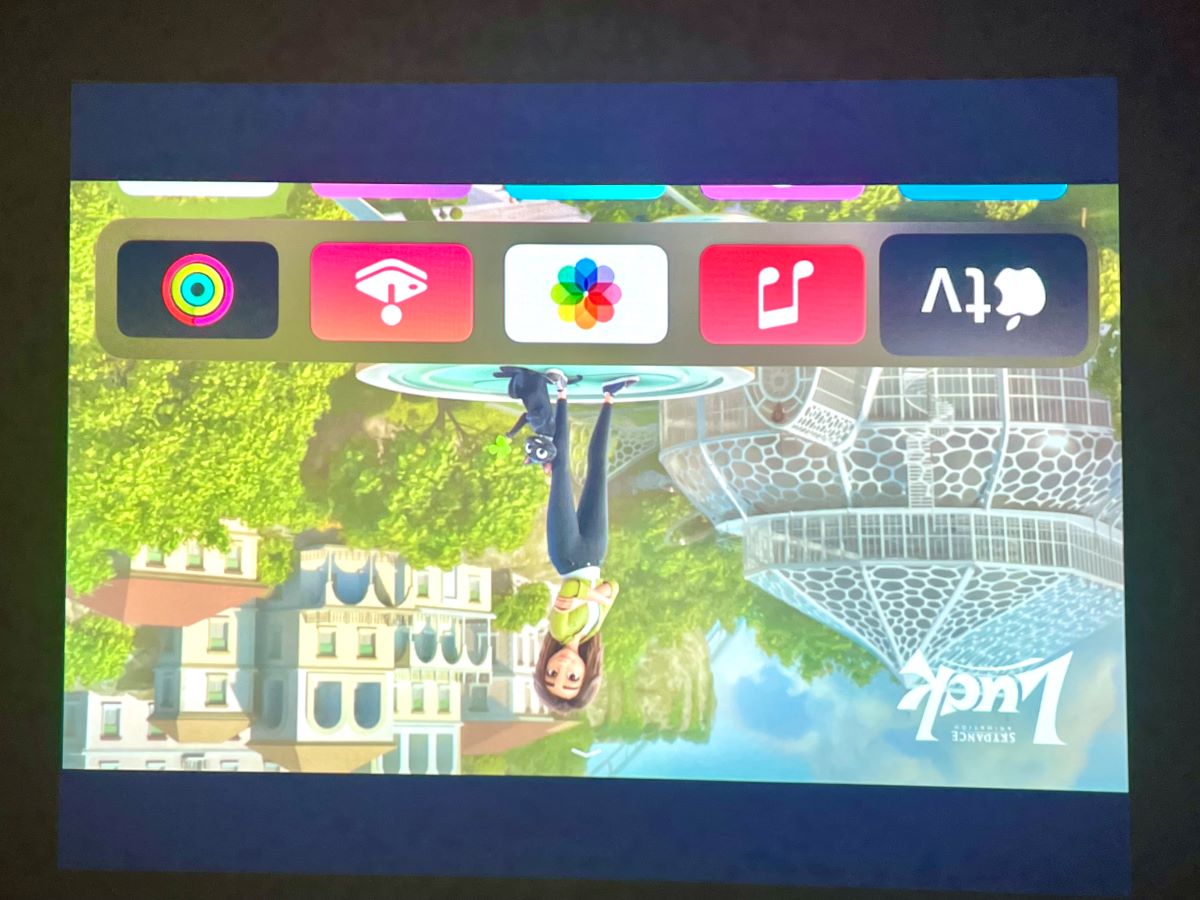
A projector showing an upside-down image display is a pretty common occurrence. It can be due to many things.
If your projector is new and shows an inverted screen, it has likely been set for ceiling mount projection, which automatically projects an upside-down image.
This is because a ceiling projector is mounted upside down when being installed.
If you just bought a second-hand projector or have been gifted by a loved one, the chances are high that the initial owner had mounted it on a ceiling and had set the default projection to Front projection.
The other possibility is that the last person who used it set it on upside-down screen mode and forgot to set it back.
Well, there is also the likelihood that you set it to a bottom-up projection by mistake!
It’s totally possible to do that without realizing it.
Projectors designed to be ceiling-mounted usually have the screen rotated upside down so that one can easily access the top-panel buttons for quick and easy operation.
But given the ceiling height, most ceiling mount projectors use the remote control as the manual buttons are far from reach.
During installation, one chooses Front/Ceiling or Rear/Ceiling projection and then uses the remote to operate the projector.
This feature is added intentionally by manufacturers. And they do this so that you can have multiple ways to mount and view your content display.
Most Epson projectors have the option of flipping back the screen, especially the ceiling-mountable projectors like the Epson PowerLite and EX models.
Curious to know how to fix the upside-down screen?
Keep reading to learn how to.
How to Rotate an Epson Projector Screen With/Without a Remote?
There are two ways to rotate an Epson projector screen: using a remote control and doing it manually.
1. Rotate an Epson Projector Screen With a Remote
The first way to rotate your Epson projector is to use the AV mute button on your remote control. Using the remote is probably the quickest way to fix this. Here’s how to do it:
Step 1: Turn on your projector and display any image (plug in any device).
Step 2: Locate the A/V Mute button on your remote control.
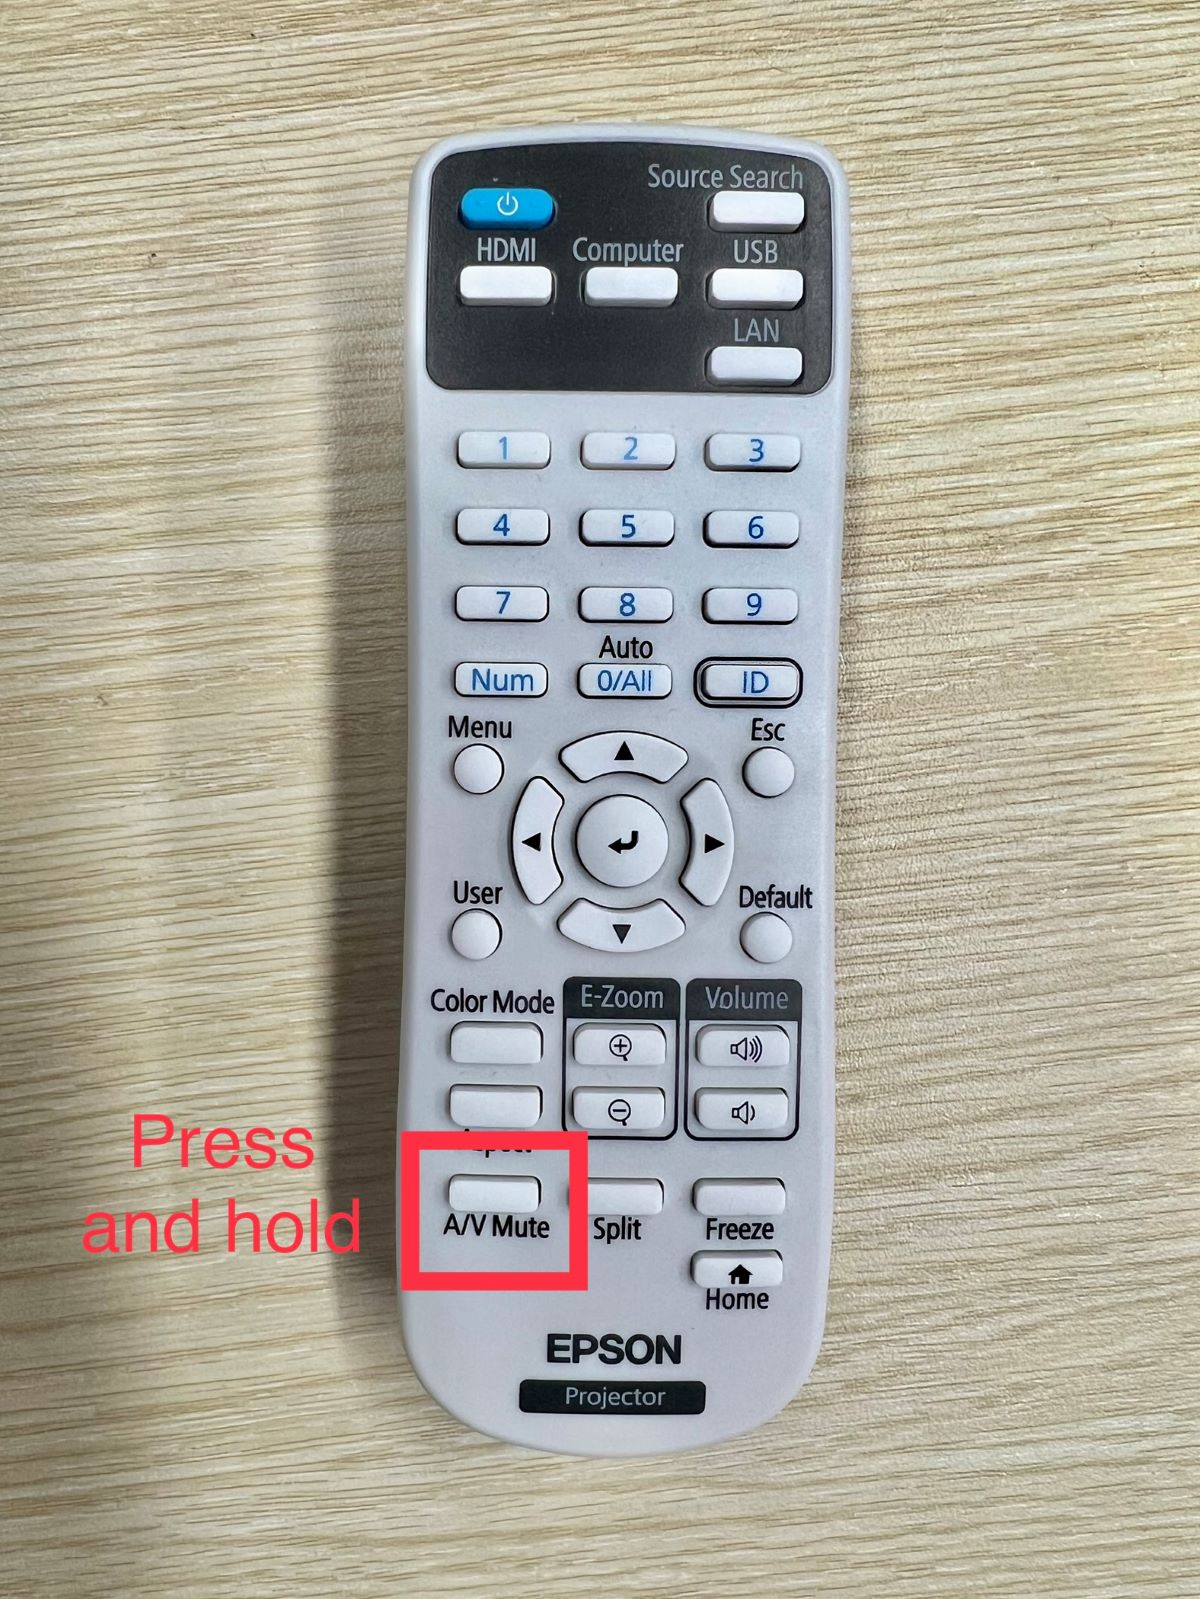
Step 3: Hold it down for several seconds until the image disappears and reappears. It will reappear with the image flipped.
To set back the image to the bottom-up mode, hold the AV mute button again for a couple of seconds. The image will disappear and then reappear inverted.
2. Flip the Upside-Down Screen Using the Projector Menu Without Remote
The second way to fix the inverted screen problem is to use the Menu function.
You can use either the panel or remote buttons to get to the necessary settings.
Here’s how to go about it:
Step 1: Turn on your projector and display any image. Look for the Menu button and press it.
Step 2: Navigate to the Extended Menu option.
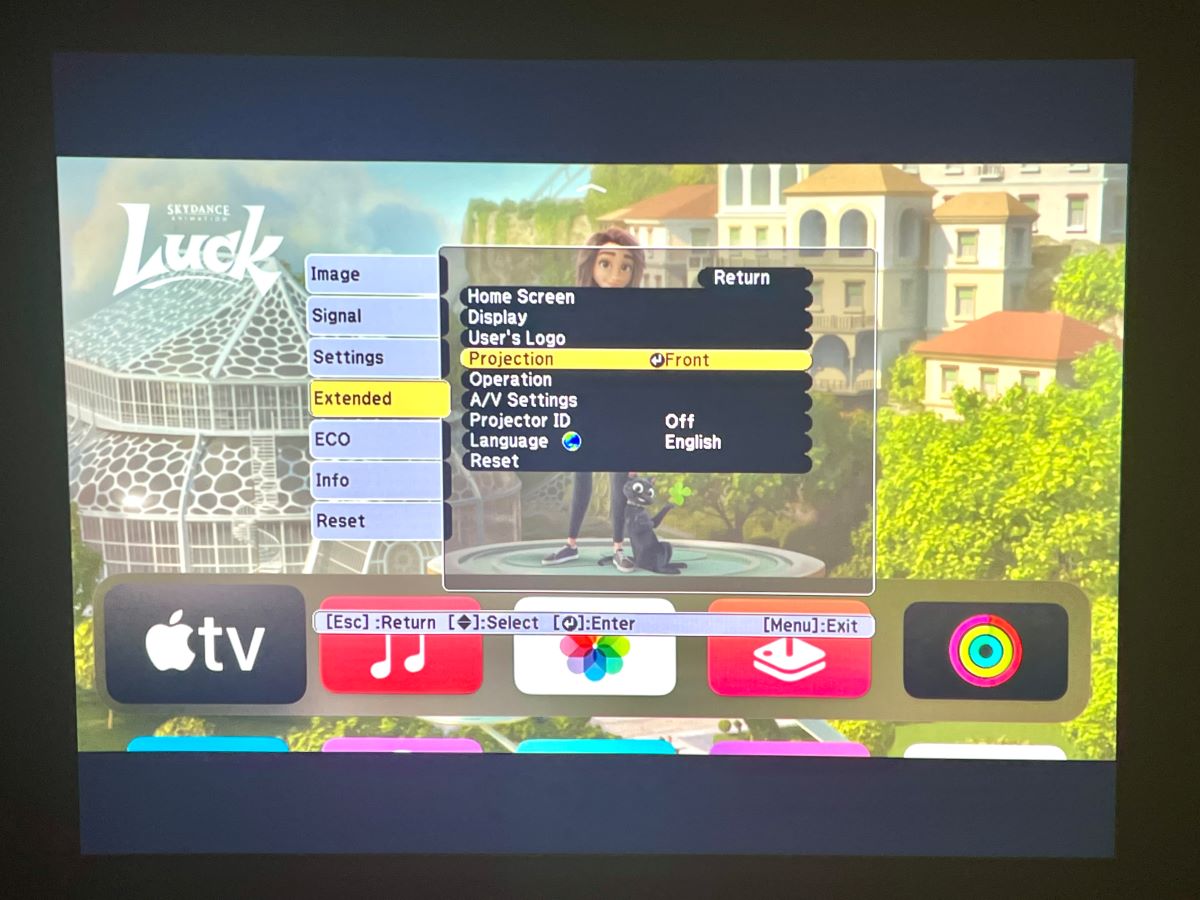
Step 3: To the left of the Extended Menu, you will see the Projection option. Selecting this option will give you a list of choices: Front, Front/Ceiling, Rear, and Rear/Ceiling.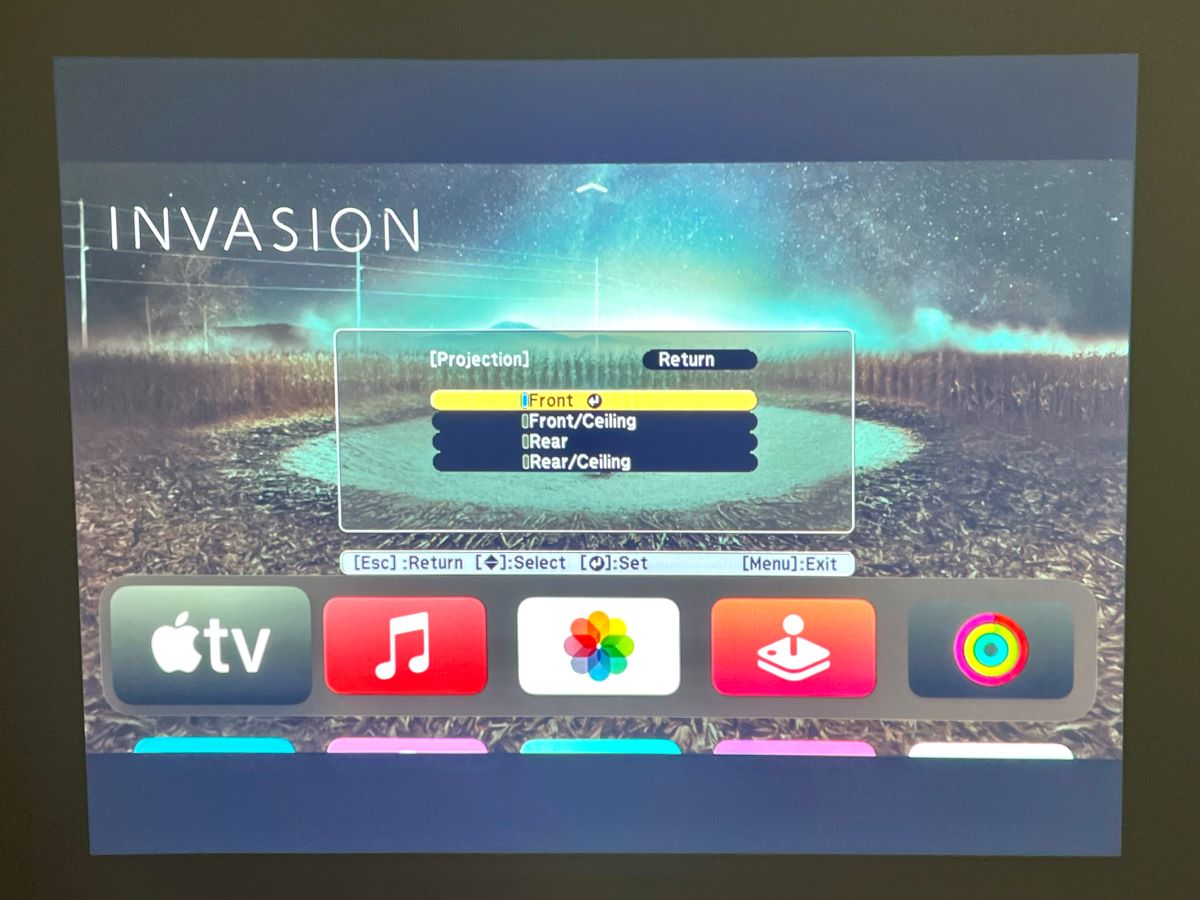
- The Front and Rear default settings provide a right-side-up projection on a table.
- The Front/Ceiling default setting gives an upside projection of the Front from the ceiling or wall mount.
- The Rear/Ceiling default setting gives an upside projection from the ceiling and behind.
Change from Front to Front/Ceiling and press Enter. Your image will then flip to the right-side-up.
Conclusion
It can be embarrassing when everyone is sitting anxiously waiting for your presentation only to be met by an inverted screen.
What’s worse is not knowing how to flip over the screen.
In this post, we have shared all the different ways that you can use to rotate the screen using a remote control and without a remote control.

Duy Anh is a seasoned technical editor specializing in helping readers troubleshoot TV, projector, and Wi-Fi issues. He’s always been drawn to logical problem-solving. His ability to approach matters from various angles with a neutral mindset enhances his technical expertise.