
Changed Your Wi-Fi Password & Can’t Connect Now? Quick Fixes for You
What To Know
- Use the WPS button on the router for password-free connections on compatible devices.
- Address Windows connectivity issues by disabling/enabling or uninstalling/updating the network driver.
Our guide simplifies the reconnection process, covering everything from utilizing your router’s WPS button to managing network drivers and accessing the password from devices still connected.
Whether you’re on a Mac or Windows, we’ve got you covered. Prepare to restore your internet access swiftly and seamlessly—here’s how to tackle the challenge.
Quick Navigation
Pre-Troubleshooting Steps
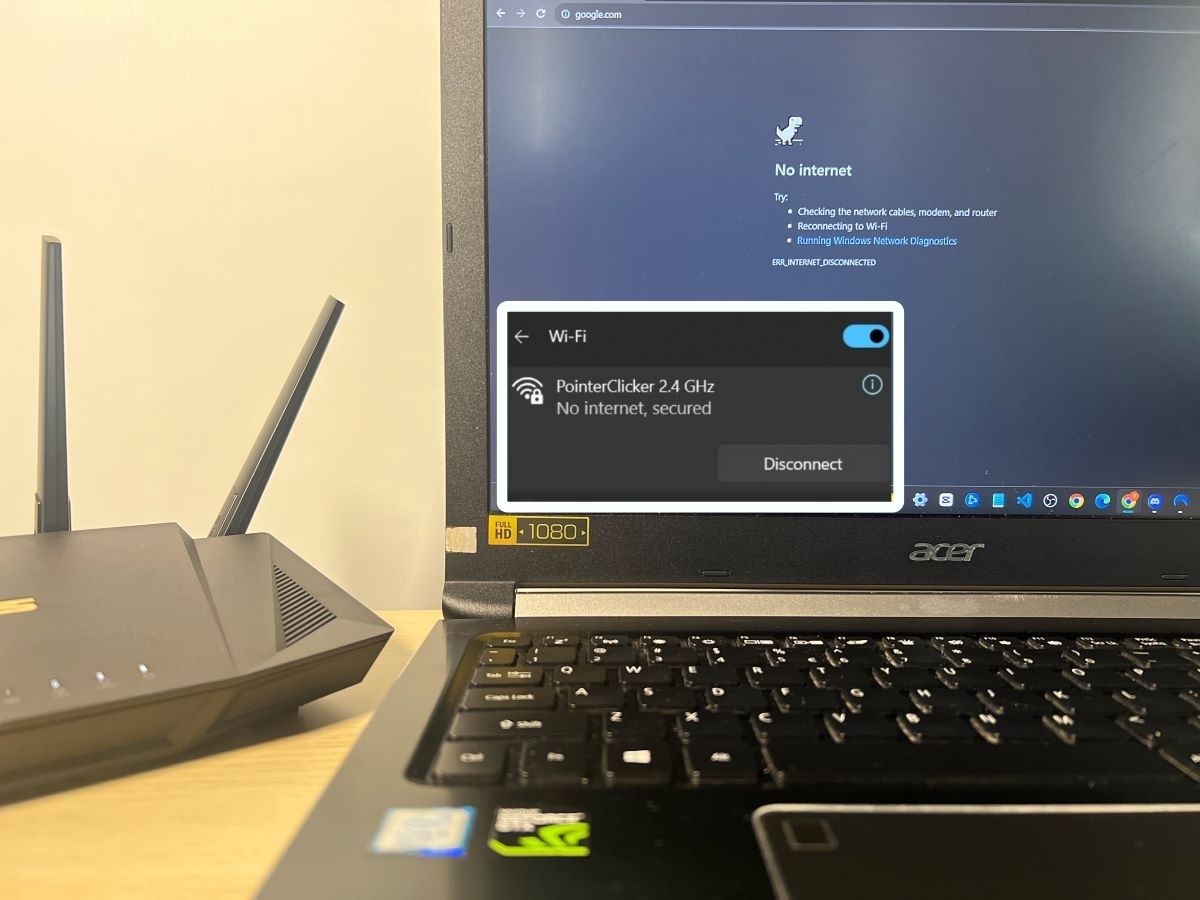
If you’ve changed your Wi-Fi password and your laptop or phone (or other devices) can’t connect to the network, here’s a checklist of simple fixes that you should try first:
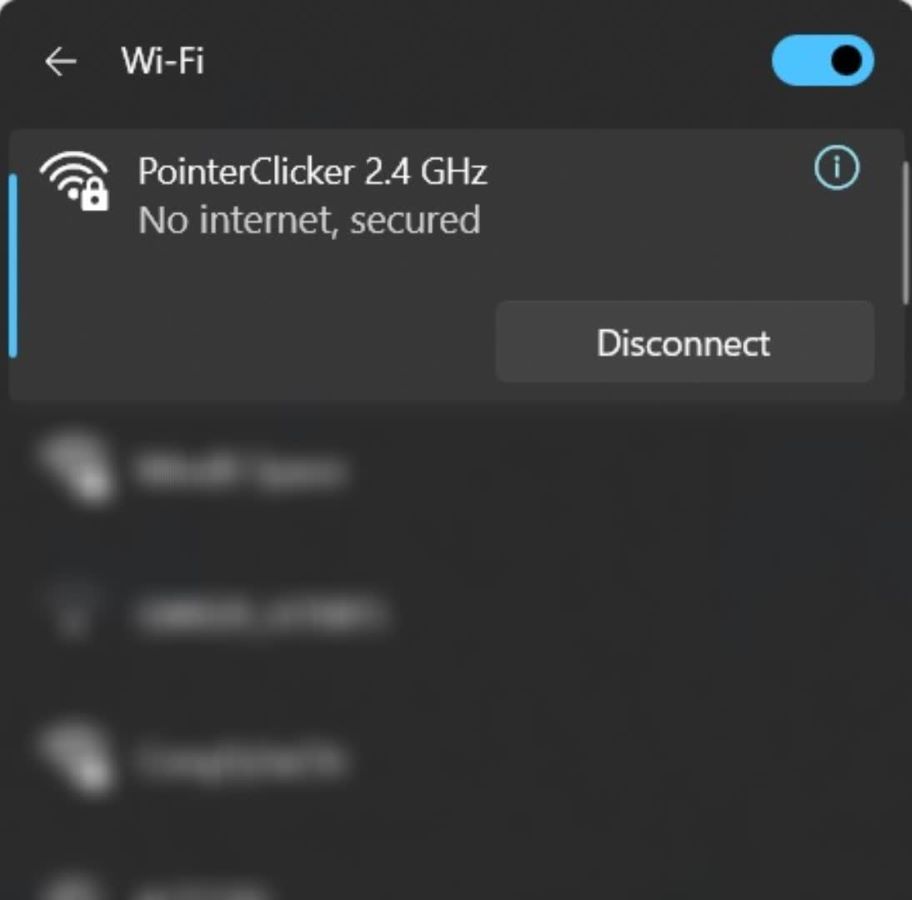
- Go to the Network settings on your laptop and forget your Wi-Fi—this will take the router off your list of saved networks. Next, reconnect to the Wi-Fi (from the list of available networks) and enter the new password when prompted.
- Reboot your connection; turn off the Wi-Fi function on your laptop and then turn it on again.
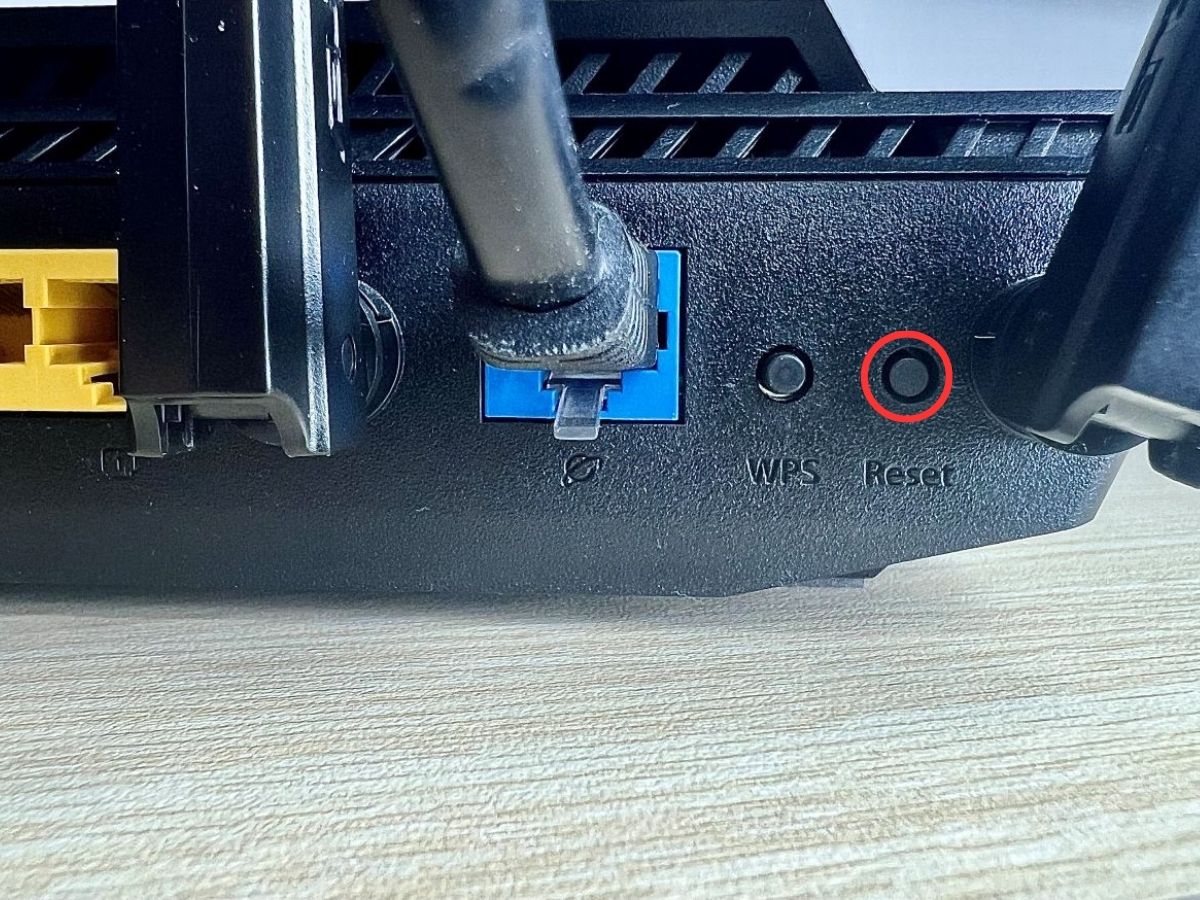
- Soft reset your Wi-Fi router to get rid of any bugs or glitches that are affecting its performance. Turn off the router and unplug its power cable; wait 30 seconds; reconnect to the power source and turn on the router.

- Restart your laptop or mobile device and try reconnecting to the Wi-Fi network.
- Try a wired connection instead—connect the router to your laptop with an Ethernet cable. If the laptop still can’t connect to the network, you may need to factory reset your router.
- Connect your laptop to a different Wi-Fi network or hotspot or hotspot. If the new connection still fails, it means your network adapter driver is glitchy or outdated.
- Overheating can cause your Wi-Fi connection to be inconsistent and unstable, so ensure your router is not overheating.
Use the WPS Button On Your Router (Windows)
Many routers have a WPS (Wi-Fi Protected Setup) feature that allows compatible devices to automatically connect to their network without a password.
The WPS button is located on the back of the router—because if a person is close enough to touch your router, they might as well connect to it without the password.

Only WPS-enabled devices (i.e., Windows PCs, Android phones, and most networking devices) are compatible with this feature. iPhones and Samsung phones do not support the WPS connection feature and will require a password to connect to your Wi-Fi.
To use the WPS feature, press and hold the WPS button on your router. Turn on the Wi-Fi function on your device and select your router’s network to connect.
Here are the steps in the process:
Step 1: Go to the wireless network options on your computer and select your router’s Wi-Fi.
Step 2: Click Connect to begin the process and you’ll see a prompt to enter your password or press the router’s WPS button.


Step 3: Check to see if your router has a button at the back labeled WPS.
Press and hold the WPS button until your screen displays a message indicating that the PC is receiving Wi-Fi settings.
The router will send network settings (including the password) to your Windows PC and connect to it automatically. After this, your laptop will connect to the Wi-Fi in the future without a passcode.

Disable and Enable or Uninstall the Network Driver (Windows 10/11)
Won, I and many other Windows users have had recurring issues with our Wi-Fi connection. Often, our devices connect securely to the router but then we get a “No Internet” message.
This issue is especially common among users who have upgraded to Windows 10 and is a sign that your PC’s wireless network adapter driver may be corrupted or outdated. An outdated network driver can contain errors or bugs that result in connectivity issues.
In this case, you can try the two fixes below.
Disable and Enable The Network Driver
Step 1: Search for and open Device Manager on your computer.

Scroll down the menu and select Network Adapters to access the drop-down menu.

Step 2: Highlight your network driver and right-click for more options. Select Disable device.

Step 3: Right-click again and Enable the driver back on.

Check to see if your computer now has internet connectivity on the network. If the issue persists, try the next solution below.
Uninstall and Update Wi-Fi Driver
If you’ve gone through quick fixes like restarting the router or toggling Wi-Fi off and on, it’s time to pull out the big guns.
After disabling and re-enabling my Wi-Fi driver did not fix my connection issues, I stumbled on a solution that worked like a charm: uninstalling my WiFi network driver and then restarting my laptop.
This process is the equivalent of updating your network driver, but it’s simpler than finding, downloading and installing updates manually.
Here are the steps to the process:
Step 1: Find the Search box on your Windows PC’s taskbar and type in Device Manager.
Step 2: Open the Device Manager; you’ll see something like this.
Step 3: Scroll down the list and highlight Network adapters. Click on the small arrow at the left to show the drop-down menu.
Step 4: Scroll to your Wi-Fi network adapter; in my case, it’s the Qualcomm Atheros Wireless Network Adapter.
Right-click on the adapter and choose Uninstall device from the pop-up options.

Step 5: After uninstalling the driver, restart your computer. The restart will allow Windows to automatically install the latest Wi-Fi driver update to your computer.
Step 6: Connect your computer to your Wi-Fi network again to see if the solution works.
Check The Wi-Fi Password On a Connected Device
If you can’t connect to the Wi-Fi because you don’t know the new password, you can check for the password on an already-connected device.
This solution might not be ideal in some instances, especially if you’re not the owner of the router you’re trying to connect to. Perhaps a family member or roommate changed the password on their router to keep you and others from connecting to it and accessing the internet.
That said, below is a walkthrough of how to find Wi-Fi passwords on connected devices.
For Macbook
Step 1: Press Command + Space on your keyboard to open the Spotlight search
Step 2: Type “Keychain Access” into the search box.

Step 3: Once the Keychain Access dialog box appears, select “System“.
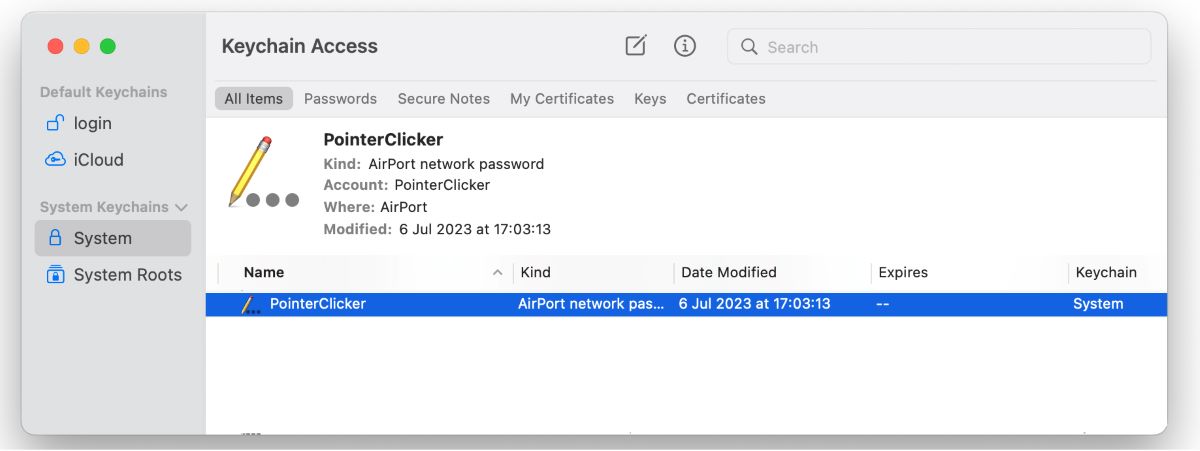
Step 4: Locate the Wi-Fi network you’re interested in, right-click on it, and choose “Copy Password to Clipboard“.

Step 5: To use the copy password feature, you’ll be prompted to enter your MacBook’s username and password.

After completing the steps, paste the Wi-Fi password into a note or another location where you can easily view it.
After retrieving the new password from the connected device, you can use it to connect another device to the Wi-Fi network.
For Windows
Step 1: Open the Settings app on your PC and select Network & Internet

Step 2: Navigate to the right side of the menu and scroll down to select Advanced Network settings.

Step 3: Scroll down and click on More network adapter options.

Step 4: A dialog box will pop up, displaying the different network connections.
Right-click on your Wi-Fi connection and select Status.

Step 5: Select Wireless Properties from the new pop-up window.

Step 6: Click on the Security tab, scroll down and enable the Show Character’s option.
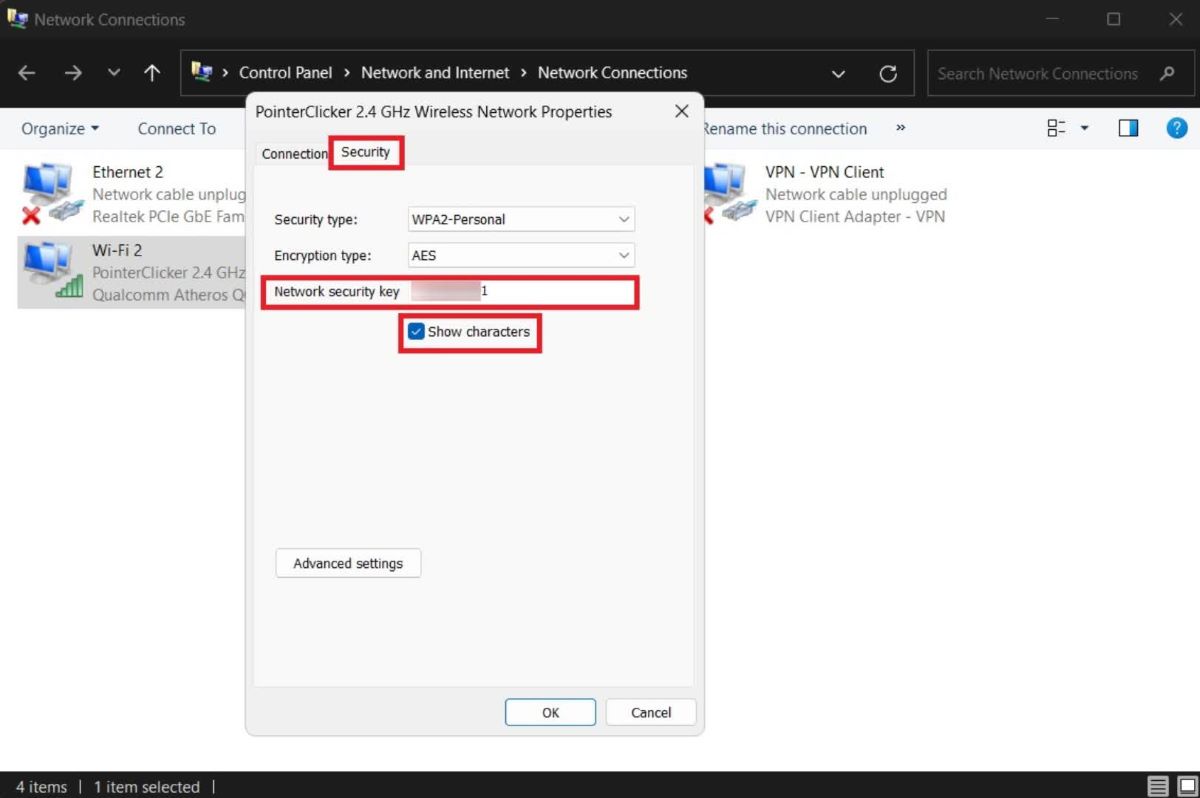
You’ll see the network password in the section for the Network security key.
You can now use the password to connect your other devices to the Wi-Fi router.
FAQ: How To Change Wi-Fi Password & Name?
You can change your Wi-Fi name and password through the admin interface of your router. Log into the router’s admin panel on the web browser of a device connected to the router’s network (Wi-Fi or Ethernet).
You’ll need to enter the router’s username and password on the login page. The default login details for your router model are usually something generic like “admin” or “password.” You can also check for this information online.
You may have previously changed the default login information and forgotten the new password. In this case, reset the router to return to the default login details or change the router’s name and password.
The steps for changing your WiFi name and password will vary slightly for different routers. However, below are general steps that should help you through the process:
Step 1: Connect your PC to the router’s WiFi network. Use an Ethernet cable if you don’t have the Wi-Fi password.
Step 2: Enter the router’s IP address into your web browser. 192.168.1.1 or 192.168.0.1 are the default addresses for most routers—if they don’t work for yours, check the user manual for the IP address.
Step 3: On the login page, enter your router’s username and password.
Step 4: Look for the Wireless Settings section on the configuration page and click on it.
Step 5: Find the box labeled “Passkey” or “Password” and enter your new password. Enter the password a second time if you’re prompted to.
Step 6: Click Apply to update the new password.
Once the new Wi-Fi settings are updated, every device currently connected to the router will be disconnected. You’ll have to enter the new password to connect a device to the Wi-Fi network.
Conclusion
Until you input your new password, your devices won’t automatically connect to your router’s WiFi after you change the password. However, if you still have no internet after creating the connection, it means your network driver needs to be updated.

Gabriella ‘Diogo is a technical writer with a vested interest in tech hardware and equipment. She shares her knowledge and processes in an easy-to-grasp, lighthearted style. When she’s not testing or researching device performance, you’ll find her writing short stories or rewatching episodes of her favorite sitcoms.